User's Manual
Page 1
...Features...7 Introduction...7 Package Overview...8 Product Overview...9 Main Unit...9 Control Panel...10 Rear View...11 Remote Control...12 Installation...13 Connecting the Projector...13 Connect to Computer / Notebook...13 Connect to ...Series) ...20 Adjusting Projection Image Size...20 User Controls...21 Control Panel...21 Remote Control...22 On-screen Display Menus...24 How to operate...24 Menu Tree...25...Display Menu 51 Image Problems...51 Intermission Problems...56 Projector Status Indication...57 Remote Control Problems...58 Audio Problems...59 Replacing the Lamp...60 Cleaning the Projector...
...Features...7 Introduction...7 Package Overview...8 Product Overview...9 Main Unit...9 Control Panel...10 Rear View...11 Remote Control...12 Installation...13 Connecting the Projector...13 Connect to Computer / Notebook...13 Connect to ...Series) ...20 Adjusting Projection Image Size...20 User Controls...21 Control Panel...21 Remote Control...22 On-screen Display Menus...24 How to operate...24 Menu Tree...25...Display Menu 51 Image Problems...51 Intermission Problems...56 Projector Status Indication...57 Remote Control Problems...58 Audio Problems...59 Replacing the Lamp...60 Cleaning the Projector...
User's Manual
Page 4
Do not look directly into the laser beam on the remote control and do not point the laser beam into the projector's lens when the lamp is in this may damage your local reseller or service ... look into anyone's eyes. See pages 60. When switching the projector off, please ensure the cooling cycle has been completed before disconnecting the power. This remote control is approaching the end of the lamp itself. The bright light may cause electric shock. ▀■ Warning - When the lamp is approaching the...
Do not look directly into the laser beam on the remote control and do not point the laser beam into the projector's lens when the lamp is in this may damage your local reseller or service ... look into anyone's eyes. See pages 60. When switching the projector off, please ensure the cooling cycle has been completed before disconnecting the power. This remote control is approaching the end of the lamp itself. The bright light may cause electric shock. ▀■ Warning - When the lamp is approaching the...
User's Manual
Page 7
...; PAL/PAL-M/PAL-N/SECAM ■ SDTV and EDTV compatible ■ HDTV compatible (720p, 1080i, 1080p) u Auto source detection with user definable settings u Fully featured IR remote control with laser pointer and mouse control u User friendly multilingual On Screen Menu u Advanced digital keystone correction and high quality full screen image re-scaling...
...; PAL/PAL-M/PAL-N/SECAM ■ SDTV and EDTV compatible ■ HDTV compatible (720p, 1080i, 1080p) u Auto source detection with user definable settings u Fully featured IR remote control with laser pointer and mouse control u User friendly multilingual On Screen Menu u Advanced digital keystone correction and high quality full screen image re-scaling...
User's Manual
Page 8
... the difference in applications for each country, some regions may have different accessories. ZoFoocmus Projector with lens cap Zoom Series/Fix Zoom Series Contrast IR Remote Control (with all the items shown below.
... the difference in applications for each country, some regions may have different accessories. ZoFoocmus Projector with lens cap Zoom Series/Fix Zoom Series Contrast IR Remote Control (with all the items shown below.
User's Manual
Page 11
Rear View 1 23 Introduction 4 5 6 78 14 13 12 11 10 9 v Due to the difference application for remote mouse function) 13. RJ45 Connector (dependent on model) 7. VGA 1/ SCART/ YPbPr Connector 6. Audio Out 3.5mm Jack 11. RS-232 Connector 12. Composite Video Input 3. Audio ...
Rear View 1 23 Introduction 4 5 6 78 14 13 12 11 10 9 v Due to the difference application for remote mouse function) 13. RJ45 Connector (dependent on model) 7. VGA 1/ SCART/ YPbPr Connector 6. Audio Out 3.5mm Jack 11. RS-232 Connector 12. Composite Video Input 3. Audio ...
User's Manual
Page 12
.../Mouse control 1 2 3 4 5 6 7 8 9 10 11 12 13 15 14 English 12 Volume +/- 22 10. Freeze 16 16. AV mute 19 13. Video Source 18 14. Introduction Remote Control 1.
.../Mouse control 1 2 3 4 5 6 7 8 9 10 11 12 13 15 14 English 12 Volume +/- 22 10. Freeze 16 16. AV mute 19 13. Video Source 18 14. Introduction Remote Control 1.
User's Manual
Page 18
To focus the image, rotate the focus ring until the image is clear. They can be found on the remote control and on the projector's control panel. . Installation Adjusting the Zoom / Focus (Zoom Series) You may turn the zoom ring to correct image distortion. Use the keystone buttons to zoom in or out. Source Enter/Help Re-Sync . The projector will focus at distances from 3.28 to 38.7 feet (1 to 11.8 meters). Keystone - Menu AV-Mute Power . English 18 Keystone + Temp Lamp Power .
To focus the image, rotate the focus ring until the image is clear. They can be found on the remote control and on the projector's control panel. . Installation Adjusting the Zoom / Focus (Zoom Series) You may turn the zoom ring to correct image distortion. Use the keystone buttons to zoom in or out. Source Enter/Help Re-Sync . The projector will focus at distances from 3.28 to 38.7 feet (1 to 11.8 meters). Keystone - Menu AV-Mute Power . English 18 Keystone + Temp Lamp Power .
User's Manual
Page 22
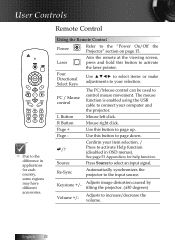
... Select Keys Use to select items or make adjustments to activate the laser pointer. L Button Mouse left click. Page - Laser Aim the remote at the viewing screen, press and hold this button to select an input signal. PC / Mouse control The PC/Mouse control can be ...to connect your computer and the projector. The mouse function is enabled using the USB cable to the difference in OSD menus). Remote Control Using the Remote Control Power Refer to the input source. Re-Sync Automatically synchronizes the projector to the "Power On/Off the Projector" section...
... Select Keys Use to select items or make adjustments to activate the laser pointer. L Button Mouse left click. Page - Laser Aim the remote at the viewing screen, press and hold this button to select an input signal. PC / Mouse control The PC/Mouse control can be ...to connect your computer and the projector. The mouse function is enabled using the USB cable to the difference in OSD menus). Remote Control Using the Remote Control Power Refer to the input source. Re-Sync Automatically synchronizes the projector to the "Power On/Off the Projector" section...
User's Manual
Page 23
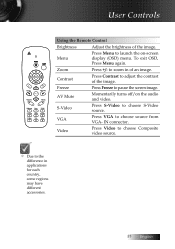
... Press VGA to choose Composite video source. Video Press Video to choose source from VGA- To exit OSD, Press Menu again. User Controls Using the Remote Control Brightness Adjust the brightness of the image. Contrast Press Contrast to zoom in applications for each country, some regions may have different accessories. 23...
... Press VGA to choose Composite video source. Video Press Video to choose source from VGA- To exit OSD, Press Menu again. User Controls Using the Remote Control Brightness Adjust the brightness of the image. Contrast Press Contrast to zoom in applications for each country, some regions may have different accessories. 23...
User's Manual
Page 24
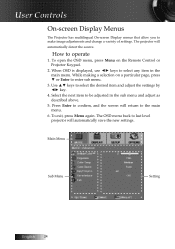
... open the OSD menu, press Menu on a particular page, press ▼ or Enter to be adjusted in the main menu. While making a selection on the Remote Control or Projector Keypad. 2. How to make image adjustments and change a variety of settings. Main Menu Sub Menu Setting English 24 To exit, press Menu...
... open the OSD menu, press Menu on a particular page, press ▼ or Enter to be adjusted in the main menu. While making a selection on the Remote Control or Projector Keypad. 2. How to make image adjustments and change a variety of settings. Main Menu Sub Menu Setting English 24 To exit, press Menu...
User's Manual
Page 48
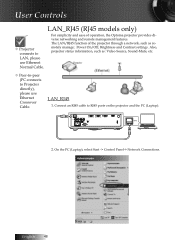
Also, projector status information, such as remotely manage: Power On/Off, Brightness and Contrast settings. Connect an RJ45 cable to Projector directly), please use Ethernet Normal Cable. v Peer-to-peer (PC ...LAN, please use Ethernet Crossover Cable. On the PC (Laptop), select Start -> Control Panel-> Network Connections. The LAN/RJ45 function of operation, the Optoma projector provides diverse networking and remote management features. LAN_RJ45 (RJ45 models only) For simplicity and ease of the projector through a network, such as : Video-Source, Sound-Mute, etc.
Also, projector status information, such as remotely manage: Power On/Off, Brightness and Contrast settings. Connect an RJ45 cable to Projector directly), please use Ethernet Normal Cable. v Peer-to-peer (PC ...LAN, please use Ethernet Crossover Cable. On the PC (Laptop), select Start -> Control Panel-> Network Connections. The LAN/RJ45 function of operation, the Optoma projector provides diverse networking and remote management features. LAN_RJ45 (RJ45 models only) For simplicity and ease of the projector through a network, such as : Video-Source, Sound-Mute, etc.
User's Manual
Page 50
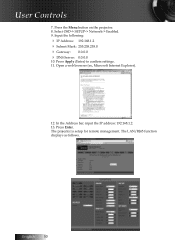
Open a web browser (ex, Microsoft Internet Explorer). 12. In the Address bar, input the IP address: 192.168.1.2. 13. English 50 Input the following: 4 IP Address: 192.168.1.2 4 Subnet Mask: 255.255.255.0 4 Gateway: 0.0.0.0 4 DNS Server: 0.0.0.0 10. Press Apply (Enter) to confirm settings. 11. Press Enter. The projector is setup for remote management. Select OSD-> SETUP-> Network-> Enabled. 9. The LAN/RJ45 function displays as follows. User Controls 7. Press the Menu button on the projector. 8.
Open a web browser (ex, Microsoft Internet Explorer). 12. In the Address bar, input the IP address: 192.168.1.2. 13. English 50 Input the following: 4 IP Address: 192.168.1.2 4 Subnet Mask: 255.255.255.0 4 Gateway: 0.0.0.0 4 DNS Server: 0.0.0.0 10. Press Apply (Enter) to confirm settings. 11. Press Enter. The projector is setup for remote management. Select OSD-> SETUP-> Network-> Enabled. 9. The LAN/RJ45 function displays as follows. User Controls 7. Press the Menu button on the projector. 8.

User's Manual
Page 52
.... 3. choose the resolution mode you are using a PC: For Windows 95, 98, 2000, XP: 1. Partial, scrolling or incorrectly displayed image 4 Press "Re-Sync" on the remote. 4 If you need to the following steps. 5. Please refer to the Replacing the lamp section. 4 Make sure you will also need under the SP box...
.... 3. choose the resolution mode you are using a PC: For Windows 95, 98, 2000, XP: 1. Partial, scrolling or incorrectly displayed image 4 Press "Re-Sync" on the remote. 4 If you need to the following steps. 5. Please refer to the Replacing the lamp section. 4 Make sure you will also need under the SP box...
User's Manual
Page 55
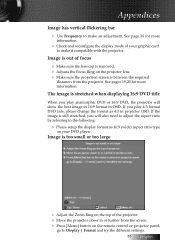
... to make it compatible with the projector. Image is out of your DVD player. If the image is removed. 4 Adjusts the Focus Ring on the remote control or projector panel, go to Display | Format and try the different settings. 55 English See page 36 for more information. 4 Check and reconfigure the...
... to make it compatible with the projector. Image is out of your DVD player. If the image is removed. 4 Adjusts the Focus Ring on the remote control or projector panel, go to Display | Format and try the different settings. 55 English See page 36 for more information. 4 Check and reconfigure the...
User's Manual
Page 56
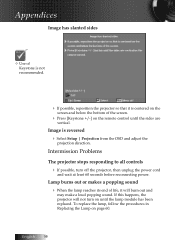
... the lamp, follow the procedures in Replacing the Lamp on page 60. Appendices Image has slanted sides v Use of the screen. 4 Press [Keystone +/-] on the remote control until the lamp module has been replaced. English 56
... the lamp, follow the procedures in Replacing the Lamp on page 60. Appendices Image has slanted sides v Use of the screen. 4 Press [Keystone +/-] on the remote control until the lamp module has been replaced. English 56
User's Manual
Page 58
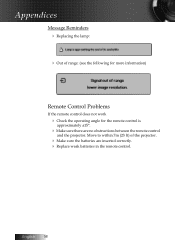
English 58 Move to within 7m (23 ft) of range: (see the following for more information) Remote Control Problems If the remote control does not work 4 Check the operating angle for the remote control is approximately ±15°. 4 Make sure there are inserted correctly. 4 Replace weak batteries in the remote control. Appendices Message Reminders 4 Replacing the lamp: 4 Out of the projector. 4 Make sure the batteries are no obstructions between the remote control and the projector.
English 58 Move to within 7m (23 ft) of range: (see the following for more information) Remote Control Problems If the remote control does not work 4 Check the operating angle for the remote control is approximately ±15°. 4 Make sure there are inserted correctly. 4 Replace weak batteries in the remote control. Appendices Message Reminders 4 Replacing the lamp: 4 Out of the projector. 4 Make sure the batteries are no obstructions between the remote control and the projector.
User's Manual
Page 59
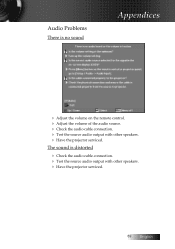
The sound is no sound Appendices 4 Adjust the volume on the remote control. 4 Adjust the volume of the audio source. 4 Check the audio cable connection. 4 Test the source audio output with other speakers. 4 Have the projector serviced. Audio Problems There is distorted 4 Check the audio cable connection. 4 Test the source audio output with other speakers. 4 Have the projector serviced. 59 English
The sound is no sound Appendices 4 Adjust the volume on the remote control. 4 Adjust the volume of the audio source. 4 Check the audio cable connection. 4 Test the source audio output with other speakers. 4 Have the projector serviced. Audio Problems There is distorted 4 Check the audio cable connection. 4 Test the source audio output with other speakers. 4 Have the projector serviced. 59 English
User's Manual
Page 67
... 20 31 0D Power ~XX140 3 7E 30 30 31 34 30 20 33 0D Remote Mouse Up ~XX140 4 7E 30 30 31 34 30 20 34 0D Remote Mouse Left ~XX140 5 7E 30 30 31 34 30 20 35 0D Remote Mouse Enter ~XX140 6 7E 30 30 31 34 30 20 36 0D... Remote Mouse Right ~XX140 7 7E 30 30 31 34 30 20 37 0D Remote Mouse Down ~XX140 8 7E 30 30 31 34 30 20 38 0D Mouse Left Click...
... 20 31 0D Power ~XX140 3 7E 30 30 31 34 30 20 33 0D Remote Mouse Up ~XX140 4 7E 30 30 31 34 30 20 34 0D Remote Mouse Left ~XX140 5 7E 30 30 31 34 30 20 35 0D Remote Mouse Enter ~XX140 6 7E 30 30 31 34 30 20 36 0D... Remote Mouse Right ~XX140 7 7E 30 30 31 34 30 20 37 0D Remote Mouse Down ~XX140 8 7E 30 30 31 34 30 20 38 0D Mouse Left Click...
Protocol Function
Page 4
... 20 31 0D Power ~XX140 3 7E 30 30 31 34 30 20 33 0D Remote Mouse Up ~XX140 4 7E 30 30 31 34 30 20 34 0D Remote Mouse Left ~XX140 5 7E 30 30 31 34 30 20 35 0D Remote Mouse Enter ~XX140 6 7E 30 30 31 34 30 20 36 0D... Remote Mouse Right ~XX140 7 7E 30 30 31 34 30 20 37 0D Remote Mouse Down ~XX140 8 7E 30 30 31 34 30 20 38 0D Mouse Left Click...
... 20 31 0D Power ~XX140 3 7E 30 30 31 34 30 20 33 0D Remote Mouse Up ~XX140 4 7E 30 30 31 34 30 20 34 0D Remote Mouse Left ~XX140 5 7E 30 30 31 34 30 20 35 0D Remote Mouse Enter ~XX140 6 7E 30 30 31 34 30 20 36 0D... Remote Mouse Right ~XX140 7 7E 30 30 31 34 30 20 37 0D Remote Mouse Down ~XX140 8 7E 30 30 31 34 30 20 38 0D Mouse Left Click...
Datasheet
Page 1
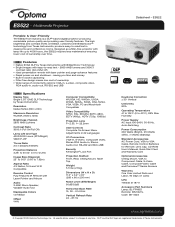
... Display Type Single 0.55" DMD DLP Technology by Texas Instruments with BrilliantColor Technology Bright images with Brilliantcolor™ technology from Optoma is a DLP®-based digital projector producing remarkable picture quality and providing user-friendly features. Features Native SVGA DLP by... text - 2800 ANSI lumens and 3000:1 contrast ratio (full on/full off) Ideal presentation remote with laser pointer and page-advance features Rapid power-on ES522, combined with easy-to 40°C), 85% Max Humidity Power Supply AC Input 100-240V, 50-60Hz...
... Display Type Single 0.55" DMD DLP Technology by Texas Instruments with BrilliantColor Technology Bright images with Brilliantcolor™ technology from Optoma is a DLP®-based digital projector producing remarkable picture quality and providing user-friendly features. Features Native SVGA DLP by... text - 2800 ANSI lumens and 3000:1 contrast ratio (full on/full off) Ideal presentation remote with laser pointer and page-advance features Rapid power-on ES522, combined with easy-to 40°C), 85% Max Humidity Power Supply AC Input 100-240V, 50-60Hz...


