User's Manual
Page 1
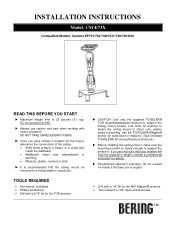
... not sure that the ceiling mount be mounted to support the ceiling mount screws. Use them as anchors to fasten the ceiling mount to support the projector. X Always use caution and care when working with a 5/16" bit for solid wood or masonry. (See enclosed TOGGLER® Anchoring Solutions brochure.) X Before installing the ceiling mount, make sure the mounting location is recommended that your location will hold the projector's weight, contact a professional contractor...
... not sure that the ceiling mount be mounted to support the ceiling mount screws. Use them as anchors to fasten the ceiling mount to support the projector. X Always use caution and care when working with a 5/16" bit for solid wood or masonry. (See enclosed TOGGLER® Anchoring Solutions brochure.) X Before installing the ceiling mount, make sure the mounting location is recommended that your location will hold the projector's weight, contact a professional contractor...
User's Manual
Page 2
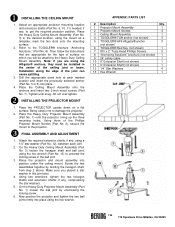
Place the Heavy Duty Ceiling Mount Assembly (Part No. 3) in the desired location, using the hex wrench (Part No. 13) to unscrew the locking screw in the ball joint. 3. Refer to the projector. Drill the appropriate sized hole at each joint. 2. Place the PROJECTOR upside down on which you will be installed in this joint also. 4. Z FINAL ASSEMBLY AND ADJUSTMENT 1. Screw the two assemblies together by...
Place the Heavy Duty Ceiling Mount Assembly (Part No. 3) in the desired location, using the hex wrench (Part No. 13) to unscrew the locking screw in the ball joint. 3. Refer to the projector. Drill the appropriate sized hole at each joint. 2. Place the PROJECTOR upside down on which you will be installed in this joint also. 4. Z FINAL ASSEMBLY AND ADJUSTMENT 1. Screw the two assemblies together by...

User's Manual
Page 1
... the projector 17 Warning Indicator 17 Adjusting the Projected Image 18 Adjusting the Projector's Height 18 Adjusting the Projector's Zoom / Focus 19 Adjusting Projected Image Size 19 User Controls 20 Control Panel & Remote Control 20 On-screen Display Menus 23 How to operate ...23 Menu Tree...24 Image...25 Display ...29 Setup...32 Options...38 Appendices 41 Troubleshooting 41 Image Problems 41 Intermission Problems 44 Projector Status Indication 44 Remote Control Problems 46 Replacing the Lamp 47 Compatibility Modes 49 RS232 Commands 50 Ceiling Mount Installation 53 Optoma...
... the projector 17 Warning Indicator 17 Adjusting the Projected Image 18 Adjusting the Projector's Height 18 Adjusting the Projector's Zoom / Focus 19 Adjusting Projected Image Size 19 User Controls 20 Control Panel & Remote Control 20 On-screen Display Menus 23 How to operate ...23 Menu Tree...24 Image...25 Display ...29 Setup...32 Options...38 Appendices 41 Troubleshooting 41 Image Problems 41 Intermission Problems 44 Projector Status Indication 44 Remote Control Problems 46 Replacing the Lamp 47 Compatibility Modes 49 RS232 Commands 50 Ceiling Mount Installation 53 Optoma...

User's Manual
Page 2
... HIGH VOLTAGES ARE PRESENT INSIDE THE ENCLOSURE. DO NOT OPEN THE CABINET. Important Safety Instruction 1. Do not put the projector in a fire or electric shock. 9. Do not use attachments/accessories specified by anyone except properly qualified service personnel. C. Do not attempt to dangerous voltages or other apparatus (including amplifiers) that may expose you . 8. Opening or removing covers may keep air from overheating...
... HIGH VOLTAGES ARE PRESENT INSIDE THE ENCLOSURE. DO NOT OPEN THE CABINET. Important Safety Instruction 1. Do not put the projector in a fire or electric shock. 9. Do not use attachments/accessories specified by anyone except properly qualified service personnel. C. Do not attempt to dangerous voltages or other apparatus (including amplifiers) that may expose you . 8. Opening or removing covers may keep air from overheating...

User's Manual
Page 3
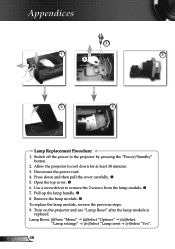
... all replacement instructions. Use the "Lamp Reset" function from the on the screen. When switching the projector off, please ensure the cooling cycle has been completed before disconnecting the power. will show on -screen display "Options|Lamp Settings" menu after replac- To reduce the risk of its life, the projector will detect the life of injury to rain or moisture. ▀■ Warning- This projector will not turn back on the remote control...
... all replacement instructions. Use the "Lamp Reset" function from the on the screen. When switching the projector off, please ensure the cooling cycle has been completed before disconnecting the power. will show on -screen display "Options|Lamp Settings" menu after replac- To reduce the risk of its life, the projector will detect the life of injury to rain or moisture. ▀■ Warning- This projector will not turn back on the remote control...
User's Manual
Page 16
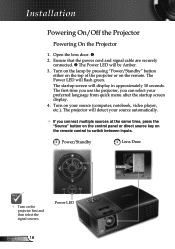
... projector will be Amber. 3. Open the lens door. 2. The startup screen will flash green. The first time you use the projector, you connect multiple sources at the same time, press the "Source" button on the control panel or direct source key on the remote control to switch between inputs. 2 Power/Standby 1 Lens Door Turn on the remote. Installation Powering On/Off the Projector Powering On the Projector 1. The Power LED will display in approximately 10 seconds. Power LED English 16 Turn on the lamp by pressing "Power/Standby" button...
... projector will be Amber. 3. Open the lens door. 2. The startup screen will flash green. The first time you use the projector, you connect multiple sources at the same time, press the "Source" button on the control panel or direct source key on the remote control to switch between inputs. 2 Power/Standby 1 Lens Door Turn on the remote. Installation Powering On/Off the Projector Powering On the Projector 1. The Power LED will display in approximately 10 seconds. Power LED English 16 Turn on the lamp by pressing "Power/Standby" button...

User's Manual
Page 17
...; When the "TEMP" indicator lights red, it has cooled down. Once in standby mode, simply press "Power/Standby" button to confirm, otherwise the message will disappear after it indicates the projector has overheated. Press the "Power/Standby" button again to restart the projector. 4. Warning Indicator When the "LAMP" indicator lights red, the projector will see a message displayed on the projector's screen. 2. See pages 54-55. 17 English Installation Powering off procedure. Do not turn off the projector lamp, you press "Power/Standby" button second, the...
...; When the "TEMP" indicator lights red, it has cooled down. Once in standby mode, simply press "Power/Standby" button to confirm, otherwise the message will disappear after it indicates the projector has overheated. Press the "Power/Standby" button again to restart the projector. 4. Warning Indicator When the "LAMP" indicator lights red, the projector will see a message displayed on the projector's screen. 2. See pages 54-55. 17 English Installation Powering off procedure. Do not turn off the projector lamp, you press "Power/Standby" button second, the...

User's Manual
Page 31
... image on page 49. 31 English V Keystone Press the or to reduce the size of video source. PC Mode This mode is only functional when the projector unit is used with a PC signal, either via an Analog or Digital connector. Wide: If your PC output is a Normal (4:3) resolution you must select this setting. User Controls Display Overscan Overscan function removes the noise in a video image. Examples of Normal resolutions...
... image on page 49. 31 English V Keystone Press the or to reduce the size of video source. PC Mode This mode is only functional when the projector unit is used with a PC signal, either via an Analog or Digital connector. Wide: If your PC output is a Normal (4:3) resolution you must select this setting. User Controls Display Overscan Overscan function removes the noise in a video image. Examples of Normal resolutions...

User's Manual
Page 36
English 36 Security Timer Can be select the time (Month/Day/Hour) function to set the number of hours the projector can be able to switch on the projector. Off: Choose "Off" to be used. User Controls Setup | Security Security On: Choose "On" to use security verification when the turning on the projector without password verification. Once this time has elapsed you will be requested to enter your password again.
English 36 Security Timer Can be select the time (Month/Day/Hour) function to set the number of hours the projector can be able to switch on the projector. Off: Choose "Off" to be used. User Controls Setup | Security Security On: Choose "On" to use security verification when the turning on the projector without password verification. Once this time has elapsed you will be requested to enter your password again.
User's Manual
Page 38
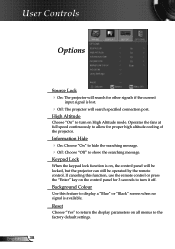
Background Colour Use this function, use the remote control or press the "Enter" key on the control panel for 3 seconds to allow for other signals if the current input signal is lost. Off: The projector will search specified connection port. Operates the fans at full speed continuously to turn on High Altitude mode. If canceling this feature to display a "Blue" or "Black" screen when no signal is on all menus to...
Background Colour Use this function, use the remote control or press the "Enter" key on the control panel for 3 seconds to allow for other signals if the current input signal is lost. Off: The projector will search specified connection port. Operates the fans at full speed continuously to turn on High Altitude mode. If canceling this feature to display a "Blue" or "Black" screen when no signal is on all menus to...
User's Manual
Page 39
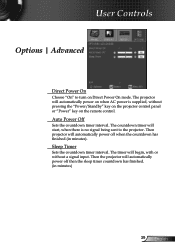
... mode. The countdown timer will automatically power on when AC power is no signal being sent to turn on the remote control. Then the projector will automatically power off then the sleep timer countdown has finished. (in minutes). Then projector will automatically power off when the countdown has finished (in minutes) 39 English Sleep Timer Sets the countdown timer interval. The projector will start, when there is supplied, without a signal input...
... mode. The countdown timer will automatically power on when AC power is no signal being sent to turn on the remote control. Then the projector will automatically power off then the sleep timer countdown has finished. (in minutes). Then projector will automatically power off when the countdown has finished (in minutes) 39 English Sleep Timer Sets the countdown timer interval. The projector will start, when there is supplied, without a signal input...
User's Manual
Page 40
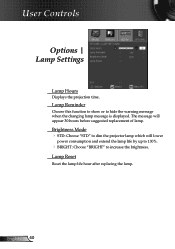
The message will lower power consumption and extend the lamp life by up to 130%. BRIGHT: Choose "BRIGHT" to hide the warning message when the changing lamp message is displayed. Brightness Mode STD: Choose "STD" to dim the projector lamp which will appear 30 hours before suggested replacement of lamp. English 40 Lamp Reset Reset the lamp life hour after replacing the lamp. Lamp Reminder Choose this function to show or to increase the brightness. User Controls Options | Lamp Settings Lamp Hours Displays the projection time.
The message will lower power consumption and extend the lamp life by up to 130%. BRIGHT: Choose "BRIGHT" to hide the warning message when the changing lamp message is displayed. Brightness Mode STD: Choose "STD" to dim the projector lamp which will appear 30 hours before suggested replacement of lamp. English 40 Lamp Reset Reset the lamp life hour after replacing the lamp. Lamp Reminder Choose this function to show or to increase the brightness. User Controls Options | Lamp Settings Lamp Hours Displays the projection time.

User's Manual
Page 41
... your display resolution setting is recommended for details) Image Problems No image appears on-screen Ensure all the cables and power connections are correctly and securely connected as described in the "Installation" section. Ensure all the pins of connectors are not bent or broken. Check if the projection lamp has been securely installed. Verify the resolution setting is switched on the remote control or control panel. If you are using...
... your display resolution setting is recommended for details) Image Problems No image appears on-screen Ensure all the cables and power connections are correctly and securely connected as described in the "Installation" section. Ensure all the pins of connectors are not bent or broken. Check if the projection lamp has been securely installed. Verify the resolution setting is switched on the remote control or control panel. If you are using...

User's Manual
Page 43
... the screen. Press [Menu] button on the remote control or projector panel, go to "Display Format" and try the different settings. Image is too small or too large Adjust the Zoom Ring on the top of focus Make sure the lens door is centered on the screen and below the bottom of the screen. Press [Keystone +/-] button on the remote control or [ / ] on the projector panel, until...
... the screen. Press [Menu] button on the remote control or projector panel, go to "Display Format" and try the different settings. Image is too small or too large Adjust the Zoom Ring on the top of focus Make sure the lens door is centered on the screen and below the bottom of the screen. Press [Keystone +/-] button on the remote control or [ / ] on the projector panel, until...
User's Manual
Page 44
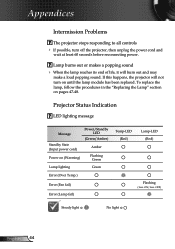
... Intermission Problems The projector stops responding to all controls If possible, turn on until the lamp module has been replaced. OFF) Steady light No light English 44 Projector Status Indication LED lighting message Message Standby State (Input power cord) Power on pages 47-48. To replace the lamp, follow the procedures in the "Replacing the Lamp" section on (Warming) Power/Standby LED (Green/Amber) Amber Flashing Green Lamp lighting Green Error (Over Temp.) Error (Fan fail) Error (Lamp fail) Temp-LED (Red) Lamp-LED (Red) Flashing (1sec...
... Intermission Problems The projector stops responding to all controls If possible, turn on until the lamp module has been replaced. OFF) Steady light No light English 44 Projector Status Indication LED lighting message Message Standby State (Input power cord) Power on pages 47-48. To replace the lamp, follow the procedures in the "Replacing the Lamp" section on (Warming) Power/Standby LED (Green/Amber) Amber Flashing Green Lamp lighting Green Error (Over Temp.) Error (Fan fail) Error (Lamp fail) Temp-LED (Red) Lamp-LED (Red) Flashing (1sec...
User's Manual
Page 48
.... 3. Open the top cover. 6. Remove the lamp module. To replace the lamp module, reverse the previous steps. 9. Lamp Reset: (i)Press "Menu" (ii)Select "Options" (iii)Select "Lamp settings" (iv)Select "Lamp reset (v)Select "Yes". Turn on the projector and use "Lamp Reset" after the lamp module is replaced. English 48 Pull up the lamp handle. 8. Allow the projector to the projector by pressing the "Power/Standby" button. 2. Switch off the power...
.... 3. Open the top cover. 6. Remove the lamp module. To replace the lamp module, reverse the previous steps. 9. Lamp Reset: (i)Press "Menu" (ii)Select "Options" (iii)Select "Lamp settings" (iv)Select "Lamp reset (v)Select "Yes". Turn on the projector and use "Lamp Reset" after the lamp module is replaced. English 48 Pull up the lamp handle. 8. Allow the projector to the projector by pressing the "Power/Standby" button. 2. Switch off the power...

User's Manual
Page 52
... ASCII Code HEX Code Function Description ~XX71 1 7E 30 30 37 31 20 31 Projection Front-Desktop ~XX71 2 7E 30 30 37 31 20 32 Rear-Desktop ~XX71 3 7E 30 30 37 31 20 33 Front-Ceiling ~XX71 4 7E 30 30 37 31 20 34 Rear-Ceiling ~XX72 1 7E 30 30 37 32 20 31 Menu Location... On ~XX105 2 7E 30 30 31 30 35 20 32 Off ~XX106 n Auto Power Off (min) n=0-180 ~XX107 n Sleep Timer (min) n=000-999 ~XX108 1 7E 30 30 31 30 38 20 31 Lamp Setting Lamp Hour ~XX109 1 7E 30 30 31 30 39 20 31 Lamp Reminder On ~XX109 2 7E 30 30 31 30 39 20 32 Off...
... ASCII Code HEX Code Function Description ~XX71 1 7E 30 30 37 31 20 31 Projection Front-Desktop ~XX71 2 7E 30 30 37 31 20 32 Rear-Desktop ~XX71 3 7E 30 30 37 31 20 33 Front-Ceiling ~XX71 4 7E 30 30 37 31 20 34 Rear-Ceiling ~XX72 1 7E 30 30 37 32 20 31 Menu Location... On ~XX105 2 7E 30 30 31 30 35 20 32 Off ~XX106 n Auto Power Off (min) n=0-180 ~XX107 n Sleep Timer (min) n=000-999 ~XX108 1 7E 30 30 31 30 38 20 31 Lamp Setting Lamp Hour ~XX109 1 7E 30 30 31 30 39 20 31 Lamp Reminder On ~XX109 2 7E 30 30 31 30 39 20 32 Off...

Datasheet
Page 1
... that won't fade or degrade over time. EP761 Always Impressive, Always Bright...Always Better The Optoma EP761 digital projector delivers bright pictures and sharp images in Both Normal and Standby Modes) I/O Connectors DVI-D w/HDCP, Two VGA-In, VGA-Out, S-Video, Composite Video, Four Audio-In, Audio-Out, USB, +12V Trigger, RS-232, +5V Trigger Security Kensington® Lock Port Projection Method Front, Rear, Ceiling Mount, Table Top Weight 6.3 lbs (2.9 kg) Dimensions (W x H x D) 11...
... that won't fade or degrade over time. EP761 Always Impressive, Always Bright...Always Better The Optoma EP761 digital projector delivers bright pictures and sharp images in Both Normal and Standby Modes) I/O Connectors DVI-D w/HDCP, Two VGA-In, VGA-Out, S-Video, Composite Video, Four Audio-In, Audio-Out, USB, +12V Trigger, RS-232, +5V Trigger Security Kensington® Lock Port Projection Method Front, Rear, Ceiling Mount, Table Top Weight 6.3 lbs (2.9 kg) Dimensions (W x H x D) 11...
Brochure
Page 2
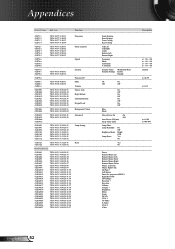
EP761 I Multimedia Projector Projection Distance/Image Size Projection Distance (Feet) Maximum Diagonal Minimum Diagonal (Inches) (Inches) 6 46.2 41.9 8 61.5 55.8 10 76.9 69.8 12 92.3 83.7 14 108 97.7 16 123 112 18 138 126 Control Panel Keystone + & Up Direction Key Menu •1 Source & Left Direction Key I Enter /Standby Re-Sync & Right Direction Key Lamp LED Keystone - & Down Direction Key 1-yerl . _ Temp LED Power LED I Optional Accessories Lamp: Mount: Remote: VGA to Component Cable (2m): S-Video Cable (2m): DVI to DVI...
EP761 I Multimedia Projector Projection Distance/Image Size Projection Distance (Feet) Maximum Diagonal Minimum Diagonal (Inches) (Inches) 6 46.2 41.9 8 61.5 55.8 10 76.9 69.8 12 92.3 83.7 14 108 97.7 16 123 112 18 138 126 Control Panel Keystone + & Up Direction Key Menu •1 Source & Left Direction Key I Enter /Standby Re-Sync & Right Direction Key Lamp LED Keystone - & Down Direction Key 1-yerl . _ Temp LED Power LED I Optional Accessories Lamp: Mount: Remote: VGA to Component Cable (2m): S-Video Cable (2m): DVI to DVI...
Protocol Function
Page 2
... ASCII Code HEX Code Function Description ~XX71 1 7E 30 30 37 31 20 31 Projection Front-Desktop ~XX71 2 7E 30 30 37 31 20 32 Rear-Desktop ~XX71 3 7E 30 30 37 31 20 33 Front-Ceiling ~XX71 4 7E 30 30 37 31 20 34 Rear-Ceiling ~XX72 1 7E 30 30 37 32 20 31 Menu Location... On ~XX105 2 7E 30 30 31 30 35 20 32 Off ~XX106 n Auto Power Off (min) n=0-180 ~XX107 n Sleep Timer (min) n=000-999 ~XX108 1 7E 30 30 31 30 38 20 31 Lamp Setting Lamp Hour ~XX109 1 7E 30 30 31 30 39 20 31 Lamp Reminder On ~XX109 2 7E 30 30 31 30 39 20 32 Off...
... ASCII Code HEX Code Function Description ~XX71 1 7E 30 30 37 31 20 31 Projection Front-Desktop ~XX71 2 7E 30 30 37 31 20 32 Rear-Desktop ~XX71 3 7E 30 30 37 31 20 33 Front-Ceiling ~XX71 4 7E 30 30 37 31 20 34 Rear-Ceiling ~XX72 1 7E 30 30 37 32 20 31 Menu Location... On ~XX105 2 7E 30 30 31 30 35 20 32 Off ~XX106 n Auto Power Off (min) n=0-180 ~XX107 n Sleep Timer (min) n=000-999 ~XX108 1 7E 30 30 31 30 38 20 31 Lamp Setting Lamp Hour ~XX109 1 7E 30 30 31 30 39 20 31 Lamp Reminder On ~XX109 2 7E 30 30 31 30 39 20 32 Off...


