
User Manual
Page 2
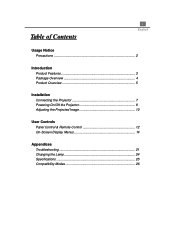
1 English Table of Contents Usage Notice Precautions 2 Introduction Product Features 3 Package Overview 4 Product Overview 5 Installation Connecting the Projector 7 Powering On/Off the Projector 8 Adjusting the Projected Image 10 User Controls Panel Control & Remote Control 12 On-Screen Display Menus 14 Appendices Troubleshooting 21 Changing the Lamp 24 Specifications 25 Compatibility Modes 26
1 English Table of Contents Usage Notice Precautions 2 Introduction Product Features 3 Package Overview 4 Product Overview 5 Installation Connecting the Projector 7 Powering On/Off the Projector 8 Adjusting the Projected Image 10 User Controls Panel Control & Remote Control 12 On-Screen Display Menus 14 Appendices Troubleshooting 21 Changing the Lamp 24 Specifications 25 Compatibility Modes 26
User Manual
Page 3
...the risk of your unit. Before switching off the product before cleaning. Precautions Follow all changing instructions. Don't: q Block the slots and openings on the projector first. Place in this product to cool down, and follow all warnings, precautions and maintenance as this may hurt your cleaning. Warning- Warning- Warning-.... Warning- Near any appliance generating a strong magnetic field. - Do not look into the lens. The bright light may cause electric shock. Connecting the projector to clean the display housing. q Disconnect the power plug from OSD menu.
...the risk of your unit. Before switching off the product before cleaning. Precautions Follow all changing instructions. Don't: q Block the slots and openings on the projector first. Place in this product to cool down, and follow all warnings, precautions and maintenance as this may hurt your cleaning. Warning- Warning- Warning-.... Warning- Near any appliance generating a strong magnetic field. - Do not look into the lens. The bright light may cause electric shock. Connecting the projector to clean the display housing. q Disconnect the power plug from OSD menu.
User Manual
Page 4
3 English Introduction Product Features This product, is an SVGA single chip 0.7" DLPä Projector. The outstanding features of it are listed as follows: q True SVGA, 800 x 600 addressable pixels q 3.3 lbs. (1.5 kgs) lightweight compact design q Single chip DLPä technology q ...
3 English Introduction Product Features This product, is an SVGA single chip 0.7" DLPä Projector. The outstanding features of it are listed as follows: q True SVGA, 800 x 600 addressable pixels q 3.3 lbs. (1.5 kgs) lightweight compact design q Single chip DLPä technology q ...
User Manual
Page 8
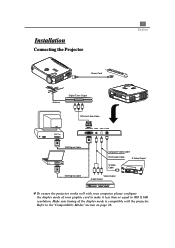
Installation Connecting the Projector 7 English Power Cord Antenna Digital Tuner Output RCA to D-Sub Cable RGB Port VGA Signal Cable RGB Port VGA Signal Cable Composite Video Cable RCA Audio Cable S-Video Output S-Video Cable Video Output Audio Output v To ensure the projector works well with the projector. Refer to 800 X 600 resolution. Make sure timimg of the display mode is compatible with your computer, please configure the display mode of your graphic card to make it less than or equal to the"Compatibility Modes"section on page 26.
Installation Connecting the Projector 7 English Power Cord Antenna Digital Tuner Output RCA to D-Sub Cable RGB Port VGA Signal Cable RGB Port VGA Signal Cable Composite Video Cable RCA Audio Cable S-Video Output S-Video Cable Video Output Audio Output v To ensure the projector works well with the projector. Refer to 800 X 600 resolution. Make sure timimg of the display mode is compatible with your computer, please configure the display mode of your graphic card to make it less than or equal to the"Compatibility Modes"section on page 26.
User Manual
Page 9
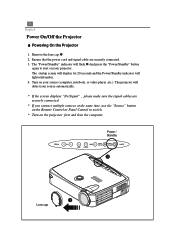
... screen displays "No Signal" , please make sure the signal cables are securely connected. 3. Turn on the projector first and then the computer. Remove the lens cap.Π2. 8 English Power On/Off the Projector u Powering On the Projector 1. Ensure that the power cord and signal cable are securely connected. * If you connect multiple sources... will display for 20 seconds and the Power/Standby indicator will flash. And press the "Power/Standby" button again to switch. * Turn on your projector. The "Power/Standby" indicator will light solid amber. 4.
... screen displays "No Signal" , please make sure the signal cables are securely connected. 3. Turn on the projector first and then the computer. Remove the lens cap.Π2. 8 English Power On/Off the Projector u Powering On the Projector 1. Ensure that the power cord and signal cable are securely connected. * If you connect multiple sources... will display for 20 seconds and the Power/Standby indicator will flash. And press the "Power/Standby" button again to switch. * Turn on your projector. The "Power/Standby" indicator will light solid amber. 4.
User Manual
Page 10
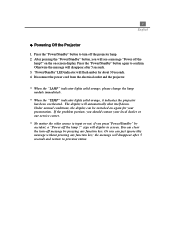
...you press"Power/Standby" by accident, a "Power off message by pressing any function key; Otherwise the message will see a message "Power off the projector lamp. 2. on the on again for about 30 seconds. 4. please change the lamp module immediately. * When the "TEMP" indicator lights solid orange...confirm. Press the "Power/Standby" button again to turn -off the lamp ?" Disconnect the power cord from the electrical outlet and the projector. * When the "LAMP" indicator lights solid orange; If the problem persists, you can clear the turn off the lamp?" sign will ...
...you press"Power/Standby" by accident, a "Power off message by pressing any function key; Otherwise the message will see a message "Power off the projector lamp. 2. on the on again for about 30 seconds. 4. please change the lamp module immediately. * When the "TEMP" indicator lights solid orange...confirm. Press the "Power/Standby" button again to turn -off the lamp ?" Disconnect the power cord from the electrical outlet and the projector. * When the "LAMP" indicator lights solid orange; If the problem persists, you can clear the turn off the lamp?" sign will ...
User Manual
Page 11
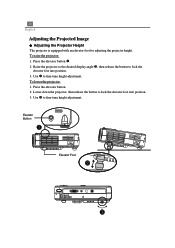
... Ž to fine-tune height adjustment. 10 English Adjusting the Projected Image u Adjusting the Projector Height The projector is equipped with an elevator foot for adjusting the projector height. To lower the projector: 1. Press the elevator button. 2. Lower down the projector, then release the button to lock the elevator foot into position. 3. Use Ž to...
... Ž to fine-tune height adjustment. 10 English Adjusting the Projected Image u Adjusting the Projector Height The projector is equipped with an elevator foot for adjusting the projector height. To lower the projector: 1. Press the elevator button. 2. Lower down the projector, then release the button to lock the elevator foot into position. 3. Use Ž to...
User Manual
Page 12
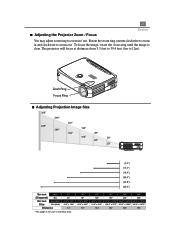
... focus at distances from 3.3 feet to 39.4 feet (1m to zoom in / out. 11 English u Adjusting the Projector Zoom / Focus You may adjust zoom ring to zoom in and clockwise to zoom out. Rotate the zoom ring counter-clockwise to 12m). To focus ...
... focus at distances from 3.3 feet to 39.4 feet (1m to zoom in / out. 11 English u Adjusting the Projector Zoom / Focus You may adjust zoom ring to zoom in and clockwise to zoom out. Rotate the zoom ring counter-clockwise to 12m). To focus ...
User Manual
Page 13
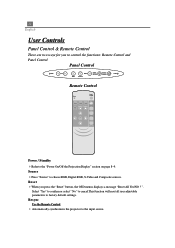
... the Projection Display" section on page 8~9. Panel Control Remote Control Power / Standby 4Refer to factory default settings. Resync Use the Remote Control 4 Automatically synchronizes the projector to choose RGB, Digital RGB, S-Video and Composite sources. ". 12 English User Controls Panel Control & Remote Control There are two ways for you press the...
... the Projection Display" section on page 8~9. Panel Control Remote Control Power / Standby 4Refer to factory default settings. Resync Use the Remote Control 4 Automatically synchronizes the projector to choose RGB, Digital RGB, S-Video and Composite sources. ". 12 English User Controls Panel Control & Remote Control There are two ways for you press the...
User Manual
Page 14
...'t displayed. Volume 4 To increase the volume, press 4 To decrease the volume, press Keystone +/- 4 Adjusts image distortion caused by tilting the projector. 13 English Use the Panel Control 4 Automatically synchronizes the projector to the input source, when you press this button while the OSD is displayed. Menu 4 Press "Menu" to a factor of items...
...'t displayed. Volume 4 To increase the volume, press 4 To decrease the volume, press Keystone +/- 4 Adjusts image distortion caused by tilting the projector. 13 English Use the Panel Control 4 Automatically synchronizes the projector to the input source, when you press this button while the OSD is displayed. Menu 4 Press "Menu" to a factor of items...
User Manual
Page 15
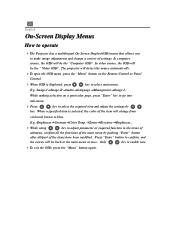
..." key to go into sub-menu. 4 Press key to adjust parameter or required function in the items of submenu, confirm all /part of settings. The projector will be the "Computer OSD". When a specified item is enable now. 4To exit the OSD, press the "Menu" button again. 14 English On-Screen ...Display Menus How to operate 4The Projector has a multilingual On-Screen Display(OSD) menu that allows you to the main menu at once. Press "Enter" button to confrim, and the screen will...
..." key to go into sub-menu. 4 Press key to adjust parameter or required function in the items of submenu, confirm all /part of settings. The projector will be the "Computer OSD". When a specified item is enable now. 4To exit the OSD, press the "Menu" button again. 14 English On-Screen ...Display Menus How to operate 4The Projector has a multilingual On-Screen Display(OSD) menu that allows you to the main menu at once. Press "Enter" button to confrim, and the screen will...
User Manual
Page 16
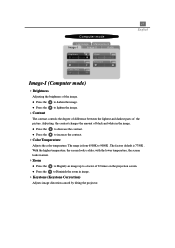
... degree of difference between the lightest and darkest parts of black and white in image. 4Keystone (Keystone Correction) Adjusts image distortion caused by tilting the projector. Adjusting the contrast changes the amount of the picture. with the lower temperature, the screen looks warmer. 4Zoom l Press the to Magnify an image up...
... degree of difference between the lightest and darkest parts of black and white in image. 4Keystone (Keystone Correction) Adjusts image distortion caused by tilting the projector. Adjusting the contrast changes the amount of the picture. with the lower temperature, the screen looks warmer. 4Zoom l Press the to Magnify an image up...
User Manual
Page 19
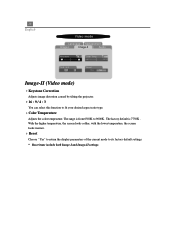
... both Image-I Image-II Audio Keystone Color Temp. 16:9 / 4:3 Reset Yes No Image-II (Video mode) 4Keystone Correction Adjusts image distortion caused by tilting the projector. 416 : 9 / 4 : 3 You can select this function to 9000K . 18 English Video mode Language Management Image-I and Image-II settings. The range is 7750K . The factory...
... both Image-I Image-II Audio Keystone Color Temp. 16:9 / 4:3 Reset Yes No Image-II (Video mode) 4Keystone Correction Adjusts image distortion caused by tilting the projector. 416 : 9 / 4 : 3 You can select this function to 9000K . 18 English Video mode Language Management Image-I and Image-II settings. The range is 7750K . The factory...
User Manual
Page 21
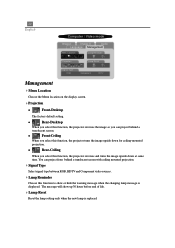
... and turns the image upside down for ceiling-mounted projection. l Rear-Desktop When you select this function, the projector reverses the image so you select this function, the projector turns the image upside down at same time. The message will show or hide the warning message when the changing lamp message is...
... and turns the image upside down for ceiling-mounted projection. l Rear-Desktop When you select this function, the projector reverses the image so you select this function, the projector turns the image upside down at same time. The message will show or hide the warning message when the changing lamp message is...

User Manual
Page 22
... is less than or equal to 800 x 600 resolution. Select the "Setting" tab. 3. In the "Desktop Area" you have removed the lens cap and the projector is less than or equal to 800 x 600. For Windows 95: 1. Problem: Partial, scrolling or incorrectly displayed image. 4 Press the "Resync"button on . Verify that...
... is less than or equal to 800 x 600 resolution. Select the "Setting" tab. 3. In the "Desktop Area" you have removed the lens cap and the projector is less than or equal to 800 x 600. For Windows 95: 1. Problem: Partial, scrolling or incorrectly displayed image. 4 Press the "Resync"button on . Verify that...
User Manual
Page 23
... " box; Problem: Image has vertical flickering bar 4 Use "Frequency" to make it . 4 Change the monitor color setting from the projector. Problem: The screen of your monitor freezes, restart all devices ". Follow above steps of resolution setting of focus 4 Adjust the Focus Ring on the... projector lens. 4 Make sure the projection screen is in changing resolutions or your graphic card to implement above steps 1~2. Then select " Standard...
... " box; Problem: Image has vertical flickering bar 4 Use "Frequency" to make it . 4 Change the monitor color setting from the projector. Problem: The screen of your monitor freezes, restart all devices ". Follow above steps of resolution setting of focus 4 Adjust the Focus Ring on the... projector lens. 4 Make sure the projection screen is in changing resolutions or your graphic card to implement above steps 1~2. Then select " Standard...

User Manual
Page 24
Problem: Lamp burns out or makes a popping sound 4 When the lamp reaches its end of the projector for your DVD player if you are playing a 16:9 DVD. 4 If you will not turn back on until the lamp module has been replaced. To .... 4 To open "Menu" then selects "Management" to the following: 4 Please select 4:3 aspect ratio type on your display. The projector itself will burn out and may make a loud popping sound. If this happens, the projector will also need to adjust the aspect ratio by digitization to full screen with 4:3 default setting. 23 English...
Problem: Lamp burns out or makes a popping sound 4 When the lamp reaches its end of the projector for your DVD player if you are playing a 16:9 DVD. 4 If you will not turn back on until the lamp module has been replaced. To .... 4 To open "Menu" then selects "Management" to the following: 4 Please select 4:3 aspect ratio type on your display. The projector itself will burn out and may make a loud popping sound. If this happens, the projector will also need to adjust the aspect ratio by digitization to full screen with 4:3 default setting. 23 English...
User Manual
Page 25
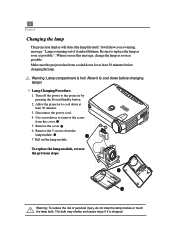
It will detect the lamp life itself. Make sure the projector has been cooled down for at least 30 minutes. 3. Allow the projector to remove the screw from the lamp module. Ž 7. Use screwdriver to cool down before changing the lamp. Allow it is dropped. Pull out the ...lamp module. To replace the lamp module, reverse the previous steps. The bulb may shatter and cause injury if it to the projector by pressing the Power/Standby button. 2. When you a warning message " Lamp is hot! Turn off the power to cool down at least 30 minutes before...
It will detect the lamp life itself. Make sure the projector has been cooled down for at least 30 minutes. 3. Allow the projector to remove the screw from the lamp module. Ž 7. Use screwdriver to cool down before changing the lamp. Allow it is dropped. Pull out the ...lamp module. To replace the lamp module, reverse the previous steps. The bulb may shatter and cause injury if it to the projector by pressing the Power/Standby button. 2. When you a warning message " Lamp is hot! Turn off the power to cool down at least 30 minutes before...


