

User manual
Page 1
DLP® Projector User manual
DLP® Projector User manual
User manual
Page 2
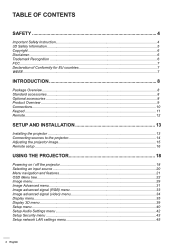
... accessories...8 Product Overview...9 Connections...10 Keypad...11 Remote...12 SETUP AND INSTALLATION 13 Installing the projector...13 Connecting sources to the projector 14 Adjusting the projector image...15 Remote setup...16 USING THE PROJECTOR 18 Powering on / off the projector 18 Selecting an input source...20 Menu navigation and features 21 OSD Menu tree...22...
... accessories...8 Product Overview...9 Connections...10 Keypad...11 Remote...12 SETUP AND INSTALLATION 13 Installing the projector...13 Connecting sources to the projector 14 Adjusting the projector image...15 Remote setup...16 USING THE PROJECTOR 18 Powering on / off the projector 18 Selecting an input source...20 Menu navigation and features 21 OSD Menu tree...22...
User manual
Page 3
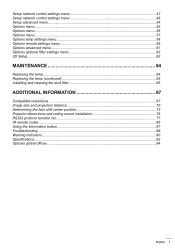
... and cleaning the dust filter 66 additional information 67 Compatible resolutions...67 Image size and projection distance 70 Determining the lens shift center position 73 Projector dimensions and ceiling mount installation 76 RS232 protocol function list...77 IR remote codes...85 Using the Information button...87 Troubleshooting...88 Warning indicators...90...
... and cleaning the dust filter 66 additional information 67 Compatible resolutions...67 Image size and projection distance 70 Determining the lens shift center position 73 Projector dimensions and ceiling mount installation 76 RS232 protocol function list...77 IR remote codes...85 Using the Information button...87 Troubleshooting...88 Warning indicators...90...
User manual
Page 4
...Do not install near heat sources such as amplifiers that emits heat. ‡‡ Do not let objects or liquids enter the projector. Please call Optoma before you to dangerous voltages or other apparatus such as radiators, heaters, stoves or any ventilation openings. SAFETY The lightning flash with ...been dropped. ±± Power supply cord or plug has been damaged. ±± Liquid has been spilled on to the projector. ±± Projector has been exposed to rain or moisture. Opening or removing covers may be of sufficient magnitude to constitute a risk of fire and/or...
...Do not install near heat sources such as amplifiers that emits heat. ‡‡ Do not let objects or liquids enter the projector. Please call Optoma before you to dangerous voltages or other apparatus such as radiators, heaters, stoves or any ventilation openings. SAFETY The lightning flash with ...been dropped. ±± Power supply cord or plug has been damaged. ±± Liquid has been spilled on to the projector. ±± Projector has been exposed to rain or moisture. Opening or removing covers may be of sufficient magnitude to constitute a risk of fire and/or...
User manual
Page 5
...seconds for long periods, they are sleep deprived or under "Replacing the Lamp" section on pages 64-65. ‡‡ Do not setup the projector in places where it shows warning messages. ‡‡ Reset the "Lamp Reset" function from the AC outlet before storage. Do not use ...with viewing in 3D and should monitor their children and ask whether they may leak. ‡‡ Do not use or store the projector in certain Projector pictures or video games. The bright light may be closely supervised when viewing these images. To replace the lamp, follow the procedures ...
...seconds for long periods, they are sleep deprived or under "Replacing the Lamp" section on pages 64-65. ‡‡ Do not setup the projector in places where it shows warning messages. ‡‡ Reset the "Lamp Reset" function from the AC outlet before storage. Do not use ...with viewing in 3D and should monitor their children and ask whether they may leak. ‡‡ Do not use or store the projector in certain Projector pictures or video games. The bright light may be closely supervised when viewing these images. To replace the lamp, follow the procedures ...
User manual
Page 6
... international copyright laws, with the screen. ‡‡ Watching 3D projection while wearing 3D glasses for an extended period of time may damage your 3D PROJECTOR near open stairwells, cables, balconies, or other purpose (as general spectacles, sunglasses, protective goggles, etc.) may be reproduced without notice. Microsoft, PowerPoint, and Windows are...
... international copyright laws, with the screen. ‡‡ Watching 3D projection while wearing 3D glasses for an extended period of time may damage your 3D PROJECTOR near open stairwells, cables, balconies, or other purpose (as general spectacles, sunglasses, protective goggles, etc.) may be reproduced without notice. Microsoft, PowerPoint, and Windows are...
User manual
Page 7
...;‡ Low Voltage Directive 2006/95/EC ‡‡ R & TTE Directive 1999/5/EC (if product has RF function) WEEE Disposal instructions Do not throw this projector. Caution Changes or modifications not expressly approved by the manufacturer could void the user's authority, which the receiver is granted by one or more of...
...;‡ Low Voltage Directive 2006/95/EC ‡‡ R & TTE Directive 1999/5/EC (if product has RF function) WEEE Disposal instructions Do not throw this projector. Caution Changes or modifications not expressly approved by the manufacturer could void the user's authority, which the receiver is granted by one or more of...
User manual
Page 8
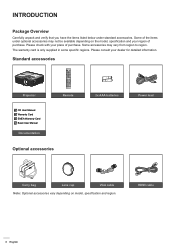
...: Optional accessories vary depending on the model, specification and your region of purchase. The warranty card is only supplied in some specific regions. Standard accessories Projector On Off Test Pattern F1 Mode Mouse Switch F2 AV Mute ENTER Info. Some of the items under standard accessories. Please check with your dealer...
...: Optional accessories vary depending on the model, specification and your region of purchase. The warranty card is only supplied in some specific regions. Standard accessories Projector On Off Test Pattern F1 Mode Mouse Switch F2 AV Mute ENTER Info. Some of the items under standard accessories. Please check with your dealer...
User manual
Page 9
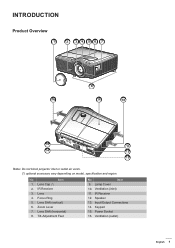
INTRODUCTION Product Overview 1 2 34 56 7 8 16 9 10 HDBaseT 15 11 14 12 13 Note: Do not block projector inlet or outlet air vents. (*) optional accessory vary depending on model, specification and region. IR Receiver 12. Speaker 13. Zoom Lever 7. Ventilation (outlet) English 9 IR Receiver 3. Ventilation (inlet) 11. Lens Shift (vertical) 6. Lens Cap (*) 2. Keypad 15. Focus Ring 5. Input/Output Connections 14. Lens 4. No Item 1. Lens Shift (horizontal) 8. Tilt-Adjustment Feet No Item 9. Lamp Cover 10. Power Socket 16.
INTRODUCTION Product Overview 1 2 34 56 7 8 16 9 10 HDBaseT 15 11 14 12 13 Note: Do not block projector inlet or outlet air vents. (*) optional accessory vary depending on model, specification and region. IR Receiver 12. Speaker 13. Zoom Lever 7. Ventilation (outlet) English 9 IR Receiver 3. Ventilation (inlet) 11. Lens Shift (vertical) 6. Lens Cap (*) 2. Keypad 15. Focus Ring 5. Input/Output Connections 14. Lens 4. No Item 1. Lens Shift (horizontal) 8. Tilt-Adjustment Feet No Item 9. Lamp Cover 10. Power Socket 16.
User manual
Page 13
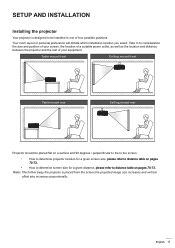
...How to determine screen size for a given screen size, please refer to distance table on pages 70-73. English 13 Note: The further away the projector is designed to be placed flat on a surface and 90 degrees / perpendicular to the to the screen. ‡‡ How to determine... to consideration the size and position of your screen, the location of a suitable power outlet, as well as the location and distance between the projector and the rest of four possible positions. Take in one of your equipment. Your room layout or personal preference will dictate which installation location you...
...How to determine screen size for a given screen size, please refer to distance table on pages 70-73. English 13 Note: The further away the projector is designed to be placed flat on a surface and 90 degrees / perpendicular to the to the screen. ‡‡ How to determine... to consideration the size and position of your screen, the location of a suitable power outlet, as well as the location and distance between the projector and the rest of four possible positions. Take in one of your equipment. Your room layout or personal preference will dictate which installation location you...
User manual
Page 14
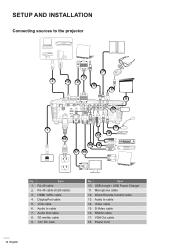
...-45 cable (Cat5 cable) 3. S-Video cable 16. VGA cable 6. Wired Remote Control cable 13. VGA Out cable 18. SETUP AND INSTALLATION Connecting sources to the projector 7 5 2 3 4 6 8 MOUSE SERVICE LAN HDMI 1 / MHL HDBaseT AC POWER HDMI 2 DisplayPort VGA1-IN / YPbPr Full 3D VGA2-IN / YPbPr / VGA-OUT RS-232C S-VIDEO L AUDIO1-IN...
...-45 cable (Cat5 cable) 3. S-Video cable 16. VGA cable 6. Wired Remote Control cable 13. VGA Out cable 18. SETUP AND INSTALLATION Connecting sources to the projector 7 5 2 3 4 6 8 MOUSE SERVICE LAN HDMI 1 / MHL HDBaseT AC POWER HDMI 2 DisplayPort VGA1-IN / YPbPr Full 3D VGA2-IN / YPbPr / VGA-OUT RS-232C S-VIDEO L AUDIO1-IN...
User manual
Page 15
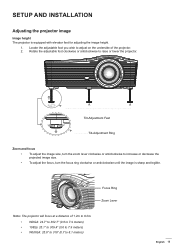
...decrease the projected image size. ‡‡ To adjust the focus, turn the zoom lever clockwise or anticlockwise to raise or lower the projector. Tilt-Adjustment Feet Tilt-Adjustment Ring Zoom and focus ‡‡ To adjust the image size, turn the focus ring clockwise or ...anticlockwise until the image is equipped with elevator feet for adjusting the image height. 1. Focus Ring Zoom Lever Note: The projector will focus at a distance of the projector. 2. Locate the adjustable foot you wish to adjust on the underside of 1.2m to 8.2m. ‡‡ WXGA: 24.7"...
...decrease the projected image size. ‡‡ To adjust the focus, turn the zoom lever clockwise or anticlockwise to raise or lower the projector. Tilt-Adjustment Feet Tilt-Adjustment Ring Zoom and focus ‡‡ To adjust the image size, turn the focus ring clockwise or ...anticlockwise until the image is equipped with elevator feet for adjusting the image height. 1. Focus Ring Zoom Lever Note: The projector will focus at a distance of the projector. 2. Locate the adjustable foot you wish to adjust on the underside of 1.2m to 8.2m. ‡‡ WXGA: 24.7"...
User manual
Page 16
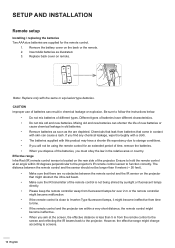
...relative area or country. Remove the battery cover on remote. Note: Replace only with skin can shorten the life of the projector. Chemicals that there are depleted. However, the effective range might change according to function correctly. Different types of batteries can result.../ replacing the batteries Two AAA size batteries are within a very short distance, the remote control might become ineffective from time to the projector. Replace back cover on the back or the remote. 2. CAUTION Improper use of batteries have a shorter life expectancy due to follow ...
...relative area or country. Remove the battery cover on remote. Note: Replace only with skin can shorten the life of the projector. Chemicals that there are depleted. However, the effective range might change according to function correctly. Different types of batteries can result.../ replacing the batteries Two AAA size batteries are within a very short distance, the remote control might become ineffective from time to the projector. Replace back cover on the back or the remote. 2. CAUTION Improper use of batteries have a shorter life expectancy due to follow ...
User manual
Page 18
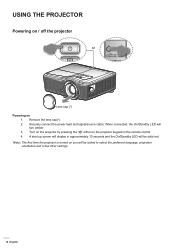
...On Off Test Pattern F1 Mode Mouse Switch F2 AV Mute ENTER Info. Securely connect the power lead and signal/source cable. Turn on the projector by pressing the " " either on 123 VGA2 Video DVI 1. A start up screen will display in approximately 10 seconds and the On/...Menu Pg Lens cap (*) Format Zoom Remote ID All VGA1 S-Video HDMI1 HDMI2 Powering on the projector keypad or the remote control 4. Remove the lens cap(*). 456 BNC YPbPr DisplayPort 3D 2. USING THE PROJECTOR Powering on you will be asked to select the preferred language, projection orientation and a few ...
...On Off Test Pattern F1 Mode Mouse Switch F2 AV Mute ENTER Info. Securely connect the power lead and signal/source cable. Turn on the projector by pressing the " " either on 123 VGA2 Video DVI 1. A start up screen will display in approximately 10 seconds and the On/...Menu Pg Lens cap (*) Format Zoom Remote ID All VGA1 S-Video HDMI1 HDMI2 Powering on the projector keypad or the remote control 4. Remove the lens cap(*). 456 BNC YPbPr DisplayPort 3D 2. USING THE PROJECTOR Powering on you will be asked to select the preferred language, projection orientation and a few ...
User manual
Page 19
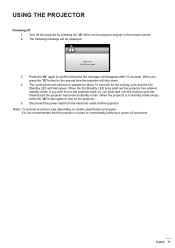
... On/ Standby LED will shut down. 4. It is not recommended that the projector is in standby mode simply press the " " button again to turn on the projector. 5. Press Power again 3. When the projector is tuned on immediately following message will disappear after 15 seconds. English 19 The... will continue to confirm otherwise the message will be displayed: Power Off? When you must wait until the cooling cycle has finished and the projector has entered standby mode. Note: (*) optional accessory vary depending on model, specification and region. Press the " " again to operate for ...
... On/ Standby LED will shut down. 4. It is not recommended that the projector is in standby mode simply press the " " button again to turn on the projector. 5. Press Power again 3. When the projector is tuned on immediately following message will disappear after 15 seconds. English 19 The... will continue to confirm otherwise the message will be displayed: Power Off? When you must wait until the cooling cycle has finished and the projector has entered standby mode. Note: (*) optional accessory vary depending on model, specification and region. Press the " " again to operate for ...
User manual
Page 20
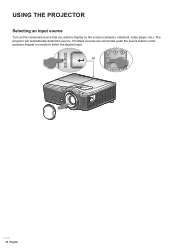
Source Re-Sync Volume V Keystone Menu Pg Format Zoom Remote ID All VGA1 S-Video HDMI1 HDMI2 123 VGA2 Video DVI 456 BNC YPbPr DisplayPort 3D 7890 20 English USING THE PROJECTOR On Off Test Pattern Mouse Switch Selecting an input source F1 F2 Mode AV Mute Turn on the screen (computer, notebook, video player, etc.). The projector will automatically detect the source. ENTER or Info. If multiple sources are connected, push the source button on the projector keypad or remote to display on the connected source that you want to select the desired input.
Source Re-Sync Volume V Keystone Menu Pg Format Zoom Remote ID All VGA1 S-Video HDMI1 HDMI2 123 VGA2 Video DVI 456 BNC YPbPr DisplayPort 3D 7890 20 English USING THE PROJECTOR On Off Test Pattern Mouse Switch Selecting an input source F1 F2 Mode AV Mute Turn on the screen (computer, notebook, video player, etc.). The projector will automatically detect the source. ENTER or Info. If multiple sources are connected, push the source button on the projector keypad or remote to display on the connected source that you want to select the desired input.
User manual
Page 21
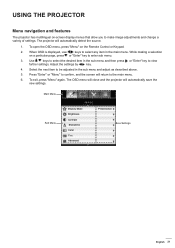
... to enter sub menu. 3. The OSD menu will close and the projector will return to confirm, and the screen will automatically save the new settings. USING THE PROJECTOR Menu navigation and features The projector has multilingual on the Remote Control or Keypad. 2. While making a ... main menu. 6. Main Menu Sub Menu I MA G E Display Mode Brightness Contrast Sharpness Color Tint Advanced Presentation Settings English 21 The projector will automatically detect the source. 1. When OSD is displayed, use keys to be adjusted in the main menu. Adjust the settings by key...
... to enter sub menu. 3. The OSD menu will close and the projector will return to confirm, and the screen will automatically save the new settings. USING THE PROJECTOR Menu navigation and features The projector has multilingual on the Remote Control or Keypad. 2. While making a ... main menu. 6. Main Menu Sub Menu I MA G E Display Mode Brightness Contrast Sharpness Color Tint Advanced Presentation Settings English 21 The projector will automatically detect the source. 1. When OSD is displayed, use keys to be adjusted in the main menu. Adjust the settings by key...

User manual
Page 22
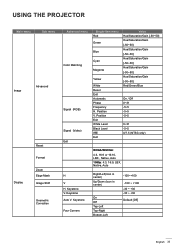
... Blue Bias Reset Exit Value Default [Presentation] PS. Color Space RGB Gain/Bias Single-item menu Presentation Bright Movie sRGB Blackboard DICOM SIM. USING THE PROJECTOR OSD Menu tree Main menu Sub menu Display Mode Brightness Contrast Sharpness Color Tint Image Advanced Advanced menu Noise Reduction BrilliantColorTM Dynamic Black Gamma Color...
... Blue Bias Reset Exit Value Default [Presentation] PS. Color Space RGB Gain/Bias Single-item menu Presentation Bright Movie sRGB Blackboard DICOM SIM. USING THE PROJECTOR OSD Menu tree Main menu Sub menu Display Mode Brightness Contrast Sharpness Color Tint Image Advanced Advanced menu Noise Reduction BrilliantColorTM Dynamic Black Gamma Color...
User manual
Page 23
... On / Off 0~31 -5~5 -5~5 -5~5 0~31 -5~5 0/7.5 (NTSC only) WXGA/WUXGA: 4:3, 16:9 or 16:10, LBX , Native, Auto 1080p: 4:3, 16:9, LBX, Native, Auto H V H. Keystone V. Keystone Auto V. USING THE PROJECTOR Main menu Sub menu Image Advanced Display Reset Format Zoom Edge Mask Image Shift Geometric Correction Advanced menu Color Matching Signal (RGB) Signal (Video) Exit...
... On / Off 0~31 -5~5 -5~5 -5~5 0~31 -5~5 0/7.5 (NTSC only) WXGA/WUXGA: 4:3, 16:9 or 16:10, LBX , Native, Auto 1080p: 4:3, 16:9, LBX, Native, Auto H V H. Keystone V. Keystone Auto V. USING THE PROJECTOR Main menu Sub menu Image Advanced Display Reset Format Zoom Edge Mask Image Shift Geometric Correction Advanced menu Color Matching Signal (RGB) Signal (Video) Exit...
User manual
Page 24
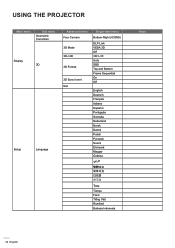
USING THE PROJECTOR Main menu Sub menu Geometric Correction Display 3D Setup Language Advanced menu Four Corners 3D Mode 3D->2D 3D Format 3D Sync Invert Exit Single-item menu Bottom-Right (ICONS) DLP-Link VESA 3D Off 3D/ L/ R Auto SBS Top and Bottom Frame Sequential On Off English Deutsch Français Italiano Español Português Svenska Nederland Norsk Dansk Polski Suomi Magyar Čeština Türkçe Farsi Tiếng Việt Română Bahasa Indonesia Value 24 English
USING THE PROJECTOR Main menu Sub menu Geometric Correction Display 3D Setup Language Advanced menu Four Corners 3D Mode 3D->2D 3D Format 3D Sync Invert Exit Single-item menu Bottom-Right (ICONS) DLP-Link VESA 3D Off 3D/ L/ R Auto SBS Top and Bottom Frame Sequential On Off English Deutsch Français Italiano Español Português Svenska Nederland Norsk Dansk Polski Suomi Magyar Čeština Türkçe Farsi Tiếng Việt Română Bahasa Indonesia Value 24 English


