

User manual
Page 1
DLP® Projector User manual
DLP® Projector User manual

User manual
Page 2
... Keypad...11 Remote control...12 SETUP AND INSTALLATION 13 Installing the projector...13 Connecting sources to the projector 14 Adjusting the projector image...16 Remote setup...17 USING THE PROJECTOR 19 Powering on / off the projector 19 Selecting an input source...20 USING The projector 21 Menu navigation and features 21 OSD Menu tree...22 Display...
... Keypad...11 Remote control...12 SETUP AND INSTALLATION 13 Installing the projector...13 Connecting sources to the projector 14 Adjusting the projector image...16 Remote setup...17 USING THE PROJECTOR 19 Powering on / off the projector 19 Selecting an input source...20 USING The projector 21 Menu navigation and features 21 OSD Menu tree...22 Display...
User manual
Page 3
...filter settings menu...38 Setup power settings menu...39 Setup security menu...40 Setup test pattern menu...41 Setup remote settings menu...41 Setup projector ID menu...41 Setup options menu...41 Setup reset all menu...42 Info menu...42 maintenance 43 Replacing the lamp...43 Installing and cleaning... the dust filter 45 additional information 46 Compatible resolutions...46 Image size and projection distance 49 Projector dimensions and ceiling mount installation 50 IR remote codes...51 Troubleshooting...53 Warning indicators...55 Specifications...57...
...filter settings menu...38 Setup power settings menu...39 Setup security menu...40 Setup test pattern menu...41 Setup remote settings menu...41 Setup projector ID menu...41 Setup options menu...41 Setup reset all menu...42 Info menu...42 maintenance 43 Replacing the lamp...43 Installing and cleaning... the dust filter 45 additional information 46 Compatible resolutions...46 Image size and projection distance 49 Projector dimensions and ceiling mount installation 50 IR remote codes...51 Troubleshooting...53 Warning indicators...55 Specifications...57...

User manual
Page 4
...;‡ To reduce the risk of fire and/or electric shock, do not expose the projector to install the projector in operation. The lamp inside . ‡‡ Do not place the projector on an unstable surface. Please call Optoma before you to dangerous voltages or other apparatus such as this user's guide. They may...
...;‡ To reduce the risk of fire and/or electric shock, do not expose the projector to install the projector in operation. The lamp inside . ‡‡ Do not place the projector on an unstable surface. Please call Optoma before you to dangerous voltages or other apparatus such as this user's guide. They may...

User manual
Page 5
...those who are sleep deprived or under "Replacing the Lamp" section on pages 43-44. ‡‡ Do not setup the projector in certain Projector pictures or video games. As power outages and brown-outs can cause photosensitive epileptic seizures. ‡‡ Pregnant women, the elderly...135; Reset the "Lamp Reset" function from , or have an undiagnosed condition that can KILL devices. 3D Safety Information Please follow the correct projector orientation installation as eye or muscle twitching; (5) confusion; (6) nausea; (7) loss of its life time, the message "Lamp life exceeded." ...
...those who are sleep deprived or under "Replacing the Lamp" section on pages 43-44. ‡‡ Do not setup the projector in certain Projector pictures or video games. As power outages and brown-outs can cause photosensitive epileptic seizures. ‡‡ Pregnant women, the elderly...135; Reset the "Lamp Reset" function from , or have an undiagnosed condition that can KILL devices. 3D Safety Information Please follow the correct projector orientation installation as eye or muscle twitching; (5) confusion; (6) nausea; (7) loss of its life time, the message "Lamp life exceeded." ...
User manual
Page 6
.... Trademark Recognition Kensington is a trademark by Darbee Products, Inc. It is a trademark of time may cause a headache or fatigue. Accordingly, DO NOT place your 3D PROJECTOR near open stairwells, cables, balconies, or other purpose (as general spectacles, sunglasses, protective goggles, etc.) may be reproduced without obligation of the manufacturer to change...
.... Trademark Recognition Kensington is a trademark by Darbee Products, Inc. It is a trademark of time may cause a headache or fatigue. Accordingly, DO NOT place your 3D PROJECTOR near open stairwells, cables, balconies, or other purpose (as general spectacles, sunglasses, protective goggles, etc.) may be reproduced without obligation of the manufacturer to change...

User manual
Page 7
...;‡ Low Voltage Directive 2006/95/EC ‡‡ R & TTE Directive 1999/5/EC (if product has RF function) WEEE Disposal instructions Do not throw this projector. To minimize pollution and ensure utmost protection of the FCC rules. If this device does cause harmful interference to radio or television reception, which is...
...;‡ Low Voltage Directive 2006/95/EC ‡‡ R & TTE Directive 1999/5/EC (if product has RF function) WEEE Disposal instructions Do not throw this projector. To minimize pollution and ensure utmost protection of the FCC rules. If this device does cause harmful interference to radio or television reception, which is...

User manual
Page 8
... of purchase. Please consult your place of the items under standard accessories. Standard accessories CD User Manual Warranty Card* Basic User Manual Projector Remote control Power lead Note: ‡‡ ‡‡ The remote control is only supplied in some specific regions. INTRODUCTION Package Overview Carefully unpack and...
... of purchase. Please consult your place of the items under standard accessories. Standard accessories CD User Manual Warranty Card* Basic User Manual Projector Remote control Power lead Note: ‡‡ ‡‡ The remote control is only supplied in some specific regions. INTRODUCTION Package Overview Carefully unpack and...

User manual
Page 9
Focus Ring 3. Power Socket 13. Input / Output English 9 Lamp Cover 2. IR Receiver 5. Ventilation (outlet) 11. Keypad 6. Lens 9. Security Bar No Item 8. Ventilation (inlet) 10. KensingtonTM Lock Port 12. Zoom Lever 4. INTRODUCTION Product Overview 1 2 3 45 68 7 9 10 13 12 11 6 Note: Do not block projector inlet or outlet air vents. (*) optional accessory varies depending on model, specification, and region. No Item 1. Tilt-Adjustment Foot 7.
Focus Ring 3. Power Socket 13. Input / Output English 9 Lamp Cover 2. IR Receiver 5. Ventilation (outlet) 11. Keypad 6. Lens 9. Security Bar No Item 8. Ventilation (inlet) 10. KensingtonTM Lock Port 12. Zoom Lever 4. INTRODUCTION Product Overview 1 2 3 45 68 7 9 10 13 12 11 6 Note: Do not block projector inlet or outlet air vents. (*) optional accessory varies depending on model, specification, and region. No Item 1. Tilt-Adjustment Foot 7.

User manual
Page 13
...advise please contact Optoma. Note: The further away the projector is designed to distance table on page 48. Take into consideration the size and position of your equipment. Table mount front Ceiling mount front Table mount rear Ceiling mount rear Projector should be installed... other orientation will dictate which installation location you select. Do not operate the projector in one of four possible positions. SETUP AND INSTALLATION Installing the projector Your projector is placed from the screen the projected image size increases and vertical offset also...
...advise please contact Optoma. Note: The further away the projector is designed to distance table on page 48. Take into consideration the size and position of your equipment. Table mount front Ceiling mount front Table mount rear Ceiling mount rear Projector should be installed... other orientation will dictate which installation location you select. Do not operate the projector in one of four possible positions. SETUP AND INSTALLATION Installing the projector Your projector is placed from the screen the projected image size increases and vertical offset also...

User manual
Page 14
... PP N/A N/A PP P N/A PP PP PP Type 6 WXGA P P P P P P P Type 7 1080p P N/A P N/A P P P VGA Out Cable 5. Audio In Cable 7. HDMI / MHL Cable 3. SETUP AND INSTALLATION Connecting sources to the projector 12 3 4 6 5 HDMI 1 HDMI 2 / MHL USB Power Out (5V 1.0A) MOUSE SERVICE VGA-IN / YPbPr VGA-OUT / YPbPr RS-232C VIDEO Audio In Audio Out MOLEX...
... PP N/A N/A PP P N/A PP PP PP Type 6 WXGA P P P P P P P Type 7 1080p P N/A P N/A P P P VGA Out Cable 5. Audio In Cable 7. HDMI / MHL Cable 3. SETUP AND INSTALLATION Connecting sources to the projector 12 3 4 6 5 HDMI 1 HDMI 2 / MHL USB Power Out (5V 1.0A) MOUSE SERVICE VGA-IN / YPbPr VGA-OUT / YPbPr RS-232C VIDEO Audio In Audio Out MOLEX...

User manual
Page 16
Rotate the adjustable foot clockwise or counterclockwise to 10. 16 English Zoom Lever Focus Ring Note: The projector will focus at a distance of the projector. 2. Tilt-Adjustment Feet Tilt-Adjustment Ring Zoom and focus ‡‡ To adjust the image size, turn the focus ring clockwise or counterclockwise until the .... ‡‡ To adjust the focus, turn the zoom lever clockwise or counterclockwise to adjust on the underside of 1m to raise or lower the projector. SETUP AND INSTALLATION Adjusting the projector image Image height The projector is sharp and legible.
Rotate the adjustable foot clockwise or counterclockwise to 10. 16 English Zoom Lever Focus Ring Note: The projector will focus at a distance of the projector. 2. Tilt-Adjustment Feet Tilt-Adjustment Ring Zoom and focus ‡‡ To adjust the image size, turn the focus ring clockwise or counterclockwise until the .... ‡‡ To adjust the focus, turn the zoom lever clockwise or counterclockwise to adjust on the underside of 1m to raise or lower the projector. SETUP AND INSTALLATION Adjusting the projector image Image height The projector is sharp and legible.

User manual
Page 18
... or the remote controller might obstruct the infra-red beam. ‡‡ Make sure the IR transmitter of the projector. Ensure to hold the remote control at an angle within 20 degrees perpendicular to the projector's IR remote control sensor to time. ‡‡ If the remote control and the... that there are within a very short distance, the remote control might become malfunction. ‡‡ If the remote control is located on the projector that might become ineffective. The distance between the remote control and the IR sensor on the top side of the remote control is not being...
... or the remote controller might obstruct the infra-red beam. ‡‡ Make sure the IR transmitter of the projector. Ensure to hold the remote control at an angle within 20 degrees perpendicular to the projector's IR remote control sensor to time. ‡‡ If the remote control and the... that there are within a very short distance, the remote control might become malfunction. ‡‡ If the remote control is located on the projector that might become ineffective. The distance between the remote control and the IR sensor on the top side of the remote control is not being...

User manual
Page 19
...simply press the " " button again to select the preferred language, projection orientation, and other settings. The following message will turn on the projector. 5. Turn on the projector by pressing the " " either on , you will shut down. 4. Turn off 1. Securely connect the power lead and signal/source ... the On/Standby LED will be flashing green or flashing blue. Press the " " again to turn the projector back on 1. Note: It is not recommended that the projector is turned on immediately, right after 15 seconds. If you wish to confirm, otherwise the message will flash...
...simply press the " " button again to select the preferred language, projection orientation, and other settings. The following message will turn on the projector. 5. Turn on the projector by pressing the " " either on , you will shut down. 4. Turn off 1. Securely connect the power lead and signal/source ... the On/Standby LED will be flashing green or flashing blue. Press the " " again to turn the projector back on 1. Note: It is not recommended that the projector is turned on immediately, right after 15 seconds. If you wish to confirm, otherwise the message will flash...

User manual
Page 20
The projector will automatically detect the source. or 20 English USING THE PROJECTOR Selecting an input source Turn on the screen, such as computer, notebook, video player, etc. If multiple sources are connected, push the source button on the projector keypad or the remote control to display on the connected source that you want to select the desired input.
The projector will automatically detect the source. or 20 English USING THE PROJECTOR Selecting an input source Turn on the screen, such as computer, notebook, video player, etc. If multiple sources are connected, push the source button on the projector keypad or the remote control to display on the connected source that you want to select the desired input.

User manual
Page 21
...Aspect Ratio Edge Mask Zoom Image Shift Keystone Select Exit Navigation guide Enter English 21 The OSD menu will close and the projector will return to confirm, and the screen will automatically save the new settings. When OSD is displayed, use keys to ...of settings. While making a selection on the remote control or the projector keyboard. 2. The projector will automatically detect the source. 1. Adjust the settings by using keys. 4. USING The projector Menu navigation and features The projector has multilingual on-screen display menus that allow you to be adjusted...
...Aspect Ratio Edge Mask Zoom Image Shift Keystone Select Exit Navigation guide Enter English 21 The OSD menu will close and the projector will return to confirm, and the screen will automatically save the new settings. When OSD is displayed, use keys to ...of settings. While making a selection on the remote control or the projector keyboard. 2. The projector will automatically detect the source. 1. Adjust the settings by using keys. 4. USING The projector Menu navigation and features The projector has multilingual on-screen display menus that allow you to be adjusted...

User manual
Page 23
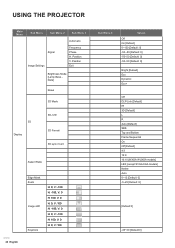
USING THE PROJECTOR Main Menu Sub Menu Sub Menu 2 Sub Menu 3 Sub Menu 4 Color Display Color Matching Saturation Hue Gain Reset RGB Gain/Bias Exit Red Gain Green ...
USING THE PROJECTOR Main Menu Sub Menu Sub Menu 2 Sub Menu 3 Sub Menu 4 Color Display Color Matching Saturation Hue Gain Reset RGB Gain/Bias Exit Red Gain Green ...
User manual
Page 24
... Off [Default] 4:3 16:9 16:10 [WXGA WUXGA models] LBX [except SVGA XGA models] Native Auto 0~10 [Default: 0] -5~25 [Default: 0] [Default:0] -40~40 [Default:0] V: 0 H: 0; V: 0 H: 0; USING THE PROJECTOR Main Menu Sub Menu Sub Menu 2 Sub Menu 3 Automatic Signal Image Settings Frequency Phase H.
... Off [Default] 4:3 16:9 16:10 [WXGA WUXGA models] LBX [except SVGA XGA models] Native Auto 0~10 [Default: 0] -5~25 [Default: 0] [Default:0] -40~40 [Default:0] V: 0 H: 0; V: 0 H: 0; USING THE PROJECTOR Main Menu Sub Menu Sub Menu 2 Sub Menu 3 Automatic Signal Image Settings Frequency Phase H.
User manual
Page 25
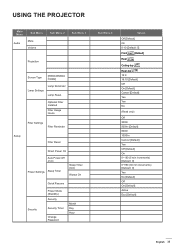
USING THE PROJECTOR Main Menu Sub Menu Audio Mute Volume Sub Menu 2 Sub Menu 3 Projection Screen Type [WXGA WUXGA models] Lamp Settings Lamp Reminder Lamp Reset Optional Filter ...
USING THE PROJECTOR Main Menu Sub Menu Audio Mute Volume Sub Menu 2 Sub Menu 3 Projection Screen Type [WXGA WUXGA models] Lamp Settings Lamp Reminder Lamp Reset Optional Filter ...
User manual
Page 26
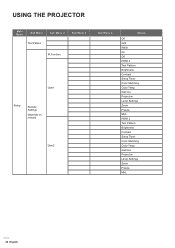
USING THE PROJECTOR Main Menu Sub Menu Test Pattern Sub Menu 2 Sub Menu 3 IR Function User1 Setup Remote Settings [depends on remote] User2 Sub Menu 4 Values Off Grid White On Off HDMI 2 Test Pattern Brightness Contrast Sleep Timer Color Matching Color Temp Gamma Projection Lamp Settings Zoom Freeze MHL HDMI 2 Test Pattern Brightness Contrast Sleep Timer Color Matching Color Temp Gamma Projection Lamp Settings Zoom Freeze MHL 26 English
USING THE PROJECTOR Main Menu Sub Menu Test Pattern Sub Menu 2 Sub Menu 3 IR Function User1 Setup Remote Settings [depends on remote] User2 Sub Menu 4 Values Off Grid White On Off HDMI 2 Test Pattern Brightness Contrast Sleep Timer Color Matching Color Temp Gamma Projection Lamp Settings Zoom Freeze MHL HDMI 2 Test Pattern Brightness Contrast Sleep Timer Color Matching Color Temp Gamma Projection Lamp Settings Zoom Freeze MHL 26 English


