
User Manual
Page 1
... 9 Control Panel 9 Connection Ports 10 Remote Control 12 Installing the Batteries 15 Remote Control Operation 16 Connection 17 Connecting a computer 19 Connecting Video source devices 20 Operation 23 Powering On/Off the Projector 23 Adjusting the Projector Height 24 Adjusting the Projector Zoom and Focus 24 Adjusting Projection Image Size 25 Menu Operation 27 Appendix 50 Installing the Dust Filter (Optional accessory 50 Replacing the Lamp 51 Ceiling mount installation 53 Compatibility Modes 54 RS232 Commands and Protocol Function List 59 Troubleshooting 64 Optoma Global...
... 9 Control Panel 9 Connection Ports 10 Remote Control 12 Installing the Batteries 15 Remote Control Operation 16 Connection 17 Connecting a computer 19 Connecting Video source devices 20 Operation 23 Powering On/Off the Projector 23 Adjusting the Projector Height 24 Adjusting the Projector Zoom and Focus 24 Adjusting Projection Image Size 25 Menu Operation 27 Appendix 50 Installing the Dust Filter (Optional accessory 50 Replacing the Lamp 51 Ceiling mount installation 53 Compatibility Modes 54 RS232 Commands and Protocol Function List 59 Troubleshooting 64 Optoma Global...

User Manual
Page 3
... the projector is equipped with a lens cap. EN-3 Warning ─ Not all projectors come with a lens cap please ensure to remove it from possible damage, do not use the projector for at least 2 hours when there is exposed to a warm one. Moisture Condensation Never operate this projector immediately after moving it before you turn on the lens and the crucial internal parts. Replacement parts When replacement parts are...
... the projector is equipped with a lens cap. EN-3 Warning ─ Not all projectors come with a lens cap please ensure to remove it from possible damage, do not use the projector for at least 2 hours when there is exposed to a warm one. Moisture Condensation Never operate this projector immediately after moving it before you turn on the lens and the crucial internal parts. Replacement parts When replacement parts are...
User Manual
Page 14
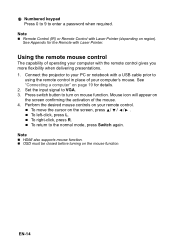
Press switch button to enter a password when required. EN-14 27 Numbered keypad Press 0 to 9 to turn on mouse function. See Appendix for details. 2. Set the input signal to the normal mode, press Switch again. Mouse icon will appear on the screen confirming the activation of operating your remote control. „ To move the cursor on page 19 for the Remote with the remote control gives you more...
Press switch button to enter a password when required. EN-14 27 Numbered keypad Press 0 to 9 to turn on mouse function. See Appendix for details. 2. Set the input signal to the normal mode, press Switch again. Mouse icon will appear on the screen confirming the activation of operating your remote control. „ To move the cursor on page 19 for the Remote with the remote control gives you more...

User Manual
Page 19
... CRT/LCD key turns the external display on the notebook. Refer to your notebook's documentation to a projector. EN-19 Take the supplied VGA cable and connect one end to the D-Sub output socket of the VGA cable to the VGA/YPbPr signal input socket on their external video ports when connected to find your notebook's key combination. Important „Many notebooks do not turn on the projector. Locate a function...
... CRT/LCD key turns the external display on the notebook. Refer to your notebook's documentation to a projector. EN-19 Take the supplied VGA cable and connect one end to the D-Sub output socket of the VGA cable to the VGA/YPbPr signal input socket on their external video ports when connected to find your notebook's key combination. Important „Many notebooks do not turn on the projector. Locate a function...

User Manual
Page 22
... the selected video image is not displayed after the projector is turned on page 20 for use to connect to the device. Also check that the Video source device is turned on and the correct video source has been selected, check that the signal cables have been connected correctly. „You need to reassess which method you can continue with this device using a composite Video connection if Component Video and S-Video inputs are...
... the selected video image is not displayed after the projector is turned on page 20 for use to connect to the device. Also check that the Video source device is turned on and the correct video source has been selected, check that the signal cables have been connected correctly. „You need to reassess which method you can continue with this device using a composite Video connection if Component Video and S-Video inputs are...

User Manual
Page 23
... the projector lamp. Once in stand-by mode, simply press to certain level. It will take a few minutes because the fan will keep running until the internal temperature is off, if turning off the projector, users need to turn the projector back on the projector. Press to turn on , you must wait until the cooling process is on the remote control. This can damage your source...
... the projector lamp. Once in stand-by mode, simply press to certain level. It will take a few minutes because the fan will keep running until the internal temperature is off, if turning off the projector, users need to turn the projector back on the projector. Press to turn on , you must wait until the cooling process is on the remote control. This can damage your source...
User Manual
Page 27
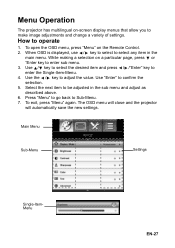
... projector has multilingual on-screen display menus that allow you to adjust the value. Use the / key to make image adjustments and change a variety of settings. To exit, press "Menu" again. When OSD is displayed, use / key to select to confirm the selection. 5. Use "Enter" to select any item in the sub menu and adjust as described above. 6. Main Menu Sub-Menu Settings Single-ItemMenu EN-27 To open...
... projector has multilingual on-screen display menus that allow you to adjust the value. Use the / key to make image adjustments and change a variety of settings. To exit, press "Menu" again. When OSD is displayed, use / key to select to confirm the selection. 5. Use "Enter" to select any item in the sub menu and adjust as described above. 6. Main Menu Sub-Menu Settings Single-ItemMenu EN-27 To open...

User Manual
Page 28
Menu tree Main Menu Sub-Menu Display Mode IMAGE Brightness Contrast Sharpness Color Tint Gamma Advanced BrilliantColor™ Color Temp. Color Settings Single-Item Menu SVGA/XGA: Presentation / Bright / Movie / sRGB / Blackboard / User / 3D WXGA: Presentation / Bright / Movie / sRGB / Blackboard / User / 3D/ Game / ISF day / ISF night Red Green Blue SVGA/XGA: Film / Video / Graphics / Standard WXGA: Film / Video / Graphics / 2.2 / 1.8 / 2.0 / 2.6 1 to 10 Warm / Standard / Cool / Cold Hue / Saturation / Gain Hue / Saturation / Gain Hue / Saturation / Gain EN-28
Menu tree Main Menu Sub-Menu Display Mode IMAGE Brightness Contrast Sharpness Color Tint Gamma Advanced BrilliantColor™ Color Temp. Color Settings Single-Item Menu SVGA/XGA: Presentation / Bright / Movie / sRGB / Blackboard / User / 3D WXGA: Presentation / Bright / Movie / sRGB / Blackboard / User / 3D/ Game / ISF day / ISF night Red Green Blue SVGA/XGA: Film / Video / Graphics / Standard WXGA: Film / Video / Graphics / 2.2 / 1.8 / 2.0 / 2.6 1 to 10 Warm / Standard / Cool / Cold Hue / Saturation / Gain Hue / Saturation / Gain Hue / Saturation / Gain EN-28
User Manual
Page 29
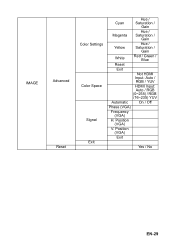
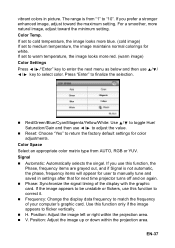
Position (VGA) V. Position (VGA) Exit Yes / No EN-29 IMAGE Advanced Reset Color Settings Color Space Signal Exit Cyan Hue / Saturation / Gain Magenta Hue / Saturation / Gain Yellow Hue / Saturation / Gain White Red / Green / Blue Reset Exit Not HDMI Input: Auto / RGB / YUV HDMI Input: Auto / RGB (0~255) / RGB (16~235) YUV Automatic On / Off Phase (VGA) Frequency (VGA) H.
Position (VGA) V. Position (VGA) Exit Yes / No EN-29 IMAGE Advanced Reset Color Settings Color Space Signal Exit Cyan Hue / Saturation / Gain Magenta Hue / Saturation / Gain Yellow Hue / Saturation / Gain White Red / Green / Blue Reset Exit Not HDMI Input: Auto / RGB / YUV HDMI Input: Auto / RGB (0~255) / RGB (16~235) YUV Automatic On / Off Phase (VGA) Frequency (VGA) H.
User Manual
Page 31
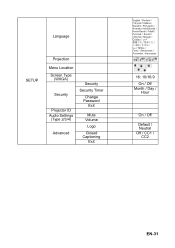
Language SETUP Projection Menu Location Screen Type (WXGA) Security Projector ID Audio Settings (Type 2/3/4) Advanced Security Security Timer Change Password Exit Mute Volume Logo Closed Captioning Exit 16: 10/16:9 On / Off Month / Day / Hour On / Off Default / Neutral Off / CC1 / CC2 EN-31
Language SETUP Projection Menu Location Screen Type (WXGA) Security Projector ID Audio Settings (Type 2/3/4) Advanced Security Security Timer Change Password Exit Mute Volume Logo Closed Captioning Exit 16: 10/16:9 On / Off Month / Day / Hour On / Off Default / Neutral Off / CC1 / CC2 EN-31

User Manual
Page 34
OPTIONS Advanced Direct Power On Auto Power Off (min.) Sleep Timer (min.) Quick Resume Power Mode (Standby) Lamp Hour Lamp Reminder Lamp Settings Optional Filter Settings Reset Brightness Mode Lamp SPA Mode Lamp Reset Exit Optional Filter Installed Filter Usage Hours Filter Reminder Filter Reset Exit On / Off On / Off Active / Eco On / Off Bright / Eco / Dynamic / Eco+ On/ Off Yes / No Yes / No On / Off Yes / No Yes / No EN-34
OPTIONS Advanced Direct Power On Auto Power Off (min.) Sleep Timer (min.) Quick Resume Power Mode (Standby) Lamp Hour Lamp Reminder Lamp Settings Optional Filter Settings Reset Brightness Mode Lamp SPA Mode Lamp Reset Exit Optional Filter Installed Filter Usage Hours Filter Reminder Filter Reset Exit On / Off On / Off Active / Eco On / Off Bright / Eco / Dynamic / Eco+ On/ Off Yes / No Yes / No On / Off Yes / No Yes / No EN-34
User Manual
Page 37
... then use / to adjust the value. „ Reset: Choose "Yes" to manually tune and saved in picture. Position: Adjust the image left or right within the projection area. The range is not automatic, the phase, frequency items will appear for user to return the factory default settings for color adjustments. Color Space Select an appropriate color matrix type from "1" to medium temperature, the image maintains normal colorings for next time projector turns...
... then use / to adjust the value. „ Reset: Choose "Yes" to manually tune and saved in picture. Position: Adjust the image left or right within the projection area. The range is not automatic, the phase, frequency items will appear for user to return the factory default settings for color adjustments. Color Space Select an appropriate color matrix type from "1" to medium temperature, the image maintains normal colorings for next time projector turns...
User Manual
Page 43
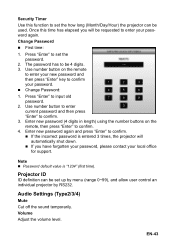
...; Password default value is entered 3 times, the projector will automatically shut down. „ If you will be used. Projector ID ID definition can be requested to enter your password again. Use number button on the remote, then press "Enter" to be set up by menu (range 0~99), and allow user control an individual projector by RS232. Audio Settings (Type2/3/4) Mute Cut off the sound temporarily. The password has to confirm. 4. Security Timer Use...
...; Password default value is entered 3 times, the projector will automatically shut down. „ If you will be used. Projector ID ID definition can be requested to enter your password again. Use number button on the remote, then press "Enter" to be set up by menu (range 0~99), and allow user control an individual projector by RS232. Audio Settings (Type2/3/4) Mute Cut off the sound temporarily. The password has to confirm. 4. Security Timer Use...
User Manual
Page 47
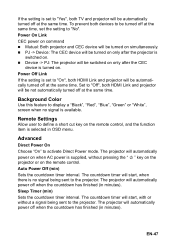
... CEC device will be not automatically turned off at the same time, set the setting to "Yes", both HDMI Link and projector will be automatically turned off at the same time. Auto Power Off (min) Sets the countdown timer interval. Background Color Use this feature to display a "Black", "Red", "Blue", "Green" or "White", screen when no signal being sent to "Off", both TV and projector will be turned on only after the CEC...
... CEC device will be not automatically turned off at the same time, set the setting to "Yes", both HDMI Link and projector will be automatically turned off at the same time. Auto Power Off (min) Sets the countdown timer interval. Background Color Use this feature to display a "Black", "Red", "Blue", "Green" or "White", screen when no signal being sent to "Off", both TV and projector will be turned on only after the CEC...

User Manual
Page 48
... standby. Optional Filter Settings Optional Filter Installed EN-48 Quick Resume If the projector is accidentally turned off, this function to show or to turn on brightness level of the content and adjust lamp power consumption between 100% and 30% dynamically. Lamp Settings Lamp Hours Display the projection time. The lamp life will be extended. „ Eco+: Choose "Eco+." Lamp SPA Mode Choose "On" to increase the brightness. „ Eco.: Choose "Eco." Lamp Reset Reset...
... standby. Optional Filter Settings Optional Filter Installed EN-48 Quick Resume If the projector is accidentally turned off, this function to show or to turn on brightness level of the content and adjust lamp power consumption between 100% and 30% dynamically. Lamp Settings Lamp Hours Display the projection time. The lamp life will be extended. „ Eco+: Choose "Eco+." Lamp SPA Mode Choose "On" to increase the brightness. „ Eco.: Choose "Eco." Lamp Reset Reset...

User Manual
Page 51
.... „ Thoroughly ventilate the area or the room when operating the lamp in an oxygen atmosphere (in an atmosphere containing an inflammable substance, such as a result of hours of use as its lifetime draws to replace the lamp when the warning message pops up on the projected image. Note „ The lamp is expected to avoid the inhalation of mercury fumes...
.... „ Thoroughly ventilate the area or the room when operating the lamp in an oxygen atmosphere (in an atmosphere containing an inflammable substance, such as a result of hours of use as its lifetime draws to replace the lamp when the warning message pops up on the projected image. Note „ The lamp is expected to avoid the inhalation of mercury fumes...
User Manual
Page 62
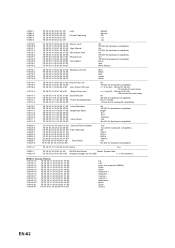
...32 20 31 0D Logo Default ~XX82 3 7E 30... cc2 ~XX100 1 7E 30 30 31 30 30 20 31 0D Source Lock On ~XX100 0 7E 30 30 31 30 30 20 30 0D ... compatible) ~XX101 1 7E 30 30 31 30 31 20 31 0D High Altitude On ~XX101 0 7E 30 30 31 30 31 20 30 0D...Color Blue ~XX104 2 7E 30 30 31 30 34 20 32 0D Black ~XX104 3 7E 30 30 31 30 34 20 33 0D Red ~XX104 4 7E 30 30 31 30 34 20 34 0D Green ~XX104 5 7E 30 30 31 30 34 20 35 0D White...31 30 36 20 a 0D Auto Power Off (min) n = 0 (a=30) ~ 180 (a=31 38 30) (5 minutes for each step). ~XX107 n 7E 30 30 31 30 37 20 a 0D Sleep Timer (min ) n = 0...
...32 20 31 0D Logo Default ~XX82 3 7E 30... cc2 ~XX100 1 7E 30 30 31 30 30 20 31 0D Source Lock On ~XX100 0 7E 30 30 31 30 30 20 30 0D ... compatible) ~XX101 1 7E 30 30 31 30 31 20 31 0D High Altitude On ~XX101 0 7E 30 30 31 30 31 20 30 0D...Color Blue ~XX104 2 7E 30 30 31 30 34 20 32 0D Black ~XX104 3 7E 30 30 31 30 34 20 33 0D Red ~XX104 4 7E 30 30 31 30 34 20 34 0D Green ~XX104 5 7E 30 30 31 30 34 20 35 0D White...31 30 36 20 a 0D Auto Power Off (min) n = 0 (a=30) ~ 180 (a=31 38 30) (5 minutes for each step). ~XX107 n 7E 30 30 31 30 37 20 a 0D Sleep Timer (min ) n = 0...
User Manual
Page 63
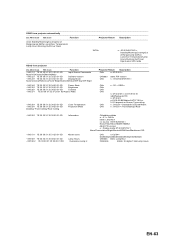
SEND from projector automatically 232 ASCII Code HEX Code Function Projector Return Description when Standby/Warming/Cooling/Out of Range/Lamp fail/Fan Lock/Over Temperature/ Lamp Hours Running Out/Cover Open INFOn n : 0/1/2/3/4/6/7/8/9 = Standby/Warming/Cooling/Out of Range/Lamp fail/Fan Lock/Over Temperature/Lamp Hours Running Out/Cover Open/Lamp SPA mode READ from projector 232 ASCII Code HEX Code Function Projector Return Description ~XX121 1 7E 30 30 31 32 31 20 31 0D Input Source Commands OKn n: 0/1/2/3/4 = None/VGA/Video/HDMI1...
SEND from projector automatically 232 ASCII Code HEX Code Function Projector Return Description when Standby/Warming/Cooling/Out of Range/Lamp fail/Fan Lock/Over Temperature/ Lamp Hours Running Out/Cover Open INFOn n : 0/1/2/3/4/6/7/8/9 = Standby/Warming/Cooling/Out of Range/Lamp fail/Fan Lock/Over Temperature/Lamp Hours Running Out/Cover Open/Lamp SPA mode READ from projector 232 ASCII Code HEX Code Function Projector Return Description ~XX121 1 7E 30 30 31 32 31 20 31 0D Input Source Commands OKn n: 0/1/2/3/4 = None/VGA/Video/HDMI1...
User Manual
Page 64
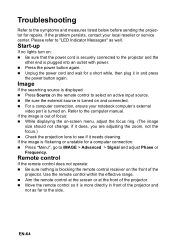
..., you are adjusting the zoom, not the focus.) „ Check the projection lens to the side. EN-64 If the problem persists, contact your notebook computer's external video port is displayed: „ Press Source on . If the image is more directly in and press the power button again. Refer to the symptoms and measures listed below before sending the projector for repairs. Use the remote control within the effective...
..., you are adjusting the zoom, not the focus.) „ Check the projection lens to the side. EN-64 If the problem persists, contact your notebook computer's external video port is displayed: „ Press Source on . If the image is more directly in and press the power button again. Refer to the symptoms and measures listed below before sending the projector for repairs. Use the remote control within the effective...

User Manual
Page 65
... Indicator Messages Message Standby State (Input power cord) Power on (Warming) Power on & Lamp lighting Power off (Cooling) Quick Resume (100 secs) SPA mode (about 3 mins) Error (Lamp fail) Error (Fan fail) Error (Over Temp) Standby State (Burn in mode) Burnin (Warming) Burnin (Cooling) Power LED (Red) Power LED (Green) Temp LED Lamp LED (Red) (Red) Steady light Flashing Flashing 0.5 sec off 0.5 sec light Steady light Flashing 0.5 sec off 0.5 sec light Back to Red steady light when cooling fan turns off Flashing 0.25 sec off 0.25 sec light Flashing 1 sec off 1 sec light Steady light...
... Indicator Messages Message Standby State (Input power cord) Power on (Warming) Power on & Lamp lighting Power off (Cooling) Quick Resume (100 secs) SPA mode (about 3 mins) Error (Lamp fail) Error (Fan fail) Error (Over Temp) Standby State (Burn in mode) Burnin (Warming) Burnin (Cooling) Power LED (Red) Power LED (Green) Temp LED Lamp LED (Red) (Red) Steady light Flashing Flashing 0.5 sec off 0.5 sec light Steady light Flashing 0.5 sec off 0.5 sec light Back to Red steady light when cooling fan turns off Flashing 0.25 sec off 0.25 sec light Flashing 1 sec off 1 sec light Steady light...


