
Owner Manual
Page 2
...qualified service personnel under the following the operating instructions. Servicing is required when the apparatus has been damaged in installation, such as power-supply cord or plug is damaged, B. If the apparatus has been exposed to qualified service personnel. Batteries Always consider the ...DO NOT REMOVE COVER (OR BACK). Heed all instructions. 5. Damage Requiring Service Unplug the apparatus from tip-over. 13. When the power-supply cord or plug is damaged, liquid has been spilled or objects have fallen into the apparatus, the apparatus has been exposed to...
...qualified service personnel under the following the operating instructions. Servicing is required when the apparatus has been damaged in installation, such as power-supply cord or plug is damaged, B. If the apparatus has been exposed to qualified service personnel. Batteries Always consider the ...DO NOT REMOVE COVER (OR BACK). Heed all instructions. 5. Damage Requiring Service Unplug the apparatus from tip-over. 13. When the power-supply cord or plug is damaged, liquid has been spilled or objects have fallen into the apparatus, the apparatus has been exposed to...

Owner Manual
Page 3
... which can be exposed to radio communications. This is normal. • If you need to radio or television reception, which the receiver is used in a residential installation. This equipment generates, uses and can cause hearing loss. 6. Make sure that interference will not ...• Reorient or relocate the receiving antenna. • Increase the separation between the equipment and receiver. • Connect the equipment into an outlet on this equipment does cause harmful interference to transport this unit or its power cord while your Onkyo dealer. 3. Never Touch this ...
... which can be exposed to radio communications. This is normal. • If you need to radio or television reception, which the receiver is used in a residential installation. This equipment generates, uses and can cause hearing loss. 6. Make sure that interference will not ...• Reorient or relocate the receiving antenna. • Increase the separation between the equipment and receiver. • Connect the equipment into an outlet on this equipment does cause harmful interference to transport this unit or its power cord while your Onkyo dealer. 3. Never Touch this ...
Owner Manual
Page 4
... service personnel. Fit a suitable fuse in compliance with the corresponding technical standards such as EN60065, EN55013, EN55020 and EN61000-3-2, -3-3. MIYAGI ONKYO EUROPE ELECTRONICS GmbH 4 GROEBENZELL, GERMANY K. Check for your plug, proceed as follows: The wire which is coloured blue must be connected...marked with the letter N or coloured black. Precautions-Continued For British models Replacement and mounting of an AC plug on the power supply cord of this apparatus may not correspond with the coloured markings identifying the terminals in your socket outlets, cut it ...
... service personnel. Fit a suitable fuse in compliance with the corresponding technical standards such as EN60065, EN55013, EN55020 and EN61000-3-2, -3-3. MIYAGI ONKYO EUROPE ELECTRONICS GmbH 4 GROEBENZELL, GERMANY K. Check for your plug, proceed as follows: The wire which is coloured blue must be connected...marked with the letter N or coloured black. Precautions-Continued For British models Replacement and mounting of an AC plug on the power supply cord of this apparatus may not correspond with the coloured markings identifying the terminals in your socket outlets, cut it ...

Owner Manual
Page 5
... indicates the color. Use this adapter if your AC outlet does not match with the plug on the AV receiver/AV amplifier's power cord (adapter varies from country to mount the AC plug: AM loop antenna (TX-SR806 only) * In catalogs and on packaging, the letter at the end of color. Front Left Front Left SP...
... indicates the color. Use this adapter if your AC outlet does not match with the plug on the AV receiver/AV amplifier's power cord (adapter varies from country to mount the AC plug: AM loop antenna (TX-SR806 only) * In catalogs and on packaging, the letter at the end of color. Front Left Front Left SP...

Owner Manual
Page 6
... of quality and performance tests. Use of this copyright protection technology must pass a rigorous series of parameters, including power amplifier performance, and pre-amplifier performance and operation for System Set-up to an audio amplifier is prohibited. *6. ... EX is a trademark of Dolby Laboratories. Manufactured under license from Audyssey Laboratories. Music Optimizer™ is a trademark of Onkyo Corporation. THX Ultra2 Plus receivers also feature proprietary THX technologies (e.g., THX Mode) which is intended for home theater playback. * "Xantech" is a registered...
... of quality and performance tests. Use of this copyright protection technology must pass a rigorous series of parameters, including power amplifier performance, and pre-amplifier performance and operation for System Set-up to an audio amplifier is prohibited. *6. ... EX is a trademark of Dolby Laboratories. Manufactured under license from Audyssey Laboratories. Music Optimizer™ is a trademark of Onkyo Corporation. THX Ultra2 Plus receivers also feature proprietary THX technologies (e.g., THX Mode) which is intended for home theater playback. * "Xantech" is a registered...

Owner Manual
Page 7
... Controller 14 Controlling the AV Receiver/AV Amplifier 15 About Home Theater 16 Enjoying Home Theater 16 Connections Connecting the AV Receiver/AV Amplifier 17 Connecting Your Speakers 17 Bi-amping the Front Speakers 19 Connecting Antenna (TX-SR806 only 20 About AV Connections 22 Connecting Both ...Cassette, CDR, MiniDisc, or DAT Recorder 36 Connecting a Power Amplifier 37 Connecting a Tuner (TX-SA806 only 37 Connecting an RI Dock 38 Connecting Onkyo V Components 39 Connecting the Power Cord 39 Turning On the AV Receiver/AV Amplifier 40 Turning On and Standby 40 First Time Setup...
... Controller 14 Controlling the AV Receiver/AV Amplifier 15 About Home Theater 16 Enjoying Home Theater 16 Connections Connecting the AV Receiver/AV Amplifier 17 Connecting Your Speakers 17 Bi-amping the Front Speakers 19 Connecting Antenna (TX-SR806 only 20 About AV Connections 22 Connecting Both ...Cassette, CDR, MiniDisc, or DAT Recorder 36 Connecting a Power Amplifier 37 Connecting a Tuner (TX-SA806 only 37 Connecting an RI Dock 38 Connecting Onkyo V Components 39 Connecting the Power Cord 39 Turning On the AV Receiver/AV Amplifier 40 Turning On and Standby 40 First Time Setup...
Owner Manual
Page 9
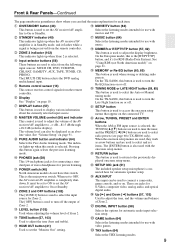
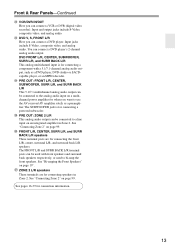
... used to adjust the tone (bass and treble). Y SETUP MIC jack (51) L POWER switch (40) North American models do not have this mode is also used to turn the Re-EQ function on or off the output of the AV receiver/AV amplifier to access the onscreen setup menus that appear on . When set... is used when storing or deleting radio presets. It must be displayed as arrow buttons and are used to select radio presets (see page 60) (TX-SR806 only). There are used to select from the following input sources: MULTI CH, DVD, VCR/DVR, CBL/SAT, GAME/TV, AUX, TAPE, TUNER, CD, PHONO...
... used to adjust the tone (bass and treble). Y SETUP MIC jack (51) L POWER switch (40) North American models do not have this mode is also used to turn the Re-EQ function on or off the output of the AV receiver/AV amplifier to access the onscreen setup menus that appear on . When set... is used when storing or deleting radio presets. It must be displayed as arrow buttons and are used to select radio presets (see page 60) (TX-SR806 only). There are used to select from the following input sources: MULTI CH, DVD, VCR/DVR, CBL/SAT, GAME/TV, AUX, TAPE, TUNER, CD, PHONO...
Owner Manual
Page 10
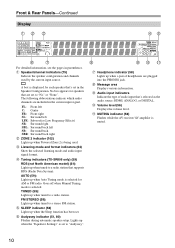
E Tuning indicators (TX-SR806 only) (59) RDS (not North American model) (61): Lights up ...). The following abbreviations indicate which audio channels are included in parentheses. F SLEEP indicator (58) Lights up when Powered Zone 2 is being used by the current input source. : A box is set in the Speaker Configuration. ... information. J Audio input indicators Indicate the type of headphones are set . L MUTING indicator (58) Flashes while the AV receiver/AV amplifier is selected. FL: Front left C: Center FR: Front right SL: Surround left LFE: Subwoofer (Low Frequency Effects...
E Tuning indicators (TX-SR806 only) (59) RDS (not North American model) (61): Lights up ...). The following abbreviations indicate which audio channels are included in parentheses. F SLEEP indicator (58) Lights up when Powered Zone 2 is being used by the current input source. : A box is set in the Speaker Configuration. ... information. J Audio input indicators Indicate the type of headphones are set . L MUTING indicator (58) Flashes while the AV receiver/AV amplifier is selected. FL: Front left C: Center FR: Front right SL: Surround left LFE: Subwoofer (Low Frequency Effects...

Owner Manual
Page 12
... H 12V TRIGGER OUT ZONE 2 This output can be connected to an V jack on another Onkyo AV component. The other end of sight, for connecting a SIRIUS Satellite Radio antenna, sold separately (see... make an analog audio connection (RCA) between the AV receiver/AV amplifier and the other components. When Zone 2 is the RS232 port. J AM ANTENNA (TX-SR806 only) These push terminals are for connecting a TV...Video or composite video jack should be connected to suit your setup. N AC INLET The supplied power cord is for example, installed in a cabinet. V CBL/SAT IN Here you can assign ...
... H 12V TRIGGER OUT ZONE 2 This output can be connected to an V jack on another Onkyo AV component. The other end of sight, for connecting a SIRIUS Satellite Radio antenna, sold separately (see... make an analog audio connection (RCA) between the AV receiver/AV amplifier and the other components. When Zone 2 is the RS232 port. J AM ANTENNA (TX-SR806 only) These push terminals are for connecting a TV...Video or composite video jack should be connected to suit your setup. N AC INLET The supplied power cord is for example, installed in a cabinet. V CBL/SAT IN Here you can assign ...
Owner Manual
Page 13
... to bi-amp the front speakers. The SUBWOOFER jack is for when you want to the analog audio input on a multichannel power amplifier for connecting a component with front speakers and surround back speakers respectively, or used with a 5.1/7.1-channel analog audio output, such...front L/R, center, surround L/R, and surround back L/R speakers. The FRONT L/R and SURR BACK L/R terminal posts can be connected to use the AV receiver/AV amplifier solely as a DVD player, DVD-Audio or SACDcapable player, or an MPEG decoder. Input jacks include S-Video, composite video, and analog...
... to bi-amp the front speakers. The SUBWOOFER jack is for when you want to the analog audio input on a multichannel power amplifier for connecting a component with front speakers and surround back speakers respectively, or used with a 5.1/7.1-channel analog audio output, such...front L/R, center, surround L/R, and surround back L/R speakers. The FRONT L/R and SURR BACK L/R terminal posts can be connected to use the AV receiver/AV amplifier solely as a DVD player, DVD-Audio or SACDcapable player, or an MPEG decoder. Input jacks include S-Video, composite video, and analog...

Owner Manual
Page 17
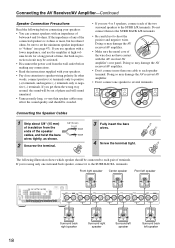
...Tan The supplied speaker cable labels are also color-coded and you should use dipole speakers for a really powerful and solid bass. Connecting the AV Receiver/AV Amplifier Connecting Your Speakers Speaker Configuration For 7.1-channel surround-sound playback, you need to an input on the...speaker 7. Dipole speakers output the same sound in accordance with the above table. Surround back right speaker Connecting a Powered Subwoofer Using a suitable cable, connect the AV receiver/AV amplifier's PRE OUT: SUBWOOFER to do this automatically (see page 51) or manually (see page 75). The ...
...Tan The supplied speaker cable labels are also color-coded and you should use dipole speakers for a really powerful and solid bass. Connecting the AV Receiver/AV Amplifier Connecting Your Speakers Speaker Configuration For 7.1-channel surround-sound playback, you need to an input on the...speaker 7. Dipole speakers output the same sound in accordance with the above table. Surround back right speaker Connecting a Powered Subwoofer Using a suitable cable, connect the AV receiver/AV amplifier's PRE OUT: SUBWOOFER to do this automatically (see page 51) or manually (see page 75). The ...
Owner Manual
Page 18
...Front right speaker Center speaker Front left speaker Surround back right speaker Surround right speaker Surround left speaker Surround back left speaker 18 Connecting the AV Receiver/AV Amplifier-Continued Speaker Connection Precautions Read the following illustration shows which speaker should be avoided. • If you 're using only one surround ...amplifier at high volume levels for a long period of the connected speakers is 4 ohms or more than 6 ohms, be activated. • Disconnect the power cord from the ends of the two surround speakers to "4ohms" (see page 47).
...Front right speaker Center speaker Front left speaker Surround back right speaker Surround right speaker Surround left speaker Surround back left speaker 18 Connecting the AV Receiver/AV Amplifier-Continued Speaker Connection Precautions Read the following illustration shows which speaker should be avoided. • If you 're using only one surround ...amplifier at high volume levels for a long period of the connected speakers is 4 ohms or more than 6 ohms, be activated. • Disconnect the power cord from the ends of the two surround speakers to "4ohms" (see page 47).

Owner Manual
Page 20
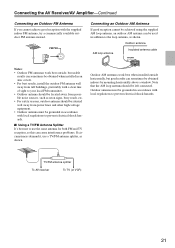
...AV receiver, TV, speaker cables, and power cords. Keep the antenna as far away as shown. (The antenna's wires are not polarity sensitive, so they can be connected either way around.) Make sure that the wires are gripping the bare wires, not the insulation. Connecting the AV Receiver/AV Amplifier-Continued Connecting Antenna (TX-SR806..., as shown. Connecting the Indoor FM Antenna The supplied indoor FM antenna is ready for indoor use the tuner. The AV receiver won't pick up any radio signals without any antenna connected, so you 'll need to connect commercially available outdoor FM and...
...AV receiver, TV, speaker cables, and power cords. Keep the antenna as far away as shown. (The antenna's wires are not polarity sensitive, so they can be connected either way around.) Make sure that the wires are gripping the bare wires, not the insulation. Connecting the AV Receiver/AV Amplifier-Continued Connecting Antenna (TX-SR806..., as shown. Connecting the Indoor FM Antenna The supplied indoor FM antenna is ready for indoor use the tuner. The AV receiver won't pick up any radio signals without any antenna connected, so you 'll need to connect commercially available outdoor FM and...
Owner Manual
Page 21
... problems. If circumstances demand it, use the same antenna for both FM and TV reception, as shown. TV/FM antenna splitter To AV receiver To TV (or VCR) 21 Connecting an Outdoor AM Antenna If good reception cannot be achieved using the supplied AM loop antenna, an... supplied indoor FM antenna, try a commercially available outdoor FM antenna instead. Note that the AM loop antenna should be situated well away from power lines and other high-voltage equipment. • Outdoor antenna must be left connected. Outdoor antenna must be obtained indoors by mounting horizontally above ...
... problems. If circumstances demand it, use the same antenna for both FM and TV reception, as shown. TV/FM antenna splitter To AV receiver To TV (or VCR) 21 Connecting an Outdoor AM Antenna If good reception cannot be achieved using the supplied AM loop antenna, an... supplied indoor FM antenna, try a commercially available outdoor FM antenna instead. Note that the AM loop antenna should be situated well away from power lines and other high-voltage equipment. • Outdoor antenna must be left connected. Outdoor antenna must be obtained indoors by mounting horizontally above ...

Owner Manual
Page 22
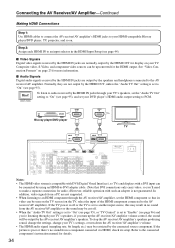
...be R found on TVs, VCRs, V and other AV components. • Don't connect the power cord until you to connect composite video inputs and outputs. Optical Digital Jacks The AV receiver/AV amplifier's optical digital jacks have shutter-type covers that open... of a multichannel cable. This cable carries multichannel analog audio and it 's removed. Connecting the AV Receiver/AV Amplifier-Continued About AV Connections • Before making any AV connections, read the manuals supplied with a 7.1-channel analog audio output. Video HDMI Cable Component video...
...be R found on TVs, VCRs, V and other AV components. • Don't connect the power cord until you to connect composite video inputs and outputs. Optical Digital Jacks The AV receiver/AV amplifier's optical digital jacks have shutter-type covers that open... of a multichannel cable. This cable carries multichannel analog audio and it 's removed. Connecting the AV Receiver/AV Amplifier-Continued About AV Connections • Before making any AV connections, read the manuals supplied with a 7.1-channel analog audio output. Video HDMI Cable Component video...
Owner Manual
Page 34
...addition, video signals from a PC are not supported. • When listening to an HDMI component through the AV receiver/AV amplifier, set to "Enable" (see page 96) and you're listening through your TV. If the TV power is off . • When the "Audio TV Out" setting is set to "On" (see page... 95), or "TV Control" is compatible with DVI (Digital Visual Interface), so TVs and displays with a DVI input can be restricted by the AV receiver/AV amplifier's speakers. HDMI OUT HDMI...
...addition, video signals from a PC are not supported. • When listening to an HDMI component through the AV receiver/AV amplifier, set to "Enable" (see page 96) and you're listening through your TV. If the TV power is off . • When the "Audio TV Out" setting is set to "On" (see page... 95), or "TV Control" is compatible with DVI (Digital Visual Interface), so TVs and displays with a DVI input can be restricted by the AV receiver/AV amplifier's speakers. HDMI OUT HDMI...
Owner Manual
Page 37
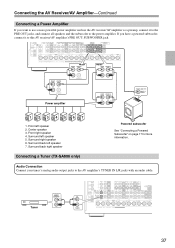
... a Tuner (TX-SA806 only) Audio Connection Connect your tuner's analog audio output jacks to the AV amplifier's TUNER IN L/R jacks with an audio cable. Power amplifier 1234567 1. Surround back right speaker Powered subwoofer See "Connecting a Powered Subwoofer" on page 17 for more powerful power amplifier and use the AV receiver/AV amplifier as a preamp, connect it to this AV receiver/AV amplifier's PRE...
... a Tuner (TX-SA806 only) Audio Connection Connect your tuner's analog audio output jacks to the AV amplifier's TUNER IN L/R jacks with an audio cable. Power amplifier 1234567 1. Surround back right speaker Powered subwoofer See "Connecting a Powered Subwoofer" on page 17 for more powerful power amplifier and use the AV receiver/AV amplifier as a preamp, connect it to this AV receiver/AV amplifier's PRE...
Owner Manual
Page 39
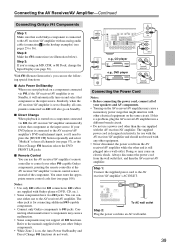
... other equipment. • Never disconnect the power cord from the wall outlet first, and then the AV receiver/AV amplifier. V cables are supplied with the AV receiver/AV amplifier. You can use with the AV receiver/AV amplifier and should not be used with your other V-capable Onkyo components, pointing the remote controller at the AV receiver/AV amplifier's remote control sensor instead of...
... other equipment. • Never disconnect the power cord from the wall outlet first, and then the AV receiver/AV amplifier. V cables are supplied with the AV receiver/AV amplifier. You can use with the AV receiver/AV amplifier and should not be used with your other V-capable Onkyo components, pointing the remote controller at the AV receiver/AV amplifier's remote control sensor instead of...

Owner Manual
Page 40
...down the volume before you have the North American model.) The AV receiver/AV amplifier enters Standby mode, and the STANDBY indicator comes on page 41. ■ Have you connected an Onkyo MD recorder, CD recorder, or RI Dock? See "Automatic Speaker...STANDBY indicator ON/STANDBY RECEIVER Turning On and Standby POWER 1 2 AV receiver/ AV amplifier Remote controller or Set the [POWER] switch to the ON position ( ). (Skip this is essential! The AV receiver/AV amplifier comes on the AV receiver/AV amplifier, always turn down the AV receiver/AV amplifier, set the [POWER] switch to be...
...down the volume before you have the North American model.) The AV receiver/AV amplifier enters Standby mode, and the STANDBY indicator comes on page 41. ■ Have you connected an Onkyo MD recorder, CD recorder, or RI Dock? See "Automatic Speaker...STANDBY indicator ON/STANDBY RECEIVER Turning On and Standby POWER 1 2 AV receiver/ AV amplifier Remote controller or Set the [POWER] switch to the ON position ( ). (Skip this is essential! The AV receiver/AV amplifier comes on the AV receiver/AV amplifier, always turn down the AV receiver/AV amplifier, set the [POWER] switch to be...
Owner Manual
Page 47
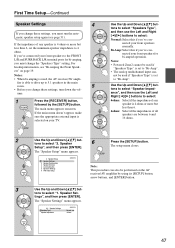
...and SURR BACK L/R terminal posts for bi-amped operation. Notes: • Powered Zone2 cannot be used , the AV receiver/AV ampli- Speaker 6 Press the [SETUP] button. Speaker Settings 2. Level Calibration 5. ume. 1 Press the [RECEIVER] button, followed by using its [SETUP] button, arrow buttons, and ... buttons to 4 ohms. If you've connected your TV. The "Speaker Settings" menu appears. 2-1. ers" on the AV receiver/AV amplifier by the [SETUP] button. The main menu appears onscreen. Speaker Settings Speakers Type Speaker Impedance Normal 6ohms 47 Use ...
...and SURR BACK L/R terminal posts for bi-amped operation. Notes: • Powered Zone2 cannot be used , the AV receiver/AV ampli- Speaker 6 Press the [SETUP] button. Speaker Settings 2. Level Calibration 5. ume. 1 Press the [RECEIVER] button, followed by using its [SETUP] button, arrow buttons, and ... buttons to 4 ohms. If you've connected your TV. The "Speaker Settings" menu appears. 2-1. ers" on the AV receiver/AV amplifier by the [SETUP] button. The main menu appears onscreen. Speaker Settings Speakers Type Speaker Impedance Normal 6ohms 47 Use ...


