
Owner Manual
Page 3
.... 5. If this equipment does cause harmful interference to radio or television reception, which the receiver is used in a particular installation. AC Fuse-The AC fuse inside this unit for a...be exposed to which can be sure to provide reasonable protection against harmful interference in your Onkyo dealer. 3. Modèle pour les Canadien REMARQUE: CET APPAREIL NUMÉRIQUE DE... EST CONFORME À LA NORME NMB-003 DU CANADA. Preventing Hearing Loss Caution Excessive sound pressure from that the voltage in a residential installation. models FCC Information for User CAUTION:...
.... 5. If this equipment does cause harmful interference to radio or television reception, which the receiver is used in a particular installation. AC Fuse-The AC fuse inside this unit for a...be exposed to which can be sure to provide reasonable protection against harmful interference in your Onkyo dealer. 3. Modèle pour les Canadien REMARQUE: CET APPAREIL NUMÉRIQUE DE... EST CONFORME À LA NORME NMB-003 DU CANADA. Preventing Hearing Loss Caution Excessive sound pressure from that the voltage in a residential installation. models FCC Information for User CAUTION:...
Owner Manual
Page 16
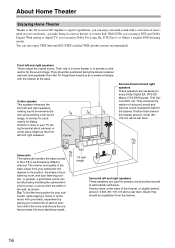
... Surround left and right speakers. With DVDs you can enjoy Dolby Pro Logic IIx, DTS Neo:6, or Onkyo's original DSP listening modes. Subwoofer The subwoofer handles the bass sounds of the wall, as the front left and right speakers These speakers are necessary to enjoy Dolby Digital ... Ideally they should be obtained by placing your listening position. About Home Theater Enjoying Home Theater Thanks to the AV receiver/AV amplifier's superb capabilities, you can enjoy surround sound with the listener at the apex. With analog or digital TV, you can also enjoy THX Surround EX (THX...
... Surround left and right speakers. With DVDs you can enjoy Dolby Pro Logic IIx, DTS Neo:6, or Onkyo's original DSP listening modes. Subwoofer The subwoofer handles the bass sounds of the wall, as the front left and right speakers These speakers are necessary to enjoy Dolby Digital ... Ideally they should be obtained by placing your listening position. About Home Theater Enjoying Home Theater Thanks to the AV receiver/AV amplifier's superb capabilities, you can enjoy surround sound with the listener at the apex. With analog or digital TV, you can also enjoy THX Surround EX (THX...

Owner Manual
Page 17
...above table. Subwoofer 2. Surround right speaker 7. If your surround sound system, you need to set the speaker settings. Powered subwoofer LINE INPUT LINE INPUT Attaching the Speaker Labels The AV receiver/AV amplifier's positive (+) speaker terminals are all red (the negative ...speaker terminal. Front right speaker 5. Dipole speakers typically have . Then all black). Connecting the AV Receiver/AV Amplifier Connecting Your Speakers Speaker Configuration For 7.1-channel surround-sound playback, you need to do this automatically (see page 51) or manually (see page 75...
...above table. Subwoofer 2. Surround right speaker 7. If your surround sound system, you need to set the speaker settings. Powered subwoofer LINE INPUT LINE INPUT Attaching the Speaker Labels The AV receiver/AV amplifier's positive (+) speaker terminals are all red (the negative ...speaker terminal. Front right speaker 5. Dipole speakers typically have . Then all black). Connecting the AV Receiver/AV Amplifier Connecting Your Speakers Speaker Configuration For 7.1-channel surround-sound playback, you need to do this automatically (see page 51) or manually (see page 75...
Owner Manual
Page 18
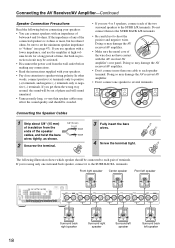
...ohms or more than 6 ohms, be sure to set the minimum speaker impedance to short the positive and negative wires. Doing so may damage the AV receiver/AV amplifier. • Don't connect one speaker to the SURR BACK L terminals. If you get them to the SURR BACK L/R terminals. •.... 4 Screw the terminal tight. Do not connect them the wrong way around, the sound will be out of phase and will sound unnatural. • Unnecessarily long, or very thin speaker cables may affect the sound quality and should be connected to negative (-) terminals. Connecting the Speaker Cables 1 Strip ...
...ohms or more than 6 ohms, be sure to set the minimum speaker impedance to short the positive and negative wires. Doing so may damage the AV receiver/AV amplifier. • Don't connect one speaker to the SURR BACK L terminals. If you get them to the SURR BACK L/R terminals. •.... 4 Screw the terminal tight. Do not connect them the wrong way around, the sound will be out of phase and will sound unnatural. • Unnecessarily long, or very thin speaker cables may affect the sound quality and should be connected to negative (-) terminals. Connecting the Speaker Cables 1 Strip ...

Owner Manual
Page 22
...- Note: The AV receiver/AV amplifier does not support SCART plugs. 22 Connecting the AV Receiver/AV Amplifier-Continued About AV Connections • Before making any AV connections, read the manuals supplied with a 7.1-channel analog audio output. Jack Description Offers the best sound quality and allows ... virtually all the way to enjoy surround sound (e.g., Dolby Digital, DTS). Push plugs in all AV components. And use yellow plugs to connect composite video inputs and outputs. Optical Digital Jacks The AV receiver/AV amplifier's optical digital jacks have shutter-type...
...- Note: The AV receiver/AV amplifier does not support SCART plugs. 22 Connecting the AV Receiver/AV Amplifier-Continued About AV Connections • Before making any AV connections, read the manuals supplied with a 7.1-channel analog audio output. Jack Description Offers the best sound quality and allows ... virtually all the way to enjoy surround sound (e.g., Dolby Digital, DTS). Push plugs in all AV components. And use yellow plugs to connect composite video inputs and outputs. Optical Digital Jacks The AV receiver/AV amplifier's optical digital jacks have shutter-type...
Owner Manual
Page 34
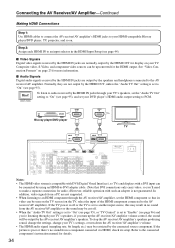
...or "TV Control" is set to the connected component's instruction manual for details. 34 To stop the AV receiver/AV amplifier's speakers producing sound, change the settings, change your TV's settings, or turn down the AV receiver/AV amplifier's volume. • The HDMI audio signal (sampling rate, bit length, etc.) may be cut..."On" (see page 95). If the picture is not guaranteed. See "Video Connection Formats" on . In addition, video signals from the AV receiver/AV amplifier or the sound may be seen on the TV screen (on your TV. Step 2: Assign each HDMI IN to an input selector in no...
...or "TV Control" is set to the connected component's instruction manual for details. 34 To stop the AV receiver/AV amplifier's speakers producing sound, change the settings, change your TV's settings, or turn down the AV receiver/AV amplifier's volume. • The HDMI audio signal (sampling rate, bit length, etc.) may be cut..."On" (see page 95). If the picture is not guaranteed. See "Video Connection Formats" on . In addition, video signals from the AV receiver/AV amplifier or the sound may be seen on the TV screen (on your TV. Step 2: Assign each HDMI IN to an input selector in no...
Owner Manual
Page 51
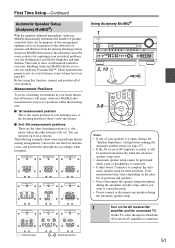
...a listening environment in both the frequency and time domain. Total measurement time varies depending on the AV receiver/AV amplifier and the connected TV. The result is clear, well-balanced sound for three positions. You can measure up to six positions within the listening area. ■ ...crossover frequencies to cancel the setup. • Do not connect or disconnect any volume level (see page 47). • If the AV receiver/AV amplifier is muted, it will sit). Choose the one listener. ■ 2nd−6th measurement positions These are the other listening positions ...
...a listening environment in both the frequency and time domain. Total measurement time varies depending on the AV receiver/AV amplifier and the connected TV. The result is clear, well-balanced sound for three positions. You can measure up to six positions within the listening area. ■ ...crossover frequencies to cancel the setup. • Do not connect or disconnect any volume level (see page 47). • If the AV receiver/AV amplifier is muted, it will sit). Choose the one listener. ■ 2nd−6th measurement positions These are the other listening positions ...
Owner Manual
Page 55
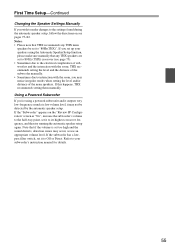
... notice irregular results when setting the level and/or distance of the main speakers. Note that if the volume is set too high and the sound distorts, detection issues may not be set up your subwoofer's instruction manual for details. 55 First Time Setup-Continued Changing the Speaker Settings Manually If... automatic speaker setup again. If this happens, THX recommends setting them manually. Refer to your speakers using a powered subwoofer and it outputs very low-frequency sound at a low volume level, it to Off or Direct.
... notice irregular results when setting the level and/or distance of the main speakers. Note that if the volume is set too high and the sound distorts, detection issues may not be set up your subwoofer's instruction manual for details. 55 First Time Setup-Continued Changing the Speaker Settings Manually If... automatic speaker setup again. If this happens, THX recommends setting them manually. Refer to your speakers using a powered subwoofer and it outputs very low-frequency sound at a low volume level, it to Off or Direct.

Owner Manual
Page 57
... to adjust. ■ Bass You can boost or cut low-frequency sounds output by the front speakers from the multichannel DVD input will now be displayed for the DVD input source. Remote controller Press the [RECEIVER] button, and then press the [DIMMER] button repeatedly to cycle through... & Treble You can typically be used if "Speakers Type" is displayed. Displaying Source Information You can use the AV receiver/AV amplifier's [DIMMER] button (North American models and TX-SA806 only). 57 If the input signal is PCM, the sampling frequency is set to the speakers as follows. See...
... to adjust. ■ Bass You can boost or cut low-frequency sounds output by the front speakers from the multichannel DVD input will now be displayed for the DVD input source. Remote controller Press the [RECEIVER] button, and then press the [DIMMER] button repeatedly to cycle through... & Treble You can typically be used if "Speakers Type" is displayed. Displaying Source Information You can use the AV receiver/AV amplifier's [DIMMER] button (North American models and TX-SA806 only). 57 If the input signal is PCM, the sampling frequency is set to the speakers as follows. See...
Owner Manual
Page 63
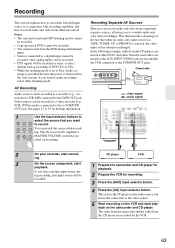
... source. 5 Start recording on the VCR and start playback on recording. See pages 23 to 39 for the video circuit. ing. The AV receiver/AV amplifier's MASTER VOLUME control has no image is provided because the power is turned off for hookup information. 1 Use the input selector buttons ...with recording capability, and how to record audio and video from the CD player are recorded by the VCR. 63 Notes: • The surround sound and DSP listening modes cannot be recorded. • Copy-protected DVDs cannot be recorded. • You cannot record from the DVD analog multichannel input...
... source. 5 Start recording on the VCR and start playback on recording. See pages 23 to 39 for the video circuit. ing. The AV receiver/AV amplifier's MASTER VOLUME control has no image is provided because the power is turned off for hookup information. 1 Use the input selector buttons ...with recording capability, and how to record audio and video from the CD player are recorded by the VCR. 63 Notes: • The surround sound and DSP listening modes cannot be recorded. • Copy-protected DVDs cannot be recorded. • You cannot record from the DVD analog multichannel input...

Owner Manual
Page 70
... PCM or DSD output on your SACD player, in some source formats. *4. This may be selected with some cases, selecting PCM will provide the best sound quality. DSD sources are no surround back speakers, or Powered Zone 2 is not a malfunction. 70
... PCM or DSD output on your SACD player, in some source formats. *4. This may be selected with some cases, selecting PCM will provide the best sound quality. DSD sources are no surround back speakers, or Powered Zone 2 is not a malfunction. 70

Owner Manual
Page 71
...HD DVD, this is for information on both the AV receiver/AV amplifier and the remote controller). It can also be selected. Using the Listening Modes-Continued About the Listening Modes The AV receiver/AV amplifier's listening modes can transform your listening room into... a movie theater or concert hall, with DVDs or other sources containing multiplexed audio, such as karaoke DVDs. The LISTENING MODE button illustration shows that listening modes can also benefit from the input source is output by sound...
...HD DVD, this is for information on both the AV receiver/AV amplifier and the remote controller). It can also be selected. Using the Listening Modes-Continued About the Listening Modes The AV receiver/AV amplifier's listening modes can transform your listening room into... a movie theater or concert hall, with DVDs or other sources containing multiplexed audio, such as karaoke DVDs. The LISTENING MODE button illustration shows that listening modes can also benefit from the input source is output by sound...

Owner Manual
Page 72
... channels provide better spatial imaging and 360-degree sound localization, perfect for HD DVD Sub Audio and Blu-ray Secondary Audio. DTS-HD High Resolution Audio Button: Developed for true 6.1/ 7.1-channel playback. For the signals supported by the AV receiver/AV amplifier, see page 69. DTS 96/24 Button... DVDs that bear the DTS 96/24 logo. This is the latest multichannel audio format from DTS. For the signals supported by the AV receiver/AV amplifier, see page 67. 5.1-channel source + Dolby PLIIx Music Button: These modes use the Dolby Pro Logic IIx Music mode to ...
... channels provide better spatial imaging and 360-degree sound localization, perfect for HD DVD Sub Audio and Blu-ray Secondary Audio. DTS-HD High Resolution Audio Button: Developed for true 6.1/ 7.1-channel playback. For the signals supported by the AV receiver/AV amplifier, see page 69. DTS 96/24 Button... DVDs that bear the DTS 96/24 logo. This is the latest multichannel audio format from DTS. For the signals supported by the AV receiver/AV amplifier, see page 67. 5.1-channel source + Dolby PLIIx Music Button: These modes use the Dolby Pro Logic IIx Music mode to ...

Owner Manual
Page 73
...Matching active. • THX Ultra2 Cinema Button: This mode expands 5.1-channel sources for background music, this mode creates a lively sound field with music. Onkyo Original DSP Modes Mono Movie Button: This mode is often mixed similarly to widen the stereo image, and simulates the natural ...reverberation of where you can enjoy a virtual 5.1 surround sound even with little or no natural reverb. 73 THX Modes carefully optimize...
...Matching active. • THX Ultra2 Cinema Button: This mode expands 5.1-channel sources for background music, this mode creates a lively sound field with music. Onkyo Original DSP Modes Mono Movie Button: This mode is often mixed similarly to widen the stereo image, and simulates the natural ...reverberation of where you can enjoy a virtual 5.1 surround sound even with little or no natural reverb. 73 THX Modes carefully optimize...

Owner Manual
Page 75
...function (see page 51). Specify "Full Band" for speakers that THX recommends any THX speakers are connected to "80Hz(THX)". Sounds below the crossover fre- Use the Up and Down [R]/[X] buttons to select "2. Speaker Setup 1. Speaker Configuration Subwoofer Yes Front ... your speakers using the Automatic Speaker Setup function. Here you can check the settings made by the Automatic Speaker Setup function, or set to the AV receiver/AV amplifier. quency will be specified: "Full Band", "40Hz", "50Hz", "60Hz", "70Hz", "80Hz(THX)", "90Hz", "100Hz", "120Hz", "150Hz", ...
...function (see page 51). Specify "Full Band" for speakers that THX recommends any THX speakers are connected to "80Hz(THX)". Sounds below the crossover fre- Use the Up and Down [R]/[X] buttons to select "2. Speaker Setup 1. Speaker Configuration Subwoofer Yes Front ... your speakers using the Automatic Speaker Setup function. Here you can check the settings made by the Automatic Speaker Setup function, or set to the AV receiver/AV amplifier. quency will be specified: "Full Band", "40Hz", "50Hz", "60Hz", "70Hz", "80Hz(THX)", "90Hz", "100Hz", "120Hz", "150Hz", ...

Owner Manual
Page 77
... automatically by the Automatic Speaker Setup function (see page 51). This function can be used to select: On: Double Bass function on the AV receiver/AV amplifier by feeding bass sounds from the front left and right bass also goes to the subwoofer. cies can be performed on (default). Front left and right channels...
... automatically by the Automatic Speaker Setup function (see page 51). This function can be used to select: On: Double Bass function on the AV receiver/AV amplifier by feeding bass sounds from the front left and right bass also goes to the subwoofer. cies can be performed on (default). Front left and right channels...

Owner Manual
Page 78
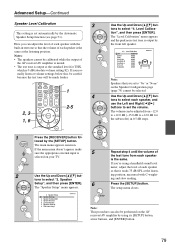
...Speaker Distance 4. Note: Speakers that the sound from each speaker arrives at the listener's ears as the sound designer intended. 2 5 3-7 3, 4 2, 8 1 Measure and make sure the appropriate external input is set from 0.5 to the listening position. 6 2 Press the [RECEIVER] button fol- Press the [SETUP] ... Down [R]/[X] buttons to select "Unit", and then use the Left and Right [F]/[S] buttons to select "2. Can be performed on the AV receiver/AV amplifier by the [SETUP] button. THX Audio Setup 8 Repeat step 6 for all speakers. Equalizer Settings 6. The setup menu closes....
...Speaker Distance 4. Note: Speakers that the sound from each speaker arrives at the listener's ears as the sound designer intended. 2 5 3-7 3, 4 2, 8 1 Measure and make sure the appropriate external input is set from 0.5 to the listening position. 6 2 Press the [RECEIVER] button fol- Press the [SETUP] ... Down [R]/[X] buttons to select "Unit", and then use the Left and Right [F]/[S] buttons to select "2. Can be performed on the AV receiver/AV amplifier by the [SETUP] button. THX Audio Setup 8 Repeat step 6 for all speakers. Equalizer Settings 6. The setup menu closes....
Owner Manual
Page 79
... 2 Use the Up and Down [R]/[X] but- Speaker Setup 1. Speaker Settings 2. Speaker Configuration 3. Here you set automatically by using a handheld sound level meter, adjust the level of each speaker is the same at the standard level for the subwoofer) in test tone so that you can...[F]/[S] buttons to set the volume. If the main menu doesn't appear, make sure the appropriate external input is 5 selected on the AV receiver/AV amplifier by the Automatic Speaker Setup function (see page 51). Equalizer Settings 6. The volume can adjust the level of each speaker so that...
... 2 Use the Up and Down [R]/[X] but- Speaker Setup 1. Speaker Settings 2. Speaker Configuration 3. Here you set automatically by using a handheld sound level meter, adjust the level of each speaker is the same at the standard level for the subwoofer) in test tone so that you can...[F]/[S] buttons to set the volume. If the main menu doesn't appear, make sure the appropriate external input is 5 selected on the AV receiver/AV amplifier by the Automatic Speaker Setup function (see page 51). Equalizer Settings 6. The volume can adjust the level of each speaker so that...
Owner Manual
Page 81
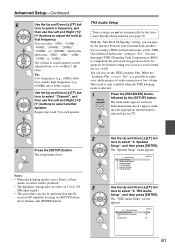
... then apply THX's Boundary Gain Compensation (BGC) to adjust the level at each speaker. You can be performed on the AV receiver/AV amplifier by using a THX-certified subwoofer, set automatically by the [SETUP] button. This result is only available when the ...Loudness Plus On 81 The volume at that frequency. Speaker Setup 1. The "THX Audio Setup" screen appears. 2-6. high frequencies (e.g., 6300Hz) affect treble sounds. 7 Use the Up and Down [R]/[X] but - Speaker Setup", and then press [ENTER]. The "Speaker Setup" menu appears. 2. Speaker Configuration 3....
... then apply THX's Boundary Gain Compensation (BGC) to adjust the level at each speaker. You can be performed on the AV receiver/AV amplifier by using a THX-certified subwoofer, set automatically by the [SETUP] button. This result is only available when the ...Loudness Plus On 81 The volume at that frequency. Speaker Setup 1. The "THX Audio Setup" screen appears. 2-6. high frequencies (e.g., 6300Hz) affect treble sounds. 7 Use the Up and Down [R]/[X] but - Speaker Setup", and then press [ENTER]. The "Speaker Setup" menu appears. 2. Speaker Configuration 3....

Owner Manual
Page 82
...] button, tons to turn off BGC. THX Loudness Plus settings for the tonal and spatial shifts that certain sound elements can be performed on the AV receiver/AV amplifier by intelligently adjusting ambient surround channel 6 Use the Up and Down [R]/[X] buttons to turn off Loud- ... new volume control tech- THX Games modes are more than 4 feet (1.2 m) apart. This procedure can now experi- Select2 Plus™ Certified receivers. round back speakers: ness Plus. < 1ft (< 0.3m): Select this if your surround back On: Select this if your sur- Select2 Subwoofer...
...] button, tons to turn off BGC. THX Loudness Plus settings for the tonal and spatial shifts that certain sound elements can be performed on the AV receiver/AV amplifier by intelligently adjusting ambient surround channel 6 Use the Up and Down [R]/[X] buttons to turn off Loud- ... new volume control tech- THX Games modes are more than 4 feet (1.2 m) apart. This procedure can now experi- Select2 Plus™ Certified receivers. round back speakers: ness Plus. < 1ft (< 0.3m): Select this if your surround back On: Select this if your sur- Select2 Subwoofer...


