Owner Manual
Page 4
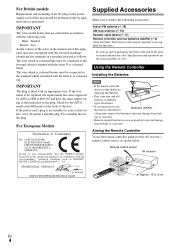
...European Models Declaration of the product name indicates the color. Remote control sensor AV receiver Approx. 16 ft. (5 m) En 4 MIYAGI ONKYO EUROPE ELECTRONICS GmbH Supplied Accessories Make sure you intend not to the terminal which is marked with the letter N or coloured black. Using...appropriate fuse. Fit a suitable fuse in compliance with the following accessories: Indoor FM antenna (➔ 16) AM loop antenna (➔ 16) Speaker cable labels (➔ 11) Remote controller and two batteries (AA/R6) (➔ 4) (Note for China: The battery for the remote ...
...European Models Declaration of the product name indicates the color. Remote control sensor AV receiver Approx. 16 ft. (5 m) En 4 MIYAGI ONKYO EUROPE ELECTRONICS GmbH Supplied Accessories Make sure you intend not to the terminal which is marked with the letter N or coloured black. Using...appropriate fuse. Fit a suitable fuse in compliance with the following accessories: Indoor FM antenna (➔ 16) AM loop antenna (➔ 16) Speaker cable labels (➔ 11) Remote controller and two batteries (AA/R6) (➔ 4) (Note for China: The battery for the remote ...
Owner Manual
Page 5
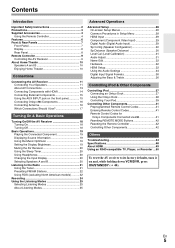
... B 10 Enjoying Home Theater 10 Connections Connecting the AV Receiver 11 Connecting Your Speakers 11 About AV Connections 13 Connecting Components with HDMI 14 Connecting External Components 15 Using the AUX INPUT jack on the front panel 15 Connecting Onkyo V Components 16 Connecting Antenna 16 Which Connections Should I Use 17 Turning On...
... B 10 Enjoying Home Theater 10 Connections Connecting the AV Receiver 11 Connecting Your Speakers 11 About AV Connections 13 Connecting Components with HDMI 14 Connecting External Components 15 Using the AUX INPUT jack on the front panel 15 Connecting Onkyo V Components 16 Connecting Antenna 16 Which Connections Should I Use 17 Turning On...
Owner Manual
Page 6
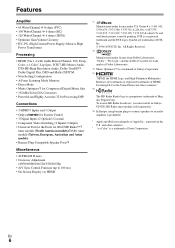
... iPod*/HD Radio™*5 tuner module (North American models)/DAB+ tuner module (Taiwan, European, Australian and Asian models) • Banana Plug-Compatible Speaker Posts*6 Miscellaneous • 40 FM/AM Presets • Crossover Adjustment (40/50/60/80/100/120/150/200 Hz) • A/V Sync Control... in the United States and other U.S. To receive HD Radio broadcasts, you must install an Onkyo UP-HT1 HD Radio tuner module (sold separately). *6 In Europe, using banana plugs to connect speakers to 100 ms) • On-Screen Display via HDMI *1 Manufactured under license under license ...
... iPod*/HD Radio™*5 tuner module (North American models)/DAB+ tuner module (Taiwan, European, Australian and Asian models) • Banana Plug-Compatible Speaker Posts*6 Miscellaneous • 40 FM/AM Presets • Crossover Adjustment (40/50/60/80/100/120/150/200 Hz) • A/V Sync Control... in the United States and other U.S. To receive HD Radio broadcasts, you must install an Onkyo UP-HT1 HD Radio tuner module (sold separately). *6 In Europe, using banana plugs to connect speakers to 100 ms) • On-Screen Display via HDMI *1 Manufactured under license under license ...
Owner Manual
Page 7
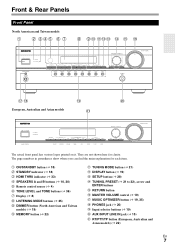
B ON/STANDBY button (➔ 18) C STANDBY indicator (➔ 18) D HDMI THRU indicator (➔ 33) E SPEAKERS A and B buttons (➔ 10, 20) F Remote control sensor (➔ 4) G TONE LEVEL and TONE buttons (➔ 36) H Display (➔ 8) I JK LMN O P Q RS T U European, Australian and Asian ...
B ON/STANDBY button (➔ 18) C STANDBY indicator (➔ 18) D HDMI THRU indicator (➔ 33) E SPEAKERS A and B buttons (➔ 10, 20) F Remote control sensor (➔ 4) G TONE LEVEL and TONE buttons (➔ 36) H Display (➔ 8) I JK LMN O P Q RS T U European, Australian and Asian ...
Owner Manual
Page 8
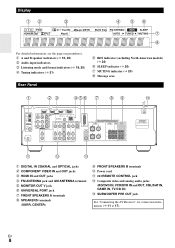
B A and B speaker indicators (➔ 10, 20) C Audio input indicators D Listening mode and format indicators (➔ 19, 25) E Tuning indicators (➔ 21) Rear Panel F RDS indicator (excluding North ... and OUT jacks E FM ANTENNA jack and AM ANTENNA terminal F MONITOR OUT V jack G UNIVERSAL PORT jack H FRONT SPEAKERS A terminals I For detailed information, see the pages in parentheses. Display BC D E FG H I SPEAKERS terminals (SURR, CENTER) J FRONT SPEAKERS B terminals K Power cord L V REMOTE CONTROL jack M Composite video and analog audio jacks (BD/DVD IN, VCR/DVR...
B A and B speaker indicators (➔ 10, 20) C Audio input indicators D Listening mode and format indicators (➔ 19, 25) E Tuning indicators (➔ 21) Rear Panel F RDS indicator (excluding North ... and OUT jacks E FM ANTENNA jack and AM ANTENNA terminal F MONITOR OUT V jack G UNIVERSAL PORT jack H FRONT SPEAKERS A terminals I For detailed information, see the pages in parentheses. Display BC D E FG H I SPEAKERS terminals (SURR, CENTER) J FRONT SPEAKERS B terminals K Power cord L V REMOTE CONTROL jack M Composite video and analog audio jacks (BD/DVD IN, VCR/DVR...
Owner Manual
Page 10
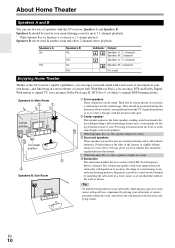
... B You can use two sets of wall position D E Speakers B: Sub Room B Front speakers These output the overall sound. With Blu-ray Discs, you can enjoy Dolby Pro Logic II, DTS Neo:6, or Onkyo's original DSP listening modes. With analog or digital TV, you ...of movement in your TV facing forward at about 2 to 3 feet (60 to 2.1-channel playback. Speakers A On Off Speakers B On Off On Off Indicator AB A B Output Speakers A: 2.1 channels Speakers B: 2 channels Speakers A: 5.1 channels Speakers B: 2 channels No sound Enjoying Home Theater Thanks to create a triangle, with a real sense of...
... B You can use two sets of wall position D E Speakers B: Sub Room B Front speakers These output the overall sound. With Blu-ray Discs, you can enjoy Dolby Pro Logic II, DTS Neo:6, or Onkyo's original DSP listening modes. With analog or digital TV, you ...of movement in your TV facing forward at about 2 to 3 feet (60 to 2.1-channel playback. Speakers A On Off Speakers B On Off On Off Indicator AB A B Output Speakers A: 2.1 channels Speakers B: 2 channels Speakers A: 5.1 channels Speakers B: 2 channels No sound Enjoying Home Theater Thanks to create a triangle, with a real sense of...
Owner Manual
Page 11
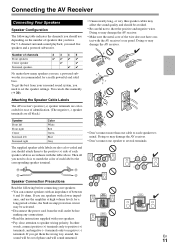
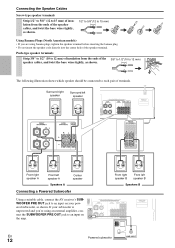
...Surround left Surround right Color White Red Green Blue Gray • Don't connect more than one speaker to several terminals. Connecting the AV Receiver Connecting Your Speakers Speaker Configuration The following before making any connections. • Read the instructions supplied with the table above....; 30). En 11 To get them to the positive (+) side of identification. (The negative (-) speaker terminals are also color-coded and you need to set the speaker settings. For 5.1-channel surround-sound playback, you should be activated. • Disconnect the power cord ...
...Surround left Surround right Color White Red Green Blue Gray • Don't connect more than one speaker to several terminals. Connecting the AV Receiver Connecting Your Speakers Speaker Configuration The following before making any connections. • Read the instructions supplied with the table above....; 30). En 11 To get them to the positive (+) side of identification. (The negative (-) speaker terminals are also color-coded and you need to set the speaker settings. For 5.1-channel surround-sound playback, you should be activated. • Disconnect the power cord ...
Owner Manual
Page 12
... Strip 1/2" to 5/8" (12 to 15 mm) of insulation from the ends of the 3/8" to 1/2"(10 to 12 mm) speaker cables, and twist the bare wires tightly, as shown. Front right speaker B Front left speaker A Center speaker Speakers A Connecting a Powered Subwoofer Using a suitable cable, connect the AV receiver's SUBWOOFER PRE OUT jack to each pair of...
... Strip 1/2" to 5/8" (12 to 15 mm) of insulation from the ends of the 3/8" to 1/2"(10 to 12 mm) speaker cables, and twist the bare wires tightly, as shown. Front right speaker B Front left speaker A Center speaker Speakers A Connecting a Powered Subwoofer Using a suitable cable, connect the AV receiver's SUBWOOFER PRE OUT jack to each pair of...
Owner Manual
Page 13
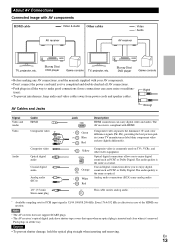
... the HDMI connection. About AV Connections Connected image with HDMI. tions). • To prevent interference, keep audio and video cables away from power cords and speaker cables. Component video separates the luminance (Y) and color difference signals (PR, PB), providing the best picture quality (some TV manufacturers label their component video sockets...
... the HDMI connection. About AV Connections Connected image with HDMI. tions). • To prevent interference, keep audio and video cables away from power cords and speaker cables. Component video separates the luminance (Y) and color difference signals (PR, PB), providing the best picture quality (some TV manufacturers label their component video sockets...
Owner Manual
Page 14
...TV is set to "On" (➔ 33) to the appropriate jacks. To stop the AV receiver's speakers producing sound, change the settings, change your components to hear from the AV receiver's speakers, too. If the TV power is off or the TV is set to the AV receiver). Connecting Components... (➔ 29). Game console TV, projector, etc. Assignable ✔ ✔ ✔ Refer to hear from your TV's speakers, by controlling the AV receiver's volume, the AV receiver's speakers will be seen on the TV screen (on the TV, select the input of the AV receiver. En 14 Satellite, cable...
...TV is set to "On" (➔ 33) to the appropriate jacks. To stop the AV receiver's speakers producing sound, change the settings, change your components to hear from the AV receiver's speakers, too. If the TV power is off or the TV is set to the AV receiver). Connecting Components... (➔ 29). Game console TV, projector, etc. Assignable ✔ ✔ ✔ Refer to hear from your TV's speakers, by controlling the AV receiver's volume, the AV receiver's speakers will be seen on the TV screen (on the TV, select the input of the AV receiver. En 14 Satellite, cable...
Owner Manual
Page 16
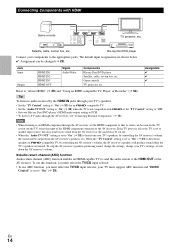
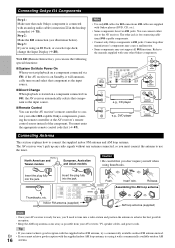
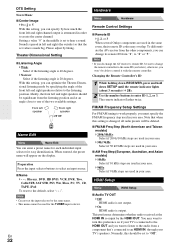
...Once your AV receiver is ready for use the AV receiver's remote controller to V jacks. Connecting Onkyo V Components Step 1: Make sure that each Onkyo component is connected with your other Onkyo components. Insert the plug fully into the jack. You must connect the antenna to the manuals ...American and Taiwan models European, Australian and Asian models Caution • Be careful that component as possible from your AV receiver, TV, speaker cables, and power cords. Tip • If you cannot achieve good reception with the supplied indoor FM antenna, try using it will ...
...Once your AV receiver is ready for use the AV receiver's remote controller to V jacks. Connecting Onkyo V Components Step 1: Make sure that each Onkyo component is connected with your other Onkyo components. Insert the plug fully into the jack. You must connect the antenna to the manuals ...American and Taiwan models European, Australian and Asian models Caution • Be careful that component as possible from your AV receiver, TV, speaker cables, and power cords. Tip • If you cannot achieve good reception with the supplied indoor FM antenna, try using it will ...

Owner Manual
Page 20
..."DOCK" or "TAPE". Press RECEIVER followed by SLEEP repeatedly to 2.1 in the PHONES jack, the speakers are reduced to select the required sleep time. Changing the Input Display When you connect an V-capable Onkyo component, you connect a pair of headphones, the listening mode is set to Stereo, unless it's...VCR/DVR input selector, but not at the same time. • Enter the appropriate remote control code before connecting your main listening room and Speakers B for 2-channel stereo playback in another room. Tip En • Alternatively, you need to turn down TV/CD, GAME or VCR/DVR...
..."DOCK" or "TAPE". Press RECEIVER followed by SLEEP repeatedly to 2.1 in the PHONES jack, the speakers are reduced to select the required sleep time. Changing the Input Display When you connect an V-capable Onkyo component, you connect a pair of headphones, the listening mode is set to Stereo, unless it's...VCR/DVR input selector, but not at the same time. • Enter the appropriate remote control code before connecting your main listening room and Speakers B for 2-channel stereo playback in another room. Tip En • Alternatively, you need to turn down TV/CD, GAME or VCR/DVR...
Owner Manual
Page 25
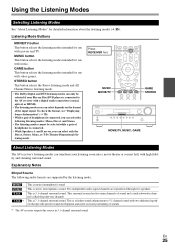
...point-one channel). Two independent audio signal channels are reproduced through two speakers. Listening Mode Buttons MOVIE/TV button This button selects the listening modes intended for use with two additional speakers that provide greater sound envelopment and more accurate positioning of sounds. ... sound. This surround system has five main channels of the input signal. Press RECEIVER first. This is connected. • While Speakers A and B are supported by the listening mode. MUSIC button This button selects the listening modes intended for detailed information about the...
...point-one channel). Two independent audio signal channels are reproduced through two speakers. Listening Mode Buttons MOVIE/TV button This button selects the listening modes intended for use with two additional speakers that provide greater sound envelopment and more accurate positioning of sounds. ... sound. This surround system has five main channels of the input signal. Press RECEIVER first. This is connected. • While Speakers A and B are supported by the listening mode. MUSIC button This button selects the listening modes intended for detailed information about the...
Owner Manual
Page 26
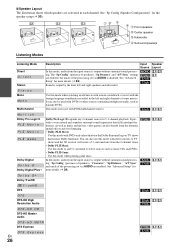
... as music CDs and DVDs. • Dolby PLII Game Use this mode to add 5.1 surround to stereo sources such as karaoke DVDs. See "Sp Config (Speaker Configuration)" for more details (➔ 28). % 9$ ' Do l b y D+ Dolby TrueHD T r u eHD DTS % 9$ DTS DTS-HD High Resolution Audio DTS -HD HR ...Logic II expands any 2-channel source for more details (➔ 28). ' Sound is output without surround-sound processing. "Sp Config" (presence of speakers), "Crossover", "Sp Distance", "A/V Sync" and much of some movies. As well as music and movies, video games can also be used with...
... as music CDs and DVDs. • Dolby PLII Game Use this mode to add 5.1 surround to stereo sources such as karaoke DVDs. See "Sp Config (Speaker Configuration)" for more details (➔ 28). % 9$ ' Do l b y D+ Dolby TrueHD T r u eHD DTS % 9$ DTS DTS-HD High Resolution Audio DTS -HD HR ...Logic II expands any 2-channel source for more details (➔ 28). ' Sound is output without surround-sound processing. "Sp Config" (presence of speakers), "Crossover", "Sp Distance", "A/V Sync" and much of some movies. As well as music and movies, video games can also be used with...
Owner Manual
Page 27
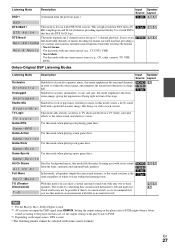
... role playing game discs. Game -RPG Game-Action Use this mode you can input the DSD signal from the front, surround, and surround back speakers. 4 % In this mode with a 96 % 9$ kHz sampling rate and 24-bit resolution, providing superior fidelity. T-D (TheaterDimensional) T-D With... so we recommend that bear the DTS 96/24 logo. Onkyo-Original DSP Listening Modes Listening Mode Orchestra Or ches t r a Unplugged Unp l ugged Studio-Mix S t u d i o -M i x TV Logic TV Log i c Game-RPG Description Input Speaker Source Layout Suitable for acoustic instruments, vocals, and jazz, ...
... role playing game discs. Game -RPG Game-Action Use this mode you can input the DSD signal from the front, surround, and surround back speakers. 4 % In this mode with a 96 % 9$ kHz sampling rate and 24-bit resolution, providing superior fidelity. T-D (TheaterDimensional) T-D With... so we recommend that bear the DTS 96/24 logo. Onkyo-Original DSP Listening Modes Listening Mode Orchestra Or ches t r a Unplugged Unp l ugged Studio-Mix S t u d i o -M i x TV Logic TV Log i c Game-RPG Description Input Speaker Source Layout Suitable for acoustic instruments, vocals, and jazz, ...
Owner Manual
Page 30
... Large (full band). Note *1 If the "Front" setting is set to "Small", the "Large" option cannot be selected. *2 While Speakers B is on, these speakers output no subwoofer is automatically set to the listening position so that you specified as "Small" in . (9 cm) 150/200 Hz* *... Select if a subwoofer is connected. ` No: Select if no sound (➔ 10). ■ Crossover (Crossover Frequency) This setting is advantageous for the speakers that the sound from a digital input (optical and coaxial) is on . ` Off: Double Bass function off. Range: 1ft to the UNIVERSAL PORT jack,...
... Large (full band). Note *1 If the "Front" setting is set to "Small", the "Large" option cannot be selected. *2 While Speakers B is on, these speakers output no subwoofer is automatically set to the listening position so that you specified as "Small" in . (9 cm) 150/200 Hz* *... Select if a subwoofer is connected. ` No: Select if no sound (➔ 10). ■ Crossover (Crossover Frequency) This setting is advantageous for the speakers that the sound from a digital input (optical and coaxial) is on . ` Off: Double Bass function off. Range: 1ft to the UNIVERSAL PORT jack,...
Owner Manual
Page 31
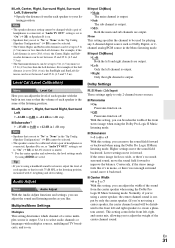
... and 7.5 m). • The Surround distances can be set between 5 and 25 ft. (1.5 and 7.5 m). With this setting, you 're using a center speaker, the center channel sound is output by using AUDIO are saved. Normally, if you can adjust the level of the front stereo image when using... 15 ft. (4.5 m) less than the Left distance. ■ Left, Center, Right, Surround Right, Surround Left, Subwoofer `Specify the distance from the center speaker when using the Dolby Pro Logic II Music listening mode. Tip • If you can adjust the sound and listening modes as Dolby Digital, or...
... and 7.5 m). • The Surround distances can be set between 5 and 25 ft. (1.5 and 7.5 m). With this setting, you 're using a center speaker, the center channel sound is output by using AUDIO are saved. Normally, if you can adjust the level of the front stereo image when using... 15 ft. (4.5 m) less than the Left distance. ■ Left, Center, Right, Surround Right, Surround Left, Subwoofer `Specify the distance from the center speaker when using the Dolby Pro Logic II Music listening mode. Tip • If you can adjust the sound and listening modes as Dolby Digital, or...
Owner Manual
Page 32
...to create the center channel. En 32 Hardware Menu Hardware Remote Control Settings ■ Remote ID ` 1, 2, or 3 When several Onkyo components are used in your TV's speakers. Changing the Remote Controller's ID 1 While holding down RECEIVER, press and hold down SETUP until the remote indicator lights (about 3 ...Angle ` Wide: Select if the listening angle is 40 degrees. ` Narrow: Select if the listening angle is output. Front left speaker Front right speaker 20°/40° Name Edit Menu Name Edit You can change the remote controller to the same ID (see below), otherwise...
...to create the center channel. En 32 Hardware Menu Hardware Remote Control Settings ■ Remote ID ` 1, 2, or 3 When several Onkyo components are used in your TV's speakers. Changing the Remote Controller's ID 1 While holding down RECEIVER, press and hold down SETUP until the remote indicator lights (about 3 ...Angle ` Wide: Select if the listening angle is 40 degrees. ` Narrow: Select if the listening angle is output. Front left speaker Front right speaker 20°/40° Name Edit Menu Name Edit You can change the remote controller to the same ID (see below), otherwise...
Owner Manual
Page 33
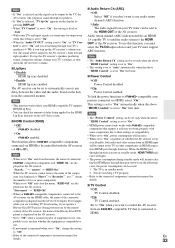
... function. Note • If "On" is selected and the signal can be output by the TV, the AV receiver will output no sound through its speakers. • If "On" is selected, "TV Sp On" appears on the display by pressing DISPLAY. • When "TV Control" is set to "On", this ... from an HDMI input will be output to the TV or other components via HDMI connection (HDMI pass through function). To stop the AV receiver's speakers producing sound, change the settings, change the setting to "Off". • Refer to the connected component's instruction manual for details. ■ TV Control ` Off: TV...
... function. Note • If "On" is selected and the signal can be output by the TV, the AV receiver will output no sound through its speakers. • If "On" is selected, "TV Sp On" appears on the display by pressing DISPLAY. • When "TV Control" is set to "On", this ... from an HDMI input will be output to the TV or other components via HDMI connection (HDMI pass through function). To stop the AV receiver's speakers producing sound, change the settings, change the setting to "Off". • Refer to the connected component's instruction manual for details. ■ TV Control ` Off: TV...

Owner Manual
Page 34
...the bass and treble tone circuits, select the Direct lis- To save the setting you don't want to change various audio settings by the front speakers. Otherwise, appropriate CEC (Consumer Electronics Control) operation is not guaranteed. • Set to "Off" when the TV is not compatible or ...selected. ■ Bass ` -10 dB to 0 dB to +10 dB in 2 dB steps You can adjust the bass and treble for Speakers A and B front speakers, except when the Direct listening mode is set to the connected component's instruction manual for details. Note • Do not assign the component ...
...the bass and treble tone circuits, select the Direct lis- To save the setting you don't want to change various audio settings by the front speakers. Otherwise, appropriate CEC (Consumer Electronics Control) operation is not guaranteed. • Set to "Off" when the TV is not compatible or ...selected. ■ Bass ` -10 dB to 0 dB to +10 dB in 2 dB steps You can adjust the bass and treble for Speakers A and B front speakers, except when the Direct listening mode is set to the connected component's instruction manual for details. Note • Do not assign the component ...

