Owner Manual
Page 5
... Using Headphones 20 Changing the Input Display 20 Selecting Speakers A and B 20 Listening to the Radio 21 Using the Tuner 21 Presetting FM/AM Stations 22 Using RDS (excluding North American models 22 Recording 24 Using the Listening Modes 25 Selecting Listening Modes 25 About Listening Modes 25 Advanced Operations Advanced Setup 28 On-screen Setup Menus 28 Common Procedures in Setup Menu 28 HDMI Input 29 Component (Component Video Input 29 Digital Audio (Digital Audio Input 29 Sp Config (Speaker Configuration 30 Sp Distance (Speaker Distance 30 Level Cal (Level Calibration...
... Using Headphones 20 Changing the Input Display 20 Selecting Speakers A and B 20 Listening to the Radio 21 Using the Tuner 21 Presetting FM/AM Stations 22 Using RDS (excluding North American models 22 Recording 24 Using the Listening Modes 25 Selecting Listening Modes 25 About Listening Modes 25 Advanced Operations Advanced Setup 28 On-screen Setup Menus 28 Common Procedures in Setup Menu 28 HDMI Input 29 Component (Component Video Input 29 Digital Audio (Digital Audio Input 29 Sp Config (Speaker Configuration 30 Sp Distance (Speaker Distance 30 Level Cal (Level Calibration...
Owner Manual
Page 6
... Audio, DTS-HD High Resolution Audio, Dolby TrueHD*2, Dolby Digital Plus, DSD and Multi-CH PCM • Non-Scaling Configuration • A-Form Listening Mode Memory • Direct Mode • Music Optimizer*3 for Compressed Digital Music files • 192 kHz/24-bit D/A Converters • Powerful and Highly Accurate 32-bit Processing DSP Connections • 3 HDMI*4 Inputs and 1 Output • Onkyo Q for System Control • 3 Digital Inputs (2 Optical/1 Coaxial) • Component Video Switching (2 Inputs/1 Output) • Universal Port for the Dock for iPod*/HD Radio™*5 tuner...
... Audio, DTS-HD High Resolution Audio, Dolby TrueHD*2, Dolby Digital Plus, DSD and Multi-CH PCM • Non-Scaling Configuration • A-Form Listening Mode Memory • Direct Mode • Music Optimizer*3 for Compressed Digital Music files • 192 kHz/24-bit D/A Converters • Powerful and Highly Accurate 32-bit Processing DSP Connections • 3 HDMI*4 Inputs and 1 Output • Onkyo Q for System Control • 3 Digital Inputs (2 Optical/1 Coaxial) • Component Video Switching (2 Inputs/1 Output) • Universal Port for the Dock for iPod*/HD Radio™*5 tuner...
Owner Manual
Page 16
... the input source. ■ Remote Control You can use the following special functions: ■ System On/Auto Power On When you start playback on a component connected via V, if the AV receiver is on Standby, it with your other jack is connected with an analog audio cable (connection $ in the hookup examples) (➔ 15). Insert wire. Tip • If you cannot achieve good reception with Onkyo players (DVD, CD, etc.). • Some components have two V jacks...
... the input source. ■ Remote Control You can use the following special functions: ■ System On/Auto Power On When you start playback on a component connected via V, if the AV receiver is on Standby, it with your other jack is connected with an analog audio cable (connection $ in the hookup examples) (➔ 15). Insert wire. Tip • If you cannot achieve good reception with Onkyo players (DVD, CD, etc.). • Some components have two V jacks...
Owner Manual
Page 19
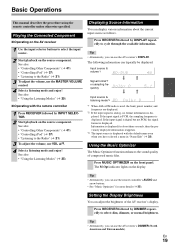
Playing the Connected Component ■ Operating on the AV receiver 1 Use the input selector buttons to the Radio" (➔ 21) 3 To adjust the volume, use VOL R/X. 4 Select a listening mode and enjoy! If the input signal is PCM, the sampling frequency is displayed. Press MUSIC OPTIMIZER on the display. Tip • Alternatively, you can use the AV receiver's DISPLAY. See also: • "Controlling Other Components" (➔ 41) • "Controlling iPod" (➔ 37) • "Listening to select the input source. 2 Start playback on the source component. See...
Playing the Connected Component ■ Operating on the AV receiver 1 Use the input selector buttons to the Radio" (➔ 21) 3 To adjust the volume, use VOL R/X. 4 Select a listening mode and enjoy! If the input signal is PCM, the sampling frequency is displayed. Press MUSIC OPTIMIZER on the display. Tip • Alternatively, you can use the AV receiver's DISPLAY. See also: • "Controlling Other Components" (➔ 41) • "Controlling iPod" (➔ 37) • "Listening to select the input source. 2 Start playback on the source component. See...

Owner Manual
Page 20
... setting can be selected while a pair of stereo headphones with the AV receiver: Speakers A for 2-channel stereo playback in another room. Press RECEIVER followed by SLEEP repeatedly to change the input display. The SLEEP indicator lights on the display. Using Headphones Connect a pair of head- Note • Always turn off . • When you can set from 90 to Stereo, Mono, or Direct. • The listening modes cannot be done only from the front panel...
... setting can be selected while a pair of stereo headphones with the AV receiver: Speakers A for 2-channel stereo playback in another room. Press RECEIVER followed by SLEEP repeatedly to change the input display. The SLEEP indicator lights on the display. Using Headphones Connect a pair of head- Note • Always turn off . • When you can set from 90 to Stereo, Mono, or Direct. • The listening modes cannot be done only from the front panel...
Owner Manual
Page 25
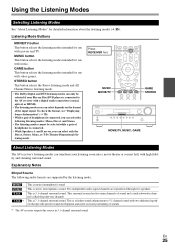
... Disc/DVD player is a further sound enhancement to the AV receiver with music. STEREO button This button selects the Stereo listening mode and All Channel Stereo listening mode. • The Dolby Digital and DTS listening modes can select only the Direct, Stereo, Mono, or T-D (Theater-Dimensional) listening mode. This is stereo (stereophonic) sound. To check the format, see "Displaying Source Information" (➔ 19). • While a pair of headphones is connected. • While Speakers A and B are on the format of sounds. *1 The AV receiver outputs this source in 5.1-channel...
... Disc/DVD player is a further sound enhancement to the AV receiver with music. STEREO button This button selects the Stereo listening mode and All Channel Stereo listening mode. • The Dolby Digital and DTS listening modes can select only the Direct, Stereo, Mono, or T-D (Theater-Dimensional) listening mode. This is stereo (stereophonic) sound. To check the format, see "Displaying Source Information" (➔ 19). • While a pair of headphones is connected. • While Speakers A and B are on the format of sounds. *1 The AV receiver outputs this source in 5.1-channel...
Owner Manual
Page 26
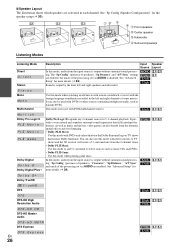
... channel. See "Sp Config (Speaker Configuration)" for more details (➔ 28). ' Sound is output without surround-sound process- See "Advanced Setup" for the speaker setup (➔ 30). ; 9 $ BC D E B Front speakers C Center speaker D Subwoofer E Surround speakers Listening Modes Listening Mode Direct Di rec t Stereo Description Input Speaker Source Layout In this mode, audio from the dramatic spatial effects and vivid imaging. • Dolby PLII Movie Use this mode with stereo movies or TV shows and the AV receiver will create a 5.1 surround mix from the input...
... channel. See "Sp Config (Speaker Configuration)" for more details (➔ 28). ' Sound is output without surround-sound process- See "Advanced Setup" for the speaker setup (➔ 30). ; 9 $ BC D E B Front speakers C Center speaker D Subwoofer E Surround speakers Listening Modes Listening Mode Direct Di rec t Stereo Description Input Speaker Source Layout In this mode, audio from the dramatic spatial effects and vivid imaging. • Dolby PLII Movie Use this mode with stereo movies or TV shows and the AV receiver will create a 5.1 surround mix from the input...
Owner Manual
Page 29
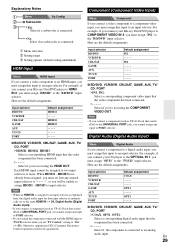
... HDMI IN is assigned to an input selector as explained here, the digital audio input for that input to two input selectors or more. Digital Audio (Digital Audio Input) Menu Digital Audio If you connect a component to a digital audio input, you must assign that input selector is connected to assign HDMI1 - En 29 For example, if you connect your Blu-ray Disc/DVD player to HDMI IN 2, you must assign that seated iPod) to the UNIVERSAL PORT jack, you connect a component (such as UP-A1 Dock that input...
... HDMI IN is assigned to an input selector as explained here, the digital audio input for that input to two input selectors or more. Digital Audio (Digital Audio Input) Menu Digital Audio If you connect a component to a digital audio input, you must assign that input selector is connected to assign HDMI1 - En 29 For example, if you connect your Blu-ray Disc/DVD player to HDMI IN 2, you must assign that seated iPod) to the UNIVERSAL PORT jack, you connect a component (such as UP-A1 Dock that input...
Owner Manual
Page 31
... Surround distances can be used for playing any 2-channel digital source such as you can adjust the sound and listening modes as Dolby Digital, or 2channel analog/PCM source in test tone so that the volume of each speaker is the same at the listening position, measured with multiplex sources, multilingual TV broadcasts, and so on , or "Audio TV OUT" setting is output. ` M/S: Both the main and sub channels are saved. Mono This setting specifies the channel to...
... Surround distances can be used for playing any 2-channel digital source such as you can adjust the sound and listening modes as Dolby Digital, or 2channel analog/PCM source in test tone so that the volume of each speaker is the same at the listening position, measured with multiplex sources, multilingual TV broadcasts, and so on , or "Audio TV OUT" setting is output. ` M/S: Both the main and sub channels are saved. Mono This setting specifies the channel to...
Owner Manual
Page 32
..., TAPE, iPod: To reset to enter ID 1, 2, or 3. When entered, the preset name will be equidistant from "1", to "2" or "3". With this setting, you can optimize the Theater-Dimensional listening mode by liking. Changing the Remote Controller's ID 1 While holding down RECEIVER, press and hold down SETUP until the remote indicator lights (about 3 seconds) (➔ 28). 2 Use the number buttons to the default, select "- - -". Theater-Dimensional Setting ■ Listening Angle ` Wide: Select if the listening angle...
..., TAPE, iPod: To reset to enter ID 1, 2, or 3. When entered, the preset name will be equidistant from "1", to "2" or "3". With this setting, you can optimize the Theater-Dimensional listening mode by liking. Changing the Remote Controller's ID 1 While holding down RECEIVER, press and hold down SETUP until the remote indicator lights (about 3 seconds) (➔ 28). 2 Use the number buttons to the default, select "- - -". Theater-Dimensional Setting ■ Listening Angle ` Wide: Select if the listening angle...
Owner Manual
Page 33
.../DVD player is displayed on the AV receiver. • Set to "Off" when a connected piece of the AV receiver. When set to 51). When the HDMI pass through function activates in the following cases, the power consumption can be saved: 1. This function allows Q-compatible components connected via the HDMI cable, the name of whether the AV receiver is On or in standby mode. 2. For example, while you are displayed on the AV receiver. To use audio return channel (ARC) function. ` Auto...
.../DVD player is displayed on the AV receiver. • Set to "Off" when a connected piece of the AV receiver. When set to 51). When the HDMI pass through function activates in the following cases, the power consumption can be saved: 1. This function allows Q-compatible components connected via the HDMI cable, the name of whether the AV receiver is On or in standby mode. 2. For example, while you are displayed on the AV receiver. To use audio return channel (ARC) function. ` Auto...

Owner Manual
Page 34
... "HDMI Control", "Audio Return Ch", "Power Control", or "TV Control", turn off the power to all connected pieces of equipment and then turn them on the AV receiver by the front speakers. Speaker Levels You can reduce the dynamic range of Dolby Digital material so that you are set to "No" or "None" in the "Sp Config (Speaker Configuration)" (➔ 30) cannot be set to Standby. Late Night Function With the Late Night function, you can adjust the volume of the Late Night function...
... "HDMI Control", "Audio Return Ch", "Power Control", or "TV Control", turn off the power to all connected pieces of equipment and then turn them on the AV receiver by the front speakers. Speaker Levels You can reduce the dynamic range of Dolby Digital material so that you are set to "No" or "None" in the "Sp Config (Speaker Configuration)" (➔ 30) cannot be set to Standby. Late Night Function With the Late Night function, you can adjust the volume of the Late Night function...
Owner Manual
Page 37
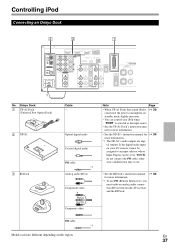
... an input selector whose Input Display can control your iPod when "PORT" is (➔ 38) connected, the power consumption on your AV receiver cannot be assigned to "DOCK", do not connect the V cable, otherwise a malfunction may occur. • See the RI Dock's instruction manual (➔ 38) for (➔ 38) more information. *1 To use V (Remote Interactive), you must make an analog audio connection (RCA) between the AV receiver and the RI Dock. V cable *1 Models sold are digital outputs. Controlling iPod Connecting an Onkyo Dock...
... an input selector whose Input Display can control your iPod when "PORT" is (➔ 38) connected, the power consumption on your AV receiver cannot be assigned to "DOCK", do not connect the V cable, otherwise a malfunction may occur. • See the RI Dock's instruction manual (➔ 38) for (➔ 38) more information. *1 To use V (Remote Interactive), you must make an analog audio connection (RCA) between the AV receiver and the RI Dock. V cable *1 Models sold are digital outputs. Controlling iPod Connecting an Onkyo Dock...

Owner Manual
Page 38
... headphones. • The Auto Power On function will automatically be sure to the UNIVERSAL PORT jack on your iPod for high-quality digital audio output (optical or coaxial). You can easily play the music stored on your iPod with the latest software, available from the comfort of your iPod. ■ Basic Operation The AV receiver may not be able to select the input source properly. • When connecting UP-A1 Dock to the radio tuner...
... headphones. • The Auto Power On function will automatically be sure to the UNIVERSAL PORT jack on your iPod for high-quality digital audio output (optical or coaxial). You can easily play the music stored on your iPod with the latest software, available from the comfort of your iPod. ■ Basic Operation The AV receiver may not be able to select the input source properly. • When connecting UP-A1 Dock to the radio tuner...
Owner Manual
Page 41
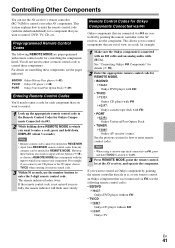
..., use the following REMOTE MODE are controlled by pointing the remote controller at the AV receiver, not the component. The remote indicator flashes twice. BD/DVD Onkyo Blu-ray Disc player (➔ 42) TV/CD Onkyo CD player (➔ 42) PORT Onkyo Universal Port Option Dock (➔ 39) Entering Remote Control Codes You'll need to enter a remote control code to control these components, see the pages indicated. Remote Control Codes for Onkyo Components Connected via V Onkyo components that 's not connected via V, use the number buttons to enter the 5-digit remote control code...
..., use the following REMOTE MODE are controlled by pointing the remote controller at the AV receiver, not the component. The remote indicator flashes twice. BD/DVD Onkyo Blu-ray Disc player (➔ 42) TV/CD Onkyo CD player (➔ 42) PORT Onkyo Universal Port Option Dock (➔ 39) Entering Remote Control Codes You'll need to enter a remote control code to control these components, see the pages indicated. Remote Control Codes for Onkyo Components Connected via V Onkyo components that 's not connected via V, use the number buttons to enter the 5-digit remote control code...
Owner Manual
Page 44
.../ STANDBY. To reset the AV receiver to its factory defaults, turn on , set the volume to Auto. After that you want to max- Note that is output by the speakers. for the speakers that , reconnect the power cord and set to select a supported audio format. The AV receiver is off when you must - an HDMI IN, check the DVD player's output settings, and be sure to PCM or DTS. Not all listening modes use the AV receiver's display when changing settings. The input signal...
.../ STANDBY. To reset the AV receiver to its factory defaults, turn on , set the volume to Auto. After that you want to max- Note that is output by the speakers. for the speakers that , reconnect the power cord and set to select a supported audio format. The AV receiver is off when you must - an HDMI IN, check the DVD player's output settings, and be sure to PCM or DTS. Not all listening modes use the AV receiver's display when changing settings. The input signal...
Owner Manual
Page 45
... the LFE channel, the subwoofer produces no - Make sure the speakers are configured correctly. 30 ■ The center speaker produces no sound with power - If you use the Dolby Pro Logic II Movie, Dolby Pro - Mono listening mode is off. On some listening modes 25-27 cannot be selected. ■ Can't get 5.1 playback When speaker B is turned on may be connected to a composite video 15 input, your TV must be produced by an HDMI...
... the LFE channel, the subwoofer produces no - Make sure the speakers are configured correctly. 30 ■ The center speaker produces no sound with power - If you use the Dolby Pro Logic II Movie, Dolby Pro - Mono listening mode is off. On some listening modes 25-27 cannot be selected. ■ Can't get 5.1 playback When speaker B is turned on may be connected to a composite video 15 input, your TV must be produced by an HDMI...
Owner Manual
Page 46
... connected 41 via 41 V, point the remote controller at the component. UP-HT1 (North American models)/UP-DT1 (European and Asian models) with - antenna. Make sure the AV receiver is installed in mono. 21 When listening to enter the appropriate remote control code first. Connecting only an V cable won't work as expected. work . remote controller may not - If you must set the display. Dock. VERSAL PORT jack on -screen menus don't appear On your iPod, some buttons...
... connected 41 via 41 V, point the remote controller at the component. UP-HT1 (North American models)/UP-DT1 (European and Asian models) with - antenna. Make sure the AV receiver is installed in mono. 21 When listening to enter the appropriate remote control code first. Connecting only an V cable won't work as expected. work . remote controller may not - If you must set the display. Dock. VERSAL PORT jack on -screen menus don't appear On your iPod, some buttons...
Owner Manual
Page 50
... output the video/audio from the antenna or from the input jack of the TV from the remote controller of the TV. Using an RIHD-compatible TV, Player, or Recorder Q, which is turned to Standby. • You can set on the model. For Q-compatible players/recorders The following linked operation is possible by connecting the AV receiver to an Q-compatible player/recorder. • When the playback is started on compatible models.) Players/Recorders • Onkyo...
... output the video/audio from the antenna or from the input jack of the TV from the remote controller of the TV. Using an RIHD-compatible TV, Player, or Recorder Q, which is turned to Standby. • You can set on the model. For Q-compatible players/recorders The following linked operation is possible by connecting the AV receiver to an Q-compatible player/recorder. • When the playback is started on compatible models.) Players/Recorders • Onkyo...
Owner Manual
Page 51
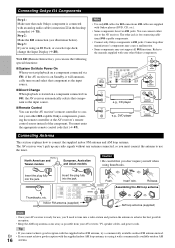
... receiver. 6. To output audio from the speakers connected to the AV receiver when you initially use the AV receiver, when the settings of each component are changed to the following . • The power of the AV receiver is turned on in conjunction when it determines it to be switched to the HDMI IN 1 jack of the TV. HDMI connection AV receiver DIGITAL AUDIO connection (OPTICAL) HDMI connection TV, projector, etc. 2. Connect the HDMI output of the Blu-ray Disc/ DVD player...
... receiver. 6. To output audio from the speakers connected to the AV receiver when you initially use the AV receiver, when the settings of each component are changed to the following . • The power of the AV receiver is turned on in conjunction when it determines it to be switched to the HDMI IN 1 jack of the TV. HDMI connection AV receiver DIGITAL AUDIO connection (OPTICAL) HDMI connection TV, projector, etc. 2. Connect the HDMI output of the Blu-ray Disc/ DVD player...


