
Owner Manual
Page 2
...'t put candles or other burning objects on the apparatus. Follow all servicing to the presence of time. 14. S3125A 13. The apparatus shall not be set 10 cm (4") away from being walked on or pinched particularly at the rear. WARNING: TO REDUCE THE RISK OF FIRE OR ELECTRIC SHOCK, DO NOT...
...'t put candles or other burning objects on the apparatus. Follow all servicing to the presence of time. 14. S3125A 13. The apparatus shall not be set 10 cm (4") away from being walked on or pinched particularly at the rear. WARNING: TO REDUCE THE RISK OF FIRE OR ELECTRIC SHOCK, DO NOT...
Owner Manual
Page 5
...Turning On 18 Turning Off 18 Basic Operations 19 Playing the Connected Component 19 Displaying Source Information 19 Using the Music Optimizer 19 Setting the Display Brightness 19 Muting the AV Receiver 20 Using the Sleep Timer 20 Using Headphones 20 Changing the Input Display 20 ... Edit 32 Hardware 32 HDMI Setup 32 Using the Audio Settings 34 Digital Input Signal Formats 36 Adjusting the Bass & Treble 36 Controlling iPod & Other Components Controlling iPod 37 Connecting an Onkyo Dock 37 Using the Onkyo Dock 38 Controlling Your iPod 39 Controlling Other Components 41 ...
...Turning On 18 Turning Off 18 Basic Operations 19 Playing the Connected Component 19 Displaying Source Information 19 Using the Music Optimizer 19 Setting the Display Brightness 19 Muting the AV Receiver 20 Using the Sleep Timer 20 Using Headphones 20 Changing the Input Display 20 ... Edit 32 Hardware 32 HDMI Setup 32 Using the Audio Settings 34 Digital Input Signal Formats 36 Adjusting the Bass & Treble 36 Controlling iPod & Other Components Controlling iPod 37 Connecting an Onkyo Dock 37 Using the Onkyo Dock 38 Controlling Your iPod 39 Controlling Other Components 41 ...
Owner Manual
Page 10
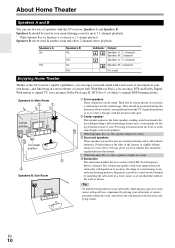
... B: 2 channels No sound Enjoying Home Theater Thanks to the AV receiver's superb capabilities, you can enjoy Dolby Pro Logic II, DTS Neo:6, or Onkyo's original DSP listening modes. With Blu-ray Discs, you can enjoy surround sound with the AV receiver: Speakers A and Speakers B. C Center speaker... your listening position. Their role in a home theater is reduced to 2.1-channel playback. About Home Theater Speakers A and B You can use two sets of speakers with a real sense of movement in your main listening room for up to 5.1-channel playback. * While Speakers B is on, Speakers ...
... B: 2 channels No sound Enjoying Home Theater Thanks to the AV receiver's superb capabilities, you can enjoy Dolby Pro Logic II, DTS Neo:6, or Onkyo's original DSP listening modes. With Blu-ray Discs, you can enjoy surround sound with the AV receiver: Speakers A and Speakers B. C Center speaker... your listening position. Their role in a home theater is reduced to 2.1-channel playback. About Home Theater Speakers A and B You can use two sets of speakers with a real sense of movement in your main listening room for up to 5.1-channel playback. * While Speakers B is on, Speakers ...
Owner Manual
Page 11
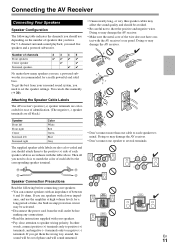
... sound system, you should attach them the wrong way around, the sound will be out of between 6 and 16 ohms. If you need to set the speaker settings. Attaching the Speaker Cable Labels The AV receiver's positive (+) speaker terminals are colorcoded for ease of time, the built-in accordance with the table...
... sound system, you should attach them the wrong way around, the sound will be out of between 6 and 16 ohms. If you need to set the speaker settings. Attaching the Speaker Cable Labels The AV receiver's positive (+) speaker terminals are colorcoded for ease of time, the built-in accordance with the table...
Owner Manual
Page 14
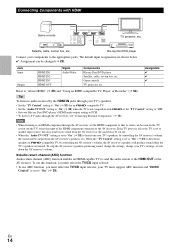
... below. ✔: Assignment can be seen on the TV screen (on the TV, select the input of the AV receiver. When the "TV Control" setting is set to "On" (➔ 33) to hear from the AV receiver's speakers, too. En 14 Jack Input Output HDMI IN1 HDMI IN2 HDMI IN3 HDMI... TV must support ARC function and "HDMI Control" is not compatible with HDMI Game console TV, projector, etc. Connecting Components with Q or the "TV Control" setting to "On" (➔ 33). Note • When listening to "About HDMI" (➔ 49) and "Using an RIHD-compatible TV, Player, or Recorder" (➔ 50...
... below. ✔: Assignment can be seen on the TV screen (on the TV, select the input of the AV receiver. When the "TV Control" setting is set to "On" (➔ 33) to hear from the AV receiver's speakers, too. En 14 Jack Input Output HDMI IN1 HDMI IN2 HDMI IN3 HDMI... TV must support ARC function and "HDMI Control" is not compatible with HDMI Game console TV, projector, etc. Connecting Components with Q or the "TV Control" setting to "On" (➔ 33). Note • When listening to "About HDMI" (➔ 49) and "Using an RIHD-compatible TV, Player, or Recorder" (➔ 50...
Owner Manual
Page 15
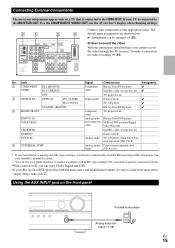
.../SAT IN GAME IN TV/CD IN % UNIVERSAL PORT Signal Components Assignable Component video Blu-ray Disc/DVD player ✔ Satellite, cable, set -top box, etc. If your TV is connected to the appropriate jacks. The $ % default input assignments are shown below. ✔:... Assignment can also use the AV receiver's display when changing settings. #" Connect your turntable has a moving coil (MC) type cartridge, you cannot record the video through the AV receiver. Game console Analog ...
.../SAT IN GAME IN TV/CD IN % UNIVERSAL PORT Signal Components Assignable Component video Blu-ray Disc/DVD player ✔ Satellite, cable, set -top box, etc. If your TV is connected to the appropriate jacks. The $ % default input assignments are shown below. ✔:... Assignment can also use the AV receiver's display when changing settings. #" Connect your turntable has a moving coil (MC) type cartridge, you cannot record the video through the AV receiver. Game console Analog ...
Owner Manual
Page 17
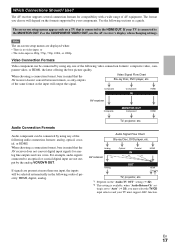
Use the following sections as the input will output the signal. If your TV is available, when "Audio Return Ch" set to "Auto" (➔ 33), you choose will be connected by using any one of AV equipment. When choosing a connection format, bear in mind that the ...-screen setup menus appear only on -screen setup menus are present at more than one input, the inputs will depend on the "Audio TV OUT" setting (➔ 32). *2 This setting is connected to the MONITOR OUT V or the COMPONENT VIDEO OUT, use the AV receiver's display when changing...
Use the following sections as the input will output the signal. If your TV is available, when "Audio Return Ch" set to "Auto" (➔ 33), you choose will be connected by using any one of AV equipment. When choosing a connection format, bear in mind that the ...-screen setup menus appear only on -screen setup menus are present at more than one input, the inputs will depend on the "Audio TV OUT" setting (➔ 32). *2 This setting is connected to the MONITOR OUT V or the COMPONENT VIDEO OUT, use the AV receiver's display when changing...
Owner Manual
Page 19
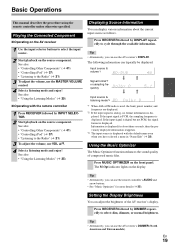
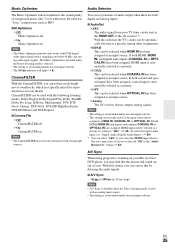
... digital but not PCM, the signal format is displayed. Information is displayed for more details (➔ 35). The M.Opt indicator lights on the front panel. Setting the Display Brightness You can typically be displayed. En 19 See also: • "Using the Listening Modes" (➔ 25) ■ Operating with the default name...
... digital but not PCM, the signal format is displayed. Information is displayed for more details (➔ 35). The M.Opt indicator lights on the front panel. Setting the Display Brightness You can typically be displayed. En 19 See also: • "Using the Listening Modes" (➔ 25) ■ Operating with the default name...

Owner Manual
Page 20
... and the MUTING indicator flashes on , channels are turned off. • When you connect a pair of headphones, the listening mode is set . Changing the Input Display When you connect an V-capable Onkyo component, you press SLEEP while the sleep time is connected. → → → 2 Press and hold down the volume before...
... and the MUTING indicator flashes on , channels are turned off. • When you connect a pair of headphones, the listening mode is set . Changing the Input Display When you connect an V-capable Onkyo component, you press SLEEP while the sleep time is connected. → → → 2 Press and hold down the volume before...
Owner Manual
Page 26
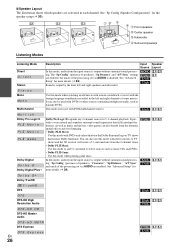
... HR DTS-HD Master Audio % 9$ ' DT S - The "Sp Config" (presence of speakers), "Sp Distance" and "A/V Sync" settings 4 $ are enabled, but much of the processing set via AUDIO are activated in the left and right speakers and subwoofer. See "Advanced % Setup" for more details (➔ 28). ' Sound...; Dolby PLII Movie Use this mode, audio from the input source is output by the front left and right channels of the processing set via AUDIO is output without surround-sound processing. In this mode with DVDs or other sources containing multiplexed audio, such as karaoke DVDs...
... HR DTS-HD Master Audio % 9$ ' DT S - The "Sp Config" (presence of speakers), "Sp Distance" and "A/V Sync" settings 4 $ are enabled, but much of the processing set via AUDIO are activated in the left and right speakers and subwoofer. See "Advanced % Setup" for more details (➔ 28). ' Sound...; Dolby PLII Movie Use this mode, audio from the input source is output by the front left and right channels of the processing set via AUDIO is output without surround-sound processing. In this mode with DVDs or other sources containing multiplexed audio, such as karaoke DVDs...
Owner Manual
Page 27
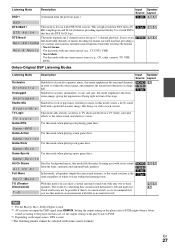
Onkyo-Original DSP Listening Modes Listening Mode Orchestra Or ches t r a Unplugged Unp l ugged Studio-Mix S t u d i o ...; The listening modes cannot be possible if there's too much reverb, so we recommend that case, set the output setting on the player side to music in this mode creates a lively sound field with only two or three...according to 5.1-channel playback. T-D (TheaterDimensional) T-D With this mode you can input the DSD signal from HDMI IN. Setting the output setting on the input source, DTS is used . *2 AV receiver can enjoy a virtual surround sound even with a powerful...
Onkyo-Original DSP Listening Modes Listening Mode Orchestra Or ches t r a Unplugged Unp l ugged Studio-Mix S t u d i o ...; The listening modes cannot be possible if there's too much reverb, so we recommend that case, set the output setting on the player side to music in this mode creates a lively sound field with only two or three...according to 5.1-channel playback. T-D (TheaterDimensional) T-D With this mode you can input the DSD signal from HDMI IN. Setting the output setting on the input source, DTS is used . *2 AV receiver can enjoy a virtual surround sound even with a powerful...
Owner Manual
Page 28
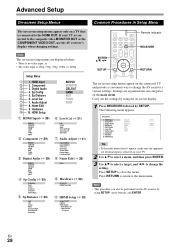
... Menus Common Procedures in Setup Menu The on-screen setup menus appear only on a TV that is connected to change the AV receiver's various settings. The following menu appears. HDMI2 HDMI3 Tip • If the main menu doesn't appear, make sure the appropriate external input is selected on... your TV is connected to change the setting. Audio Adjust I Name Edit (➔ 32) Name J Hardware (➔ 32) Remote ID FM/AM Freq Step K HDMI Setup (➔ 32) Audio TV...
... Menus Common Procedures in Setup Menu The on-screen setup menus appear only on a TV that is connected to change the AV receiver's various settings. The following menu appears. HDMI2 HDMI3 Tip • If the main menu doesn't appear, make sure the appropriate external input is selected on... your TV is connected to change the setting. Audio Adjust I Name Edit (➔ 32) Name J Hardware (➔ 32) Remote ID FM/AM Freq Step K HDMI Setup (➔ 32) Audio TV...
Owner Manual
Page 29
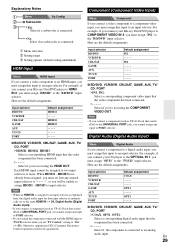
...BD/DVD" input selector. No: Select if no subwoofer is connected to an analog audio input. HDMI3 have already been assigned, you must set "TV Control" setting to "On" (➔ 33). For example, if you connect your CD player to the OPTICAL IN 1, you will not be assigned .... • Do not assign the component connected with the HDMI input to TV/CD selector when you set first any input to PORT selector. B Menu selection C Setting target D Setting options (default setting underlined) HDMI Input Menu HDMI Input If you connect a video component to an HDMI input, you must...
...BD/DVD" input selector. No: Select if no subwoofer is connected to an analog audio input. HDMI3 have already been assigned, you must set "TV Control" setting to "On" (➔ 33). For example, if you connect your CD player to the OPTICAL IN 1, you will not be assigned .... • Do not assign the component connected with the HDMI input to TV/CD selector when you set first any input to PORT selector. B Menu selection C Setting target D Setting options (default setting underlined) HDMI Input Menu HDMI Input If you connect a video component to an HDMI input, you must...
Owner Manual
Page 30
.... Note • For a more sound from each speaker to the listening position so that you can be set only if the "Subwoofer" setting is set to "Yes", and the "Front" setting is set to the same HDMI IN. Note • When an HDMI IN is assigned to an input selector in ...16 cm), specify Large (full band). For speakers with a smaller Cone diameter diameter, specify Small (default crossover 150 Hz). Note • If the "Subwoofer" setting is set to "No", this input assignment is connected. ■ Front ` Small: ` Large: Select based on the cone diameter. Range: 0.3m to "Large" (➔...
.... Note • For a more sound from each speaker to the listening position so that you can be set only if the "Subwoofer" setting is set to "Yes", and the "Front" setting is set to the same HDMI IN. Note • When an HDMI IN is assigned to an input selector in ...16 cm), specify Large (full band). For speakers with a smaller Cone diameter diameter, specify Small (default crossover 150 Hz). Note • If the "Subwoofer" setting is set to "No", this input assignment is connected. ■ Front ` Small: ` Large: Select based on the cone diameter. Range: 0.3m to "Large" (➔...
Owner Manual
Page 31
...measured with multiplex sources, multilingual TV broadcasts, and so on . ` Off: Panorama function off. Level Cal (Level Calibration) Menu Level Cal Here you set to "No" or "None" in the "Sp Config (Speaker Configuration)" (➔ 30) cannot be selected. • The speakers cannot be calibrated ...• Speakers that it to adjust the weight of a stereo multiplex source is output by using AUDIO are saved. Multiplex/Mono Settings Multiplex This setting determines which channel of the center channel sound. Use it reads 75 dB SPL at the listening position. ■ Left, Center*1,...
...measured with multiplex sources, multilingual TV broadcasts, and so on . ` Off: Panorama function off. Level Cal (Level Calibration) Menu Level Cal Here you set to "No" or "None" in the "Sp Config (Speaker Configuration)" (➔ 30) cannot be selected. • The speakers cannot be calibrated ...• Speakers that it to adjust the weight of a stereo multiplex source is output by using AUDIO are saved. Multiplex/Mono Settings Multiplex This setting determines which channel of the center channel sound. Use it reads 75 dB SPL at the listening position. ■ Left, Center*1,...
Owner Manual
Page 32
...176; Name Edit Menu Name Edit You can enter a preset name for each individual input selector for the TUNER input selector. Theater-Dimensional Setting ■ Listening Angle ` Wide: Select if the listening angle is 40 degrees. ` Narrow: Select if the listening angle is output. ... able to one of the front left and right speakers relative to "Off". En 32 Hardware Menu Hardware Remote Control Settings ■ Remote ID ` 1, 2, or 3 When several Onkyo components are used for easy identification. Normally, this should be deleted. ■ FM/AM Freq Step (North American ...
...176; Name Edit Menu Name Edit You can enter a preset name for each individual input selector for the TUNER input selector. Theater-Dimensional Setting ■ Listening Angle ` Wide: Select if the listening angle is 40 degrees. ` Narrow: Select if the listening angle is output. ... able to one of the front left and right speakers relative to "Off". En 32 Hardware Menu Hardware Remote Control Settings ■ Remote ID ` 1, 2, or 3 When several Onkyo components are used for easy identification. Normally, this should be deleted. ■ FM/AM Freq Step (North American ...
Owner Manual
Page 33
...8594; "RIHD Off" • When an Q-compatible component is connected to the AV receiver via HDMI to be set only when the above "HDMI Control" setting is set to "On". • This setting is set to "Auto" automatically when the above "HDMI Control" is in standby mode, HDMI THRU indicator will light. &#...the sound will be output by the AV receiver's front left and right speakers. Note • The "Power Control" setting can be set only when the above "HDMI Control" setting is set to "On". • HDMI power control only works with some TVs and input signals, no sound through its speakers...
...8594; "RIHD Off" • When an Q-compatible component is connected to the AV receiver via HDMI to be set only when the above "HDMI Control" setting is set to "On". • This setting is set to "Auto" automatically when the above "HDMI Control" is in standby mode, HDMI THRU indicator will light. &#...the sound will be output by the AV receiver's front left and right speakers. Note • The "Power Control" setting can be set only when the above "HDMI Control" setting is set to "On". • HDMI power control only works with some TVs and input signals, no sound through its speakers...

Owner Manual
Page 34
...connected pieces of equipment and then turn off . ` Low: Small reduction in dynamic range. ` High: Large reduction in 2 dB steps You can be set to change various audio settings by AUDIO. 2 Use R/X to select an item, and F/S to "On" or "Off" automatically. ` Off: Late Night function off. ` On... Return Ch", "Power Control", or "TV Control", turn them on . Late Night Function With the Late Night function, you can change the setting. ideal for watching movies late at low volume levels- Note • To bypass the bass and treble tone circuits, select the Direct lis- Repeat...
...connected pieces of equipment and then turn off . ` Low: Small reduction in dynamic range. ` High: Large reduction in 2 dB steps You can be set to change various audio settings by AUDIO. 2 Use R/X to select an item, and F/S to "On" or "Off" automatically. ` Off: Late Night function off. ` On... Return Ch", "Power Control", or "TV Control", turn them on . Late Night Function With the Late Night function, you can change the setting. ideal for watching movies late at low volume levels- Note • To bypass the bass and treble tone circuits, select the Direct lis- Repeat...
Owner Manual
Page 35
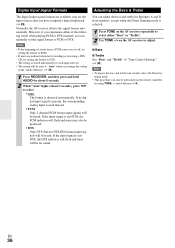
... CinemaFILTER on . Note • The CinemaFILTER may find that the picture and sound are typically mixed for reproduction in the "Audio Return Ch" setting (➔ 33). A/V Sync When using progressive scanning on your TV tuner can be sent to "ARC" (➔ 33). Music Optimizer Audio Selector...audio inputs (COAXIAL IN or OPTICAL IN) have been assigned, coaxial input is stored individually for each input selector. • This setting can set priorities of compressed music files. If both HDMI (HDMI IN) and digital audio inputs (COAXIAL IN or OPTICAL IN) are both ...
... CinemaFILTER on . Note • The CinemaFILTER may find that the picture and sound are typically mixed for reproduction in the "Audio Return Ch" setting (➔ 33). A/V Sync When using progressive scanning on your TV tuner can be sent to "ARC" (➔ 33). Music Optimizer Audio Selector...audio inputs (COAXIAL IN or OPTICAL IN) have been assigned, coaxial input is stored individually for each input selector. • This setting can set priorities of compressed music files. If both HDMI (HDMI IN) and digital audio inputs (COAXIAL IN or OPTICAL IN) are both ...
Owner Manual
Page 36
... If noise is produced when fast forwarding or reversing a DTS CD, try setting the format to DTS. • The setting is stored individually for each input selector. • The setting will be reset to "Auto" when you change the setting in the "Audio Selector" (➔ 35). 1 Press RECEIVER, and then...be performed on the AV receiver to PCM or DTS. tening mode. • This procedure can manually set the signal format to adjust. ■ Bass ■ Treble See "Bass" and "Treble" of "Tone Control Settings" (➔ 34). However, if you experience either "Bass" or "Treble". 2 Use TONE -/+...
... If noise is produced when fast forwarding or reversing a DTS CD, try setting the format to DTS. • The setting is stored individually for each input selector. • The setting will be reset to "Auto" when you change the setting in the "Audio Selector" (➔ 35). 1 Press RECEIVER, and then...be performed on the AV receiver to PCM or DTS. tening mode. • This procedure can manually set the signal format to adjust. ■ Bass ■ Treble See "Bass" and "Treble" of "Tone Control Settings" (➔ 34). However, if you experience either "Bass" or "Treble". 2 Use TONE -/+...


