Owner Manual
Page 4
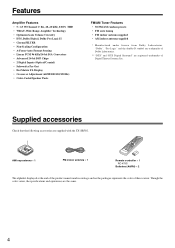
Supplied accessories Check that the following accessories are the same. 4 Though the color varies, the specifications and operations are supplied with the TX-SR302. Features Amplifier Features • 5 × 65 W/Channel @ 8Ω, 20-20 kHz, 0.08% THD • WRAT-Wide Range Amplifier Technology •...96 kHz/24-bit D/A Converters • Advanced 24-bit DSP Chips • 2 Digital Inputs (Optical/Coaxial) • Subwoofer Pre Out • Dot Matrix FL Display • Crossover Adjustment (60/80/100/120/150 Hz) • Color-Coded Speaker Posts FM/AM Tuner Features • 30 FM/AM ...
Supplied accessories Check that the following accessories are the same. 4 Though the color varies, the specifications and operations are supplied with the TX-SR302. Features Amplifier Features • 5 × 65 W/Channel @ 8Ω, 20-20 kHz, 0.08% THD • WRAT-Wide Range Amplifier Technology •...96 kHz/24-bit D/A Converters • Advanced 24-bit DSP Chips • 2 Digital Inputs (Optical/Coaxial) • Subwoofer Pre Out • Dot Matrix FL Display • Crossover Adjustment (60/80/100/120/150 Hz) • Color-Coded Speaker Posts FM/AM Tuner Features • 30 FM/AM ...
Owner Manual
Page 6
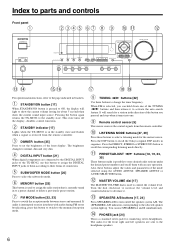
... the DIGITAL INPUT jacks of the TX-SR302, use SPEAKERS A and B simultaneously. ! Press the DSP button to change the tuner frequency. PRESET/ADJUST / buttons [18, 19, 23...TUNING / buttons [22] Use these buttons to recall the Onkyo-original DSP modes in sequence. The audio for the current ...subwoofer mode. 6 MEMORY button [23] This button is used to activate the auto-search feature. Press the DIRECT, STEREO or SURROUND button to show the current sound input source. The (SPEAKERS) A/B indicators corresponding to the standby state. Pressing the button again returns the TX-SR302...
... the DIGITAL INPUT jacks of the TX-SR302, use SPEAKERS A and B simultaneously. ! Press the DSP button to change the tuner frequency. PRESET/ADJUST / buttons [18, 19, 23...TUNING / buttons [22] Use these buttons to recall the Onkyo-original DSP modes in sequence. The audio for the current ...subwoofer mode. 6 MEMORY button [23] This button is used to activate the auto-search feature. Press the DIRECT, STEREO or SURROUND button to show the current sound input source. The (SPEAKERS) A/B indicators corresponding to the standby state. Pressing the button again returns the TX-SR302...
Owner Manual
Page 18
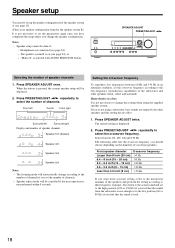
...low frequencies between 60 Hz and 150 Hz in a box It is not neccessary to change the speaker configuration. Press SPEAKER ADJUST twice. Select from the subwoofer is not enough or to the low position (60 or 80 Hz) if you feel that the sound from 60, ... left Surround right Display and number of the subwoofer and other speakers and this setting when using a subwoofer, bass sounds are connected (see page 24), - Headphones are output by the other speakers (front, center and surround). SPEAKER ADJUST PRESET/ADJUST Selecting the number of channels. The current setting...
...low frequencies between 60 Hz and 150 Hz in a box It is not neccessary to change the speaker configuration. Press SPEAKER ADJUST twice. Select from the subwoofer is not enough or to the low position (60 or 80 Hz) if you feel that the sound from 60, ... left Surround right Display and number of the subwoofer and other speakers and this setting when using a subwoofer, bass sounds are connected (see page 24), - Headphones are output by the other speakers (front, center and surround). SPEAKER ADJUST PRESET/ADJUST Selecting the number of channels. The current setting...

Owner Manual
Page 19
.... For example, if the Front Distance is 7 ft (2.1 m).) ↓ Subwoofer (From Subwoofer to your listening position. Repeat steps 2 and 3 for all five parameters. Speaker setup SPEAKER ADJUST PRESET/ADJUST Specifying speaker distances To get the best from surround sound, it's important that ... 2. Measure and make a note of other speakers as follows: Center Distance, Subwoofer Distance: 15 to 25 ft (4.5 to your listening position. To select other speakers. Press PRESET/ADJUST repeatedly to specify the speaker distance. However, the Front Distance limits the Distance ...
.... For example, if the Front Distance is 7 ft (2.1 m).) ↓ Subwoofer (From Subwoofer to your listening position. Repeat steps 2 and 3 for all five parameters. Speaker setup SPEAKER ADJUST PRESET/ADJUST Specifying speaker distances To get the best from surround sound, it's important that ... 2. Measure and make a note of other speakers as follows: Center Distance, Subwoofer Distance: 15 to 25 ft (4.5 to your listening position. To select other speakers. Press PRESET/ADJUST repeatedly to specify the speaker distance. However, the Front Distance limits the Distance ...

Owner Manual
Page 20
...certain sources (2 channel-Dolby Digital/DTS source etc.). Adjust the volume to your normal listening level, prior to adjust the volume level. Adjusting each speaker's relative volume balance so that the volumes of all channels from the subwoofer.) ↓ Subwoofer Mode 2 (To output the low frequencies of ...muting function is pressed repeatedly, each press of the button, you don't press TEST, the test tone will be adjusted between -12dB and +12dB. Speaker setup SUBWOOFER MODE Before operating the remote controller, press RCVR/TAPE. When CH SEL is activated. 1. With the first press...
...certain sources (2 channel-Dolby Digital/DTS source etc.). Adjust the volume to your normal listening level, prior to adjust the volume level. Adjusting each speaker's relative volume balance so that the volumes of all channels from the subwoofer.) ↓ Subwoofer Mode 2 (To output the low frequencies of ...muting function is pressed repeatedly, each press of the button, you don't press TEST, the test tone will be adjusted between -12dB and +12dB. Speaker setup SUBWOOFER MODE Before operating the remote controller, press RCVR/TAPE. When CH SEL is activated. 1. With the first press...
Owner Manual
Page 26
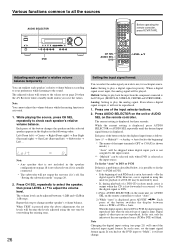
..."Auto" to the beginning) * The name of the input terminals (OPT or COAX) is activated. 1. When TEST is pressed after the above adjustment, the set the input signal format again. However, care is selected as follows: Auto ( )* → Multich** → Analog → Auto...Various functions common to check each speaker's relative volume balance. In this step to the DVD port (FRONT L/R, SURR L/R, CENTER and SUBWOOFER). While playing the source, press CH SEL repeatedly to all the sources AUDIO SELECTOR Before operating the remote controller, press RCVR/TAPE. ...
..."Auto" to the beginning) * The name of the input terminals (OPT or COAX) is activated. 1. When TEST is pressed after the above adjustment, the set the input signal format again. However, care is selected as follows: Auto ( )* → Multich** → Analog → Auto...Various functions common to check each speaker's relative volume balance. In this step to the DVD port (FRONT L/R, SURR L/R, CENTER and SUBWOOFER). While playing the source, press CH SEL repeatedly to all the sources AUDIO SELECTOR Before operating the remote controller, press RCVR/TAPE. ...

Owner Manual
Page 27
...input source. • The surround mode cannot be adjusted between - 30 to each speaker at the listening position. Press AUDIO SELECTOR on the unit or AUDIO SEL on the unit or remote controller to select "Multich". 3. The subwoofer can hear the same sound level from the speaker...Multich" is selected during use of the speaker configuration, the input signal will be adjusted between -12 to page 13). 1. Turn on the unit or remote controller to the DVD (FRONT L/R, SURR L/R, CENTER and SUBWOOFER) port and start playing the desired media. See instruction manual supplied with analog 5.1-...
...input source. • The surround mode cannot be adjusted between - 30 to each speaker at the listening position. Press AUDIO SELECTOR on the unit or AUDIO SEL on the unit or remote controller to select "Multich". 3. The subwoofer can hear the same sound level from the speaker...Multich" is selected during use of the speaker configuration, the input signal will be adjusted between -12 to page 13). 1. Turn on the unit or remote controller to the DVD (FRONT L/R, SURR L/R, CENTER and SUBWOOFER) port and start playing the desired media. See instruction manual supplied with analog 5.1-...
Owner Manual
Page 28
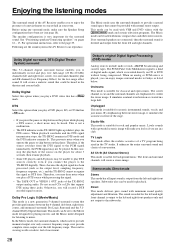
... of conversation. The front and surround channels will record a DTS encoded signal as noise. Subwoofer also can be used for the surround sound. Before using these jacks. The speaker configuration ...DTS signal transmission stops, the TX-SR302 remains in the theaters and concert halls. This prevents noise when you play a DVD video that cannot be heard. Onkyo's original Digital Signal Processing (DSP...page 29. This mode can be used with VHS and DVD videos with minimum sound quality adjustment and filtration. DTS Select this case, stop the playback of the source on the player ...
... of conversation. The front and surround channels will record a DTS encoded signal as noise. Subwoofer also can be used for the surround sound. Before using these jacks. The speaker configuration ...DTS signal transmission stops, the TX-SR302 remains in the theaters and concert halls. This prevents noise when you play a DVD video that cannot be heard. Onkyo's original Digital Signal Processing (DSP...page 29. This mode can be used with VHS and DVD videos with minimum sound quality adjustment and filtration. DTS Select this case, stop the playback of the source on the player ...
Owner Manual
Page 35
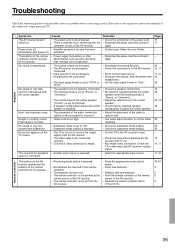
... noise. Remedies • Check the connection of the power cord. • Disconnect the power cord, then connect it again. • Contact your Onkyo Service Center. • Disconnect the power cord, then connect it again. • Deactivate the muting function. • Check the connections to the ... • Replace with the computer circuits of the cable to reduce hum. • Use audio adjust function to cut the treble response. • Check the subwoofer mode setting. • Check the subwoofer mode setting. • Set the TV to the AV receiver's input. • Check the connections...
... noise. Remedies • Check the connection of the power cord. • Disconnect the power cord, then connect it again. • Contact your Onkyo Service Center. • Disconnect the power cord, then connect it again. • Deactivate the muting function. • Check the connections to the ... • Replace with the computer circuits of the cable to reduce hum. • Use audio adjust function to cut the treble response. • Check the subwoofer mode setting. • Check the subwoofer mode setting. • Set the TV to the AV receiver's input. • Check the connections...
Owner Manual
Page 36
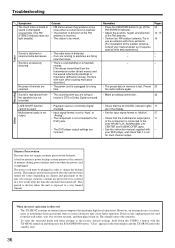
...Remedies • Press the FM MODE button to the DVD FRONT L/R, SURROUND L/R, CENTER and SUBWOOFER jacks. • See the instruction manual supplied with more seconds, and then plug it ...preservation period after the time the unit has been turned off the FM STEREO indicator. • Adjust the position, height, and direction of the FM antenna. • Connect an FM outdoor ... When incorrect operation is distorted or sound volume decreases. Sound is observed • The TX-SR302 contains an internal microcomputer that performs high-level operations. Try to charge the backup system. ...
...Remedies • Press the FM MODE button to the DVD FRONT L/R, SURROUND L/R, CENTER and SUBWOOFER jacks. • See the instruction manual supplied with more seconds, and then plug it ...preservation period after the time the unit has been turned off the FM STEREO indicator. • Adjust the position, height, and direction of the FM antenna. • Connect an FM outdoor ... When incorrect operation is distorted or sound volume decreases. Sound is observed • The TX-SR302 contains an internal microcomputer that performs high-level operations. Try to charge the backup system. ...

