
Owner Manual
Page 6
... Control Codes 84 Entering Remote Control Codes 85 Remapping Colored Buttons 85 Remote Control Codes for Onkyo Components Connected via RI 86 Resetting the REMOTE MODE Buttons 86 Resetting the Remote Controller 86 Controlling Other Components 86 Learning Commands 89 Using Normal Macros 90 Appendix Troubleshooting 91 Firmware Update 97 Connection Tips and Video Signal Path 101 Using an RIHD-compatible TV, Player, or Recorder 104 About HDMI 106 Network/USB Features 107 License and Trademark Information 110 Specifications 111 To reset the AV receiver to its factory defaults, turn...
... Control Codes 84 Entering Remote Control Codes 85 Remapping Colored Buttons 85 Remote Control Codes for Onkyo Components Connected via RI 86 Resetting the REMOTE MODE Buttons 86 Resetting the Remote Controller 86 Controlling Other Components 86 Learning Commands 89 Using Normal Macros 90 Appendix Troubleshooting 91 Firmware Update 97 Connection Tips and Video Signal Path 101 Using an RIHD-compatible TV, Player, or Recorder 104 About HDMI 106 Network/USB Features 107 License and Trademark Information 110 Specifications 111 To reset the AV receiver to its factory defaults, turn...
Owner Manual
Page 7
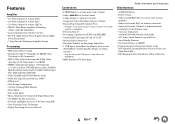
... 2 Outputs • Onkyo Q for System Control • 6 Digital Inputs (3 Optical/3 Coaxial) • Component Video Switching (2 Inputs/1 Output) • Banana Plug-Compatible Speaker Posts * In Europe, using banana plugs to connect speakers to an audio amplifier is prohibited. • Powered Zone 2/3 • Bi-Amping Capability for FL/FR with FHL/FHR • Analog RGB Video Input (D-sub 15) for PC • Internet Radio Connectivity • Network Capability for Streaming Audio Files • 2 USB Inputs (Front/Rear) for Memory Devices and iPod®/iPhone® models (Enables Display...
... 2 Outputs • Onkyo Q for System Control • 6 Digital Inputs (3 Optical/3 Coaxial) • Component Video Switching (2 Inputs/1 Output) • Banana Plug-Compatible Speaker Posts * In Europe, using banana plugs to connect speakers to an audio amplifier is prohibited. • Powered Zone 2/3 • Bi-Amping Capability for FL/FR with FHL/FHR • Analog RGB Video Input (D-sub 15) for PC • Internet Radio Connectivity • Network Capability for Streaming Audio Files • 2 USB Inputs (Front/Rear) for Memory Devices and iPod®/iPhone® models (Enables Display...
Owner Manual
Page 21
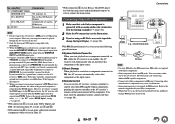
... tape deck, change the Input Display (➔ page 48). Music on your Onkyo components. • While Zone 2/3 is on, the System On/Auto Power On and Direct Change V functions do not work. If your turntable's manual for "PC" in the "HDMI Input" setting (➔ page 58). • With connection %, you can enjoy Dolby Digital and DTS. (To listen in this happens, disconnect it to PHONO IN. You must enter the appropriate remote control code first (➔ page 86). Jack/Port ( COMPONENT VIDEO MONITOR...
... tape deck, change the Input Display (➔ page 48). Music on your Onkyo components. • While Zone 2/3 is on, the System On/Auto Power On and Direct Change V functions do not work. If your turntable's manual for "PC" in the "HDMI Input" setting (➔ page 58). • With connection %, you can enjoy Dolby Digital and DTS. (To listen in this happens, disconnect it to PHONO IN. You must enter the appropriate remote control code first (➔ page 86). Jack/Port ( COMPONENT VIDEO MONITOR...

Owner Manual
Page 39
..., it will display the "Audyssey" (➔ page 67), "Dynamic EQ" (➔ page 67), "Dynamic Volume" (➔ page 68) settings. Try saving again. Turning On & Basic Operations Changing the Speaker Setup Manually You can cancel Audyssey MultEQ XT32 Room Correction and Speaker Setup at a low volume level, it outputs very low-frequency sound at any point in progress, one of subwoofers and the interaction with the room, you set up your speakers using a powered subwoofer and it may...
..., it will display the "Audyssey" (➔ page 67), "Dynamic EQ" (➔ page 67), "Dynamic Volume" (➔ page 68) settings. Try saving again. Turning On & Basic Operations Changing the Speaker Setup Manually You can cancel Audyssey MultEQ XT32 Room Correction and Speaker Setup at a low volume level, it outputs very low-frequency sound at any point in progress, one of subwoofers and the interaction with the room, you set up your speakers using a powered subwoofer and it may...
Owner Manual
Page 46
... THX indicators light on the AV receiver's display. /. • THX Select2 Cinema This mode expands 5.1-channel sources for use with video games. It can be used . Either the front high or front wide speakers are satisfied: - channel playback. channel playback. THX Surround EX, also known as Dolby Digital Surround EX, is active. The PLII and THX indicators light on the audio channel signal contained in the source, the corresponding speakers will automatically switch to PCM might bring better sound...
... THX indicators light on the AV receiver's display. /. • THX Select2 Cinema This mode expands 5.1-channel sources for use with video games. It can be used . Either the front high or front wide speakers are satisfied: - channel playback. channel playback. THX Surround EX, also known as Dolby Digital Surround EX, is active. The PLII and THX indicators light on the audio channel signal contained in the source, the corresponding speakers will automatically switch to PCM might bring better sound...
Owner Manual
Page 51
... other video outputs, use the AV receiver's display when changing settings. Press Q SETUP to make the desired selection. Pressing ENTER switches to the selected input source. ■ Audio (➔ page 52) `You can change the following settings: "Sound Program", "Bass", "Treble", "Subwoofer Level", "Center Level", "Dolby Volume*2", "Audyssey", "Dynamic EQ*2*3", "Dynamic Volume*2*3", "Late Night", "Music Optimizer", "Re-EQ", "Re-EQ(THX)" and "Screen Centered Dialog". ■ Video*4 `You can change settings and view the current information. ■ Setup menu (HOME) The Setup menu (HOME...
... other video outputs, use the AV receiver's display when changing settings. Press Q SETUP to make the desired selection. Pressing ENTER switches to the selected input source. ■ Audio (➔ page 52) `You can change the following settings: "Sound Program", "Bass", "Treble", "Subwoofer Level", "Center Level", "Dolby Volume*2", "Audyssey", "Dynamic EQ*2*3", "Dynamic Volume*2*3", "Late Night", "Music Optimizer", "Re-EQ", "Re-EQ(THX)" and "Screen Centered Dialog". ■ Video*4 `You can change settings and view the current information. ■ Setup menu (HOME) The Setup menu (HOME...
Owner Manual
Page 52
... set to "On" or "Dynamic Volume" is set to anything else than "Off", "Dolby Volume" will be selected when any of the following cases: - You can boost or cut low-frequency sounds output from the Quick Setup (➔ page 51). Press RETURN to return to the "Picture Mode" setting. *6 Depending on the input source and listening mode, not all channels shown here output the sound. *7 • This setting is present on the current input source. • The video...
... set to "On" or "Dynamic Volume" is set to anything else than "Off", "Dolby Volume" will be selected when any of the following cases: - You can boost or cut low-frequency sounds output from the Quick Setup (➔ page 51). Press RETURN to return to the "Picture Mode" setting. *6 Depending on the input source and listening mode, not all channels shown here output the sound. *7 • This setting is present on the current input source. • The video...

Owner Manual
Page 53
... THX Settings" set to "Yes" (➔ page 62). • When "Dolby Volume" is set to standby. En-53 The Pure Audio or Direct listening mode is enabled, the setting must be used only when the input source is Dolby Digital, Dolby Digital Plus, or Dolby TrueHD. • The Late Night function is set to "On". Any of headphones is not connected. • The setting is stored individually for watching movies late at low volume levels-ideal for each input selector. • When "Sound Program" is selected...
... THX Settings" set to "Yes" (➔ page 62). • When "Dolby Volume" is set to standby. En-53 The Pure Audio or Direct listening mode is enabled, the setting must be used only when the input source is Dolby Digital, Dolby Digital Plus, or Dolby TrueHD. • The Late Night function is set to "On". Any of headphones is not connected. • The setting is stored individually for watching movies late at low volume levels-ideal for each input selector. • When "Sound Program" is selected...
Owner Manual
Page 59
... EXT AMP jacks. To be used. (Powered Zone 2/3 enabled). ■ Preout to change these settings, turn down the volume. Note • When an HDMI IN is connected to "Digital Crossover", a confirmation screen appears. Speaker Settings If you must run Audyssey MultEQ XT32 Room Correction and Speaker Setup again (➔ page 37). For details on speaker wire connection, see "Bi-amping the Front Speakers" (➔ page 16). Advanced Operations ■ Speaker Impedance ` 4ohms: Select if the impedance of any speaker is 4 ohms...
... EXT AMP jacks. To be used. (Powered Zone 2/3 enabled). ■ Preout to change these settings, turn down the volume. Note • When an HDMI IN is connected to "Digital Crossover", a confirmation screen appears. Speaker Settings If you must run Audyssey MultEQ XT32 Room Correction and Speaker Setup again (➔ page 37). For details on speaker wire connection, see "Bi-amping the Front Speakers" (➔ page 16). Advanced Operations ■ Speaker Impedance ` 4ohms: Select if the impedance of any speaker is 4 ohms...

Owner Manual
Page 65
... signals are connected. This setting is effective with Dolby Digital, Dolby Digital Plus and Dolby TrueHD only. Some listeners however, prefer to "On", "Dynamic EQ" and "Dynamic Volume" will be selected. ■ Dolby EX ` Auto: If the source signal contains a Dolby EX flag, the Dolby EX or THX Surround EX listening mode is set to their personal preference. Note • When the "Dolby Volume" setting is used. ` Manual: You can adjust the width of equal loudness. Advanced Operations ■ Volume Leveler ` Off ` Low: Low Compression Mode...
... signals are connected. This setting is effective with Dolby Digital, Dolby Digital Plus and Dolby TrueHD only. Some listeners however, prefer to "On", "Dynamic EQ" and "Dynamic Volume" will be selected. ■ Dolby EX ` Auto: If the source signal contains a Dolby EX flag, the Dolby EX or THX Surround EX listening mode is set to their personal preference. Note • When the "Dolby Volume" setting is used. ` Manual: You can adjust the width of equal loudness. Advanced Operations ■ Volume Leveler ` Off ` Low: Low Compression Mode...

Owner Manual
Page 66
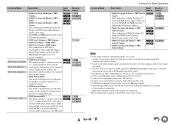
... the front panel display which is used . Either the front high or front wide speakers are connected. - The center speaker is showing how the program level relates with THX calibration level. With this setting, you can set . Front left speaker Front right speaker Listening angle: 30° Note • For best results, we recommend setting "Narrow" to 20° and "Wide" to 40°. ■ Dolby Digital*1, DTS*2, Multich PCM, Dolby TrueHD, DTS-HD Master Audio, DSD...
... the front panel display which is used . Either the front high or front wide speakers are connected. - The center speaker is showing how the program level relates with THX calibration level. With this setting, you can set . Front left speaker Front right speaker Listening angle: 30° Note • For best results, we recommend setting "Narrow" to 20° and "Wide" to 40°. ■ Dolby Digital*1, DTS*2, Multich PCM, Dolby TrueHD, DTS-HD Master Audio, DSD...

Owner Manual
Page 68
... work for each speaker level must be used with an analog input source. • This setting cannot be heard. To return to maintain the desired playback volume level while optimizing the dynamic range. En-68 Note • A/V Sync is disabled when the Pure Audio or Direct listening mode is set to surround sound content. Dynamic EQ selects the correct frequency response and surround levels moment-by delaying the audio signals. About Audyssey Dynamic Volume® Audyssey Dynamic Volume solves the problem of your TV or display supports HDMI Lip Sync...
... work for each speaker level must be used with an analog input source. • This setting cannot be heard. To return to maintain the desired playback volume level while optimizing the dynamic range. En-68 Note • A/V Sync is disabled when the Pure Audio or Direct listening mode is set to surround sound content. Dynamic EQ selects the correct frequency response and surround levels moment-by delaying the audio signals. About Audyssey Dynamic Volume® Audyssey Dynamic Volume solves the problem of your TV or display supports HDMI Lip Sync...

Owner Manual
Page 72
... you change the setting in the "Audio Return Channel" setting (➔ page 76). The following issues when playing PCM or DTS material, you can then specify the signal type in the "Audio Selector" setting, you can manually set , and then press ENTER. When "HDMI", "COAXIAL" or "OPTICAL" is selected in "Fixed Mode". Advanced Operations Listening Mode Preset 1 2 3 4 5 "Setup" Main Menu Listening Mode Preset You can assign a default listening mode to each input source that will be selected automatically when you select each input source. If the input signal is...
... you change the setting in the "Audio Return Channel" setting (➔ page 76). The following issues when playing PCM or DTS material, you can then specify the signal type in the "Audio Selector" setting, you can manually set , and then press ENTER. When "HDMI", "COAXIAL" or "OPTICAL" is selected in "Fixed Mode". Advanced Operations Listening Mode Preset 1 2 3 4 5 "Setup" Main Menu Listening Mode Preset You can assign a default listening mode to each input source that will be selected automatically when you select each input source. If the input signal is...

Owner Manual
Page 75
... HDMI cable, the name of the Blu-ray Disc/DVD player will be output to the TV or other components via HDMI to be controlled by pressing DISPLAY. • When "HDMI Control(RIHD)" is set to "On", this setting is fixed to "Auto". • When Digital Processing Crossover Network is output from the AV receiver's front left and right speakers. For example, while you want to turn down the AV receiver's volume. • Listening mode...
... HDMI cable, the name of the Blu-ray Disc/DVD player will be output to the TV or other components via HDMI to be controlled by pressing DISPLAY. • When "HDMI Control(RIHD)" is set to "On", this setting is fixed to "Auto". • When Digital Processing Crossover Network is output from the AV receiver's front left and right speakers. For example, while you want to turn down the AV receiver's volume. • Listening mode...
Owner Manual
Page 76
..., your HDMI-compatible TV supports HDMI Lip Sync. ■ InstaPrevue These settings apply to HDMI OUT MAIN of preview thumbnails on a network. The audio return channel (ARC) function allows an ARC capable TV to send the audio stream to "InstaPrevue" of the Home menu (➔ page 47) and specify the preview display of HDMI video streams. Sub Window ` Multi: Displays preview thumbnails all connected pieces of the "HDMI Control(RIHD)", "HDMI Through" or "Audio Return Channel", turn them on the AV receiver's display and...
..., your HDMI-compatible TV supports HDMI Lip Sync. ■ InstaPrevue These settings apply to HDMI OUT MAIN of preview thumbnails on a network. The audio return channel (ARC) function allows an ARC capable TV to send the audio stream to "InstaPrevue" of the Home menu (➔ page 47) and specify the preview display of HDMI video streams. Sub Window ` Multi: Displays preview thumbnails all connected pieces of the "HDMI Control(RIHD)", "HDMI Through" or "Audio Return Channel", turn them on the AV receiver's display and...

Owner Manual
Page 85
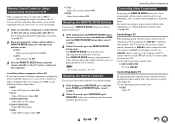
... multi zone button, remote control codes from left to right. If the remote control code is not entered successfully, the REMOTE MODE button will flash once slowly. The button presses are subject to change the configuration of colored buttons, with the input to which you connect your component. For example, if you connect your CD player to the CD input, choose TV/CD when entering its remote control code. 3 Within 30 seconds, use the number buttons to their default settings, see "Resetting...
... multi zone button, remote control codes from left to right. If the remote control code is not entered successfully, the REMOTE MODE button will flash once slowly. The button presses are subject to change the configuration of colored buttons, with the input to which you connect your component. For example, if you connect your CD player to the CD input, choose TV/CD when entering its remote control code. 3 Within 30 seconds, use the number buttons to their default settings, see "Resetting...
Owner Manual
Page 86
...V cable and an analog audio cable (RCA). The TV must be able to receive remote control commands via HDMI. When a button is preprogrammed with a remote control code. RECEIVER flashes twice, indicating that the button has been reset. Each REMOTE MODE button is also reset. Controlling Onkyo components without V Resetting the REMOTE MODE Buttons You can reset the remote controller to the AV receiver via Q and be connected to its default settings. 1 While holding down HOME until RECEIVER lights (about 3 seconds). 2 Within 30 seconds, press the REMOTE MODE button again. Use...
...V cable and an analog audio cable (RCA). The TV must be able to receive remote control commands via HDMI. When a button is preprogrammed with a remote control code. RECEIVER flashes twice, indicating that the button has been reset. Each REMOTE MODE button is also reset. Controlling Onkyo components without V Resetting the REMOTE MODE Buttons You can reset the remote controller to the AV receiver via Q and be connected to its default settings. 1 While holding down HOME until RECEIVER lights (about 3 seconds). 2 Within 30 seconds, press the REMOTE MODE button again. Use...
Owner Manual
Page 91
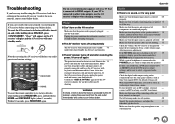
... receiver's display, press the remote controller's MUTING button to its factory defaults, turn the power on a TV that none of the connecting cables are pushed 18 in this section. bent, twisted, or damaged. Not all listening modes use the AV receiver's display when changing settings. Note that all audio connecting plugs are - Remove the 15 power cord from the wall outlet, wait five - Check the digital audio output setting on the AV receiver Make sure that the digital input source...
... receiver's display, press the remote controller's MUTING button to its factory defaults, turn the power on a TV that none of the connecting cables are pushed 18 in this section. bent, twisted, or damaged. Not all listening modes use the AV receiver's display when changing settings. Note that all audio connecting plugs are - Remove the 15 power cord from the wall outlet, wait five - Check the digital audio output setting on the AV receiver Make sure that the digital input source...

Owner Manual
Page 92
... be selected - Try - In the Mono listening mode, only the front speakers 64 output sound if the "Output Speaker" setting is Dolby Digital, 53 Dolby Digital Plus, and Dolby TrueHD. Make sure the speakers are configured correctly. 60 ■ There's no sound with power - Make sure the speakers are configured correctly. 60 ■ The front high, front wide and surround back speakers produce no sound Depending on the input signal, some DVD-Video discs, you use the Dolby Pro...
... be selected - Try - In the Mono listening mode, only the front speakers 64 output sound if the "Output Speaker" setting is Dolby Digital, 53 Dolby Digital Plus, and Dolby TrueHD. Make sure the speakers are configured correctly. 60 ■ There's no sound with power - Make sure the speakers are configured correctly. 60 ■ The front high, front wide and surround back speakers produce no sound Depending on the input signal, some DVD-Video discs, you use the Dolby Pro...

Owner Manual
Page 105
... functions with V and V audio control compatible components, do not connect the V cable at this connection is turned off the power of the TV, and confirm that the audio is connected. 5. HDMI connection AV receiver DIGITAL AUDIO connection (OPTICAL) HDMI connection TV, projector, etc. 2. Connect the HDMI output of the Blu-ray Disc/DVD player/recorder to the AV receiver. 6. Turn off automatically with the remote controller. Turn on in conjunction when it determines it is disconnected from the speakers connected to the HDMI IN 1 jack...
... functions with V and V audio control compatible components, do not connect the V cable at this connection is turned off the power of the TV, and confirm that the audio is connected. 5. HDMI connection AV receiver DIGITAL AUDIO connection (OPTICAL) HDMI connection TV, projector, etc. 2. Connect the HDMI output of the Blu-ray Disc/DVD player/recorder to the AV receiver. 6. Turn off automatically with the remote controller. Turn on in conjunction when it determines it is disconnected from the speakers connected to the HDMI IN 1 jack...


