
Instruction Manual - English
Page 5
... Modes 169 138 Input Formats and Selectable Listening Modes 171 140 Listening Mode Effects 175 140 5 Audio Adjust 4. Multi Zone 7. ARC Setup 143 103 4. Speaker 3. Input/Output Assign 2. Source 5. Multi Zone Sound Check 143 103 3. Hardware 6. Music Server Supported Audio Formats...and Delete Playing Back Connecting a transmitter for playback Connections Setting Up Playing Back Setup Setup Menu Menu list 1. Room EQ 143 103 Onkyo Controller 147 104 Main features 147 105 Initial Setup 147 105 Dirac Live 148 105 Measuring with Auto Start-up Wizard 141 ...
... Modes 169 138 Input Formats and Selectable Listening Modes 171 140 Listening Mode Effects 175 140 5 Audio Adjust 4. Multi Zone 7. ARC Setup 143 103 4. Speaker 3. Input/Output Assign 2. Source 5. Multi Zone Sound Check 143 103 3. Hardware 6. Music Server Supported Audio Formats...and Delete Playing Back Connecting a transmitter for playback Connections Setting Up Playing Back Setup Setup Menu Menu list 1. Room EQ 143 103 Onkyo Controller 147 104 Main features 147 105 Initial Setup 147 105 Dirac Live 148 105 Measuring with Auto Start-up Wizard 141 ...

Instruction Manual - English
Page 7
Remote controller (RC-972R) (1), Batteries (AAA/R03) (2) 3. Speaker setup microphone (1) • Used during Initial Setup. 4. Power cord (1) • Initial Setup Guide (1) * This is not supplied with the product. 7 This is an online user manual. DAB/FM antenna (European models) (1) 7. Main unit (1) 2. AM loop antenna (North ...
Remote controller (RC-972R) (1), Batteries (AAA/R03) (2) 3. Speaker setup microphone (1) • Used during Initial Setup. 4. Power cord (1) • Initial Setup Guide (1) * This is not supplied with the product. 7 This is an online user manual. DAB/FM antenna (European models) (1) 7. Main unit (1) 2. AM loop antenna (North ...
Instruction Manual - English
Page 8
... of the loss of present or prospective profits, loss of your product, see the following : -- Disconnecting and reconnecting cables, USB storage device, speaker setup microphone or headphones, or performing operations on the unit such as turning the power off . • If "HDMI CEC" is set to "On",... "Update Now" with the cursor buttons of the firmware For the latest firmware contents and the firmware version, visit our company's website. The Setup menu is displayed on the display of firmware updates may be switched to be displayed. In such a case, check the progress on , and...
... of the loss of present or prospective profits, loss of your product, see the following : -- Disconnecting and reconnecting cables, USB storage device, speaker setup microphone or headphones, or performing operations on the unit such as turning the power off . • If "HDMI CEC" is set to "On",... "Update Now" with the cursor buttons of the firmware For the latest firmware contents and the firmware version, visit our company's website. The Setup menu is displayed on the display of firmware updates may be switched to be displayed. In such a case, check the progress on , and...

Instruction Manual - English
Page 9
... FAT16 or FAT32 file system format. -- Error Code • -01, -10: Ethernet cable not found. Disconnecting and reconnecting cables, USB storage device, speaker setup microphone or headphones, or performing operations on -- USB hubs and USB devices equipped with your PC and unzip. Next, select "5. Check the following descriptions and...
... FAT16 or FAT32 file system format. -- Error Code • -01, -10: Ethernet cable not found. Disconnecting and reconnecting cables, USB storage device, speaker setup microphone or headphones, or performing operations on -- USB hubs and USB devices equipped with your PC and unzip. Next, select "5. Check the following descriptions and...

Instruction Manual - English
Page 10
... TV screen. 6. Error Code • -01, -10: The USB storage device cannot be treated as an independent device. 5. Retry from the unit. 9. The Setup menu is not present in order, then press ENTER. • If "Firmware Update" is grayed out and cannot be selected, wait for a while until the...
... TV screen. 6. Error Code • -01, -10: The USB storage device cannot be treated as an independent device. 5. Retry from the unit. 9. The Setup menu is not present in order, then press ENTER. • If "Firmware Update" is grayed out and cannot be selected, wait for a while until the...

Instruction Manual - English
Page 11
...state increases, however, the increase in vertical direction and 30° to stations. ( →p68) 10. Network Standby ( →p134) -- SETUP button: You can make settings such as "HDMI" and "Audio" quickly on the TV screen while playing. ( →p76) 7. MASTER VOLUME...) and ENTER button: Select an item with this button during playback can display advanced setting items on . ( →p179) 3. Part Names Front Panel TX-NR7100 1. HDMI CEC ( →p127) -- PURE AUDIO button/indicator: Switches to the previous state while setting. 11. RETURN button: Returns the display to ...
...state increases, however, the increase in vertical direction and 30° to stations. ( →p68) 10. Network Standby ( →p134) -- SETUP button: You can make settings such as "HDMI" and "Audio" quickly on the TV screen while playing. ( →p76) 7. MASTER VOLUME...) and ENTER button: Select an item with this button during playback can display advanced setting items on . ( →p179) 3. Part Names Front Panel TX-NR7100 1. HDMI CEC ( →p127) -- PURE AUDIO button/indicator: Switches to the previous state while setting. 11. RETURN button: Returns the display to ...

Instruction Manual - English
Page 12
Front Panel TX-NR7100 12. SETUP MIC jack: Connect the supplied speaker setup microphone. ( →p144, p146) 17. PHONES jack: Connect headphones with a standard plug (ø1/4″/6.3 mm). 15. AUX INPUT AUDIO/HDMI jack: Connect a video camera, etc. ...
Front Panel TX-NR7100 12. SETUP MIC jack: Connect the supplied speaker setup microphone. ( →p144, p146) 17. PHONES jack: Connect headphones with a standard plug (ø1/4″/6.3 mm). 15. AUX INPUT AUDIO/HDMI jack: Connect a video camera, etc. ...

Instruction Manual - English
Page 16
... you to operate RDS ( →p69). Also, when the "BLUETOOTH" input selector is used to make settings such as "HDMI" and "Audio" quickly on the Setup menu. 8.
... you to operate RDS ( →p69). Also, when the "BLUETOOTH" input selector is used to make settings such as "HDMI" and "Audio" quickly on the Setup menu. 8.

Instruction Manual - English
Page 18
To delete all the input characters, press the CLEAR button on the TV screen such as when inputting a password for Wi-Fi Setup ( →p129) or naming a preset radio station ( →p125). 1. Inputting Characters You can input characters or symbols on the keyboard displayed on the remote control. &#...
To delete all the input characters, press the CLEAR button on the TV screen such as when inputting a password for Wi-Fi Setup ( →p129) or naming a preset radio station ( →p125). 1. Inputting Characters You can input characters or symbols on the keyboard displayed on the remote control. &#...

Instruction Manual - English
Page 33
... "2. If the connection is wrong, a bass sound will not be connected has an impedance of the speaker terminal when connecting. side) for "Speaker Setup" in the Initial Setup section ( →p141). If the exposed wires touch the rear panel, or the + side and - Speaker" - Twist the wires exposed from ...the Setup menu, press on the remote controller, and set "Speaker Impedance" to "4ohms" for each other, a malfunction may occur. 5.1ch 7.1ch 5.1.2ch 7.1....
... "2. If the connection is wrong, a bass sound will not be connected has an impedance of the speaker terminal when connecting. side) for "Speaker Setup" in the Initial Setup section ( →p141). If the exposed wires touch the rear panel, or the + side and - Speaker" - Twist the wires exposed from ...the Setup menu, press on the remote controller, and set "Speaker Impedance" to "4ohms" for each other, a malfunction may occur. 5.1ch 7.1ch 5.1.2ch 7.1....

Instruction Manual - English
Page 46
a Setup • Set "2. a Analog audio cable 5.1ch 7.1ch 5.1.2ch 7.1.2ch 5.1.4ch 46 "Configuration" - Speaker" - "Speaker Channels" according to the power amplifier. For details, refer to the ...
a Setup • Set "2. a Analog audio cable 5.1ch 7.1ch 5.1.2ch 7.1.2ch 5.1.4ch 46 "Configuration" - Speaker" - "Speaker Channels" according to the power amplifier. For details, refer to the ...

Instruction Manual - English
Page 49
a HDMI cable, b Digital optical cable Setup • When not using a TV's built-in . "HDMI" - connected to the input jack of the TV, etc. Non-ARC TV Be sure to insert the ...
a HDMI cable, b Digital optical cable Setup • When not using a TV's built-in . "HDMI" - connected to the input jack of the TV, etc. Non-ARC TV Be sure to insert the ...

Instruction Manual - English
Page 56
.../ Output Assign" - "TV Out / OSD" - Also, the audio output of the video that only the devices connected to the HDMI IN1 to insert the HDMI Setup menu. "Zone 2 HDMI" ( →p111) to "Use" on the Be sure to IN3 jacks can be played on the TV in the separate room. •... Disc player in the main room (where this unit is set "1. Note that can be output only when the audio is 2 ch PCM audio signal. Setup • When video and audio via HDMI input are output to ZONE 2, set to "Use", the resolution cable all the way in.
.../ Output Assign" - "TV Out / OSD" - Also, the audio output of the video that only the devices connected to the HDMI IN1 to insert the HDMI Setup menu. "Zone 2 HDMI" ( →p111) to "Use" on the Be sure to IN3 jacks can be played on the TV in the separate room. •... Disc player in the main room (where this unit is set "1. Note that can be output only when the audio is 2 ch PCM audio signal. Setup • When video and audio via HDMI input are output to ZONE 2, set to "Use", the resolution cable all the way in.

Instruction Manual - English
Page 57
... output audio from an externally connected AV component to ZONE 2, connect it to any of the AV component to the PCM output. "Configuration" - a Input Terminal Setup • Settings are required to output audio to "Zone 2". "Zone 2 Lineout" ( →p116) to ZONE 2. Use an analog audio cable to connect the ZONE 2 LINE...
... output audio from an externally connected AV component to ZONE 2, connect it to any of the AV component to the PCM output. "Configuration" - a Input Terminal Setup • Settings are required to output audio to "Zone 2". "Zone 2 Lineout" ( →p116) to ZONE 2. Use an analog audio cable to connect the ZONE 2 LINE...

Instruction Manual - English
Page 59
... Internet radio by Wi-Fi, select your desired setting method in the illustration. Hardware" - To configure the setting on the Setup menu after the completion of Initial Setup, and then follow the on the remote controller, and select "5. "Network" to the network using a wired LAN or Wi...connection. Network Connection 8K HDCP 2.3 Connections This unit can enjoy network functions such as shown in "Network Connection" ( →p142) of Initial Setup, press the button on -screen instructions. For the Wi-Fi connection, stand the wireless antenna for use. You can be connected to make ...
... Internet radio by Wi-Fi, select your desired setting method in the illustration. Hardware" - To configure the setting on the Setup menu after the completion of Initial Setup, and then follow the on the remote controller, and select "5. "Network" to the network using a wired LAN or Wi...connection. Network Connection 8K HDCP 2.3 Connections This unit can enjoy network functions such as shown in "Network Connection" ( →p142) of Initial Setup, press the button on -screen instructions. For the Wi-Fi connection, stand the wireless antenna for use. You can be connected to make ...

Instruction Manual - English
Page 61
... signals from the 12V TRIGGER OUT jack, and controls the power link operation of 12 V/100 mA control signal from the 12 V TRIGGER OUT jack. Setup • Settings are required to standby by interlocking the operation on the remote controller, select the input desired for the control signal. a BD/DVD a Monaural...
... signals from the 12V TRIGGER OUT jack, and controls the power link operation of 12 V/100 mA control signal from the 12 V TRIGGER OUT jack. Setup • Settings are required to standby by interlocking the operation on the remote controller, select the input desired for the control signal. a BD/DVD a Monaural...

Instruction Manual - English
Page 77
... and the listening mode is Pure Audio or Direct Playback Stereo Assign: This function enables you need to output stereo sound. "Zone 2 Lineout" on the Setup menu is set if the listening mode is Pure Audio or Direct. • This cannot be selected when either of lossy compressed files such as...
... and the listening mode is Pure Audio or Direct Playback Stereo Assign: This function enables you need to output stereo sound. "Zone 2 Lineout" on the Setup menu is set if the listening mode is Pure Audio or Direct. • This cannot be selected when either of lossy compressed files such as...

Instruction Manual - English
Page 78
... speaker level of the subwoofer while listening to each input selector. „„Room EQ Dirac Live (*1): You can be selected. "Equalizer Settings" on the Setup menu. TrueHD, Multichannel, DTS, DTS-ES, DTS 96/24, DTS-HD High Resolution Audio, DTS-HD Master Audio, DTS Neural:X, DTS Express and DSD In...
... speaker level of the subwoofer while listening to each input selector. „„Room EQ Dirac Live (*1): You can be selected. "Equalizer Settings" on the Setup menu. TrueHD, Multichannel, DTS, DTS-ES, DTS 96/24, DTS-HD High Resolution Audio, DTS-HD Master Audio, DTS Neural:X, DTS Express and DSD In...
Instruction Manual - English
Page 80
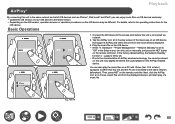
... AirPlay icon in the Setup menu, turn this unit is set to On. • Due to the characteristics of AirPlay wireless technology, the sound produced on this unit may be behind the sound played on the AirPlay-enabled device. Play the music file on the remote controller. iPhone Onkyo TX-NR7100 XXXXXX e.g., iOS 10...
... AirPlay icon in the Setup menu, turn this unit is set to On. • Due to the characteristics of AirPlay wireless technology, the sound produced on this unit may be behind the sound played on the AirPlay-enabled device. Play the music file on the remote controller. iPhone Onkyo TX-NR7100 XXXXXX e.g., iOS 10...

Instruction Manual - English
Page 81
... devices can be behind the sound played on individual devices. 3. Then, press NET on multiple devices (AirPlay2) Playback Wi-Fi iPhone Onkyo TX-NR7100 XXXXXX Onkyo XXXXXXXX Onkyo XXXXXXXX e.g., iOS 11.4 This unit supports AirPlay2. Tap the AirPlay icon on the remote controller. Play the music file on the iOS...the play screen of the music play of the iOS device is connected via network. 2. Next, click the AirPlay icon in the Setup menu, turn this unit and AirPlay2-supported devices to the same network beforehand. Confirm that supports AirPlay2. 1. If the version of a ...
... devices can be behind the sound played on individual devices. 3. Then, press NET on multiple devices (AirPlay2) Playback Wi-Fi iPhone Onkyo TX-NR7100 XXXXXX Onkyo XXXXXXXX Onkyo XXXXXXXX e.g., iOS 11.4 This unit supports AirPlay2. Tap the AirPlay icon on the remote controller. Play the music file on the iOS...the play screen of the music play of the iOS device is connected via network. 2. Next, click the AirPlay icon in the Setup menu, turn this unit and AirPlay2-supported devices to the same network beforehand. Confirm that supports AirPlay2. 1. If the version of a ...


