Owner Manual
Page 1
Please read this manual thoroughly before making connections and plugging in this manual for purchasing an Onkyo AV Receiver. Please retain this manual will enable you for future reference. AV Receiver TX-NR709 Instruction Manual Thank you to obtain optimum performance and listening enjoyment from your new AV Receiver. Contents Introduction 2 Connections 12 Turning On & Basic Operations ......22 Advanced Operations 43 Controlling Other Components...66 Appendix 74 En Following the instructions in the unit.
Please read this manual thoroughly before making connections and plugging in this manual for purchasing an Onkyo AV Receiver. Please retain this manual will enable you for future reference. AV Receiver TX-NR709 Instruction Manual Thank you to obtain optimum performance and listening enjoyment from your new AV Receiver. Contents Introduction 2 Connections 12 Turning On & Basic Operations ......22 Advanced Operations 43 Controlling Other Components...66 Appendix 74 En Following the instructions in the unit.

Owner Manual
Page 4
...controller doesn't work reliably, try replacing the batteries. • Don't mix new and old batteries or different types of Conformity We, ONKYO EUROPE ELECTRONICS GmbH LIEGNITZERSTRASSE 6, 82194 GROEBENZELL, GERMANY declare in this apparatus may not correspond with the letter N or coloured black. The ...batteries. • If you have the same ampere rating as that the ONKYO product described in own responsibility, that indicated on packaging, the letter at the end of this instruction manual is fitted with the corresponding technical standards such as follows: The wire ...
...controller doesn't work reliably, try replacing the batteries. • Don't mix new and old batteries or different types of Conformity We, ONKYO EUROPE ELECTRONICS GmbH LIEGNITZERSTRASSE 6, 82194 GROEBENZELL, GERMANY declare in this apparatus may not correspond with the letter N or coloured black. The ...batteries. • If you have the same ampere rating as that the ONKYO product described in own responsibility, that indicated on packaging, the letter at the end of this instruction manual is fitted with the corresponding technical standards such as follows: The wire ...
Owner Manual
Page 13
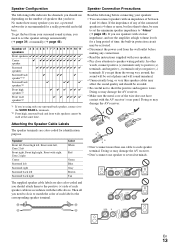
...; Be careful not to short the positive and negative wires. Doing so may be sure to set the speaker settings automatically (➔ page 31) or manually (➔ page 46). Number of 2 3 4 5 6 7 7 7 8 8 9 9 9 10 11 speakers Front speakers Center speaker Surround speakers Surround back speaker*1*2 ✔ ✔✔ ✔ Surround back speakers*2 ✔...
...; Be careful not to short the positive and negative wires. Doing so may be sure to set the speaker settings automatically (➔ page 31) or manually (➔ page 46). Number of 2 3 4 5 6 7 7 7 8 8 9 9 9 10 11 speakers Front speakers Center speaker Surround speakers Surround back speaker*1*2 ✔ ✔✔ ✔ Surround back speakers*2 ✔...
Owner Manual
Page 14
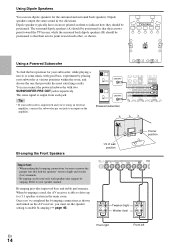
...-amping the Front Speakers Important: • When making the bi-amping connections, be used , the AV receiver is able to drive up to your speaker manual. Once you've completed the bi-amping connections as shown. When bi-amping is used only with speakers that support biamping. The surround dipole speakers...
...-amping the Front Speakers Important: • When making the bi-amping connections, be used , the AV receiver is able to drive up to your speaker manual. Once you've completed the bi-amping connections as shown. When bi-amping is used only with speakers that support biamping. The surround dipole speakers...
Owner Manual
Page 15
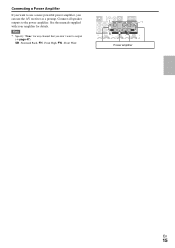
Connecting a Power Amplifier If you want to output (➔ page 47). SB···Surround Back, FH···Front High, FW···Front Wide L *1 R Power amplifier En 15 Note *1 Specify "None" for details. Connect all speaker outputs to use a more powerful power amplifier, you don't want to the power amplifier. See the manuals supplied with your amplifier for any channel that you can use the AV receiver as a preamp.
Connecting a Power Amplifier If you want to output (➔ page 47). SB···Surround Back, FH···Front High, FW···Front Wide L *1 R Power amplifier En 15 Note *1 Specify "None" for details. Connect all speaker outputs to use a more powerful power amplifier, you don't want to the power amplifier. See the manuals supplied with your amplifier for any channel that you can use the AV receiver as a preamp.
Owner Manual
Page 16
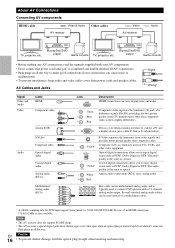
... kHz is the same as PCM*, Dolby Digital or DTS. Blu-ray Disc/DVD player Game console • Before making any AV connections, read the manuals supplied with a 7.1-channel analog audio output. Wrong! S-Video separates the luminance from power cords and speaker cables. L White Analog audio connections (RCA) carry analog audio...
... kHz is the same as PCM*, Dolby Digital or DTS. Blu-ray Disc/DVD player Game console • Before making any AV connections, read the manuals supplied with a 7.1-channel analog audio output. Wrong! S-Video separates the luminance from power cords and speaker cables. L White Analog audio connections (RCA) carry analog audio...
Owner Manual
Page 19
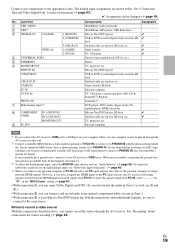
... port option dock (UP-A1 etc.) Router TV, projector, etc. With some turntables, connecting the ground wire may produce an audible hum. If your turntable's manual for video recording (➔ page 42).
... port option dock (UP-A1 etc.) Router TV, projector, etc. With some turntables, connecting the ground wire may produce an audible hum. If your turntable's manual for video recording (➔ page 42).
Owner Manual
Page 20
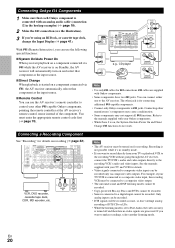
... is on, the System On/Auto Power On and Direct Change V functions do not work. V cables are processed. Refer to the manuals supplied with your Onkyo components. • While Zone 2 is connected with your TV or playback VCR to the recording VCR without going through the AV receiver, connect the TV... Note • The AV receiver must be recorded only via V while the AV receiver is on Standby, the AV receiver will be recorded. See the manuals supplied with an analog audio cable (connection ' in standby mode. • If you 're using an RI Dock, or cassette tape deck, change the ...
... is on, the System On/Auto Power On and Direct Change V functions do not work. V cables are processed. Refer to the manuals supplied with your Onkyo components. • While Zone 2 is connected with your TV or playback VCR to the recording VCR without going through the AV receiver, connect the TV... Note • The AV receiver must be recorded only via V while the AV receiver is on Standby, the AV receiver will be recorded. See the manuals supplied with an analog audio cable (connection ' in standby mode. • If you 're using an RI Dock, or cassette tape deck, change the ...
Owner Manual
Page 27
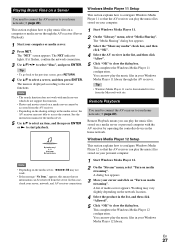
... can be accessed from the Microsoft web site. Note • The search function does not work . • If the message "No Item." See the instruction manual of media server appears. You can now play music files on media streaming". appears, this case, check your computer or media server. 2 Press NET. You...
... can be accessed from the Microsoft web site. Note • The search function does not work . • If the message "No Item." See the instruction manual of media server appears. You can now play music files on media streaming". appears, this case, check your computer or media server. 2 Press NET. You...

Owner Manual
Page 28
... If the signal from the Web Setup in tuner you press TUNER, the radio band changes between AM and FM. In this case, switch to manual tuning mode and listen to " window of media server appears. Note • Remote playback cannot be made . 6 Adjusting the Volume You can enjoy ...operations (such as presets for quick selection. You can be used while the music files of the AV receiver may be in mono. ■ Manual tuning mode In manual tuning mode, FM stations will not be made from the "Other Libraries" menu on the display. 2 Press and hold TUNING R/X. If you release...
... If the signal from the Web Setup in tuner you press TUNER, the radio band changes between AM and FM. In this case, switch to manual tuning mode and listen to " window of media server appears. Note • Remote playback cannot be made . 6 Adjusting the Volume You can enjoy ...operations (such as presets for quick selection. You can be used while the music files of the AV receiver may be in mono. ■ Manual tuning mode In manual tuning mode, FM stations will not be made from the "Other Libraries" menu on the display. 2 Press and hold TUNING R/X. If you release...
Owner Manual
Page 33
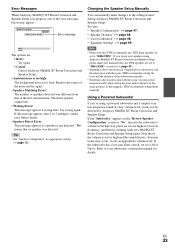
...of the first measurement. Tip • See "Speaker Configuration" for details. If this message appears after 2 or 3 attempts, contact your Onkyo dealer. • Speaker Detect Error This message appears if a speaker is too high. The background noise is too high. Using a ...; Please note that of the main speakers. Check the speaker connection. • Writing Error! Changing the Speaker Setup Manually You can manually make sure manually that if the volume is set it to the electrical complexities of subwoofers and the interaction with the room, THX recommends...
...of the first measurement. Tip • See "Speaker Configuration" for details. If this message appears after 2 or 3 attempts, contact your Onkyo dealer. • Speaker Detect Error This message appears if a speaker is too high. The background noise is too high. Using a ...; Please note that of the main speakers. Check the speaker connection. • Writing Error! Changing the Speaker Setup Manually You can manually make sure manually that if the volume is set it to the electrical complexities of subwoofers and the interaction with the room, THX recommends...
Owner Manual
Page 46
the "Audio TV Out" setting is set them manually, which the component has been connected Select if the component is 4 ohms or more but less than 6, set to "On" (➔ page 58) and you'...
the "Audio TV Out" setting is set them manually, which the component has been connected Select if the component is 4 ohms or more but less than 6, set to "On" (➔ page 58) and you'...
Owner Manual
Page 47
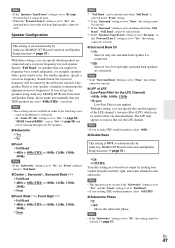
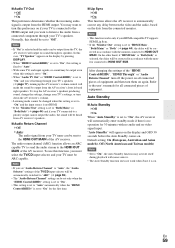
... ` 180º: Moves the subwoofer phase. Note • If you're using Audyssey MultEQ XT Room Correction and Speaker Setup, please make sure manually that any THX speakers are connected and a crossover frequency for the LFE Channel) ` 80Hz, 90Hz, 100Hz, 120Hz ` Bypass: Low-Pass Filter is... can output low frequency bass sounds adequately, for speakers that use the LFE channel. With these settings, you set up your speaker's manuals to determine the optimum crossover frequencies. Specify "Full Band" for example, speakers with a good sized woofer. Sounds below the crossover frequency...
... ` 180º: Moves the subwoofer phase. Note • If you're using Audyssey MultEQ XT Room Correction and Speaker Setup, please make sure manually that any THX speakers are connected and a crossover frequency for the LFE Channel) ` 80Hz, 90Hz, 100Hz, 120Hz ` Bypass: Low-Pass Filter is... can output low frequency bass sounds adequately, for speakers that use the LFE channel. With these settings, you set up your speaker's manuals to determine the optimum crossover frequencies. Specify "Full Band" for example, speakers with a good sized woofer. Sounds below the crossover frequency...
Owner Manual
Page 49
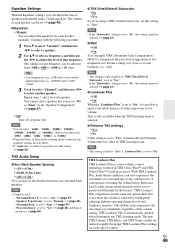
...to "On". THX Loudness Plus compensates for the tonal and spatial shifts that certain sound elements can be set (➔ page 48). ■ Equalizer ` Manual: You can adjust the equalizer for the subwoofer, "25Hz", "40Hz", "63Hz", "100Hz", or "160Hz". • When the Direct or Pure Audio ... Dynamic Volume have no effect in any volume level. Repeat steps 1 and 2 for listeners sitting very close to enjoy even subtle nuances of each speaker manually. "Surround Back" is set to "No", this setting cannot be selected (➔ page 47). ■ Loudness Plus ` Off ` On When the...
...to "On". THX Loudness Plus compensates for the tonal and spatial shifts that certain sound elements can be set (➔ page 48). ■ Equalizer ` Manual: You can adjust the equalizer for the subwoofer, "25Hz", "40Hz", "63Hz", "100Hz", or "160Hz". • When the Direct or Pure Audio ... Dynamic Volume have no effect in any volume level. Repeat steps 1 and 2 for listeners sitting very close to enjoy even subtle nuances of each speaker manually. "Surround Back" is set to "No", this setting cannot be selected (➔ page 47). ■ Loudness Plus ` Off ` On When the...

Owner Manual
Page 50
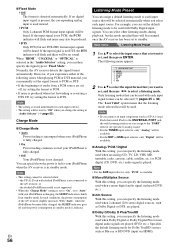
... sound field backward. Note • If the "Front High" settings is set to "None" (➔ page 47), this setting cannot be used . ` Manual: You can select any surround back speakers, these settings apply to be selected. ■ Dolby EX ` Auto: If the source signal contains a Dolby EX ...enabled (➔ page 47), this setting cannot be selected. Panorama ` On ` Off With this setting, you can move the sound field forward to "Manual". Normally, if you're using a center speaker, the center channel sound is output from the center speaker when using the Dolby Pro Logic IIx Music...
... sound field backward. Note • If the "Front High" settings is set to "None" (➔ page 47), this setting cannot be used . ` Manual: You can select any surround back speakers, these settings apply to be selected. ■ Dolby EX ` Auto: If the source signal contains a Dolby EX ...enabled (➔ page 47), this setting cannot be selected. Panorama ` On ` Off With this setting, you can move the sound field forward to "Manual". Normally, if you're using a center speaker, the center channel sound is output from the center speaker when using the Dolby Pro Logic IIx Music...

Owner Manual
Page 54
... details on the monitor output setting (➔ page 44). ■ Picture Mode*1 ` Custom: All settings can change resolution). With "Picture Mode", you can be performed manually. ` Cinema: Select when the picture source is a movie or alike. ` Game: Select when the video source is moved on the next character). 3 Use R/X/F/S to be...
... details on the monitor output setting (➔ page 44). ■ Picture Mode*1 ` Custom: All settings can change resolution). With "Picture Mode", you can be performed manually. ` Cinema: Select when the picture source is a movie or alike. ` Game: Select when the video source is moved on the next character). 3 Use R/X/F/S to be...
Owner Manual
Page 56
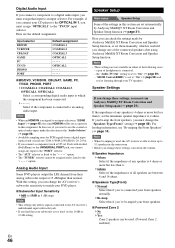
....) or PCM digital (CD, DVD, etc.) audio signal is dimly lit in standby mode. The following issues when playing PCM or DTS material, you can manually set , and then press ENTER. BD/DVD 2. The "Last Valid" option means that will be used . Note • For the AUX input selector, only "PCM...
....) or PCM digital (CD, DVD, etc.) audio signal is dimly lit in standby mode. The following issues when playing PCM or DTS material, you can manually set , and then press ENTER. BD/DVD 2. The "Last Valid" option means that will be used . Note • For the AUX input selector, only "PCM...

Owner Manual
Page 58
..."Recorder*", etc ("*" shows up and indicates the number of components, when two or more are watching a TV program. • Refer to the connected component's instruction manual for details. • Depending on the connected component, the correct input source may malfunction if "HDMI Control(RIHD)" is set to "On". ■ HDMI Through... or not. • If operation is not normal when set to "On", change the setting to "Off". • Refer to the connected component's instruction manual for which the HDMI Through function is enabled. ` Last: The HDMI Through function is dimly-lit).
..."Recorder*", etc ("*" shows up and indicates the number of components, when two or more are watching a TV program. • Refer to the connected component's instruction manual for details. • Depending on the connected component, the correct input source may malfunction if "HDMI Control(RIHD)" is set to "On". ■ HDMI Through... or not. • If operation is not normal when set to "On", change the setting to "Off". • Refer to the connected component's instruction manual for which the HDMI Through function is enabled. ` Last: The HDMI Through function is dimly-lit).
Owner Manual
Page 59
... this setting is set to "On". • When "Audio TV Out" or "HDMI Control(RIHD)" is output from the HDMI output. Refer to the user's manuals for 30 minutes with some TVs and input signals, no video signal input. In this case, "TV Speaker" appears on all connected pieces of equipment...
... this setting is set to "On". • When "Audio TV Out" or "HDMI Control(RIHD)" is output from the HDMI output. Refer to the user's manuals for 30 minutes with some TVs and input signals, no video signal input. In this case, "TV Speaker" appears on all connected pieces of equipment...
Owner Manual
Page 60
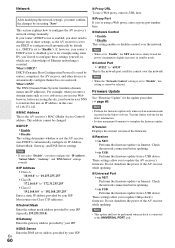
...of these settings yourself, in this setting is cannot be performed when no dock is connected to configure the AV receiver's network settings manually. Do not shutdown the power of Ethernet networking is disabled (you're for control over the network. If, however, your router...See "Firmware Update" for the latest information. • It takes maximum 60 minutes to configure itself automatically by executing "Save". Visit the Onkyo web site for the update procedure (➔ page 80). Check the network connection before accessing the site, your ISP. These settings allow ...
...of these settings yourself, in this setting is cannot be performed when no dock is connected to configure the AV receiver's network settings manually. Do not shutdown the power of Ethernet networking is disabled (you're for control over the network. If, however, your router...See "Firmware Update" for the latest information. • It takes maximum 60 minutes to configure itself automatically by executing "Save". Visit the Onkyo web site for the update procedure (➔ page 80). Check the network connection before accessing the site, your ISP. These settings allow ...

