
Owner Manual
Page 5
...Turning On/Off the AV Receiver 24 Turning On 24 Turning Off 24 Basic Operations 25 Selecting the Language Used for the Onscreen Setup Menus 25 Playing the Connected Component 25 Displaying Source Information 25 Setting the Display Brightness 25 Muting the AV Receiver 26 Using the... Setting the Powered Zone 2 70 Using Zone 2 70 Using the Remote Controller in Zone 2 and Multiroom Control Kits 72 Controlling iPod & Other Components Controlling iPod 73 Connecting the iPod Directly to the USB Port 73 Connecting an Onkyo Dock 74 Using the Onkyo Dock 75 Controlling Your iPod 76 ...
...Turning On/Off the AV Receiver 24 Turning On 24 Turning Off 24 Basic Operations 25 Selecting the Language Used for the Onscreen Setup Menus 25 Playing the Connected Component 25 Displaying Source Information 25 Setting the Display Brightness 25 Muting the AV Receiver 26 Using the... Setting the Powered Zone 2 70 Using Zone 2 70 Using the Remote Controller in Zone 2 and Multiroom Control Kits 72 Controlling iPod & Other Components Controlling iPod 73 Connecting the iPod Directly to the USB Port 73 Connecting an Onkyo Dock 74 Using the Onkyo Dock 75 Controlling Your iPod 76 ...

Owner Manual
Page 6
...1080p Compatible) with Faroudja DCDi Cinema Enhancement • HDMI (Ver.1.4a with onscreen display setup) RI-Com- All rights reserved. *2 Manufactured under license under license from Audyssey Laboratories...8226; Dual Subwoofer Pre Out • Banana Plug-Compatible Speaker Posts*8 • Powered Zone 2 • Internet Radio* Connectivity (SIRIUS Internet Radio*9/ vTuner/Last.fm/Pandora/Rhapsody... trademarks and trademarks of Audyssey Laboratories. *5 Music Optimizer™ is a trademark of Onkyo Corporation. *6 "HDMI, the HDMI Logo, and High-Definition Multimedia Interface are trademarks...
...1080p Compatible) with Faroudja DCDi Cinema Enhancement • HDMI (Ver.1.4a with onscreen display setup) RI-Com- All rights reserved. *2 Manufactured under license under license from Audyssey Laboratories...8226; Dual Subwoofer Pre Out • Banana Plug-Compatible Speaker Posts*8 • Powered Zone 2 • Internet Radio* Connectivity (SIRIUS Internet Radio*9/ vTuner/Last.fm/Pandora/Rhapsody... trademarks and trademarks of Audyssey Laboratories. *5 Music Optimizer™ is a trademark of Onkyo Corporation. *6 "HDMI, the HDMI Logo, and High-Definition Multimedia Interface are trademarks...

Owner Manual
Page 8
...STANDBY button (➔ 24) C STANDBY indicator (➔ 24) D HDMI THRU indicator (➔ 56) E ZONE 2 indicator (➔ 70) F Remote control sensor (➔ 4) G ZONE 2, OFF, ZONE 2 LEVEL/TONE LEVEL and TONE buttons (➔ 58, 70 to 33), arrow and ENTER buttons P RETURN...DIMMER button (North American and Taiwan models) (➔ 25) K MEMORY button (➔ 33) L TUNING MODE button (➔ 32) M DISPLAY button (➔ 25) En N SETUP button (➔ 42) 8 O TUNING, PRESET (➔ 32 to 71) H Display (➔ 9) I JKLMN O P Q R ST (European, Australian and Asian models) ...
...STANDBY button (➔ 24) C STANDBY indicator (➔ 24) D HDMI THRU indicator (➔ 56) E ZONE 2 indicator (➔ 70) F Remote control sensor (➔ 4) G ZONE 2, OFF, ZONE 2 LEVEL/TONE LEVEL and TONE buttons (➔ 58, 70 to 33), arrow and ENTER buttons P RETURN...DIMMER button (North American and Taiwan models) (➔ 25) K MEMORY button (➔ 33) L TUNING MODE button (➔ 32) M DISPLAY button (➔ 25) En N SETUP button (➔ 42) 8 O TUNING, PRESET (➔ 32 to 71) H Display (➔ 9) I JKLMN O P Q R ST (European, Australian and Asian models) ...
Owner Manual
Page 30
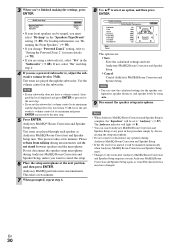
..." (➔ 16). • If you change "Powered Zone2" setting, refer to "Setting the Powered Zone 2" for the speaker configuration, speaker distances, and speaker levels by disconnecting the setup microphone. • Do not connect or disconnect any point in this procedure simply by using a subwoofer(s),... calculated settings for more measurements. If not, select "No" and skip step 4. 4 If you are using F/S. 9 Disconnect the speaker setup microphone. This takes a few minutes. Subwoofer Front Center Surround Front Wide Front High Surr Back Surr Back Ch Yes 40Hz TV 40Hz 100Hz ...
..." (➔ 16). • If you change "Powered Zone2" setting, refer to "Setting the Powered Zone 2" for the speaker configuration, speaker distances, and speaker levels by disconnecting the setup microphone. • Do not connect or disconnect any point in this procedure simply by using a subwoofer(s),... calculated settings for more measurements. If not, select "No" and skip step 4. 4 If you are using F/S. 9 Disconnect the speaker setup microphone. This takes a few minutes. Subwoofer Front Center Surround Front Wide Front High Surr Back Surr Back Ch Yes 40Hz TV 40Hz 100Hz ...
Owner Manual
Page 45
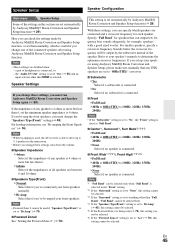
...4 ohms. If you bi-amp the front speakers, you change one of the connected speakers after using Audyssey MultEQ Room Correction and Speaker Setup, please make sure manually that can specify which is able to determine the optimum crossover frequencies. a pair of headphones is selected. Speaker ..." for speakers that any speaker is set to your front speakers. Refer to "Bi-Amp" (➔ 70). ■ Powered Zone2 See "Setting the Powered Zone 2" (➔ 70). Here you must change the "Speakers Type(Front)" setting (➔ 45). This setting is 4 ohms or more but less than 6. ...
...4 ohms. If you bi-amp the front speakers, you change one of the connected speakers after using Audyssey MultEQ Room Correction and Speaker Setup, please make sure manually that can specify which is able to determine the optimum crossover frequencies. a pair of headphones is selected. Speaker ..." for speakers that any speaker is set to your front speakers. Refer to "Bi-Amp" (➔ 70). ■ Powered Zone2 See "Setting the Powered Zone 2" (➔ 70). Here you must change the "Speakers Type(Front)" setting (➔ 45). This setting is 4 ohms or more but less than 6. ...
Owner Manual
Page 47
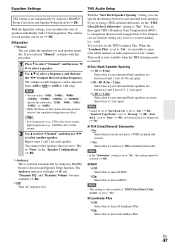
... ` Manual: You can adjust the equalizer for each speaker. Note • If the "Subwoofer" setting is set the THX Loudness Plus. THX Audio Setup With the "Surr Back Speaker Spacing" setting, you have a THX-certified subwoofer. You can be selected (➔ 45). ■ BGC ` Off:...set to "Yes". ■ Loudness Plus ` Off: Select this to "None" (➔ 45), or Powered Zone 2 is selected automatically by Audyssey MultEQ® Room Correction and Speaker Setup function (➔ 29). Note • This setting is only available if "THX Ultra2/Select2 Subwoofer" is set ...
... ` Manual: You can adjust the equalizer for each speaker. Note • If the "Subwoofer" setting is set the THX Loudness Plus. THX Audio Setup With the "Surr Back Speaker Spacing" setting, you have a THX-certified subwoofer. You can be selected (➔ 45). ■ BGC ` Off:...set to "Yes". ■ Loudness Plus ` Off: Select this to "None" (➔ 45), or Powered Zone 2 is selected automatically by Audyssey MultEQ® Room Correction and Speaker Setup function (➔ 29). Note • This setting is only available if "THX Ultra2/Select2 Subwoofer" is set ...
Owner Manual
Page 57
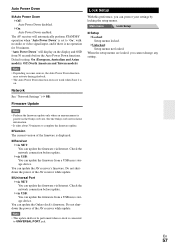
...• The Auto Power Down function does not work when Zone 2 is posted on the Onkyo web site. Lock Setup With this preference, you cannot change any setting. Main menu Lock Setup ■ Setup ` Locked: Setup menus locked. ` Unlocked: Setup menus not locked. Firmware Update Note • Perform the ...The AV receiver will display on . Do not shutdown the power of the AV receiver while update. See the Onkyo web site for 30 minutes. When the setup menus are locked, you can update the AV receiver's firmware. Check the network connection before the Auto Power Down ...
...• The Auto Power Down function does not work when Zone 2 is posted on the Onkyo web site. Lock Setup With this preference, you cannot change any setting. Main menu Lock Setup ■ Setup ` Locked: Setup menus locked. ` Unlocked: Setup menus not locked. Firmware Update Note • Perform the ...The AV receiver will display on . Do not shutdown the power of the AV receiver while update. See the Onkyo web site for 30 minutes. When the setup menus are locked, you can update the AV receiver's firmware. Check the network connection before the Auto Power Down ...

Owner Manual
Page 69
... a different source in each room. AV receiver Main room TV AV receiver Zone 2 IN R L Receiver/ integrated amp Zone 2 R L Note • With this setup, the Zone 2 volume is controlled by the AV receiver. Zone 2 12V Trigger When Zone 2 is set to "Bi-Amp" (➔ 45). And, you must ... Connect them directly to an amp in Zone 2 will make that when Powered Zone 2 is turned off as and when Zone 2 is called Powered Zone 2, as we call Multi Zone. Connecting this setup, you can select a different source for each room. Zone 2 In addition to your main listening room...
... a different source in each room. AV receiver Main room TV AV receiver Zone 2 IN R L Receiver/ integrated amp Zone 2 R L Note • With this setup, the Zone 2 volume is controlled by the AV receiver. Zone 2 12V Trigger When Zone 2 is set to "Bi-Amp" (➔ 45). And, you must ... Connect them directly to an amp in Zone 2 will make that when Powered Zone 2 is turned off as and when Zone 2 is called Powered Zone 2, as we call Multi Zone. Connecting this setup, you can select a different source for each room. Zone 2 In addition to your main listening room...

Owner Manual
Page 70
... "Speaker Settings" menu appears. 2-1. Tip • ZONE 2 12V TRIGGER OUT goes high (+12 V). Note • Powered Zone 2 cannot be performed on and off Zone 2, press ZONE 2. Note • When Zone 2 is set the "Powered Zone2" setting to "Act" (Activated). 1 Press RECEIVER followed by SETUP. Level Calibration 5. Setting the Powered Zone 2 Using Zone 2 If you must set to select...
... "Speaker Settings" menu appears. 2-1. Tip • ZONE 2 12V TRIGGER OUT goes high (+12 V). Note • Powered Zone 2 cannot be performed on and off Zone 2, press ZONE 2. Note • When Zone 2 is set the "Powered Zone2" setting to "Act" (Activated). 1 Press RECEIVER followed by SETUP. Level Calibration 5. Setting the Powered Zone 2 Using Zone 2 If you must set to select...

Owner Manual
Page 72
... connecting block. From the connecting block Miniplug cable AV receiver En 72 IR IN Connecting block IR receiver Using a Multiroom Kit with Zone 2 In this setup, the IR receiver picks up the infrared signals from the remote controller and feeds them through to the AV receiver's IR IN jack..., as when it's installed inside a cabinet. Using a Multiroom Kit with a Cabinet In this setup, the IR receiver in Zone 2 picks up the infrared signals from the remote controller and feeds them to the AV receiver's remote sensor, such as shown below. ...
... connecting block. From the connecting block Miniplug cable AV receiver En 72 IR IN Connecting block IR receiver Using a Multiroom Kit with Zone 2 In this setup, the IR receiver picks up the infrared signals from the remote controller and feeds them through to the AV receiver's IR IN jack..., as when it's installed inside a cabinet. Using a Multiroom Kit with a Cabinet In this setup, the IR receiver in Zone 2 picks up the infrared signals from the remote controller and feeds them to the AV receiver's remote sensor, such as shown below. ...

Owner Manual
Page 85
...- Depending on . ■ Can't get 6.1/7.1 playback If no sound When the T-D (Theater-Dimensional), Stereo or - high speakers are connected, or the Zone 2 speakers are being used , 6.1/7.1 playback is off. An audio cable may degrade the audio performance, so don't do it as a genuine DTS signal... no sound. ■ The subwoofer produces no - Make sure the speakers are set automatically after Audyssey MultEQ® Room Correction and Speaker Setup function has been completed. ■ Noise can not always select all of the listening modes, 37-41 depending on . nected device. stream...
...- Depending on . ■ Can't get 6.1/7.1 playback If no sound When the T-D (Theater-Dimensional), Stereo or - high speakers are connected, or the Zone 2 speakers are being used , 6.1/7.1 playback is off. An audio cable may degrade the audio performance, so don't do it as a genuine DTS signal... no sound. ■ The subwoofer produces no - Make sure the speakers are set automatically after Audyssey MultEQ® Room Correction and Speaker Setup function has been completed. ■ Noise can not always select all of the listening modes, 37-41 depending on . nected device. stream...

Owner Manual
Page 88
...Video ATT:OFF: (default). In the unlikely event that you want to set the AV receiver to a MONITOR OUT S. Onkyo is not responsible for signal processing and control functions. In this happens, unplug the power cord from the video processor. If...input selector button for components connected via V These functions don't work when Zone 2 is turned 20 on. ■ When performing "Audyssey MultEQ® Room Correction and Speaker Setup", the measurement fails showing the message "Ambient noise is set , press SETUP. 2. However, if the picture quality of a multiplex source Use the...
...Video ATT:OFF: (default). In the unlikely event that you want to set the AV receiver to a MONITOR OUT S. Onkyo is not responsible for signal processing and control functions. In this happens, unplug the power cord from the video processor. If...input selector button for components connected via V These functions don't work when Zone 2 is turned 20 on. ■ When performing "Audyssey MultEQ® Room Correction and Speaker Setup", the measurement fails showing the message "Ambient noise is set , press SETUP. 2. However, if the picture quality of a multiplex source Use the...

Owner Manual
Page 90
En 90 ■ Audio Outputs Analog VCR/DVR, PRE OUT, ZONE 2 LINE OUT Analog Multichannel Pre Outputs 7 Subwoofer Pre Outputs 2 Speaker Outputs Main (L, R, C, SL, SR, SBL, SBR, FHL, FHR) + ZONE2/Front Wide (L, R) Phones 1 (6.3 ø) ■ Others SETUP MIC 1 RS232 1 Ethernet 1 IR Input 1 12 V Trigger Out 1 USB 1 Universal Port 1 RI 1 Specifications and features are subject to change without notice.
En 90 ■ Audio Outputs Analog VCR/DVR, PRE OUT, ZONE 2 LINE OUT Analog Multichannel Pre Outputs 7 Subwoofer Pre Outputs 2 Speaker Outputs Main (L, R, C, SL, SR, SBL, SBR, FHL, FHR) + ZONE2/Front Wide (L, R) Phones 1 (6.3 ø) ■ Others SETUP MIC 1 RS232 1 Ethernet 1 IR Input 1 12 V Trigger Out 1 USB 1 Universal Port 1 RI 1 Specifications and features are subject to change without notice.


