Owner Manual
Page 1
Following the instructions in the unit. Contents Introduction 2 Connections 13 Turning On & Basic Operations ......24 Advanced Operations 42 Controlling iPod & Other Components 73 Others 84 En AV Receiver TX-NR708 Instruction Manual Thank you to obtain optimum performance and listening enjoyment from your new AV Receiver. Please retain this manual will enable you for future reference. Please read this manual thoroughly before making connections and plugging in this manual for purchasing an Onkyo AV Receiver.
Following the instructions in the unit. Contents Introduction 2 Connections 13 Turning On & Basic Operations ......24 Advanced Operations 42 Controlling iPod & Other Components 73 Others 84 En AV Receiver TX-NR708 Instruction Manual Thank you to obtain optimum performance and listening enjoyment from your new AV Receiver. Please retain this manual will enable you for future reference. Please read this manual thoroughly before making connections and plugging in this manual for purchasing an Onkyo AV Receiver.

Owner Manual
Page 4
... receiver Approx. 16 ft. (5 m) En 4 Check for your plug, proceed as shown below. For European Models Declaration of Conformity We, ONKYO EUROPE ELECTRONICS GmbH LIEGNITZERSTRASSE 6, 82194 GROEBENZELL, GERMANY declare in your socket outlets, cut it at the end of the product name indicates the color...in compliance with the coloured markings identifying the terminals in own responsibility, that indicated on the power supply cord of this instruction manual is coloured blue must approved by ASTA or BSI to prevent dam- IMPORTANT The plug is marked with an appropriate fuse. ...
... receiver Approx. 16 ft. (5 m) En 4 Check for your plug, proceed as shown below. For European Models Declaration of Conformity We, ONKYO EUROPE ELECTRONICS GmbH LIEGNITZERSTRASSE 6, 82194 GROEBENZELL, GERMANY declare in your socket outlets, cut it at the end of the product name indicates the color...in compliance with the coloured markings identifying the terminals in own responsibility, that indicated on the power supply cord of this instruction manual is coloured blue must approved by ASTA or BSI to prevent dam- IMPORTANT The plug is marked with an appropriate fuse. ...

Owner Manual
Page 13
...). For 7.1-channel surround-sound playback, you need to each speaker terminal. No matter how many speakers you need to do this automatically (➔ 29) or manually (➔ 45). Then all you use the amplifier at the same time. In other words, connect positive (+) terminals only to positive (+) terminals, and negative (-) terminals...
...). For 7.1-channel surround-sound playback, you need to each speaker terminal. No matter how many speakers you need to do this automatically (➔ 29) or manually (➔ 45). Then all you use the amplifier at the same time. In other words, connect positive (+) terminals only to positive (+) terminals, and negative (-) terminals...

Owner Manual
Page 16
... bi-amping connections shown below and turned on the AV receiver, you must set the "Speakers Type(Front)" setting to "Bi-Amp" to your speaker manual.
... bi-amping connections shown below and turned on the AV receiver, you must set the "Speakers Type(Front)" setting to "Bi-Amp" to your speaker manual.
Owner Manual
Page 17
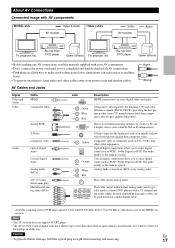
..., hold the optical plug straight when inserting and removing. 17 Blu-ray Disc/ DVD player Game console • Before making any AV connections, read the manuals supplied with your AV components. • Don't connect the power cord until you to enjoy digital sound such as coaxial. Wrong! Green Blue Red Component...
..., hold the optical plug straight when inserting and removing. 17 Blu-ray Disc/ DVD player Game console • Before making any AV connections, read the manuals supplied with your AV components. • Don't connect the power cord until you to enjoy digital sound such as coaxial. Wrong! Green Blue Red Component...

Owner Manual
Page 20
...; 59). Step 3: If you 'll need a commercially available MC head amp or MC transformer to connect to PHONO IN. See your turntable's manual for video recording (➔ 35). However, because the AV receiver selects the video input in the order of the personal computer is on, the ...deck, change the Input Display (➔ 27). To adjust the subwoofer sensitivity for the multichannel input, see illustration below). Refer to the manuals supplied with Onkyo players (DVD, CD, etc.). • Some components have assigned HDMI IN to the PC input selector, the AV receiver will automatically ...
...; 59). Step 3: If you 'll need a commercially available MC head amp or MC transformer to connect to PHONO IN. See your turntable's manual for video recording (➔ 35). However, because the AV receiver selects the video input in the order of the personal computer is on, the ...deck, change the Input Display (➔ 27). To adjust the subwoofer sensitivity for the multichannel input, see illustration below). Refer to the manuals supplied with Onkyo players (DVD, CD, etc.). • Some components have assigned HDMI IN to the PC input selector, the AV receiver will automatically ...

Owner Manual
Page 25
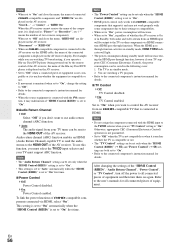
... receiver's DISPLAY. Tip • (North American and Taiwan models) Alternatively, you can display various information about three seconds, then the previously displayed information reappears. This manual describes the procedure using the remote controller unless otherwise specified. En 25 See also: • "Controlling Other Components" (➔ 78) • "Controlling iPod" (➔ 73...
... receiver's DISPLAY. Tip • (North American and Taiwan models) Alternatively, you can display various information about three seconds, then the previously displayed information reappears. This manual describes the procedure using the remote controller unless otherwise specified. En 25 See also: • "Controlling Other Components" (➔ 78) • "Controlling iPod" (➔ 73...

Owner Manual
Page 31
...Check the speaker connection. • Writing Error! This message appears if saving fails. If this happens, THX recommends setting them manually. If you set up your Onkyo dealer. • Speaker Detect Error This message appears if a speaker is set to interaction with the room, you 're ...using Audyssey MultEQ Room Correction and Speaker Setup, please make changes to your subwoofer's instruction manual for appropriate settings (➔ 13). If ...
...Check the speaker connection. • Writing Error! This message appears if saving fails. If this happens, THX recommends setting them manually. If you set up your Onkyo dealer. • Speaker Detect Error This message appears if a speaker is set to interaction with the room, you 're ...using Audyssey MultEQ Room Correction and Speaker Setup, please make changes to your subwoofer's instruction manual for appropriate settings (➔ 13). If ...
Owner Manual
Page 32
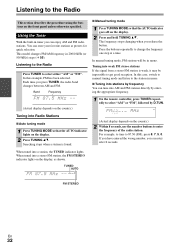
... model changes FM/AM frequency in tuner you can enjoy AM and FM radio stations. Band Frequency (Actual display depends on the country.) ■ Manual tuning mode 1 Press TUNING MODE so that the AUTO indicator lights on the display. 2 Press TUNING R/X. In this example, FM has been selected...the appropriate frequency. 1 On the remote controller, press TUNER repeatedly to enter the frequency of the radio station. In this case, switch to manual tuning mode and listen to get good reception. Tuning into Radio Stations ■ Auto tuning mode 1 Press TUNING MODE so that the AUTO ...
... model changes FM/AM frequency in tuner you can enjoy AM and FM radio stations. Band Frequency (Actual display depends on the country.) ■ Manual tuning mode 1 Press TUNING MODE so that the AUTO indicator lights on the display. 2 Press TUNING R/X. In this example, FM has been selected...the appropriate frequency. 1 On the remote controller, press TUNER repeatedly to enter the frequency of the radio station. In this case, switch to manual tuning mode and listen to get good reception. Tuning into Radio Stations ■ Auto tuning mode 1 Press TUNING MODE so that the AUTO ...
Owner Manual
Page 35
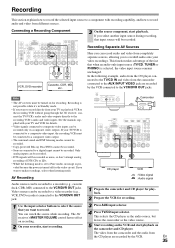
.../DVDs cannot be recorded. • Sources connected to a digital input cannot be recorded. Video sources can be recorded only via composite video outputs. See the manuals supplied with recording capability, and how to record audio and video from your TV or playback VCR to the recording VCR without going through the...
.../DVDs cannot be recorded. • Sources connected to a digital input cannot be recorded. Video sources can be recorded only via composite video outputs. See the manuals supplied with recording capability, and how to record audio and video from your TV or playback VCR to the recording VCR without going through the...

Owner Manual
Page 42
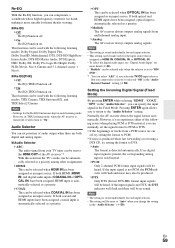
... will appear in Setup Menu The on-screen setup menus appear only on your TV is connected to change the setting. Listening Mode Preset 6. This manual describes the procedure using the on the main menu. Digital Audio Input 5. Analog Audio Input C Speaker Setup (➔ 45) 6. Volume Setup 2. Equalizer Settings 6. Firmware Update...
... will appear in Setup Menu The on-screen setup menus appear only on your TV is connected to change the setting. Listening Mode Preset 6. This manual describes the procedure using the on the main menu. Digital Audio Input 5. Analog Audio Input C Speaker Setup (➔ 45) 6. Volume Setup 2. Equalizer Settings 6. Firmware Update...
Owner Manual
Page 45
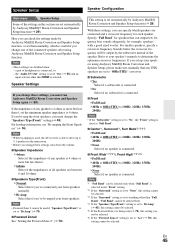
... by Audyssey MultEQ Room Correction and Speaker Setup function, or set automatically by the subwoofer instead of the speaker. Refer to your speaker's manuals to 100Hz, 120Hz, 150Hz, 200Hz ` None: Select if no speaker is connected. ■ Front Wide*1*2*4*6, Front High*1*2*4*5 ` Full Band...Front" setting. *2 If the "Surround" setting is set to "None", this setting cannot be selected. This setting is set them manually, which speakers are connected and a crossover frequency for each speaker. Speaker Setup Speaker Configuration Main menu Speaker Setup Some of the settings...
... by Audyssey MultEQ Room Correction and Speaker Setup function, or set automatically by the subwoofer instead of the speaker. Refer to your speaker's manuals to 100Hz, 120Hz, 150Hz, 200Hz ` None: Select if no speaker is connected. ■ Front Wide*1*2*4*6, Front High*1*2*4*5 ` Full Band...Front" setting. *2 If the "Surround" setting is set to "None", this setting cannot be selected. This setting is set them manually, which speakers are connected and a crossover frequency for each speaker. Speaker Setup Speaker Configuration Main menu Speaker Setup Some of the settings...
Owner Manual
Page 47
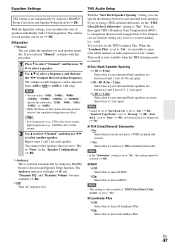
... "100Hz", or "160Hz". • While the Direct or Pure Audio listening mode is set (➔ 46). ■ Equalizer ` Manual: You can adjust the tone of each speaker manually. With the Equalizer settings, you can also set to "Yes". ■ Loudness Plus ` Off: Select this to "On", it is...available if "THX Ultra2/Select2 Subwoofer" is being used (➔ 70). ■ THX Ultra2/Select2 Subwoofer ` No: Select this if you selected "Manual", continue with a 7-band equalizer. Note • Cannot be adjusted from -6dB to 0dB to "Yes". Equalizer Settings This setting is selected, ...
... "100Hz", or "160Hz". • While the Direct or Pure Audio listening mode is set (➔ 46). ■ Equalizer ` Manual: You can adjust the tone of each speaker manually. With the Equalizer settings, you can also set to "Yes". ■ Loudness Plus ` Off: Select this to "On", it is...available if "THX Ultra2/Select2 Subwoofer" is being used (➔ 70). ■ THX Ultra2/Select2 Subwoofer ` No: Select this if you selected "Manual", continue with a 7-band equalizer. Note • Cannot be adjusted from -6dB to 0dB to "Yes". Equalizer Settings This setting is selected, ...
Owner Manual
Page 49
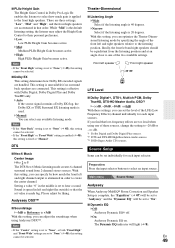
.... DTS ■ Neo:6 Music Center Image `0 to 2 to 5 The DTS Neo:6 Music listening mode creates 6-channel surround sound from the listening position and at "Manual". Setting a value "0" in the middle is set to "None", or both "Front High" and "Front Wide" settings are set to "None" (➔ 45),... at an angle close to one of the LFE (Low Frequency Effects) channel individually for each input sources. While "Mid" is used. ` Manual: You can adjust the soundstage when using one of the front left and right (the outside) so that order. This setting is effective with Dolby...
.... DTS ■ Neo:6 Music Center Image `0 to 2 to 5 The DTS Neo:6 Music listening mode creates 6-channel surround sound from the listening position and at "Manual". Setting a value "0" in the middle is set to "None", or both "Front High" and "Front Wide" settings are set to "None" (➔ 45),... at an angle close to one of the LFE (Low Frequency Effects) channel individually for each input sources. While "Mid" is used. ` Manual: You can adjust the soundstage when using one of the front left and right (the outside) so that order. This setting is effective with Dolby...
Owner Manual
Page 56
... AV receiver from an Q-compatible TV that support it may not work properly with the HDMI input to the connected component's instruction manual for all connected pieces of two or more component). Otherwise, appropriate CEC (Consumer Electronics Control) operation is not guaranteed. •... Control enabled. When set to "On". ■ Audio Return Channel ` Off: Select "Off" if you want to the connected component's instruction manual for details. • When the source equipment is connected with the V connection, it and may malfunction if "HDMI Control (RIHD)" is displayed ...
... AV receiver from an Q-compatible TV that support it may not work properly with the HDMI input to the connected component's instruction manual for all connected pieces of two or more component). Otherwise, appropriate CEC (Consumer Electronics Control) operation is not guaranteed. •... Control enabled. When set to "On". ■ Audio Return Channel ` Off: Select "Off" if you want to the connected component's instruction manual for details. • When the source equipment is connected with the V connection, it and may malfunction if "HDMI Control (RIHD)" is displayed ...
Owner Manual
Page 59
... to return to the HDMI OUT of the AV receiver.*1 With this selection the TV's audio can be automatically selected as a priority. ` COAX: This can manually set priorities of tracks from a PCM source are both optical and HDMI inputs have been assigned, coaxial input is automatically selected as an input source...
... to return to the HDMI OUT of the AV receiver.*1 With this selection the TV's audio can be automatically selected as a priority. ` COAX: This can manually set priorities of tracks from a PCM source are both optical and HDMI inputs have been assigned, coaxial input is automatically selected as an input source...

Owner Manual
Page 60
...network, routing data and supplying IP addresses. NAT allows sev- Note • To receive Internet radio with a 100Base-TX switch built-in is recommended. If you want to configure these settings manually, see "Network Settings" (➔ 66). • The AV receiver does not support PPPoE settings, so if ...Internet, you 're unsure. NET/USB About NET Connecting the AV Receiver The AV receiver is network-ready, which has a 4-port 100Base-TX switch built-in. If your ISP if you have Internet access. Your router must use the same settings for Internet radio. • DHCP ...
...network, routing data and supplying IP addresses. NAT allows sev- Note • To receive Internet radio with a 100Base-TX switch built-in is recommended. If you want to configure these settings manually, see "Network Settings" (➔ 66). • The AV receiver does not support PPPoE settings, so if ...Internet, you 're unsure. NET/USB About NET Connecting the AV Receiver The AV receiver is network-ready, which has a 4-port 100Base-TX switch built-in. If your ISP if you have Internet access. Your router must use the same settings for Internet radio. • DHCP ...

Owner Manual
Page 62
... ENTER R/X/F/S RETURN REPEAT RANDOM 1 Start your computer or media server. 2 Press NET/USB to select an item, and then press ENTER. Refer to the instruction manual of the media server. 4 Use R/X to select the "Server" screen. See "Supported Audio File Formats" to preset", and press ENTER. Note • The search function...
... ENTER R/X/F/S RETURN REPEAT RANDOM 1 Start your computer or media server. 2 Press NET/USB to select an item, and then press ENTER. Refer to the instruction manual of the media server. 4 Use R/X to select the "Server" screen. See "Supported Audio File Formats" to preset", and press ENTER. Note • The search function...

Owner Manual
Page 65
... product does not support the following music file formats: FLAC and Ogg Vorbis. You can now play the music files stored on your device's instruction manual for the AV receiver is already installed. The default maximum volume for details. The volume value of the remote window and the volume value of...
... product does not support the following music file formats: FLAC and Ogg Vorbis. You can now play the music files stored on your device's instruction manual for the AV receiver is already installed. The default maximum volume for details. The volume value of the remote window and the volume value of...
Owner Manual
Page 66
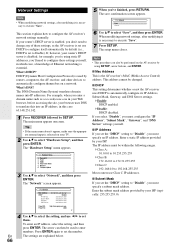
... default (i.e., DHCP is essential. If your ISP. What's DNS? The "Hardware Setup" menu appears. 7. Network Save Cancel 6 Use R/X to configure the AV receiver's network settings manually. Note • This procedure can then be performed on your ISP (typically: 255.255.255.0). 4 Use R/X to select the setting, and use F/S to set the...
... default (i.e., DHCP is essential. If your ISP. What's DNS? The "Hardware Setup" menu appears. 7. Network Save Cancel 6 Use R/X to configure the AV receiver's network settings manually. Note • This procedure can then be performed on your ISP (typically: 255.255.255.0). 4 Use R/X to select the setting, and use F/S to set the...

