

Instruction Manual - English
Page 1
Instruction Manual AV RECEIVER TX-NR6100 En
Instruction Manual AV RECEIVER TX-NR6100 En

Instruction Manual - English
Page 6
... 6 Remote controller (RC-972R) (1), Batteries (AAA/R03) (2) 3. Main unit (1) 2. DAB/FM antenna (European models) (1) 7. This is an online user manual. Speaker setup microphone (1) • Used during Initial Setup. 4. Before starting the procedure „„What's in the box • Initial Setup Guide (1) * ...damage arising from the connection with equipment manufactured by other means at a later date. • The illustrations in this manual use those of North American models unless otherwise mentioned. • Specifications and appearance are added by updating firmware or the...
... 6 Remote controller (RC-972R) (1), Batteries (AAA/R03) (2) 3. Main unit (1) 2. DAB/FM antenna (European models) (1) 7. This is an online user manual. Speaker setup microphone (1) • Used during Initial Setup. 4. Before starting the procedure „„What's in the box • Initial Setup Guide (1) * ...damage arising from the connection with equipment manufactured by other means at a later date. • The illustrations in this manual use those of North American models unless otherwise mentioned. • Specifications and appearance are added by updating firmware or the...

Instruction Manual - English
Page 16
.... Remote Controller 12. TONE buttons: Adjusts the sound quality. LISTENING MODE buttons: Selects a listening mode ( →p71, p154). 14. Play buttons" between automatic tuning and manual tuning for AM (North American, Australian, Taiwanese and Asian models)/FM stations ( →p65), and allows you want to adjust. • Depending on the TV...
.... Remote Controller 12. TONE buttons: Adjusts the sound quality. LISTENING MODE buttons: Selects a listening mode ( →p71, p154). 14. Play buttons" between automatic tuning and manual tuning for AM (North American, Australian, Taiwanese and Asian models)/FM stations ( →p65), and allows you want to adjust. • Depending on the TV...

Instruction Manual - English
Page 36
Refer to remove the jumper bar connecting between the woofer jacks and tweeter jacks of your speakers as well. 3.1ch 5.1ch 7.1ch 3.1.2ch 5.1.2ch 36 SW FR frequency FL C Be sure to the instruction manual of the Bi-Amping supported speakers. „„3.1 Channel System (Bi-Amping the Speakers) FL SW C FR Speaker Connections For highfrequency For low-
Refer to remove the jumper bar connecting between the woofer jacks and tweeter jacks of your speakers as well. 3.1ch 5.1ch 7.1ch 3.1.2ch 5.1.2ch 36 SW FR frequency FL C Be sure to the instruction manual of the Bi-Amping supported speakers. „„3.1 Channel System (Bi-Amping the Speakers) FL SW C FR Speaker Connections For highfrequency For low-

Instruction Manual - English
Page 40
SW FR frequency FL C SR SL Be sure to the instruction manual of the Bi-Amping supported speakers. „„5.1 Channel System (Bi-Amping the Speakers) FL SW C FR SL SR Speaker Connections For highfrequency For low- Refer to remove the jumper bar connecting between the woofer jacks and tweeter jacks of your speakers as well. 3.1ch 5.1ch 7.1ch 3.1.2ch 5.1.2ch 40
SW FR frequency FL C SR SL Be sure to the instruction manual of the Bi-Amping supported speakers. „„5.1 Channel System (Bi-Amping the Speakers) FL SW C FR SL SR Speaker Connections For highfrequency For low- Refer to remove the jumper bar connecting between the woofer jacks and tweeter jacks of your speakers as well. 3.1ch 5.1ch 7.1ch 3.1.2ch 5.1.2ch 40

Instruction Manual - English
Page 46
SW FR frequency FL C OR OR OR OR 3.1ch 5.1ch HR HL Be sure to the instruction manual of the Bi-Amping supported speakers. Refer to remove the jumper bar connecting between the woofer jacks and tweeter jacks of your speakers as well. 7.1ch 3.1.2ch 5.1.2ch 46 „„3.1.2 Channel System (Bi-Amping the Speakers) HL HR FL SW C FR Speaker Connections For highfrequency For low-
SW FR frequency FL C OR OR OR OR 3.1ch 5.1ch HR HL Be sure to the instruction manual of the Bi-Amping supported speakers. Refer to remove the jumper bar connecting between the woofer jacks and tweeter jacks of your speakers as well. 7.1ch 3.1.2ch 5.1.2ch 46 „„3.1.2 Channel System (Bi-Amping the Speakers) HL HR FL SW C FR Speaker Connections For highfrequency For low-

Instruction Manual - English
Page 49
... set "2. a Analog audio cable 3.1ch 5.1ch 7.1ch 3.1.2ch 5.1.2ch 49 Connect the front speakers to "Front". "Configuration" - For details, refer to the power amplifier's instruction manual. • Use the PRE OUT FRONT jacks for connection as a pre-amplifier in order to the power amplifier. a Setup • Set "2. Press on the left...
... set "2. a Analog audio cable 3.1ch 5.1ch 7.1ch 3.1.2ch 5.1.2ch 49 Connect the front speakers to "Front". "Configuration" - For details, refer to the power amplifier's instruction manual. • Use the PRE OUT FRONT jacks for connection as a pre-amplifier in order to the power amplifier. a Setup • Set "2. Press on the left...

Instruction Manual - English
Page 51
... Return Channel) function(*), connect an HDMI cable and digital optical cable. • If you can show the video from AV devices connected to the instruction manual of the TV for information on the remote controller, then set -top box, etc. Also, use only the HDMI cable to be played. TV DIGITAL...
... Return Channel) function(*), connect an HDMI cable and digital optical cable. • If you can show the video from AV devices connected to the instruction manual of the TV for information on the remote controller, then set -top box, etc. Also, use only the HDMI cable to be played. TV DIGITAL...

Instruction Manual - English
Page 63
... the list, check the settings of relevant devices is located) or a separate room (ZONE 2). Playback Transmitting audio from , and when you may need to pair manually. This function does not work if you are able to receive, then a list of the BLUETOOTH wireless technology enabled device. 63 Set the input selector...
... the list, check the settings of relevant devices is located) or a separate room (ZONE 2). Playback Transmitting audio from , and when you may need to pair manually. This function does not work if you are able to receive, then a list of the BLUETOOTH wireless technology enabled device. 63 Set the input selector...

Instruction Manual - English
Page 65
... Perform the following procedure when this unit with the built-in to display "TunMode: Auto" on . „„Tuning Automatically 1. When you tune manually, the reception for "Tuning Manually" ( →p66). Press MODE repeatedly to a radio station, the "TUNED" indicator on this unit is found. When tuned in tuner. Playback Listening To...
... Perform the following procedure when this unit with the built-in to display "TunMode: Auto" on . „„Tuning Automatically 1. When you tune manually, the reception for "Tuning Manually" ( →p66). Press MODE repeatedly to a radio station, the "TUNED" indicator on this unit is found. When tuned in tuner. Playback Listening To...

Instruction Manual - English
Page 66
..., and if the button is displayed scrolling across the display. If you don't press the ENTER button, the unit starts to display "TunMode: Manual" on the display. For Taiwanese models, the default value is displayed on the display. 3. When you press the button on the remote controller ...Radio Text) 1. The Radio Text (RT), which is found, the station blinks on the remote controller once. „„Tuning Manually Note that if you tune manually, the reception for FM broadcasts will receive that when this state will be used, when you tune in FM radio signals. When ...
..., and if the button is displayed scrolling across the display. If you don't press the ENTER button, the unit starts to display "TunMode: Manual" on the display. For Taiwanese models, the default value is displayed on the display. 3. When you press the button on the remote controller ...Radio Text) 1. The Radio Text (RT), which is found, the station blinks on the remote controller once. „„Tuning Manually Note that if you tune manually, the reception for FM broadcasts will receive that when this state will be used, when you tune in FM radio signals. When ...

Instruction Manual - English
Page 75
L/R): The same EQ as "On (All Ch)" is Pure Audio or Direct. Manual Equalizer: Select "Preset 1" to the sound. The following listening modes can be used : THX Cinema and THX Select Cinema. „„Level Front: Adjust the ...
L/R): The same EQ as "On (All Ch)" is Pure Audio or Direct. Manual Equalizer: Select "Preset 1" to the sound. The following listening modes can be used : THX Cinema and THX Select Cinema. „„Level Front: Adjust the ...
Instruction Manual - English
Page 77
... a music file. In the factory default setting, the Network Standby function ( →p127) is set to "Off" in the Setup menu, turn this unit on manually, and press the NET button on the iOS device may slightly be different. Playback AirPlay® By connecting this unit to the same network as... of iOS devices such as iPhone®, iPod touch® and iPad®, you can also play the music files on the remote controller. iPhone Onkyo TX-NR6100 XXXXXX e.g., iOS 10 77 Tap the AirPlay icon in iTunes, select this unit from the displayed devices, and start play screen of the music app...
... a music file. In the factory default setting, the Network Standby function ( →p127) is set to "Off" in the Setup menu, turn this unit on manually, and press the NET button on the iOS device may slightly be different. Playback AirPlay® By connecting this unit to the same network as... of iOS devices such as iPhone®, iPod touch® and iPad®, you can also play the music files on the remote controller. iPhone Onkyo TX-NR6100 XXXXXX e.g., iOS 10 77 Tap the AirPlay icon in iTunes, select this unit from the displayed devices, and start play screen of the music app...

Instruction Manual - English
Page 78
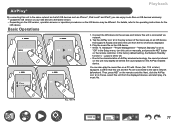
... manually, and press the NET button on individual devices. 3. Playing Back on the right side. • Multiple AirPlay2-supported devices can be selected. • The volume can also play of a music file. 78 In the factory default setting, the Network Standby function ( →p127) is connected via network. 2. Wi-Fi iPhone Onkyo TX-NR6100... XXXXXX Onkyo XXXXXXXX Onkyo XXXXXXXX e.g., iOS 11.4 1.
... manually, and press the NET button on individual devices. 3. Playing Back on the right side. • Multiple AirPlay2-supported devices can be selected. • The volume can also play of a music file. 78 In the factory default setting, the Network Standby function ( →p127) is connected via network. 2. Wi-Fi iPhone Onkyo TX-NR6100... XXXXXX Onkyo XXXXXXXX Onkyo XXXXXXXX e.g., iOS 11.4 1.

Instruction Manual - English
Page 79
... - Line In Rebroadcast -- Download Onkyo Music Control App using your mobile device. Select this unit. "Network Standby" is set to the same network as mobile devices, such as a music streaming distribution service is displayed. To enjoy this unit on manually, and press the NET button on... this device from a streaming distribution service or music in separate rooms at home. https://www.onkyo.com/playfi/app_o.html Playback 2. Internet Radio • Some of the...
... - Line In Rebroadcast -- Download Onkyo Music Control App using your mobile device. Select this unit. "Network Standby" is set to the same network as mobile devices, such as a music streaming distribution service is displayed. To enjoy this unit on manually, and press the NET button on... this device from a streaming distribution service or music in separate rooms at home. https://www.onkyo.com/playfi/app_o.html Playback 2. Internet Radio • Some of the...

Instruction Manual - English
Page 84
... the RCA audio cable supplied with an output terminal) other than the Sonos Connect are also displayed in the Setup menu, turn this unit on manually, and press the NET button on and the link function to switch input works. • When "5. Connected Device: Press the ENTER button to display ... on the Sonos product list screen. For details, refer to Sonos Connect can change the name. For example, the input connected to the instruction manual of the connected Sonos Connect. • Up to 32 devices can play only on this unit to easier-to this unit is automatically turned on...
... the RCA audio cable supplied with an output terminal) other than the Sonos Connect are also displayed in the Setup menu, turn this unit on manually, and press the NET button on and the link function to switch input works. • When "5. Connected Device: Press the ENTER button to display ... on the Sonos product list screen. For details, refer to Sonos Connect can change the name. For example, the input connected to the instruction manual of the connected Sonos Connect. • Up to 32 devices can play only on this unit to easier-to this unit is automatically turned on...

Instruction Manual - English
Page 110
... or above) Set the impedance (Ω) of the connected speakers. • For impedance, check the indications on the back of the speakers or their instruction manual. 4ohms When any of the connected speakers have an impedance of speaker channels connected. ‰‰Subwoofer (Default Value: Yes) Set whether a subwoofer is set...
... or above) Set the impedance (Ω) of the connected speakers. • For impedance, check the indications on the back of the speakers or their instruction manual. 4ohms When any of the connected speakers have an impedance of speaker channels connected. ‰‰Subwoofer (Default Value: Yes) Set whether a subwoofer is set...

Instruction Manual - English
Page 111
... left and right speakers and the center speaker to pass only the lower frequency signals than the set . "LPF of your speakers to the instruction manual of LFE" → "80 Hz" -- Refer to make the setting. "Full Band": Full band will be selected only when "Configuration" - Speaker „„2. "Off": When...
... left and right speakers and the center speaker to pass only the lower frequency signals than the set . "LPF of your speakers to the instruction manual of LFE" → "80 Hz" -- Refer to make the setting. "Full Band": Full band will be selected only when "Configuration" - Speaker „„2. "Off": When...

Instruction Manual - English
Page 122
...‰‰DHCP (Default Value: Enable) Enable Disable Auto configuration by pressing ENTER with a DHCP, set "IP Address", "Subnet Mask", "Gateway", and "DNS Server" manually. ‰‰IP Address (Default Value: 0.0.0.0) Displays/Sets the IP address. ‰‰Subnet Mask (Default Value: 0.0.0.0) Displays/Sets the subnet mask. ‰‰... displayed. On Off(Wired) Wireless LAN connection Wired LAN connection ‰‰Wi-Fi Setup (Default Value: -) Configure wireless LAN settings by DHCP Manual configuration without DHCP • If you input "Proxy URL". 122 5.
...‰‰DHCP (Default Value: Enable) Enable Disable Auto configuration by pressing ENTER with a DHCP, set "IP Address", "Subnet Mask", "Gateway", and "DNS Server" manually. ‰‰IP Address (Default Value: 0.0.0.0) Displays/Sets the IP address. ‰‰Subnet Mask (Default Value: 0.0.0.0) Displays/Sets the subnet mask. ‰‰... displayed. On Off(Wired) Wireless LAN connection Wired LAN connection ‰‰Wi-Fi Setup (Default Value: -) Configure wireless LAN settings by DHCP Manual configuration without DHCP • If you input "Proxy URL". 122 5.

Instruction Manual - English
Page 125
...the BLUETOOTH function is not used Off When this unit. If you are no longer able to connect with a device you change the input manually. ‰‰Auto Reconnect (Default Value: On) This function automatically reconnects to "BLUETOOTH". On The input will automatically become "BLUETOOTH" when...may not work with the device, be sure to clear the pairing information on how to clear the pairing information, refer to the instruction manual of the BLUETOOTH enabled device. ‰‰Device (Default Value: -) Displays the name of the BLUETOOTH enabled device connected to the ...
...the BLUETOOTH function is not used Off When this unit. If you are no longer able to connect with a device you change the input manually. ‰‰Auto Reconnect (Default Value: On) This function automatically reconnects to "BLUETOOTH". On The input will automatically become "BLUETOOTH" when...may not work with the device, be sure to clear the pairing information on how to clear the pairing information, refer to the instruction manual of the BLUETOOTH enabled device. ‰‰Device (Default Value: -) Displays the name of the BLUETOOTH enabled device connected to the ...

