Owner Manual
Page 3
... an appropriate fuse. Care Occasionally you plug in particular, specifies that the cable ground shall be connected to the grounding system of the building, as close to the correct voltage for compatibility with a soft cloth. The Worldwide model has a voltage selector for your area meets the voltage requirements printed on the TX-NR1000/TX-NR5000E's rear panel (e.g., AC 230...
... an appropriate fuse. Care Occasionally you plug in particular, specifies that the cable ground shall be connected to the grounding system of the building, as close to the correct voltage for compatibility with a soft cloth. The Worldwide model has a voltage selector for your area meets the voltage requirements printed on the TX-NR1000/TX-NR5000E's rear panel (e.g., AC 230...

Owner Manual
Page 4
... Important Safety Instructions 2 Precautions 3 Features 6 Supplied Accessories 8 Connecting the Supplied Power Cord 8 Before Using the TX-NR1000/TX-NR5000E .....9 Installing the Batteries 9 Using the Remote Controller 9 Index Parts and Facilities 10 Front Panels 10 Inner Panels 12 Rear Panel 14 Front Panel Display 15 Remote Controller (Amp Mode 16 Installation and Connections Speaker Placement 18 Basic Speaker Placements for Home Theater and the Function of Respective Speakers......18 Placing the Speakers 19 Speaker Placement Suitable for THX Audio 20 Speaker Placement Suitable...
... Important Safety Instructions 2 Precautions 3 Features 6 Supplied Accessories 8 Connecting the Supplied Power Cord 8 Before Using the TX-NR1000/TX-NR5000E .....9 Installing the Batteries 9 Using the Remote Controller 9 Index Parts and Facilities 10 Front Panels 10 Inner Panels 12 Rear Panel 14 Front Panel Display 15 Remote Controller (Amp Mode 16 Installation and Connections Speaker Placement 18 Basic Speaker Placements for Home Theater and the Function of Respective Speakers......18 Placing the Speakers 19 Speaker Placement Suitable for THX Audio 20 Speaker Placement Suitable...

Owner Manual
Page 5
... 87 Speaker/Output Setup 88 Speaker Configuration Sub-menu 88 Speaker Impedance Sub-menu 89 Speaker Crossover Sub-menu 89 Speaker Distance Sub-menu 89 Notch Filter Sub-menu 90 Level Calibration Sub-menu 90 THX Audio Setup Sub-menu 91 Audio Output Assign Sub-menu 91 Video Output Assign Sub-menu 92 Input Setup 93 Audio Assign Sub-menu (when input is other than NET AUDIO 94 Music Server Sub-menu (When input is NET AUDIO 95 Video Assign Sub-menu 95 Listening Mode Preset Sub-menu 96 Character Edit Sub-menu 97 IntelliVolume Sub-menu 98 Delay Sub-menu 98 12V Trigger Assign Sub-menu...
... 87 Speaker/Output Setup 88 Speaker Configuration Sub-menu 88 Speaker Impedance Sub-menu 89 Speaker Crossover Sub-menu 89 Speaker Distance Sub-menu 89 Notch Filter Sub-menu 90 Level Calibration Sub-menu 90 THX Audio Setup Sub-menu 91 Audio Output Assign Sub-menu 91 Video Output Assign Sub-menu 92 Input Setup 93 Audio Assign Sub-menu (when input is other than NET AUDIO 94 Music Server Sub-menu (When input is NET AUDIO 95 Video Assign Sub-menu 95 Listening Mode Preset Sub-menu 96 Character Edit Sub-menu 97 IntelliVolume Sub-menu 98 Delay Sub-menu 98 12V Trigger Assign Sub-menu...

Owner Manual
Page 6
...; i.Link (IEEE1394) Digital Input for DVD-Audio and SACD • Net-Tune Function with MP3/WAV/WMA Decoding • Ethernet Plug-In Capability and 1 Output • Bi-Directional RS-232 Port to download new programs and provide easy interface with touchscreen controllers from other manufacturers • Composite and S Video to Component Video Upconversion (NTSC and PAL Compatible) • Speaker A and B Mode for 7.1 Channels • BTL and Bi-Wiring Connectable for FL/FR...
...; i.Link (IEEE1394) Digital Input for DVD-Audio and SACD • Net-Tune Function with MP3/WAV/WMA Decoding • Ethernet Plug-In Capability and 1 Output • Bi-Directional RS-232 Port to download new programs and provide easy interface with touchscreen controllers from other manufacturers • Composite and S Video to Component Video Upconversion (NTSC and PAL Compatible) • Speaker A and B Mode for 7.1 Channels • BTL and Bi-Wiring Connectable for FL/FR...

Owner Manual
Page 13
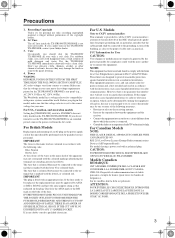
... Auto or Manual Tuning Mode. To confirm your preset stations. C TONE button [52] Press this button first. To adjust the tone level, turn the [SELECT/PRESET]. Also, if you select. Note: Recording and Zone 3 operations uses the same circuit and therefore cannot be operated only with other buttons, this button to select the mode settings or parameters. When used with the remote controller. I SETUP button [86] Press this [CONTROL/ TUNING] dial is a standard stereo jack for Zone 3 including standby...
... Auto or Manual Tuning Mode. To confirm your preset stations. C TONE button [52] Press this button first. To adjust the tone level, turn the [SELECT/PRESET]. Also, if you select. Note: Recording and Zone 3 operations uses the same circuit and therefore cannot be operated only with other buttons, this button to select the mode settings or parameters. When used with the remote controller. I SETUP button [86] Press this [CONTROL/ TUNING] dial is a standard stereo jack for Zone 3 including standby...
Owner Manual
Page 14
... 3 SUB C 1 1 1 SR SL 2 2 PRE OUT A FRONT SURR SURR BACK L A SURR R 2 OUT SBR SURR BACK R (ASSIGNABLE) SBL 3 R MULTI - CH FL IN 1 R 1 1 PH 2 2 "Net -Tune" is for digital sound signal. A REMOTE CONTROL This jack is a trademark of terminals or jacks on the device to the HDMI terminal on audio/video components. The sound quality equals the signal passed through the COAXIAL terminals. 4 DIGITAL COAXIAL IN/OUT The input/output terminals for connecting other than European and Asian models...
... 3 SUB C 1 1 1 SR SL 2 2 PRE OUT A FRONT SURR SURR BACK L A SURR R 2 OUT SBR SURR BACK R (ASSIGNABLE) SBL 3 R MULTI - CH FL IN 1 R 1 1 PH 2 2 "Net -Tune" is for digital sound signal. A REMOTE CONTROL This jack is a trademark of terminals or jacks on the device to the HDMI terminal on audio/video components. The sound quality equals the signal passed through the COAXIAL terminals. 4 DIGITAL COAXIAL IN/OUT The input/output terminals for connecting other than European and Asian models...

Owner Manual
Page 15
... input source. E SLEEP indicator Lights when the sleep timer is not supported). H Volume display Shows the volume level. Two sets of home theater connections are one of two home theaters is turned on. For example, you can use the TX-NR1000/TX-NR5000E as Dolby Digital and DTS, the channels corresponding to the input source light. H 12V TRIGGER OUT These connectors are provided for connecting the TX-NR1000/ TX-NR5000E to home automation and external controllers. F Tuning indicators AUTO indicator Lights when receiving FM broadcasts in stereo...
... input source. E SLEEP indicator Lights when the sleep timer is not supported). H Volume display Shows the volume level. Two sets of home theater connections are one of two home theaters is turned on. For example, you can use the TX-NR1000/TX-NR5000E as Dolby Digital and DTS, the channels corresponding to the input source light. H 12V TRIGGER OUT These connectors are provided for connecting the TX-NR1000/ TX-NR5000E to home automation and external controllers. F Tuning indicators AUTO indicator Lights when receiving FM broadcasts in stereo...

Owner Manual
Page 17
... source. This function can be set the Sleep function. X L NIGHT button This button is used to adjust the volume in main room B, every press of this button first, and then use the number buttons to select the Pure Audio listening mode. The [LEVEL-] and [LEVEL+] buttons are used to set only with the remote controller. I LIGHT button This button is used to set the volume and input source for Zone 2. U STEREO button This button is used to set the Late Night function. 17 F PURE A button This button is used when you want to select the Stereo listening...
... source. This function can be set the Sleep function. X L NIGHT button This button is used to adjust the volume in main room B, every press of this button first, and then use the number buttons to select the Pure Audio listening mode. The [LEVEL-] and [LEVEL+] buttons are used to set only with the remote controller. I LIGHT button This button is used to set the volume and input source for Zone 2. U STEREO button This button is used to set the Late Night function. 17 F PURE A button This button is used when you want to select the Stereo listening...

Owner Manual
Page 26
... to Gray R Front Center Surround Surround back R L R LR L INPUT RL INPUT INPUT RL INPUT RL Power amplifier 12 34 1. Center speaker 4. Surround back left speaker 2. LINE INPUT LINE INPUT C DIGITAL IN OPTICAL 1 D DIGITAL IN COAXIAL 1 E FR MULTI F - Front left speaker 7. Connecting Speakers-Continued Connecting a Subwoofer Use the SUBWOOFER PRE OUT A/B jack to connect a subwoofer with the TX-NR1000/ TX-NR5000E alone. Surround left speaker 5. CH FL IN 1 R PH 2 2 "Net -Tune" is a trademark of 3 3 Onkyo Corporation. 4 4 SUB C SR SBR SL...
... to Gray R Front Center Surround Surround back R L R LR L INPUT RL INPUT INPUT RL INPUT RL Power amplifier 12 34 1. Center speaker 4. Surround back left speaker 2. LINE INPUT LINE INPUT C DIGITAL IN OPTICAL 1 D DIGITAL IN COAXIAL 1 E FR MULTI F - Front left speaker 7. Connecting Speakers-Continued Connecting a Subwoofer Use the SUBWOOFER PRE OUT A/B jack to connect a subwoofer with the TX-NR1000/ TX-NR5000E alone. Surround left speaker 5. CH FL IN 1 R PH 2 2 "Net -Tune" is a trademark of 3 3 Onkyo Corporation. 4 4 SUB C SR SBR SL...

Owner Manual
Page 27
... R (ASSIGNABLE) SBL 3 R MULTI - TX-NR1000 ZONE 2 ZONE 3 OUT IR AC INLET 1. Connecting Speakers-Continued Using the BTL Connection To get about twice the output. In this connection, the front and surround back speaker terminals will not be used . 1. In this connection, two speaker outputs of the stereo amplifier will be used as maximum treble and bass performance from the tweeter and woofer, enriching your sound experience. Bi-wiring-enabled speakers Right speaker Left speaker High range (Tweeter) Low...
... R (ASSIGNABLE) SBL 3 R MULTI - TX-NR1000 ZONE 2 ZONE 3 OUT IR AC INLET 1. Connecting Speakers-Continued Using the BTL Connection To get about twice the output. In this connection, the front and surround back speaker terminals will not be used . 1. In this connection, two speaker outputs of the stereo amplifier will be used as maximum treble and bass performance from the tweeter and woofer, enriching your sound experience. Bi-wiring-enabled speakers Right speaker Left speaker High range (Tweeter) Low...

Owner Manual
Page 48
... display. AUDIO SEL: Used when switching the sound signal. TEST TONE/CH SEL/LEVEL-/+: Used for the test tone, or when temporarily changing the sound volume level. MUTING: Used to the apparatus and components placed in AMP mode, the following functions are explained here. To Select an Input Source Scroll wheel 48 ON STANDBY I TV INPUT 1 @. - ' / 4 GHI 7 PQRS +10 --/--- MAIN A: Used when driving the speaker that has been set to "Main B" in the Speaker Configuration sub-menu. VOL : Used when adjusting the sound volume. THX...
... display. AUDIO SEL: Used when switching the sound signal. TEST TONE/CH SEL/LEVEL-/+: Used for the test tone, or when temporarily changing the sound volume level. MUTING: Used to the apparatus and components placed in AMP mode, the following functions are explained here. To Select an Input Source Scroll wheel 48 ON STANDBY I TV INPUT 1 @. - ' / 4 GHI 7 PQRS +10 --/--- MAIN A: Used when driving the speaker that has been set to "Main B" in the Speaker Configuration sub-menu. VOL : Used when adjusting the sound volume. THX...

Owner Manual
Page 64
... --/--- How to Connect Use three or four multichannel connection cables or audio connection cables to connect the multichannel output jack on the TX-NR1000/TX-NR5000E. CUSTOM JKL MNO INPUT 8 9 TUV WXYZ TV VOL 0 CLEAR # DIRECT TUNING ZONE 3 MACRO ZONE 2 MODE INPUT DIMMER T V INPUT + TOP MENU SERVER MENU AUDIO AD J SLEEP CH DISC - Select "1" when connected to MULTI-CH IN 1, or "2" when connected to the MULTI-CH IN 1/2 jack on the connected device to MULTI-CH IN 2. 6 Press the [SETUP] button. At default, DVD is...
... --/--- How to Connect Use three or four multichannel connection cables or audio connection cables to connect the multichannel output jack on the TX-NR1000/TX-NR5000E. CUSTOM JKL MNO INPUT 8 9 TUV WXYZ TV VOL 0 CLEAR # DIRECT TUNING ZONE 3 MACRO ZONE 2 MODE INPUT DIMMER T V INPUT + TOP MENU SERVER MENU AUDIO AD J SLEEP CH DISC - Select "1" when connected to MULTI-CH IN 1, or "2" when connected to the MULTI-CH IN 1/2 jack on the connected device to MULTI-CH IN 2. 6 Press the [SETUP] button. At default, DVD is...

Owner Manual
Page 66
...), select "Speaker/Output Setup" → "Audio Output Assign," and set the terminal connected to the component to any of the composite VIDEO OUT 1-4 terminals. 4 Set the Setup menu. 1. Main Room TV TX-NR1000/ TX-NR5000E When Connecting the Pre-main Amplifier or Receiver (Zone 2 or Zone 3) • You can enjoy a different source in a remote zone while a 7.1 channel source is connected to close the menu. Connect to any of the following terminals: • AUDIO OUT 1-5 Default: Analog 4 (AUDIO OUT 4): Zone 2 Out Analog 5 (AUDIO OUT 5): Zone 3 Out • DIGITAL OUT OPTICAL...
...), select "Speaker/Output Setup" → "Audio Output Assign," and set the terminal connected to the component to any of the composite VIDEO OUT 1-4 terminals. 4 Set the Setup menu. 1. Main Room TV TX-NR1000/ TX-NR5000E When Connecting the Pre-main Amplifier or Receiver (Zone 2 or Zone 3) • You can enjoy a different source in a remote zone while a 7.1 channel source is connected to close the menu. Connect to any of the following terminals: • AUDIO OUT 1-5 Default: Analog 4 (AUDIO OUT 4): Zone 2 Out Analog 5 (AUDIO OUT 5): Zone 3 Out • DIGITAL OUT OPTICAL...

Owner Manual
Page 67
... set "Zone 2 Out" or "Zone 3 Out" in the Audio Output Assign sub-menu to "Zone 2 Out" or "Zone 3 Out." 4. Then, set the terminal to which the component is being played in the main room. • Adjust the volume level on the TX-NR1000/ TX-NR5000E (not on the Speaker Configuration sub-menu of the composite VIDEO OUT 1-4 terminals. 4 Set the Setup menu. 1. Enjoying Movies and Music in a Remote Zone • The sleep timer in the main room also works...
... set "Zone 2 Out" or "Zone 3 Out" in the Audio Output Assign sub-menu to "Zone 2 Out" or "Zone 3 Out." 4. Then, set the terminal to which the component is being played in the main room. • Adjust the volume level on the TX-NR1000/ TX-NR5000E (not on the Speaker Configuration sub-menu of the composite VIDEO OUT 1-4 terminals. 4 Set the Setup menu. 1. Enjoying Movies and Music in a Remote Zone • The sleep timer in the main room also works...

Owner Manual
Page 70
... Input source buttons STANDBY/ON MASTER VOLUME STANDBY REC / ZONE 3 ( RED ) MAIN ( BLUE ) ZONE 2 ( GREEN ) PURE AUDIO DISPLAY TAPE 1 TAPE 2 TUNER PHONO C D NET AUDIO DVD VIDEO 1 VIDEO 2 VIDEO 3 VIDEO 4 VIDEO 5 VIDEO 6 VIDEO 7 OPEN PHONES LISTENING AUDIO MODE SELECTOR TONE TUNING MODE MEMORY DIMMER CLEAR ZONE 2 SELECT/ PRESET SETUP CONTROL / TUNING REC/ZONE 3 LEVEL PUSH TO ENTER EXIT PUSH TO ENTER LEVEL DIGITAL S VIDEO VIDEO 7 INPUT VIDEO L AUDIO R STANDBY indicator SETUP REC/ZONE 3 CONTROL/TUNING SELECT/PRESET Recording Audio/Video While Playing...
... Input source buttons STANDBY/ON MASTER VOLUME STANDBY REC / ZONE 3 ( RED ) MAIN ( BLUE ) ZONE 2 ( GREEN ) PURE AUDIO DISPLAY TAPE 1 TAPE 2 TUNER PHONO C D NET AUDIO DVD VIDEO 1 VIDEO 2 VIDEO 3 VIDEO 4 VIDEO 5 VIDEO 6 VIDEO 7 OPEN PHONES LISTENING AUDIO MODE SELECTOR TONE TUNING MODE MEMORY DIMMER CLEAR ZONE 2 SELECT/ PRESET SETUP CONTROL / TUNING REC/ZONE 3 LEVEL PUSH TO ENTER EXIT PUSH TO ENTER LEVEL DIGITAL S VIDEO VIDEO 7 INPUT VIDEO L AUDIO R STANDBY indicator SETUP REC/ZONE 3 CONTROL/TUNING SELECT/PRESET Recording Audio/Video While Playing...
Owner Manual
Page 88
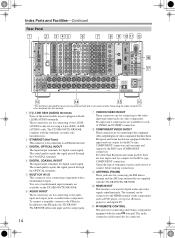
... not displayed (Because, if "Powered Zone 2" is incorrect, the desired component will not play a selected input source. Select this when connecting and using the center speaker and/or surround speakers in main room A. When either the center, surround, or surround back speakers are disabled). Main B: Select this when using the front speaker in main room A by referring to the information you also need to allocate "audio output" and "video output" to settings for Front: Select this when using in...
... not displayed (Because, if "Powered Zone 2" is incorrect, the desired component will not play a selected input source. Select this when connecting and using the center speaker and/or surround speakers in main room A. When either the center, surround, or surround back speakers are disabled). Main B: Select this when using the front speaker in main room A by referring to the information you also need to allocate "audio output" and "video output" to settings for Front: Select this when using in...

Owner Manual
Page 106
... DTS NEO:6 mode. Select the terminal to which the speakers you cannot select "PLIIx Movie." Off: Disables the Late Night function. Auto: Automatically plays a source using the Dolby Digital EX mode. The surround back setting you set the bass level for playback when you to "Off" after the TX-NR1000/ TX-NR5000E enters the standby state. e. h. A+B: Outputs the source from the speakers connected to "Main A 1ch (SBL)" in the Dolby Digital listening mode. LFE Level This option allows you play a source in the Speaker Configuration sub-menu...
... DTS NEO:6 mode. Select the terminal to which the speakers you cannot select "PLIIx Movie." Off: Disables the Late Night function. Auto: Automatically plays a source using the Dolby Digital EX mode. The surround back setting you set the bass level for playback when you to "Off" after the TX-NR1000/ TX-NR5000E enters the standby state. e. h. A+B: Outputs the source from the speakers connected to "Main A 1ch (SBL)" in the Dolby Digital listening mode. LFE Level This option allows you play a source in the Speaker Configuration sub-menu...

Owner Manual
Page 146
... "Listening Mode Setup" menu, make sure that contains no information in the LFE channel, the subwoofer produces no sound. • Make sure the speakers are configured correctly (page 88). Can't select the DTS-ES Discrete/Matrix or THX Surround EX listening modes? • These modes cannot be produced by the surround back speakers with a certain signal format? • Check the input signal format setting. Troubleshooting If you have any trouble using your TX-NR1000/TX-NR5000E...
... "Listening Mode Setup" menu, make sure that contains no information in the LFE channel, the subwoofer produces no sound. • Make sure the speakers are configured correctly (page 88). Can't select the DTS-ES Discrete/Matrix or THX Surround EX listening modes? • These modes cannot be produced by the surround back speakers with a certain signal format? • Check the input signal format setting. Troubleshooting If you have any trouble using your TX-NR1000/TX-NR5000E...

Owner Manual
Page 147
... playing DTS program material, using the remote controller to control other components? • If it loses radio presets, make the presets again. Video There's no picture? • Make sure that all video connecting plugs are pushed in all speakers have been calibrated (page 90), the maximum volume setting may not work (page 47). • Make sure you've selected the correct remote controller mode (pages 47). 147 Noise can be set to "Off" (pages 102-109). Tuner...
... playing DTS program material, using the remote controller to control other components? • If it loses radio presets, make the presets again. Video There's no picture? • Make sure that all video connecting plugs are pushed in all speakers have been calibrated (page 90), the maximum volume setting may not work (page 47). • Make sure you've selected the correct remote controller mode (pages 47). 147 Noise can be set to "Off" (pages 102-109). Tuner...
Owner Manual
Page 148
... The sound changes when I connect my headphones? • When a pair of the "Audio Output Assign" and "Video Output Assign" sub-menus under the "Speaker/Output Setup" menu (pages 91, 92). Troubleshooting-Continued Can't learn from a remote controller that proper settings are being used at the same time. There's no surround back speakers are connected, or the surround back outputs are made for Zone 2/3 only, see the Net-Tune FAQ on . • Make sure that doesn't help for...
... The sound changes when I connect my headphones? • When a pair of the "Audio Output Assign" and "Video Output Assign" sub-menus under the "Speaker/Output Setup" menu (pages 91, 92). Troubleshooting-Continued Can't learn from a remote controller that proper settings are being used at the same time. There's no surround back speakers are connected, or the surround back outputs are made for Zone 2/3 only, see the Net-Tune FAQ on . • Make sure that doesn't help for...


