
Owner Manual
Page 1
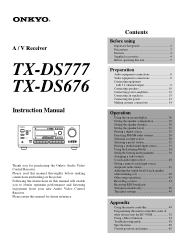
... BASS/ SETUP ADJUSTMENT TREBLE MODE PRESET/MODE ADJ MULTI CH INPUT DISPLAY DIRECT LISTENING MODE STEREO /DTS THX SURROUND DSP PUSH TO ENTER REC OUT DIGITAL/ ANALOG CH LEVEL MODE DVD VIDEO-1 VIDEO-2 VIDEO-3 VIDEO-4 TAPE FM AM PHONO C D DOWN MASTER VOLUME UP VIDEO 4/VIDEO CAM INPUT S VIDEO VIDEO L AUDIO R(MONO) AV RECEIVER TX-DS777 Thank you to it 42 Other setup operations 43 Recording a source 44 Receiving RDS broadcasts (European models only 46 The initial settings 48 Appendix Using the remote controller 49 Programming the remote controller codes...
... BASS/ SETUP ADJUSTMENT TREBLE MODE PRESET/MODE ADJ MULTI CH INPUT DISPLAY DIRECT LISTENING MODE STEREO /DTS THX SURROUND DSP PUSH TO ENTER REC OUT DIGITAL/ ANALOG CH LEVEL MODE DVD VIDEO-1 VIDEO-2 VIDEO-3 VIDEO-4 TAPE FM AM PHONO C D DOWN MASTER VOLUME UP VIDEO 4/VIDEO CAM INPUT S VIDEO VIDEO L AUDIO R(MONO) AV RECEIVER TX-DS777 Thank you to it 42 Other setup operations 43 Recording a source 44 Receiving RDS broadcasts (European models only 46 The initial settings 48 Appendix Using the remote controller 49 Programming the remote controller codes...

Owner Manual
Page 2
... static charges. NO USER-SERVICEABLE PARTS INSIDE. All the safety and operating instructions should be sure the antenna system is intended to alert the user to a wall or ceiling only as recom- Quick stops, excessive force, and uneven sur- Heat - cluding amplifiers) that they exit from the outlet when left unused for future reference. 3. Power-Cord Protection - nience receptacles...
... static charges. NO USER-SERVICEABLE PARTS INSIDE. All the safety and operating instructions should be sure the antenna system is intended to alert the user to a wall or ceiling only as recom- Quick stops, excessive force, and uneven sur- Heat - cluding amplifiers) that they exit from the outlet when left unused for future reference. 3. Power-Cord Protection - nience receptacles...
Owner Manual
Page 3
... the rear panel of the area where this number. 2. Following this instruction manual is marked with the corresponding technical standards such as practical. Worldwide models are equipped with a clean cloth. Should the fuse need to be performed only by one or more of the following code: Blue : Neutral Brown : Live As the colours of the wires in your Onkyo authorized service station...
... the rear panel of the area where this number. 2. Following this instruction manual is marked with the corresponding technical standards such as practical. Worldwide models are equipped with a clean cloth. Should the fuse need to be performed only by one or more of the following code: Blue : Neutral Brown : Live As the colours of the wires in your Onkyo authorized service station...
Owner Manual
Page 4
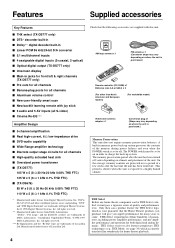
...169; 1996 Digital Theater Systems, Inc. Features Supplied accessories Key Features s THX select (TX-DS777 only) s DTS* decorder built-in s Dolby** digital decoder built-in s Linear PCM 96 kHz/24-bit D/A converter s 5.1 multichannel inputs s 4 assignable digital inputs (2-coaxial, 2-optical) s Optical digital output (TX-DS777 only) s Onscreen display s Main-in jacks for front left & right channels (TX-DS777 only) s Pre outs for all channels s Banana-plug posts for all channels s Aluminum volume control s New user-friendly smart scan s New backlit learning remote with this unit. "Dolby...
...169; 1996 Digital Theater Systems, Inc. Features Supplied accessories Key Features s THX select (TX-DS777 only) s DTS* decorder built-in s Dolby** digital decoder built-in s Linear PCM 96 kHz/24-bit D/A converter s 5.1 multichannel inputs s 4 assignable digital inputs (2-coaxial, 2-optical) s Optical digital output (TX-DS777 only) s Onscreen display s Main-in jacks for front left & right channels (TX-DS777 only) s Pre outs for all channels s Banana-plug posts for all channels s Aluminum volume control s New user-friendly smart scan s New backlit learning remote with this unit. "Dolby...
Owner Manual
Page 5
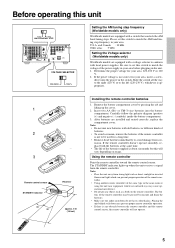
... models are installed and seated correctly, replace the compartment cover. Be sure to set this unit 9 kHz 10 kHz AM FREQUENCY STEP DIGITAL INPUT R AMP IN COAXIAL 1 COAXIAL 2 OPTICAL 1 FRONT PRE OUT FRONT SUB WOOFER CENTER OPTICAL 2 SURROUND FRONT OPTICAL DIGITAL OUTPUT SUB WOOFER CENTER SURROUND MULTI CHANNEL INPUT R CD GMD PHONO R L L L R L V S VIDEO-1 OUT IN VIDEO-2 VIDEO-3 OUT IN IN ANTENNA AM FM 75 DVD IN (REC) OUT MONITOR OUT AV RECEIVER MODEL NO. or UM-3)-size batteries into the groove in your area before plugging in...
... models are installed and seated correctly, replace the compartment cover. Be sure to set this unit 9 kHz 10 kHz AM FREQUENCY STEP DIGITAL INPUT R AMP IN COAXIAL 1 COAXIAL 2 OPTICAL 1 FRONT PRE OUT FRONT SUB WOOFER CENTER OPTICAL 2 SURROUND FRONT OPTICAL DIGITAL OUTPUT SUB WOOFER CENTER SURROUND MULTI CHANNEL INPUT R CD GMD PHONO R L L L R L V S VIDEO-1 OUT IN VIDEO-2 VIDEO-3 OUT IN IN ANTENNA AM FM 75 DVD IN (REC) OUT MONITOR OUT AV RECEIVER MODEL NO. or UM-3)-size batteries into the groove in your area before plugging in...

Owner Manual
Page 7
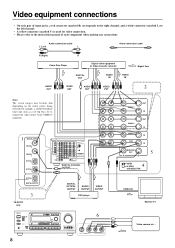
...Connect a remote control cable to turn the POWER switch ON ( ). With some players, connecting a ground wire results in use commercially available optical digital audio cables. 3. When not in larger noise. TX-DS777/TX-DS676 DIGITAL INPUT R AMP IN COAXIAL 1 COAXIAL 2 OPTICAL 1 FRONT PRE OUT FRONT SUB WOOFER CENTER OPTICAL 2 SURROUND FRONT OPTICAL DIGITAL OUTPUT SUB WOOFER CENTER SURROUND MULTI CHANNEL INPUT R CD GMD PHONO R L L L R L V S OUT VIDEO-1 IN VIDEO-2 VIDEO-3 OUT IN IN ANTENNA AM FM 75 DVD IN (REC) OUT TAPE MONITOR OUT V S AV RECEIVER MODEL...
...Connect a remote control cable to turn the POWER switch ON ( ). With some players, connecting a ground wire results in use commercially available optical digital audio cables. 3. When not in larger noise. TX-DS777/TX-DS676 DIGITAL INPUT R AMP IN COAXIAL 1 COAXIAL 2 OPTICAL 1 FRONT PRE OUT FRONT SUB WOOFER CENTER OPTICAL 2 SURROUND FRONT OPTICAL DIGITAL OUTPUT SUB WOOFER CENTER SURROUND MULTI CHANNEL INPUT R CD GMD PHONO R L L L R L V S OUT VIDEO-1 IN VIDEO-2 VIDEO-3 OUT IN IN ANTENNA AM FM 75 DVD IN (REC) OUT TAPE MONITOR OUT V S AV RECEIVER MODEL...
Owner Manual
Page 8
...REMOTE CONTROL DIGITAL COAXIAL OUTPUT DIGITAL OPTICAL OUTPUT AUDIO OUTPUT DVD player VIDEO OUTPUT STANDBY/ON STAND-BY POWER ON OFF A SPEAKERS B PHONES DIMMER FM MUTE/ MODE DOWN TUNING UP CHARACTER/ MEMORY SP/SYS AUDIO BASS/ SETUP ADJUSTMENT TREBLE MODE PRESET/MODE ADJ MULTI CH INPUT DISPLAY DIRECT STEREO LISTENING MODE /DTS THX SURROUND DSP PUSH TO ENTER REC OUT DIGITAL/ ANALOG CH LEVEL MODE DVD VIDEO-1 VIDEO-2 VIDEO-3 VIDEO-4 TAPE FM AM PHONO C D DOWN MASTER VOLUME UP VIDEO 4/VIDEO CAM INPUT S VIDEO VIDEO L AUDIO R(MONO) AV RECEIVER TX-DS777...
...REMOTE CONTROL DIGITAL COAXIAL OUTPUT DIGITAL OPTICAL OUTPUT AUDIO OUTPUT DVD player VIDEO OUTPUT STANDBY/ON STAND-BY POWER ON OFF A SPEAKERS B PHONES DIMMER FM MUTE/ MODE DOWN TUNING UP CHARACTER/ MEMORY SP/SYS AUDIO BASS/ SETUP ADJUSTMENT TREBLE MODE PRESET/MODE ADJ MULTI CH INPUT DISPLAY DIRECT STEREO LISTENING MODE /DTS THX SURROUND DSP PUSH TO ENTER REC OUT DIGITAL/ ANALOG CH LEVEL MODE DVD VIDEO-1 VIDEO-2 VIDEO-3 VIDEO-4 TAPE FM AM PHONO C D DOWN MASTER VOLUME UP VIDEO 4/VIDEO CAM INPUT S VIDEO VIDEO L AUDIO R(MONO) AV RECEIVER TX-DS777...
Owner Manual
Page 9
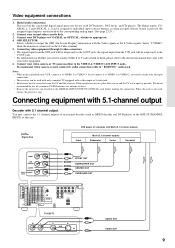
..., and CD players. REMOTE CONTROL TX-DS777 R L V S DVD IN AUDIO OUT VIDEO OUT 9 The digital inputs, COAXIAL 1, 2 and OPTICAL 1, 2can be assigned to individual input selector buttons, so when an input selector button is pressed, the assigned digital input is not used , connect its audio connection cable to the VIDEO-4 / VIDEO CAM INPUT jacks. If this receiver. When this unit. :Signal flow DVD player or a decoder with Multi (5.1) channel outputs Front Multi (5.1) channel outputs Subwoofer Center Surround FRONT SUB WOOFER CENTER SURROUND MULTI CHANNEL INPUT R L FRONT...
..., and CD players. REMOTE CONTROL TX-DS777 R L V S DVD IN AUDIO OUT VIDEO OUT 9 The digital inputs, COAXIAL 1, 2 and OPTICAL 1, 2can be assigned to individual input selector buttons, so when an input selector button is pressed, the assigned digital input is not used , connect its audio connection cable to the VIDEO-4 / VIDEO CAM INPUT jacks. If this receiver. When this unit. :Signal flow DVD player or a decoder with Multi (5.1) channel outputs Front Multi (5.1) channel outputs Subwoofer Center Surround FRONT SUB WOOFER CENTER SURROUND MULTI CHANNEL INPUT R L FRONT...

Owner Manual
Page 11
...positive (+) and negative (-) speaker wire. Screw No! REMOTE CONTROL TX-DS777/TX-DS676 Front SpeakerA L ch. Front SpeakerA R ch. DIGITAL INPUT R AMP IN COAXIAL 1 COAXIAL 2 OPTICAL 1 FRONT PRE OUT FRONT SUB WOOFER CENTER OPTICAL 2 SURROUND FRONT OPTICAL DIGITAL OUTPUT SUB WOOFER CENTER SURROUND MULTI CHANNEL INPUT R CD GMD PHONO R L L L R L V S VIDEO-1 OUT IN VIDEO-2 VIDEO-3 OUT IN IN ANTENNA AM FM 75 DVD IN (REC) OUT TAPE MONITOR OUT V S AV RECEIVER MODEL NO. Surround Speaker L ch. 11 Connecting the speaker cable 1. Insert wire 4. Note: To prevent...
...positive (+) and negative (-) speaker wire. Screw No! REMOTE CONTROL TX-DS777/TX-DS676 Front SpeakerA L ch. Front SpeakerA R ch. DIGITAL INPUT R AMP IN COAXIAL 1 COAXIAL 2 OPTICAL 1 FRONT PRE OUT FRONT SUB WOOFER CENTER OPTICAL 2 SURROUND FRONT OPTICAL DIGITAL OUTPUT SUB WOOFER CENTER SURROUND MULTI CHANNEL INPUT R CD GMD PHONO R L L L R L V S VIDEO-1 OUT IN VIDEO-2 VIDEO-3 OUT IN IN ANTENNA AM FM 75 DVD IN (REC) OUT TAPE MONITOR OUT V S AV RECEIVER MODEL NO. Surround Speaker L ch. 11 Connecting the speaker cable 1. Insert wire 4. Note: To prevent...
Owner Manual
Page 12
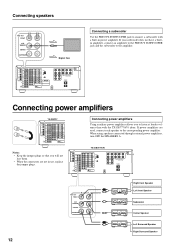
... Center Speaker 12 Left Surround Speaker Right Surround Speaker REMOTE CONTROL Connecting a subwoofer Use the PREOUT SUBWOOFER jack to the amplifier. Connecting speakers PRE OUT FRONT SUB WOOFER CENTER SURROUND :Signal flow DIGITAL INPUT R AMP IN COAXIAL 1 COAXIAL 2 OPTICAL 1 FRONT PRE OUT FRONT SUB WOOFER CENTER OPTICAL 2 SURROUND FRONT OPTICAL DIGITAL OUTPUT SUB WOOFER CENTER SURROUND MULTI CHANNEL INPUT R CD GMD PHONO R L L L R L V S VIDEO-1 OUT IN VIDEO-2 VIDEO-3 OUT IN IN ANTENNA AM FM 75 DVD IN (REC) OUT TAPE MONITOR OUT V S AV RECEIVER MODEL...
... Center Speaker 12 Left Surround Speaker Right Surround Speaker REMOTE CONTROL Connecting a subwoofer Use the PREOUT SUBWOOFER jack to the amplifier. Connecting speakers PRE OUT FRONT SUB WOOFER CENTER SURROUND :Signal flow DIGITAL INPUT R AMP IN COAXIAL 1 COAXIAL 2 OPTICAL 1 FRONT PRE OUT FRONT SUB WOOFER CENTER OPTICAL 2 SURROUND FRONT OPTICAL DIGITAL OUTPUT SUB WOOFER CENTER SURROUND MULTI CHANNEL INPUT R CD GMD PHONO R L L L R L V S VIDEO-1 OUT IN VIDEO-2 VIDEO-3 OUT IN IN ANTENNA AM FM 75 DVD IN (REC) OUT TAPE MONITOR OUT V S AV RECEIVER MODEL...
Owner Manual
Page 13
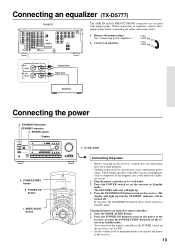
... use a wall outlet on from the remote controller: 1. MODE AUDIO button 1. Connect an equalizer. The STANDBY indicator will light up and the STANDBY indicator will light up . 3. Turning the power on a different circuit. 1. POWER switch Display STANDBY/ON STAND-BY POWER ON OFF A SPEAKERS B PHONES DIMMER FM MUTE/ MODE DOWN TUNING UP CHARACTER/ MEMORY SP/SYS AUDIO BASS/ SETUP ADJUSTMENT TREBLE MODE PRESET/MODE ADJ MULTI CH INPUT DISPLAY DIRECT STEREO LISTENING MODE /DTS THX SURROUND DSP PUSH TO ENTER REC OUT DIGITAL/ ANALOG CH LEVEL MODE DVD VIDEO...
... use a wall outlet on from the remote controller: 1. MODE AUDIO button 1. Connect an equalizer. The STANDBY indicator will light up and the STANDBY indicator will light up . 3. Turning the power on a different circuit. 1. POWER switch Display STANDBY/ON STAND-BY POWER ON OFF A SPEAKERS B PHONES DIMMER FM MUTE/ MODE DOWN TUNING UP CHARACTER/ MEMORY SP/SYS AUDIO BASS/ SETUP ADJUSTMENT TREBLE MODE PRESET/MODE ADJ MULTI CH INPUT DISPLAY DIRECT STEREO LISTENING MODE /DTS THX SURROUND DSP PUSH TO ENTER REC OUT DIGITAL/ ANALOG CH LEVEL MODE DVD VIDEO...
Owner Manual
Page 18
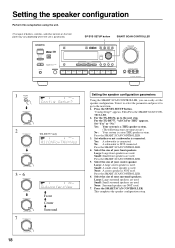
...SETUP button SMART SCAN CONTROLLER STANDBY/ON STAND-BY POWER ON OFF A SPEAKERS B PHONES MULTI CH INPUT DIMMER DISPLAY FM MUTE/ MODE DOWN TUNING UP CHARACTER/ MEMORY SP/SYS AUDIO BASS/ SETUP ADJUSTMENT TREBLE MODE PRESET/MODE ADJ SMART SCAN CONTROLLER DIRECT STEREO LISTENING MODE /DTS THX SURROUND PUSH TO ENTER DSP REC OUT DIGITAL/ ANALOG CH LEVEL MODE DVD VIDEO-1 VIDEO-2 VIDEO-3 VIDEO-4 TAPE FM AM PHONO C D DOWN MASTER VOLUME UP VIDEO 4/VIDEO CAM INPUT S VIDEO VIDEO L AUDIO R(MONO) AV RECEIVER TX-DS777 1 SP/SYS SETUP SPEAKERS A TUNED AUTO PRESET...
...SETUP button SMART SCAN CONTROLLER STANDBY/ON STAND-BY POWER ON OFF A SPEAKERS B PHONES MULTI CH INPUT DIMMER DISPLAY FM MUTE/ MODE DOWN TUNING UP CHARACTER/ MEMORY SP/SYS AUDIO BASS/ SETUP ADJUSTMENT TREBLE MODE PRESET/MODE ADJ SMART SCAN CONTROLLER DIRECT STEREO LISTENING MODE /DTS THX SURROUND PUSH TO ENTER DSP REC OUT DIGITAL/ ANALOG CH LEVEL MODE DVD VIDEO-1 VIDEO-2 VIDEO-3 VIDEO-4 TAPE FM AM PHONO C D DOWN MASTER VOLUME UP VIDEO 4/VIDEO CAM INPUT S VIDEO VIDEO L AUDIO R(MONO) AV RECEIVER TX-DS777 1 SP/SYS SETUP SPEAKERS A TUNED AUTO PRESET...
Owner Manual
Page 21
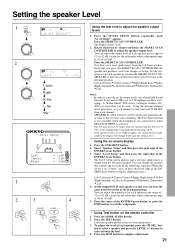
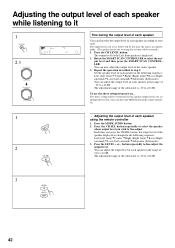
... EXIT button, to display additional items.) Left (Left front) Center (Center) Right (Right front) R-Sur (Right surround) L-Sur (Left surround) Subwoofer (Subwoofer) Left. 4. The Test Tone function is not available when the headphones are connected or when MULTI CH INPUT is selected. • The test tone will change the speaker that produces a test tone changes as the test tone starts sounding. Set the output level of each speaker by rotating the SMART SCAN CONTROLLER so that has been set to complete adjustment. 21...
... EXIT button, to display additional items.) Left (Left front) Center (Center) Right (Right front) R-Sur (Right surround) L-Sur (Left surround) Subwoofer (Subwoofer) Left. 4. The Test Tone function is not available when the headphones are connected or when MULTI CH INPUT is selected. • The test tone will change the speaker that produces a test tone changes as the test tone starts sounding. Set the output level of each speaker by rotating the SMART SCAN CONTROLLER so that has been set to complete adjustment. 21...
Owner Manual
Page 23
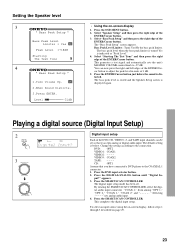
...the sound is below. To select an input source using the on-screen display, follow steps 1 through 3 described on -screen display 1. DVD: OPT2 VIDEO1: COAX1 VIDEO2: - - - - Press the DVD input selector button. 2. By rotating the SMART SCAN CONTROLLER, select the digi- Press the SMART SCAN CONTROLLER. VIDEO3: COAX2 TAPE: - - - - put?" Playing a digital source (Digital Input Setup) 2 DIGITAL/ ANALOG SPEAKERS A PCM DIGITAL STEREO DIRECT 3 PRESET/MODE ADJ PUSH TO ENTER PRESET/MODE ADJ PUSH TO ENTER Digital input setup Each of the DVD, CD, VIDEO 1-3, and TAPE input...
...the sound is below. To select an input source using the on-screen display, follow steps 1 through 3 described on -screen display 1. DVD: OPT2 VIDEO1: COAX1 VIDEO2: - - - - Press the DVD input selector button. 2. By rotating the SMART SCAN CONTROLLER, select the digi- Press the SMART SCAN CONTROLLER. VIDEO3: COAX2 TAPE: - - - - put?" Playing a digital source (Digital Input Setup) 2 DIGITAL/ ANALOG SPEAKERS A PCM DIGITAL STEREO DIRECT 3 PRESET/MODE ADJ PUSH TO ENTER PRESET/MODE ADJ PUSH TO ENTER Digital input setup Each of the DVD, CD, VIDEO 1-3, and TAPE input...
Owner Manual
Page 27
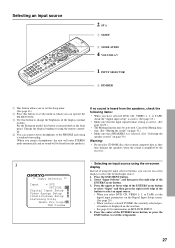
... Muting function may damage the speakers when the sound is amplified by the receiver. 3 ** Input Selector ** Input = DVD OPTICAL 1 Digital Input Setup Video Assign Setup IntelliVolume Setup Listening Dolby Mode= Pro Logic THX Cinema • Selecting an input source using the on MULTICH INPUT. 4. INPUT SELECTOR 3 DIMMER 1 This button allows you to set the sleep timer. (See page 31.) 2 Press this button to select an input source. • When you select DVD, CD, VIDEO 1- 3, or TAPE, set the mode in which you can operate the TX-DS777/676. 3 Use this button is...
... Muting function may damage the speakers when the sound is amplified by the receiver. 3 ** Input Selector ** Input = DVD OPTICAL 1 Digital Input Setup Video Assign Setup IntelliVolume Setup Listening Dolby Mode= Pro Logic THX Cinema • Selecting an input source using the on MULTICH INPUT. 4. INPUT SELECTOR 3 DIMMER 1 This button allows you to set the sleep timer. (See page 31.) 2 Press this button to select an input source. • When you select DVD, CD, VIDEO 1- 3, or TAPE, set the mode in which you can operate the TX-DS777/676. 3 Use this button is...
Owner Manual
Page 34
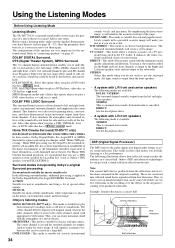
... (Digital Signal Processor) The DSP converts the audio signals into reflected sound that makes you get such a sound reflection effect from three front channels. DOLBY DIGITAL Surround, DTS (Digital Theater System), MPEG Surround This 5.1-channel digital surround format enables you feel like listening to the Dolby Digital/Dolby Pro Logic/DTS/MPEG Surround. ate a realistic sound that has a mark. For Home THX Cinema Surround playback, we recommend that has a mark. Onkyo's listening modes MONO MOVIE(TX-DS777 only) : This mode is very effective for play a DVD player, video...
... (Digital Signal Processor) The DSP converts the audio signals into reflected sound that makes you get such a sound reflection effect from three front channels. DOLBY DIGITAL Surround, DTS (Digital Theater System), MPEG Surround This 5.1-channel digital surround format enables you feel like listening to the Dolby Digital/Dolby Pro Logic/DTS/MPEG Surround. ate a realistic sound that has a mark. For Home THX Cinema Surround playback, we recommend that has a mark. Onkyo's listening modes MONO MOVIE(TX-DS777 only) : This mode is very effective for play a DVD player, video...
Owner Manual
Page 42
... surround) L-sur (Left surround) Subwoofer (Subwoofer) You can fine-tune the output level of each speaker according to your taste. Press the CH LEVEL button. The adjustment range of the subwoofer is changed in step 2. The above setting from now on the remote controller. 1 • Adjusting the output level of each speaker using the test tone will be restored.) db 1. Adjusting the output level of each speaker while listening to it 1 CH LEVEL SPEAKERS A PCM DIGITAL STEREO 2.3 PRESET/MODE ADJ PUSH TO ENTER PRESET/MODE ADJ...
... surround) L-sur (Left surround) Subwoofer (Subwoofer) You can fine-tune the output level of each speaker according to your taste. Press the CH LEVEL button. The adjustment range of the subwoofer is changed in step 2. The above setting from now on the remote controller. 1 • Adjusting the output level of each speaker using the test tone will be restored.) db 1. Adjusting the output level of each speaker while listening to it 1 CH LEVEL SPEAKERS A PCM DIGITAL STEREO 2.3 PRESET/MODE ADJ PUSH TO ENTER PRESET/MODE ADJ...
Owner Manual
Page 44
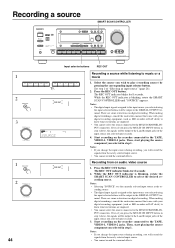
... CONTROLLER STANDBY/ON STAND-BY POWER ON OFF A SPEAKERS B PHONES MULTI CH INPUT DIMMER DISPLAY FM MUTE/ MODE DOWN TUNING UP CHARACTER/ MEMORY SP/SYS AUDIO BASS/ SETUP ADJUSTMENT TREBLE MODE PRESET/MODE ADJ SMART SCAN CONTROLLER DIRECT STEREO LISTENING MODE /DTS THX SURROUND PUSH TO ENTER DSP REC OUT DIGITAL/ ANALOG CH LEVEL MODE DVD VIDEO-1 VIDEO-2 VIDEO-3 VIDEO-4 TAPE FM AM PHONO C D DOWN MASTER VOLUME UP VIDEO 4/VIDEO CAM INPUT S VIDEO VIDEO L AUDIO R(MONO) AV RECEIVER TX-DS777 1 DVD VIDEO-1 VIDEO-2 VIDEO-3 VIDEO-4 2 REC OUT 3 PRESET/MODE...
... CONTROLLER STANDBY/ON STAND-BY POWER ON OFF A SPEAKERS B PHONES MULTI CH INPUT DIMMER DISPLAY FM MUTE/ MODE DOWN TUNING UP CHARACTER/ MEMORY SP/SYS AUDIO BASS/ SETUP ADJUSTMENT TREBLE MODE PRESET/MODE ADJ SMART SCAN CONTROLLER DIRECT STEREO LISTENING MODE /DTS THX SURROUND PUSH TO ENTER DSP REC OUT DIGITAL/ ANALOG CH LEVEL MODE DVD VIDEO-1 VIDEO-2 VIDEO-3 VIDEO-4 TAPE FM AM PHONO C D DOWN MASTER VOLUME UP VIDEO 4/VIDEO CAM INPUT S VIDEO VIDEO L AUDIO R(MONO) AV RECEIVER TX-DS777 1 DVD VIDEO-1 VIDEO-2 VIDEO-3 VIDEO-4 2 REC OUT 3 PRESET/MODE...
Owner Manual
Page 58
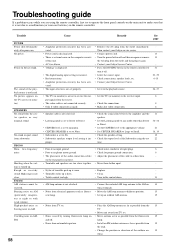
... receiver input. 8 put signals from the center speaker, or very minimal sound. Trouble POWER Power shut off . Power on but no phono motor ground. • Check for proper ground connection. 6 • The placement of the audio connection cables • Adjust the placement of the cable to Large or Small. • Check the speaker setting. • Check the output level of the Subwoofer using the remote controller, first try to operate the front panel controls on the TV screen (or monitor) SPEAKERS...
... receiver input. 8 put signals from the center speaker, or very minimal sound. Trouble POWER Power shut off . Power on but no phono motor ground. • Check for proper ground connection. 6 • The placement of the audio connection cables • Adjust the placement of the cable to Large or Small. • Check the speaker setting. • Check the output level of the Subwoofer using the remote controller, first try to operate the front panel controls on the TV screen (or monitor) SPEAKERS...

Owner Manual
Page 59
... the remote controller at the remote sensor of the 5 mote sensor of the video disc player, video cassette recorder, TV monitor, etc., that the DOLBY DIGITAL indicator lights up on the display. • The listening mode is set to "Stereo," "5ch ste- • See the table on the display. • Playback source is assigned. • Check the connection again. Picture and sound do not match. Cinema Re-EQ function cannot be used . tenna. • The power...
... the remote controller at the remote sensor of the 5 mote sensor of the video disc player, video cassette recorder, TV monitor, etc., that the DOLBY DIGITAL indicator lights up on the display. • The listening mode is set to "Stereo," "5ch ste- • See the table on the display. • Playback source is assigned. • Check the connection again. Picture and sound do not match. Cinema Re-EQ function cannot be used . tenna. • The power...


