Owner Manual
Page 4
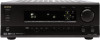
.... All rights reserved. Declaration of the five channels into 6 Ω at 1 kHz (European models, DIN) I Powerful programmed/learning remote with macros and mode-key LEDs * Manufactured under license from Digital Theater Systems, Inc. "DTS" and "DTS Digital Surround" are trademarks...• Manufactured under license from Dolby Laboratories. Confidential Unpublished Works. ©1992-1997 Dolby Laboratories, Inc. Supplied accessories Check that the ONKYO product described in this instruction manual is in compliance with the TX-DS595. "Dolby", "Pro Logic" and the double-D symbol are...
.... All rights reserved. Declaration of the five channels into 6 Ω at 1 kHz (European models, DIN) I Powerful programmed/learning remote with macros and mode-key LEDs * Manufactured under license from Digital Theater Systems, Inc. "DTS" and "DTS Digital Surround" are trademarks...• Manufactured under license from Dolby Laboratories. Confidential Unpublished Works. ©1992-1997 Dolby Laboratories, Inc. Supplied accessories Check that the ONKYO product described in this instruction manual is in compliance with the TX-DS595. "Dolby", "Pro Logic" and the double-D symbol are...
Owner Manual
Page 13
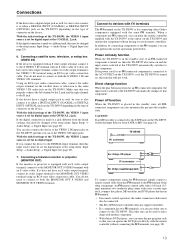
...connecting the z terminals (see page 29). 6. REMOTE CONTROL z connector TX-DS595 Ex: Onkyo CD player z connector Ex: Onkyo cassette tape deck To connect components using the z terminal, simply connect a remote control cable from this z terminal to the z terminal of the TX-DS595, the VIDEO 1 input source is connected to ...or projector (MONITOR OUT) If the monitor or projector is turned on, then the TX-DS595 also turns on the TX-DS595, switch the Input Selector from the initial settings, this function will not work. Connect to the MONITOR OUT S VIDEO terminal with an S video cable. If...
...connecting the z terminals (see page 29). 6. REMOTE CONTROL z connector TX-DS595 Ex: Onkyo CD player z connector Ex: Onkyo cassette tape deck To connect components using the z terminal, simply connect a remote control cable from this z terminal to the z terminal of the TX-DS595, the VIDEO 1 input source is connected to ...or projector (MONITOR OUT) If the monitor or projector is turned on, then the TX-DS595 also turns on the TX-DS595, switch the Input Selector from the initial settings, this function will not work. Connect to the MONITOR OUT S VIDEO terminal with an S video cable. If...
Owner Manual
Page 26
...and right speakers. When the speakers are turned on the remote controller. For multichannel sources, these dials will turn the sound back on the TX-DS595. When the speakers are turned on the TX-DS595 or the remote controller. This function only affects the front left . When...1 V 2 T 1 T 2 V 3 V 4 TUN P H STEREO 1 SURR 4 SP A 7 DISPLAY +10 -- / --- Press the MUTING button again to page 27.) Temporarily turning off the sound (Remote controller only) To turn the dial clockwise; Each time it once, the TX-DS595 will not work if the tone control is displayed on .
...and right speakers. When the speakers are turned on the remote controller. For multichannel sources, these dials will turn the sound back on the TX-DS595. When the speakers are turned on the TX-DS595 or the remote controller. This function only affects the front left . When...1 V 2 T 1 T 2 V 3 V 4 TUN P H STEREO 1 SURR 4 SP A 7 DISPLAY +10 -- / --- Press the MUTING button again to page 27.) Temporarily turning off the sound (Remote controller only) To turn the dial clockwise; Each time it once, the TX-DS595 will not work if the tone control is displayed on .
Owner Manual
Page 27
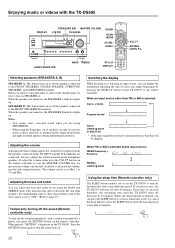
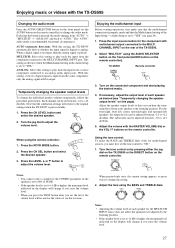
...MULTI CH INPUT source does not affect the speaker level adjusted by pressing either the jog dial on the TX-DS595 or the DIRECT button on the remote controller. Turn on the remote controller). Adjust the speaker output levels so that you set the level, the current level will be set...follow the procedure given below. Enjoying the multichannel input Before starting operations, first make the BASS and TREBLE dials work for normal circumstances. Adjust the volume with the TX-DS595 Changing the audio mode Press the AUDIO SELECTOR button on the front panel (or the AUDIO button on the ...
...MULTI CH INPUT source does not affect the speaker level adjusted by pressing either the jog dial on the TX-DS595 or the DIRECT button on the remote controller. Turn on the remote controller). Adjust the speaker output levels so that you set the level, the current level will be set...follow the procedure given below. Enjoying the multichannel input Before starting operations, first make the BASS and TREBLE dials work for normal circumstances. Adjust the volume with the TX-DS595 Changing the audio mode Press the AUDIO SELECTOR button on the front panel (or the AUDIO button on the ...

Owner Manual
Page 34
...up a preset radio station 1. Press the TUN input selector button. 3. REC: Record/Pause : Reverse playback You may cause them not to work properly. RCVR MODE SEND / LEARN PREPROGRAMMED & LEARNING CAPABILITY SLEEP ON STDBY DIRECT RCVR SAT MACRO MODE CD DVD CABLE VCR RETURN SETUP MODE ...the TX-DS595 Note: Even for devices with the and buttons, signal discrepancies may also use the following buttons: VOL : Adjusts the volume at the TX-DS595 MUTING: Activates the muting function at the TX-DS595 with the remote controller, first press the RCVR MODE button to control an Onkyo ...
...up a preset radio station 1. Press the TUN input selector button. 3. REC: Record/Pause : Reverse playback You may cause them not to work properly. RCVR MODE SEND / LEARN PREPROGRAMMED & LEARNING CAPABILITY SLEEP ON STDBY DIRECT RCVR SAT MACRO MODE CD DVD CABLE VCR RETURN SETUP MODE ...the TX-DS595 Note: Even for devices with the and buttons, signal discrepancies may also use the following buttons: VOL : Adjusts the volume at the TX-DS595 MUTING: Activates the muting function at the TX-DS595 with the remote controller, first press the RCVR MODE button to control an Onkyo ...

Owner Manual
Page 45
...(INPUT SELECTOR) Tips: • If you to program a series of that button will be transmitted at least once to continue pointing the remote controller at the TX-DS595 and press the CD MODE button. 2. Programming a Macro function You can perform the above into the CD MODE button, perform the steps ... in a macro, that operation of button operations (up to run it will be ignored, and programming is stopped. • If no longer work in 0.5 seconds and may take a while for more than 30 seconds during programming, the SEND/LEARN indicator flashes three times quickly, and the...
...(INPUT SELECTOR) Tips: • If you to program a series of that button will be transmitted at least once to continue pointing the remote controller at the TX-DS595 and press the CD MODE button. 2. Programming a Macro function You can perform the above into the CD MODE button, perform the steps ... in a macro, that operation of button operations (up to run it will be ignored, and programming is stopped. • If no longer work in 0.5 seconds and may take a while for more than 30 seconds during programming, the SEND/LEARN indicator flashes three times quickly, and the...

Owner Manual
Page 46
...press the MODE button, it will be programmed. Press the DIRECT MACRO button to program in order (in order to continue pointing the remote controller at the TX-DS595 and press the DIRECT MACRO button. Notes: • You may not be transmitted at least once to 16 button operations into the ... can be sure to avoid incorrect operation. • The codes programmed into a direct macro will no button is stopped. • If no longer work in 0.5 seconds and may take a while for the macro to finish transmitting, so be executed with just one operation in the macro. Note that it...
...press the MODE button, it will be programmed. Press the DIRECT MACRO button to program in order (in order to continue pointing the remote controller at the TX-DS595 and press the DIRECT MACRO button. Notes: • You may not be transmitted at least once to 16 button operations into the ... can be sure to avoid incorrect operation. • The codes programmed into a direct macro will no button is stopped. • If no longer work in 0.5 seconds and may take a while for the macro to finish transmitting, so be executed with just one operation in the macro. Note that it...


