

Owner Manual
Page 1
...remote controller codes of other devices 8 Connecting speakers 10 Positioning speakers 11 Connecting the power 11 Making antenna connections .......... 12 Thank you to obtain optimum performance and listening enjoyment from your new AV Receiver. Please retain this manual thoroughly before making connections and turning on the power. AV Receiver TX-DS575X...devices into the RC-392M 34 Using a Macro function 36 Appendix Troubleshooting guide 40 Specifications 41 Control guide Control positions and names .......... 42 Please read this manual for purchasing the Onkyo AV Receiver.
...remote controller codes of other devices 8 Connecting speakers 10 Positioning speakers 11 Connecting the power 11 Making antenna connections .......... 12 Thank you to obtain optimum performance and listening enjoyment from your new AV Receiver. Please retain this manual thoroughly before making connections and turning on the power. AV Receiver TX-DS575X...devices into the RC-392M 34 Using a Macro function 36 Appendix Troubleshooting guide 40 Specifications 41 Control guide Control positions and names .......... 42 Please read this manual for purchasing the Onkyo AV Receiver.
Owner Manual
Page 4
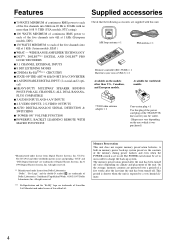
...last time the unit has been turned off. Memory Preservation This unit does not require memory preservation batteries. AM loop antenna × 1 FM antenna × 1 Remote controller (RC-392M) × 1 Batteries (size AA or UM-3) × 2 Available on the models other worldwide patents issues and pending. No.5,451,942 and ... each of the five channels into 8Ω from 20 Hz to 20 kHz with this plug if the power cord plug of the TX-DS575X does not fit your AC outlet. (Shape may vary depending on the area which it was purchased.) *Manufactured under license of Lucasfilm...
...last time the unit has been turned off. Memory Preservation This unit does not require memory preservation batteries. AM loop antenna × 1 FM antenna × 1 Remote controller (RC-392M) × 1 Batteries (size AA or UM-3) × 2 Available on the models other worldwide patents issues and pending. No.5,451,942 and ... each of the five channels into 8Ω from 20 Hz to 20 kHz with this plug if the power cord plug of the TX-DS575X does not fit your AC outlet. (Shape may vary depending on the area which it was purchased.) *Manufactured under license of Lucasfilm...
Owner Manual
Page 5
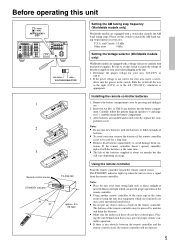
... the preset voltage is appropriate. Insert two AA (R6- rosion. The buttons of the remote controller may cause operational interference. • Do not put any obstacle between the remote controller and the remote control sensor, the remote controller will vary depending on the remote controller. TX-DS575X 10kHz 9kHz AM FREQUENCY STEP 220-230V 120V VOLTAGE SELECTOR AC OUTLETS SWITCHED TOTAL 100W...
... the preset voltage is appropriate. Insert two AA (R6- rosion. The buttons of the remote controller may cause operational interference. • Do not put any obstacle between the remote controller and the remote control sensor, the remote controller will vary depending on the remote controller. TX-DS575X 10kHz 9kHz AM FREQUENCY STEP 220-230V 120V VOLTAGE SELECTOR AC OUTLETS SWITCHED TOTAL 100W...
Owner Manual
Page 6
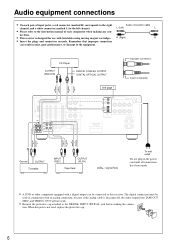
... a white connector (marked L) to the equipment. Remember that improper connection can be used , replace the protective cap. 6 TX-DS575X Ground OUTPUT Turntable INPUT (REC) OUTPUT (PLAY) Tape Deck : signal flow To wall outlet Do not plug in the power...L SUBWOOFER PRE OUT CENTER SUB WOOFER MULTI CH INPUT DIGITAL INPUT COAXIAL 2 FRONT SPEAKERS B COAXIAL 1 L OPTICAL 2 OPTICAL 1 R SURROUND SPEAKERS L R REMOTE CONTROL AC OUTLETS AC 230V 50Hz SWITCHED TOTAL 100W MAX. When this receiver. L (Left) L • Please refer to this jack is disconnected, the audio output...
... a white connector (marked L) to the equipment. Remember that improper connection can be used , replace the protective cap. 6 TX-DS575X Ground OUTPUT Turntable INPUT (REC) OUTPUT (PLAY) Tape Deck : signal flow To wall outlet Do not plug in the power...L SUBWOOFER PRE OUT CENTER SUB WOOFER MULTI CH INPUT DIGITAL INPUT COAXIAL 2 FRONT SPEAKERS B COAXIAL 1 L OPTICAL 2 OPTICAL 1 R SURROUND SPEAKERS L R REMOTE CONTROL AC OUTLETS AC 230V 50Hz SWITCHED TOTAL 100W MAX. When this receiver. L (Left) L • Please refer to this jack is disconnected, the audio output...
Owner Manual
Page 7
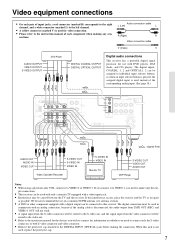
TX-DS575X : signal flow AUDIO OUT AUDIO IN VIDEO OUT S-VIDEO OUT S-VIDEO IN VIDEO IN Video Cassette Recorder S-VIDEO IN VIDEO IN Monitor TV S-VIDEO OUT ... SPEAKER I N FRONT OUT R L MONITOR OUT SURROUND S R L SUBWOOFER PRE OUT CENTER SUB WOOFER MULTI CH INPUT DIGITAL INPUT COAXIAL 2 FRONT SPEAKERS B COAXIAL 1 L OPTICAL 2 OPTICAL 1 R SURROUND SPEAKERS L R REMOTE CONTROL AC OUTLETS AC 230V 50Hz SWITCHED TOTAL 100W MAX. Audio connection cable L (Left) L R (Right) R Video connection cable V (Video) V AUDIO OUTPUT VIDEO OUTPUT S-VIDEO OUTPUT DVD...
TX-DS575X : signal flow AUDIO OUT AUDIO IN VIDEO OUT S-VIDEO OUT S-VIDEO IN VIDEO IN Video Cassette Recorder S-VIDEO IN VIDEO IN Monitor TV S-VIDEO OUT ... SPEAKER I N FRONT OUT R L MONITOR OUT SURROUND S R L SUBWOOFER PRE OUT CENTER SUB WOOFER MULTI CH INPUT DIGITAL INPUT COAXIAL 2 FRONT SPEAKERS B COAXIAL 1 L OPTICAL 2 OPTICAL 1 R SURROUND SPEAKERS L R REMOTE CONTROL AC OUTLETS AC 230V 50Hz SWITCHED TOTAL 100W MAX. Audio connection cable L (Left) L R (Right) R Video connection cable V (Video) V AUDIO OUTPUT VIDEO OUTPUT S-VIDEO OUTPUT DVD...
Owner Manual
Page 8
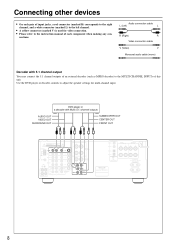
...) to adjust the speaker settings for video connection. • Please refer to the instruction manual of each component when making any con- TX-DS575X 8 AV RECEIVER MODEL NO. Audio connection cable L (Left) L R (Right) R Video connection cable V (Video) V Monaural... PRE OUT CENTER SUB WOOFER MULTI CH INPUT DIGITAL INPUT COAXIAL 2 FRONT SPEAKERS B COAXIAL 1 L OPTICAL 2 OPTICAL 1 R SURROUND SPEAKERS L R REMOTE CONTROL AC OUTLETS AC 230V 50Hz SWITCHED TOTAL 100W MAX. Connecting other devices • On each pair of input jacks, a red connector (marked R) corresponds...
...) to adjust the speaker settings for video connection. • Please refer to the instruction manual of each component when making any con- TX-DS575X 8 AV RECEIVER MODEL NO. Audio connection cable L (Left) L R (Right) R Video connection cable V (Video) V Monaural... PRE OUT CENTER SUB WOOFER MULTI CH INPUT DIGITAL INPUT COAXIAL 2 FRONT SPEAKERS B COAXIAL 1 L OPTICAL 2 OPTICAL 1 R SURROUND SPEAKERS L R REMOTE CONTROL AC OUTLETS AC 230V 50Hz SWITCHED TOTAL 100W MAX. Connecting other devices • On each pair of input jacks, a red connector (marked R) corresponds...
Owner Manual
Page 9
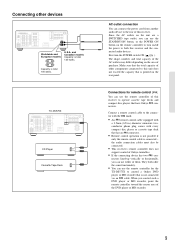
...receiver and the connected audio devices. TX-DS575X Worldwide and European models U.S.A. Capacity is connected - and Canadian models Capacity is not connected via an cable. TX-DS575X CD Player Cassette Tape Deck AC outlet connection You can use the remote controller of this unit does not exceed ...for the TX-DS575X to turn the POWER switch ON ( ON ). Since the AC outlets on the unit are a SWITCHED type outlet, you can use the remote controller for remote control ( ) You can use the STANDBY/ON button, or the POWER ON button on the remote controller to control a Onkyo DVD player ...
...receiver and the connected audio devices. TX-DS575X Worldwide and European models U.S.A. Capacity is connected - and Canadian models Capacity is not connected via an cable. TX-DS575X CD Player Cassette Tape Deck AC outlet connection You can use the remote controller of this unit does not exceed ...for the TX-DS575X to turn the POWER switch ON ( ON ). Since the AC outlets on the unit are a SWITCHED type outlet, you can use the remote controller for remote control ( ) You can use the STANDBY/ON button, or the POWER ON button on the remote controller to control a Onkyo DVD player ...
Owner Manual
Page 10
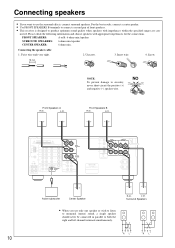
...-+ RL FRONT SPEAKERS: A or B: 6 ohms min./speaker SURROUND SPEAKERS: 6 ohms min./speaker CENTER SPEAKER: 6 ohms min. Unscrew. 3. TX-DS575X -+ Active subwoofer Center Speaker • When you want to use only one speaker or wish to listen to monaural (mono) sound, a single...OUT CENTER SUB WOOFER MULTI CH INPUT DIGITAL INPUT COAXIAL 2 FRONT SPEAKERS B COAXIAL 1 L OPTICAL 2 OPTICAL 1 R SURROUND SPEAKERS L R REMOTE CONTROL AC OUTLETS AC 230V 50Hz SWITCHED TOTAL 100W MAX. Connecting speakers • If you use the surround effects, connect surround speakers. For the best...
...-+ RL FRONT SPEAKERS: A or B: 6 ohms min./speaker SURROUND SPEAKERS: 6 ohms min./speaker CENTER SPEAKER: 6 ohms min. Unscrew. 3. TX-DS575X -+ Active subwoofer Center Speaker • When you want to use only one speaker or wish to listen to monaural (mono) sound, a single...OUT CENTER SUB WOOFER MULTI CH INPUT DIGITAL INPUT COAXIAL 2 FRONT SPEAKERS B COAXIAL 1 L OPTICAL 2 OPTICAL 1 R SURROUND SPEAKERS L R REMOTE CONTROL AC OUTLETS AC 230V 50Hz SWITCHED TOTAL 100W MAX. Connecting speakers • If you use the surround effects, connect surround speakers. For the best...
Owner Manual
Page 11
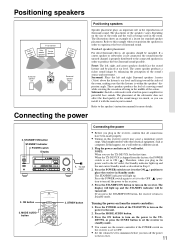
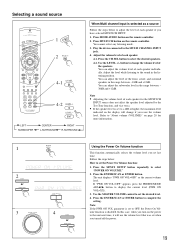
...light up and the unit enters Standby mode as computers. If a center speaker or subwoofer is not connected, the sound from the remote controller: 1. MODE AUDIO button 3. The STANDBY indicator will be placed at ear level. Turning the power on from the unused channel ...STEREO LISTENING MODE /DTS SURROUND 5 CH STEREO ENTER / SCAN DSP LATE NIGHT/ LFE LEVEL FRONT EFFECT Re-EQ CONTROL MULTI CH INPUT DVD VIDEO 1 VIDEO 2 VIDEO 3 TAPE FM AM PHONO C D DOWN MASTER VOLUME UP BASS TREBLE AV RECEIVER TX-DS575X 1. The placement of the sound's source and movement.
...light up and the unit enters Standby mode as computers. If a center speaker or subwoofer is not connected, the sound from the remote controller: 1. MODE AUDIO button 3. The STANDBY indicator will be placed at ear level. Turning the power on from the unused channel ...STEREO LISTENING MODE /DTS SURROUND 5 CH STEREO ENTER / SCAN DSP LATE NIGHT/ LFE LEVEL FRONT EFFECT Re-EQ CONTROL MULTI CH INPUT DVD VIDEO 1 VIDEO 2 VIDEO 3 TAPE FM AM PHONO C D DOWN MASTER VOLUME UP BASS TREBLE AV RECEIVER TX-DS575X 1. The placement of the sound's source and movement.
Owner Manual
Page 16
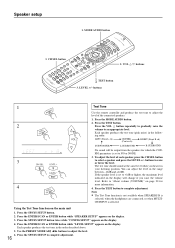
TEST button 3. buttons 1 Test Tone Use the remote controller and produce the test tone to adjust the level of each speaker, press the CH SEL button 3 to select a speaker and press the LEVEL +/- Press ...
TEST button 3. buttons 1 Test Tone Use the remote controller and produce the test tone to adjust the level of each speaker, press the CH SEL button 3 to select a speaker and press the LEVEL +/- Press ...
Owner Manual
Page 17
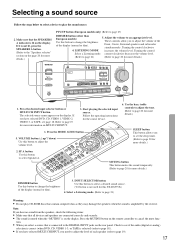
...Refer to page 27) DIMMER button (other than European models) Use this button to select Speaker A. The selected source name appears on the remote controller to cancel the mute func- SP A button Use this button to change the brightness of each speaker (refer to page 20 for more ... VIDEO 3 TAPE FM AM PHONO C D DOWN MASTER VOLUME UP BASS TREBLE AV RECEIVER TX-DS575X 1. Check to see page 18. Adjust the volume to page 21) Warning: • Do not play the sound source. 2. These controls allow you need to adjust the level of the display (normal or dim). 3. Press...
...Refer to page 27) DIMMER button (other than European models) Use this button to select Speaker A. The selected source name appears on the remote controller to cancel the mute func- SP A button Use this button to change the brightness of each speaker (refer to page 20 for more ... VIDEO 3 TAPE FM AM PHONO C D DOWN MASTER VOLUME UP BASS TREBLE AV RECEIVER TX-DS575X 1. Check to see page 18. Adjust the volume to page 21) Warning: • Do not play the sound source. 2. These controls allow you need to adjust the level of the display (normal or dim). 3. Press...
Owner Manual
Page 19
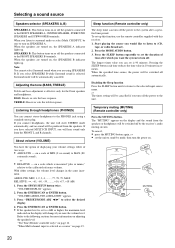
... the volume level of the front, center, and surround speakers in the range between -12dB and +12dB. Refer to "About volume (VOLUME)" on the remote controller. Press the ENTER/SCAN or ENTER button to select "POWER ON VOLUME." 2. In this case, when you turned off the power. 19 Play the device... PWR ON VOL parameter is set to OFF, the Power On Volume function is set to +1dB or higher, the maximum level indicated on the remote controller. 2. Press the ENTER/SCAN or ENTER button. You cannot select any listening mode. 3. Follow the steps below to adjust the level of each speaker...
... the volume level of the front, center, and surround speakers in the range between -12dB and +12dB. Refer to "About volume (VOLUME)" on the remote controller. Press the ENTER/SCAN or ENTER button to select "POWER ON VOLUME." 2. In this case, when you turned off the power. 19 Play the device... PWR ON VOL parameter is set to OFF, the Power On Volume function is set to +1dB or higher, the maximum level indicated on the remote controller. 2. Press the ENTER/SCAN or ENTER button. You cannot select any listening mode. 3. Follow the steps below to adjust the level of each speaker...
Owner Manual
Page 20
... level changes in 10-minute increments. Pressing the SLEEP button each time reduces the time value in the same increment. Temporary muting (MUTING) (Remote controller only) Press the MUTING button. To cancel, • press the MUTING button again, or • set to +1dB or higher, the...page 19. "VOLUME DISPLAY" appears. 2. "When Multi channel input is effective only for more information on adjusting the speaker level: "Test Tone (Remote controller only)" on page 16. To set is set the unit to stand-by the receiver's audio muting circuits. Press the MODE AUDIO button. 3. When...
... level changes in 10-minute increments. Pressing the SLEEP button each time reduces the time value in the same increment. Temporary muting (MUTING) (Remote controller only) Press the MUTING button. To cancel, • press the MUTING button again, or • set to +1dB or higher, the...page 19. "VOLUME DISPLAY" appears. 2. "When Multi channel input is effective only for more information on adjusting the speaker level: "Test Tone (Remote controller only)" on page 16. To set is set the unit to stand-by the receiver's audio muting circuits. Press the MODE AUDIO button. 3. When...

Owner Manual
Page 26
... as the source by pressing the TUN input selector button on the display. Using preset radio stations 1 FM AM 2 PRESET/ MODE ADJ DOW N UP 1, 2 Remote controller 3 Remote controller Selecting a preset station 1. Press the MODE AUDIO button. 2. Press the MEMORY button twice. ch 3. Select the tuner as explained in the previous section. 2. Select...26 Enter the desired preset number using the PRESET/MODE ADJ √/® button. or +) button. 2 MEMORY 3 ENTER or ENTER / SCAN Cancelling preset stations 1. Remote controller operation 1. "PRESET ERASE" appears on the...
... as the source by pressing the TUN input selector button on the display. Using preset radio stations 1 FM AM 2 PRESET/ MODE ADJ DOW N UP 1, 2 Remote controller 3 Remote controller Selecting a preset station 1. Press the MODE AUDIO button. 2. Press the MEMORY button twice. ch 3. Select the tuner as explained in the previous section. 2. Select...26 Enter the desired preset number using the PRESET/MODE ADJ √/® button. or +) button. 2 MEMORY 3 ENTER or ENTER / SCAN Cancelling preset stations 1. Remote controller operation 1. "PRESET ERASE" appears on the...

Owner Manual
Page 31
... the figure are programmed into or sent by the remote controller. First, press the desired MODE button to a correct mode. STNBY STNBY LIGHT VOL TEST MUTING Using the RC-392M to control each device Turning the power on and off to control the TX-DS575X from a remote controller, first press the MODE AUDIO button, then press...
... the figure are programmed into or sent by the remote controller. First, press the desired MODE button to a correct mode. STNBY STNBY LIGHT VOL TEST MUTING Using the RC-392M to control each device Turning the power on and off to control the TX-DS575X from a remote controller, first press the MODE AUDIO button, then press...
Owner Manual
Page 32
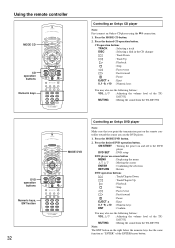
Using the remote controller MODE CD CD operation buttons Numeric keys Controlling an Onkyo CD player Note: First connect an Onkyo CD player using the connection. 1. CD operation buttons TRACK : Selecting a track DISC : Selecting a disk in the CD changer : Track Down : Track Up... "ENTER" of the TXDS575X MUTING : Muting the sound from the TX-DS575X DVD operation buttons Numeric keys, ENT button 32 MODE DVD Controlling an Onkyo DVD player Note: Make sure that you point the transmission part on the remote controller toward the sensor area on -screen button MENU : Displaying the menu...
Using the remote controller MODE CD CD operation buttons Numeric keys Controlling an Onkyo CD player Note: First connect an Onkyo CD player using the connection. 1. CD operation buttons TRACK : Selecting a track DISC : Selecting a disk in the CD changer : Track Down : Track Up... "ENTER" of the TXDS575X MUTING : Muting the sound from the TX-DS575X DVD operation buttons Numeric keys, ENT button 32 MODE DVD Controlling an Onkyo DVD player Note: Make sure that you point the transmission part on the remote controller toward the sensor area on -screen button MENU : Displaying the menu...
Owner Manual
Page 33
... the transmission part on the remote controller toward the sensor area on or standby the power to program remote controller signals of other devices. (See page 34.) You may also use the following buttons: VOL q/u : Adjusting the volume level of the TXDS575X MUTING : Muting the sound from the TX-DS575X Controlling an Onkyo tape deck Note: First connect...
... the transmission part on the remote controller toward the sensor area on or standby the power to program remote controller signals of other devices. (See page 34.) You may also use the following buttons: VOL q/u : Adjusting the volume level of the TXDS575X MUTING : Muting the sound from the TX-DS575X Controlling an Onkyo tape deck Note: First connect...

Owner Manual
Page 34
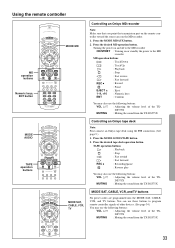
...button, the SEND/LEARN indicator lights up. If you wish to restore the Onkyo preset codes after codes have already been programmed into the buttons on the manufacturers and types of other remote controller codes into the RC-392M The RC-392M has two learning functions. If ...you try to program into the already-programmed buttons. • This remote controller uses infrared rays. Place the RC-392M and the remote controller for another device, with the function code changing each function to learn " operations for the Onkyo CD player, tape deck, DVD player, and MD recorder have ...
...button, the SEND/LEARN indicator lights up. If you wish to restore the Onkyo preset codes after codes have already been programmed into the buttons on the manufacturers and types of other remote controller codes into the RC-392M The RC-392M has two learning functions. If ...you try to program into the already-programmed buttons. • This remote controller uses infrared rays. Place the RC-392M and the remote controller for another device, with the function code changing each function to learn " operations for the Onkyo CD player, tape deck, DVD player, and MD recorder have ...

Owner Manual
Page 35
.... 2. Press and release the button from all buttons. The SEND/LEARN indicator flashes twice slowly. The learned code is not malfunction. 35 Programming the remote controller codes of other devices into the RC-392M See page 39 for information on how to a single MODE button, the SEND/LEARN indicator may remain...
.... 2. Press and release the button from all buttons. The SEND/LEARN indicator flashes twice slowly. The learned code is not malfunction. 35 Programming the remote controller codes of other devices into the RC-392M See page 39 for information on how to a single MODE button, the SEND/LEARN indicator may remain...

Owner Manual
Page 36
...into each of button operations into the MACRO MODE button. However, some devices may miss the next code. During transmission, point the remote controller toward the TX-DS575X, press the MODE CD button, and press the MACRO MODE button to program (in Macro mode takes a while. Press the operation... up to program Steps 1-5 (described above) into the MACRO MODE button under the MODE CD button (CD mode). 1. Point the remote controller toward the device to complete one of the operation buttons already programmed in the MACRO MODE button, or if you make a mistake during...
...into each of button operations into the MACRO MODE button. However, some devices may miss the next code. During transmission, point the remote controller toward the TX-DS575X, press the MODE CD button, and press the MACRO MODE button to program (in Macro mode takes a while. Press the operation... up to program Steps 1-5 (described above) into the MACRO MODE button under the MODE CD button (CD mode). 1. Point the remote controller toward the device to complete one of the operation buttons already programmed in the MACRO MODE button, or if you make a mistake during...


