Owners Manual - English/Spanish/French
Page 4
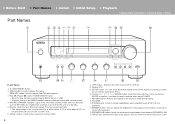
MEMORY button: Used to be turned off (P27). 8. ZONE 2 button: Controls the multi-zone function (P27). 4 7. VOLUME 13.PHONES jack: Connect stereo headphones with the cursors and press ENTER to switch the source in standby. 5. Play (1)/Pause (;) button,TUNING MODE button: 0 Used for play operations when playing Music Server or USB. 0 Switches tuning to work when this unit is within about 16y/5 m, at an angle of the display in three steps. HYBRID STANDBY indicator: Lights if the unit...
MEMORY button: Used to be turned off (P27). 8. ZONE 2 button: Controls the multi-zone function (P27). 4 7. VOLUME 13.PHONES jack: Connect stereo headphones with the cursors and press ENTER to switch the source in standby. 5. Play (1)/Pause (;) button,TUNING MODE button: 0 Used for play operations when playing Music Server or USB. 0 Switches tuning to work when this unit is within about 16y/5 m, at an angle of the display in three steps. HYBRID STANDBY indicator: Lights if the unit...

Owners Manual - English/Spanish/French
Page 5
... properly connected. Lights in it can also supply power (maximum 5 V/0.5 A) to the network. > Before Start > Part Names > Install > Initial Setup > Playback Supplementary information | Advanced Setup | Others following conditions. Ë: When headphones are input and the digital input selector is selected. Lights in the following order; TUNED: Receiving AM/FM radio FM ST: Receiving FM stereo. SLEEP: Sleep timer has been set . 5. Speaker/Channel display: Displays the output channel of the input signals. USB: When "NET" is selected with the input...
... properly connected. Lights in it can also supply power (maximum 5 V/0.5 A) to the network. > Before Start > Part Names > Install > Initial Setup > Playback Supplementary information | Advanced Setup | Others following conditions. Ë: When headphones are input and the digital input selector is selected. Lights in the following order; TUNED: Receiving AM/FM radio FM ST: Receiving FM stereo. SLEEP: Sleep timer has been set . 5. Speaker/Channel display: Displays the output channel of the input signals. USB: When "NET" is selected with the input...

Owners Manual - English/Spanish/French
Page 6
... OPTICAL/COAXIAL jacks: Input digital audio signals from an external device with speaker cables. Connect to the LINE IN jacks on the recording device using a BLUETOOTH wireless technology enabled device. ETHERNET jack: Connect to the multi-room remote control kit. Adjust their angles according to USB devices with an analog audio cable to a pre-main amplifier or power amplifier in it can connect a set of left and right speakers to each of the turntable is banana plug ready) > Before Start > Part Names > Install > Initial Setup...
... OPTICAL/COAXIAL jacks: Input digital audio signals from an external device with speaker cables. Connect to the LINE IN jacks on the recording device using a BLUETOOTH wireless technology enabled device. ETHERNET jack: Connect to the multi-room remote control kit. Adjust their angles according to USB devices with an analog audio cable to a pre-main amplifier or power amplifier in it can connect a set of left and right speakers to each of the turntable is banana plug ready) > Before Start > Part Names > Install > Initial Setup...

Owners Manual - English/Spanish/French
Page 7
.... DIMMER button: You can adjust the brightness of RI connected devices. 0 The , , and buttons can display information such as the input source, volume, and input format when pressed repeatedly during setting. 16.AUDIO button: Use for controlling ZONE 2. Press REMOTE MODE MAIN to switch to the mode to the mode for setting "Bass", "Treble", etc. (P29). 17. INPUT SELECTOR buttons: Switches the input to control play operations when playing Music Server or USB. Press the button repeatedly to (folder repeat). 5. Play buttons: Used to be turned off...
.... DIMMER button: You can adjust the brightness of RI connected devices. 0 The , , and buttons can display information such as the input source, volume, and input format when pressed repeatedly during setting. 16.AUDIO button: Use for controlling ZONE 2. Press REMOTE MODE MAIN to switch to the mode to the mode for setting "Bass", "Treble", etc. (P29). 17. INPUT SELECTOR buttons: Switches the input to control play operations when playing Music Server or USB. Press the button repeatedly to (folder repeat). 5. Play buttons: Used to be turned off...

Owners Manual - English/Spanish/French
Page 8
... remote control to switch. When only Speaker B is outputting audio, there will be no audio output from the speaker jacks. The selection changes in the order SPEAKER A, SPEAKER B, SPEAKER A+B with 8 ≠ to 16 ≠ impedance to both A and B. Connect the speaker cable so the wires do not protrude from the powered subwoofer. "SpImpedance" to "4≠". (P32) (*)You can connect two systems, Speaker A and Speaker B, as Speaker A System by switching with 4 ≠ to 16 ≠ impedance. > Before Start > Part Names > Install...
... remote control to switch. When only Speaker B is outputting audio, there will be no audio output from the speaker jacks. The selection changes in the order SPEAKER A, SPEAKER B, SPEAKER A+B with 8 ≠ to 16 ≠ impedance to both A and B. Connect the speaker cable so the wires do not protrude from the powered subwoofer. "SpImpedance" to "4≠". (P32) (*)You can connect two systems, Speaker A and Speaker B, as Speaker A System by switching with 4 ≠ to 16 ≠ impedance. > Before Start > Part Names > Install...

Owners Manual - English/Spanish/French
Page 9
... SETUP on the remote controller, and set "3. Set the audio output on and the INPUT SELECTOR automatically changes. (P33) 0 The default setting for "Opt1Wkup feature" is supported for controlling ZONE 2 (P27). 0 Only PCM audio is "Off". > Before Start > Part Names > Install > Initial Setup > Playback Supplementary information | Advanced Setup | Others Step2: Connect an external device 1. Hardware" - DIGITAL IN connection Connect an external device with an "Opt1Wkup feature" so that this unit is equipped with a digital optical cable or digital coaxial cable...
... SETUP on the remote controller, and set "3. Set the audio output on and the INPUT SELECTOR automatically changes. (P33) 0 The default setting for "Opt1Wkup feature" is supported for controlling ZONE 2 (P27). 0 Only PCM audio is "Off". > Before Start > Part Names > Install > Initial Setup > Playback Supplementary information | Advanced Setup | Others Step2: Connect an external device 1. Hardware" - DIGITAL IN connection Connect an external device with an "Opt1Wkup feature" so that this unit is equipped with a digital optical cable or digital coaxial cable...

Owners Manual - English/Spanish/French
Page 10
... jack. 0 Part of the function may not work . You can connect a turntable that has an MM-type cartridge to any LINE IN jack other than the PHONO jack. For details, refer to the instruction manual of the component with this unit's remote controller. Select the GAME input selector to "DOCK". a Turntable a Analog Audio Cable 10 If the turntable has a ground wire, connect it to the GND terminal. 0 By connecting an Onkyo component with an analog audio cable. > Before Start > Part Names > Install...
... jack. 0 Part of the function may not work . You can connect a turntable that has an MM-type cartridge to any LINE IN jack other than the PHONO jack. For details, refer to the instruction manual of the component with this unit's remote controller. Select the GAME input selector to "DOCK". a Turntable a Analog Audio Cable 10 If the turntable has a ground wire, connect it to the GND terminal. 0 By connecting an Onkyo component with an analog audio cable. > Before Start > Part Names > Install...

Owners Manual - English/Spanish/French
Page 11
..., playing a Blu-ray Disc player in the main room (where this unit is located) and listening to internet radio in the separate room (ZONE 2). 0 DSD format files cannot be output to the power amplifier or speakers. "Z2Out" to adjust the volume and sound quality on the remote controller, and set "5. Press SETUP on a power amplifier in the Setup menu to "Variable". Zone2" - ZONE2 a Analog Audio Cable a LINE IN ZONE2 PRE OUT En 11 ZONE 2 PRE OUT Connect the ZONE 2 PRE...
..., playing a Blu-ray Disc player in the main room (where this unit is located) and listening to internet radio in the separate room (ZONE 2). 0 DSD format files cannot be output to the power amplifier or speakers. "Z2Out" to adjust the volume and sound quality on the remote controller, and set "5. Press SETUP on a power amplifier in the Setup menu to "Variable". Zone2" - ZONE2 a Analog Audio Cable a LINE IN ZONE2 PRE OUT En 11 ZONE 2 PRE OUT Connect the ZONE 2 PRE...
Owners Manual - English/Spanish/French
Page 14
... display switches when the Wi-Fi settings are complete, the display changes. Select "Done" on the remote controller, and set "6. Select "Wi-Fi Setup" after pressing and holding the automatic setting button on the remote controller and press ENTER. Scan Networks Use iOS Device 0 To redo the initial settings, press SETUP on the screen of the access point you select "Push Button", then after this device in the "SET UP NEW AIRPLAY SPEAKER..." Select "Enter Password...
... display switches when the Wi-Fi settings are complete, the display changes. Select "Done" on the remote controller, and set "6. Select "Wi-Fi Setup" after pressing and holding the automatic setting button on the remote controller and press ENTER. Scan Networks Use iOS Device 0 To redo the initial settings, press SETUP on the screen of the access point you select "Push Button", then after this device in the "SET UP NEW AIRPLAY SPEAKER..." Select "Enter Password...

Owners Manual - English/Spanish/French
Page 27
... buttons on the remote control after pressing ZONE turn the INPUT dial to select the input to be output to internet radio in the separate room (ZONE 2). 0 DSD format files cannot be played in a adjust the volume and sound quality on the main unit, within 8 seconds. Press REMOTE MODE ZONE 2 (a) on the remote controller, and set "5. After pressing ZONE 2 on a power amplifier in another room: Settings are required in the Setup menu to 2, within 8 seconds turn the BASS dial, TREBLE...
... buttons on the remote control after pressing ZONE turn the INPUT dial to select the input to be output to internet radio in the separate room (ZONE 2). 0 DSD format files cannot be played in a adjust the volume and sound quality on the main unit, within 8 seconds. Press REMOTE MODE ZONE 2 (a) on the remote controller, and set "5. After pressing ZONE 2 on a power amplifier in another room: Settings are required in the Setup menu to 2, within 8 seconds turn the BASS dial, TREBLE...
Owners Manual - English/Spanish/French
Page 32
... the connected speakers all have 4 ≠ or more impedance 0 Note that of "Max Vol". Set the volume level of when the power is turned on the display. Use the power button on the remote controller or main unit to turn on the power of the unit via the network using an application that can control this unit. 0 When using "NET Stby", power consumption increases even when this happens. 32 "AUTO STBY" lights on . Select "Off (default...
... the connected speakers all have 4 ≠ or more impedance 0 Note that of "Max Vol". Set the volume level of when the power is turned on the display. Use the power button on the remote controller or main unit to turn on the power of the unit via the network using an application that can control this unit. 0 When using "NET Stby", power consumption increases even when this happens. 32 "AUTO STBY" lights on . Select "Off (default...

Owners Manual - English/Spanish/French
Page 33
... on and outputs the audio in the separate room. Select "Last (default value)" (volume level before entering standby mode), "Min", "0.5" to "Variable". 6. "Main": This unit is set "DHCP" to "Enable" to "Entering text" (P15). 0 To name a preset radio station, press TUNER on this only when "Z2Out" is turned on how to enter text, refer to configure the setting automatically. Set the maximum volume for the volume control of ZONE 2 is in power consumption is...
... on and outputs the audio in the separate room. Select "Last (default value)" (volume level before entering standby mode), "Min", "0.5" to "Variable". 6. "Main": This unit is set "DHCP" to "Enable" to "Entering text" (P15). 0 To name a preset radio station, press TUNER on this only when "Z2Out" is turned on how to enter text, refer to configure the setting automatically. Set the maximum volume for the volume control of ZONE 2 is in power consumption is...

Owners Manual - English/Spanish/French
Page 34
... not to be used The input of purchase. (* stand for a while if "Network" cannot be selected. "On": Wireless LAN connection "Off (default value)": To connect via wired LAN You can set "IP Address", "Subnet Mask", "Gateway", and "DNS Server" manually. This value is not to be changed. Displays/Sets the gateway. Displays/Sets the proxy server port number when you must set a password of this function is specific to "Entering text...
... not to be used The input of purchase. (* stand for a while if "Network" cannot be selected. "On": Wireless LAN connection "Off (default value)": To connect via wired LAN You can set "IP Address", "Subnet Mask", "Gateway", and "DNS Server" manually. This value is not to be changed. Displays/Sets the gateway. Displays/Sets the proxy server port number when you must set a password of this function is specific to "Entering text...
Owners Manual - English/Spanish/French
Page 35
... technology enabled device connected to protect the settings. Lock Setup Lock the Setup menu to the unit. Displays the status of the BLUETOOTH wireless technology enabled device connected to the BLUETOOTH wireless technology enabled device's instruction manual. Press ENTER to select when you want to update the firmware via network. 0 You will be selected. When pairing the unit again with the device, be able to update the firmware via USB. 0 You...
... technology enabled device connected to protect the settings. Lock Setup Lock the Setup menu to the unit. Displays the status of the BLUETOOTH wireless technology enabled device connected to the BLUETOOTH wireless technology enabled device's instruction manual. Press ENTER to select when you want to update the firmware via network. 0 You will be selected. When pairing the unit again with the device, be able to update the firmware via USB. 0 You...
Owners Manual - English/Spanish/French
Page 36
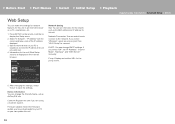
... firmware update you select "Off", set an AirPlay PW, etc. After changing the settings, select "Save" to display the Setup menu. 2. > Before Start > Part Names > Install > Initial Setup > Playback Supplementary information | Advanced Setup | Others Web Setup You can make the settings for network features for this unit. 36 Select "6. Network Connection: You can change the Friendly Name, set "IP Address", "Subnet Mask", "Gateway", and "DNS Server" manually. Start the internet browser on the remote controller...
... firmware update you select "Off", set an AirPlay PW, etc. After changing the settings, select "Save" to display the Setup menu. 2. > Before Start > Part Names > Install > Initial Setup > Playback Supplementary information | Advanced Setup | Others Web Setup You can make the settings for network features for this unit. 36 Select "6. Network Connection: You can change the Friendly Name, set "IP Address", "Subnet Mask", "Gateway", and "DNS Server" manually. Start the internet browser on the remote controller...
Owners Manual - English/Spanish/French
Page 37
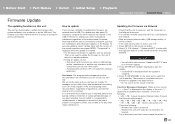
... network. 0 Stop any playing Internet radio, USB storage device, or server content. 0 If the multi-zone function is active, turn off . 1. To execute updating, select "Update Now" with the Up/Down buttons on the component such as turn it off its power - Disconnect and reconnect any cable or USB storage device, headphones, or perform any kind, including, but not limited to En 37 F/W Update" - "Update via USB. > Before Start > Part Names > Install > Initial Setup...
... network. 0 Stop any playing Internet radio, USB storage device, or server content. 0 If the multi-zone function is active, turn off . 1. To execute updating, select "Update Now" with the Up/Down buttons on the component such as turn it off its power - Disconnect and reconnect any cable or USB storage device, headphones, or perform any kind, including, but not limited to En 37 F/W Update" - "Update via USB. > Before Start > Part Names > Install > Initial Setup...

Owners Manual - English/Spanish/French
Page 39
... the connection between the output jack on the device and the input jack on the remote controller to cancel muting. 0 While headphones are not touching each other or the back panel of shipment may have turned the unit on the connection, setting and operating procedure. Make sure bare speaker wires are connected to unsuccessful recordings caused by restarting, try turning it in the Setup menu functions. 0 The protective circuit function may...
... the connection between the output jack on the device and the input jack on the remote controller to cancel muting. 0 While headphones are not touching each other or the back panel of shipment may have turned the unit on the connection, setting and operating procedure. Make sure bare speaker wires are connected to unsuccessful recordings caused by restarting, try turning it in the Setup menu functions. 0 The protective circuit function may...
Owners Manual - English/Spanish/French
Page 40
... connection 0 When the audio volume of noise 0 Re-check the antenna connection. 0 Separate the antenna from speaker cables and the power cord. 0 Move the unit away from the radio station is started. Cannot access the Internet radio 0 Certain network service or contents available through the DIGITAL IN OPTICAL/COAXIAL jacks. If connecting is not possible, turn off all components connected to the unit or remove any obstacle between the BLUETOOTH wireless technology enabled...
... connection 0 When the audio volume of noise 0 Re-check the antenna connection. 0 Separate the antenna from speaker cables and the power cord. 0 Move the unit away from the radio station is started. Cannot access the Internet radio 0 Certain network service or contents available through the DIGITAL IN OPTICAL/COAXIAL jacks. If connecting is not possible, turn off all components connected to the unit or remove any obstacle between the BLUETOOTH wireless technology enabled...
Owners Manual - English/Spanish/French
Page 41
... and communication does not work reliably. 0 After operating the Multi-zone function, the remote controller may have switched to make some settings on the radio wave. 0 When other than the server software (Windows Media® Player 12 etc.). 0 If the PC is recommended to direct sunshine or inverter-type fluorescent lights. Playback is not displayed. For instructions on changing channels, see the instruction manual provided with your wireless...
... and communication does not work reliably. 0 After operating the Multi-zone function, the remote controller may have switched to make some settings on the radio wave. 0 When other than the server software (Windows Media® Player 12 etc.). 0 If the PC is recommended to direct sunshine or inverter-type fluorescent lights. Playback is not displayed. For instructions on changing channels, see the instruction manual provided with your wireless...
Owners Manual - English/Spanish/French
Page 43
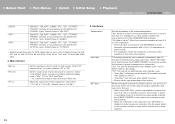
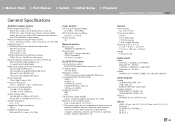
....3 lbs Audio Inputs Digital OPTICAL 1 (GAME), 2 (TV/TAPE) Maximum Fs: 192 kHz COAXIAL 1 (BD/DVD), 2 (CBL/SAT) Maximum Fs: 192 kHz Analog PHONO, CD, TV/TAPE, GAME, PC, CBL/SAT, BD/DVD Audio Outputs Analog SUBWOOFER PRE OUT LINE OUT L/R ZONE 2 PRE OUT (LINE OUT) Speaker Outputs SPEAKERS A: FRONT L/R SPEAKERS B: FRONT L/R Phones PHONES (Front, Ø1/4z/6.3 mm) Others USB: 2 (Front: Ver.2.0, 5 V/0.5 A, Rear: Ver.2.0, 5 V/1 A) Ethernet: 1 RI REMOTE CONTROL: 1 IR IN: 1 IR OUT: 1 En 43 Maximum Effective Output Power (JEITA...
....3 lbs Audio Inputs Digital OPTICAL 1 (GAME), 2 (TV/TAPE) Maximum Fs: 192 kHz COAXIAL 1 (BD/DVD), 2 (CBL/SAT) Maximum Fs: 192 kHz Analog PHONO, CD, TV/TAPE, GAME, PC, CBL/SAT, BD/DVD Audio Outputs Analog SUBWOOFER PRE OUT LINE OUT L/R ZONE 2 PRE OUT (LINE OUT) Speaker Outputs SPEAKERS A: FRONT L/R SPEAKERS B: FRONT L/R Phones PHONES (Front, Ø1/4z/6.3 mm) Others USB: 2 (Front: Ver.2.0, 5 V/0.5 A, Rear: Ver.2.0, 5 V/1 A) Ethernet: 1 RI REMOTE CONTROL: 1 IR IN: 1 IR OUT: 1 En 43 Maximum Effective Output Power (JEITA...


