Owner Manual
Page 1
Stereo Receiver TX-8522/ TX-8222 Instruction Manual Contents Introduction 2 Connections 12 Enjoying Audio Sources 20 Thank you to obtain optimum performance and listening enjoyment from your new Stereo Receiver. Following the instructions in this manual thoroughly before making connections and plugging in the unit. Others Troubleshooting 32 Specifications 34 En Please read this manual will enable you for future reference. Please retain this manual for purchasing an Onkyo Stereo Receiver.
Stereo Receiver TX-8522/ TX-8222 Instruction Manual Contents Introduction 2 Connections 12 Enjoying Audio Sources 20 Thank you to obtain optimum performance and listening enjoyment from your new Stereo Receiver. Following the instructions in this manual thoroughly before making connections and plugging in the unit. Others Troubleshooting 32 Specifications 34 En Please read this manual will enable you for future reference. Please retain this manual for purchasing an Onkyo Stereo Receiver.

Owner Manual
Page 3
... red. If the fuse needs to be replaced, the replacement fuse must be performed only by ASTA or BSI to the correct voltage for your Onkyo dealer. 3. Care-Occasionally you turn on the power supply cord of mild detergent and water. Make sure that indicated on the case. • This...terminal which is set to BS1362 and have it 's for the ASTA mark or the BSI mark on , so be connected to disconnect this instruction manual is in such a model, make sure that the voltage selector is coloured brown must approved by qualified service personnel. For European Models ...
... red. If the fuse needs to be replaced, the replacement fuse must be performed only by ASTA or BSI to the correct voltage for your Onkyo dealer. 3. Care-Occasionally you turn on the power supply cord of mild detergent and water. Make sure that indicated on the case. • This...terminal which is set to BS1362 and have it 's for the ASTA mark or the BSI mark on , so be connected to disconnect this instruction manual is in such a model, make sure that the voltage selector is coloured brown must approved by qualified service personnel. For European Models ...

Owner Manual
Page 7
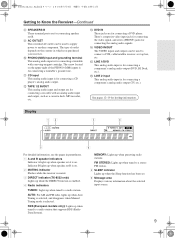
... the model or shipping destination. F DISPLAY (30) Displays various information about the currently selected input source. R TUNING MODE button (26, 27) Selects the Auto or Manual tuning mode for Satellite Radio stations.
... the model or shipping destination. F DISPLAY (30) Displays various information about the currently selected input source. R TUNING MODE button (26, 27) Selects the Auto or Manual tuning mode for Satellite Radio stations.
Owner Manual
Page 9
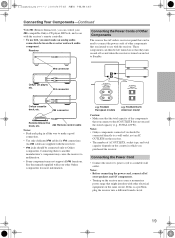
... 1/DVD This analog audio input is for connecting a turntable's ground wire. MEMORY: Lights up when Auto Tuning is selected, and disappears when Manual Tuning mode is for connecting speaker set . 6 Message area Displays various information about the selected input source. 9 The type of the PHONO ...PHONO (MM) input and grounding terminal This analog audio input is on . 2 MUTING indicator Flashes while the receiver is muted. 3 DIRECT indicator (TX-8522 only) Lights up when tuned to a radio station that supports RDS (Radio Data System). K CD input This analog audio input is selected. ...
... 1/DVD This analog audio input is for connecting a turntable's ground wire. MEMORY: Lights up when Auto Tuning is selected, and disappears when Manual Tuning mode is for connecting speaker set . 6 Message area Displays various information about the selected input source. 9 The type of the PHONO ...PHONO (MM) input and grounding terminal This analog audio input is on . 2 MUTING indicator Flashes while the receiver is muted. 3 DIRECT indicator (TX-8522 only) Lights up when tuned to a radio station that supports RDS (Radio Data System). K CD input This analog audio input is selected. ...
Owner Manual
Page 19
...Onkyo cassette deck, etc. See the manuals supplied with your speakers and AV components. • Turning on the receiver may not support all of the components that they turn on and off as and when the receiver is a problem, plug the receiver into a different branch circuit. 19 TX... the receiver. TX-8222 European models e.g. Notes: • Before connecting the power cord, connect all functions. e.g. Connecting Your Components-Continued With (Remote Interactive), you can then be connected only to Onkyo components. These components can control your -compatible Onkyo CD player, RI...
...Onkyo cassette deck, etc. See the manuals supplied with your speakers and AV components. • Turning on the receiver may not support all of the components that they turn on and off as and when the receiver is a problem, plug the receiver into a different branch circuit. 19 TX... the receiver. TX-8222 European models e.g. Notes: • Before connecting the power cord, connect all functions. e.g. Connecting Your Components-Continued With (Remote Interactive), you can then be connected only to Onkyo components. These components can control your -compatible Onkyo CD player, RI...
Owner Manual
Page 24
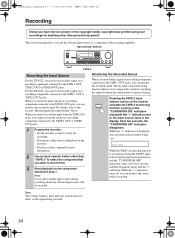
... the recorder so that it's ready for recording. • If necessary, adjust the recording level on the recorder. • See the recorder's manual for more information. 2 Use an input selector button other than "TAPE 2" to select the component that you can monitor the recorded sound. Pressing ...using your recordings for few seconds, the "T2 MONITOR ON" indication disappears. Note: If you can monitor the recorded sound. For the TX-8222, you can monitor the sound before or after recording. After few seconds and then disappears along with the ">" indication next to the input ...
... the recorder so that it's ready for recording. • If necessary, adjust the recording level on the recorder. • See the recorder's manual for more information. 2 Use an input selector button other than "TAPE 2" to select the component that you can monitor the recorded sound. Pressing ...using your recordings for few seconds, the "T2 MONITOR ON" indication disappears. Note: If you can monitor the recorded sound. For the TX-8222, you can monitor the sound before or after recording. After few seconds and then disappears along with the ">" indication next to the input ...

Owner Manual
Page 26
... all radio presets are deleted. Manual Tuning The frequency stops changing when you release the button. You can enjoy AM and FM radio stations. 1 Receiver or [TX-8522 North American model] Use the [FM/AM] input selector button to select AM or FM. [TX-8522 Other models/TX-8222] Use the [FM] or... ] button. Listening to the Radio DIRECT TUNING TUNING DOWN/UP Number buttons Number buttons CLR TUNING/CH / DIRECT TUNING FM/AM TUNING MODE TX-8522 North American model AM Frequency Step Setup (not North America and Europe) You must specify the AM frequency step used in tuner, you ...
... all radio presets are deleted. Manual Tuning The frequency stops changing when you release the button. You can enjoy AM and FM radio stations. 1 Receiver or [TX-8522 North American model] Use the [FM/AM] input selector button to select AM or FM. [TX-8522 Other models/TX-8222] Use the [FM] or... ] button. Listening to the Radio DIRECT TUNING TUNING DOWN/UP Number buttons Number buttons CLR TUNING/CH / DIRECT TUNING FM/AM TUNING MODE TX-8522 North American model AM Frequency Step Setup (not North America and Europe) You must specify the AM frequency step used in tuner, you ...

Owner Manual
Page 27
... appears and the preset number flashes. The station or channel is deleted and its number disappears from the display. For the TX-8522 other models it may be used to delete. Presetting AM/FM Stations Number buttons MEMORY TUNING MODE PRESET / I Tuning into Weak... FM Stereo Stations If the signal from 1 through 40. In this procedure for AM. Repeat this case, switch to Manual Tuning mode and listen to get good reception. When tuned into a stereo FM station, the FM STEREO indicator also appears. See the previous section...
... appears and the preset number flashes. The station or channel is deleted and its number disappears from the display. For the TX-8522 other models it may be used to delete. Presetting AM/FM Stations Number buttons MEMORY TUNING MODE PRESET / I Tuning into Weak... FM Stereo Stations If the signal from 1 through 40. In this procedure for AM. Repeat this case, switch to Manual Tuning mode and listen to get good reception. When tuned into a stereo FM station, the FM STEREO indicator also appears. See the previous section...

