Owner Manual
Page 1
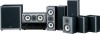
...) Powered Subwoofer (SKW-940) Instruction Manual Contents Introduction 2 Connection 19 Turning On & First Time Setup..... 34 Basic Operation Playing your AV components ....... 37 Listening to the Radio 39 Thank you to obtain optimum performance and listening enjoyment from your new 7.1ch THX Certified Digital Surround Receiver and Speaker Package. Please retain this manual for purchasing an Onkyo 7.1ch THX Certified Digital Surround Receiver and Speaker Package. Enjoying the Listening Modes...
...) Powered Subwoofer (SKW-940) Instruction Manual Contents Introduction 2 Connection 19 Turning On & First Time Setup..... 34 Basic Operation Playing your AV components ....... 37 Listening to the Radio 39 Thank you to obtain optimum performance and listening enjoyment from your new 7.1ch THX Certified Digital Surround Receiver and Speaker Package. Please retain this manual for purchasing an Onkyo 7.1ch THX Certified Digital Surround Receiver and Speaker Package. Enjoying the Listening Modes...
Owner Manual
Page 4
... audio cables (Always turn it in the plug. Check for home and other limited consumer uses only unless otherwise authorized by U.S. Reverse engineering or disassembly is marked with the letter L or coloured red. If discoloration problems persist, try moving the speakers away from the turntable, CD player or DVD player otherwise lower the unit's output level. Input Signal Warning The speakers can also be connected to the speakers. tronic musical...
... audio cables (Always turn it in the plug. Check for home and other limited consumer uses only unless otherwise authorized by U.S. Reverse engineering or disassembly is marked with the letter L or coloured red. If discoloration problems persist, try moving the speakers away from the turntable, CD player or DVD player otherwise lower the unit's output level. Input Signal Warning The speakers can also be connected to the speakers. tronic musical...
Owner Manual
Page 6
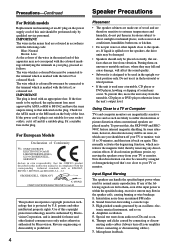
... of THX Ltd. sion • 3 S-Video inputs, 2 outputs • 4 assignable digital inputs (3 optical, 1 coaxial) • Subwoofer pre out • Color-coded 7.1 multichannel input for use with Super Audio CD and DVD-Audio • A/B speaker drive • Color-coded speaker terminal posts Tuner • 40 AM/FM presets • AM/FM auto tuning • RDS (Radio Data System) (Europe only) Remote Controller • Preprogrammed for many years to component video conver- Surround EX is your guarantee that the Home Theatre products...
... of THX Ltd. sion • 3 S-Video inputs, 2 outputs • 4 assignable digital inputs (3 optical, 1 coaxial) • Subwoofer pre out • Color-coded 7.1 multichannel input for use with Super Audio CD and DVD-Audio • A/B speaker drive • Color-coded speaker terminal posts Tuner • 40 AM/FM presets • AM/FM auto tuning • RDS (Radio Data System) (Europe only) Remote Controller • Preprogrammed for many years to component video conver- Surround EX is your guarantee that the Home Theatre products...
Owner Manual
Page 8
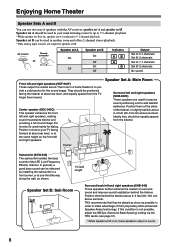
... in a home theater is not possible, adjust the SB Spc (Surround Back Spacing) setting via the THX Audio (see page 51). * While speaker set B On Off On Off Indicator AB A B Output Set A: 5.1 channels Set B: 2 channels Set A: 7.1 channels Set B: 2 channels No sound Front left and right speakers. Speaker Set A: Main Room Surround left and right speakers (SKM-940S) These speakers are output by installing the subwoofer in a front corner, or at one-third the way along the wall, as the...
... in a home theater is not possible, adjust the SB Spc (Surround Back Spacing) setting via the THX Audio (see page 51). * While speaker set B On Off On Off Indicator AB A B Output Set A: 5.1 channels Set B: 2 channels Set A: 7.1 channels Set B: 2 channels No sound Front left and right speakers. Speaker Set A: Main Room Surround left and right speakers (SKM-940S) These speakers are output by installing the subwoofer in a front corner, or at one-third the way along the wall, as the...
Owner Manual
Page 9
... 44 Adjusting Speaker Levels 44 Enjoying the Listening Modes Using the Listening Modes 45 Selecting Listening Modes 45 About the Listening Modes 47 Using the Late Night Function 49 Using the Re-EQ 49 Using the Audio Adjust Settings 49 Using the THX Audio Settings 51 Recording 52 Advanced Operation Advanced Setup 53 Advanced Speaker Settings 53 Digital Input Signal Formats 56 Correcting Sound and Picture Sync 56 Controlling Other Components 57 Entering Remote Control Codes 57 Remote Control Codes for Onkyo Components Connected via 58 Resetting REMOTE MODE Buttons 58 Resetting...
... 44 Adjusting Speaker Levels 44 Enjoying the Listening Modes Using the Listening Modes 45 Selecting Listening Modes 45 About the Listening Modes 47 Using the Late Night Function 49 Using the Re-EQ 49 Using the Audio Adjust Settings 49 Using the THX Audio Settings 51 Recording 52 Advanced Operation Advanced Setup 53 Advanced Speaker Settings 53 Digital Input Signal Formats 56 Correcting Sound and Picture Sync 56 Controlling Other Components 57 Entering Remote Control Codes 57 Remote Control Codes for Onkyo Components Connected via 58 Resetting REMOTE MODE Buttons 58 Resetting...
Owner Manual
Page 11
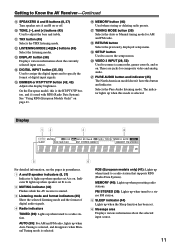
...) Turn speaker sets A and B on . M DISPLAY button (38) Displays various information about the selected input source. 11 On the European model, this is muted. 3 Listening mode and format indicators (45) Show the selected listening mode and the format of digital input signals. S SETUP button Used to adjust the bass and treble. Selects the Pure Audio listening mode. FM STEREO (39): Lights up when tuned to specify the format of digital audio signals. 4 Radio indicators TUNED (39): Lights up when Auto Tuning is selected, and disappears when Manual Tuning mode is selected. N DIGITAL INPUT...
...) Turn speaker sets A and B on . M DISPLAY button (38) Displays various information about the selected input source. 11 On the European model, this is muted. 3 Listening mode and format indicators (45) Show the selected listening mode and the format of digital input signals. S SETUP button Used to adjust the bass and treble. Selects the Pure Audio listening mode. FM STEREO (39): Lights up when tuned to specify the format of digital audio signals. 4 Radio indicators TUNED (39): Lights up when Auto Tuning is selected, and disappears when Manual Tuning mode is selected. N DIGITAL INPUT...

Owner Manual
Page 12
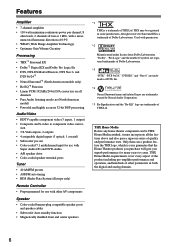
... used to connect a DVD player with an analog audio input and output, such as CD and DVD players. Getting to Know the AV Receiver-Continued Rear Panel 12 3 45 6 DIGITAL IN COA XIAL OPTICAL 1 COMPONENT VIDEO IN 3 IN 2 IN 1 OUT Y PB 2 PR 3 REMOTE CONTROL IN OUT IN L L R CD R TAPE ANTENNA AM FM 75 SURROUND BACK SPEAKERS L VIDEO 2 V VIDEO 1 DVD MONITOR OUT R S IN IN L OUT OUT IN IN IN FRONT SURROUND CENTER SURR BACK L R VIDEO 2 VIDEO 1 R SUB WOOFER DVD SURROUND SPEAKERS FRONT SPEAKERS A L CENTER SPEAKER R PRE OUT SUB WOOFER...
... used to connect a DVD player with an analog audio input and output, such as CD and DVD players. Getting to Know the AV Receiver-Continued Rear Panel 12 3 45 6 DIGITAL IN COA XIAL OPTICAL 1 COMPONENT VIDEO IN 3 IN 2 IN 1 OUT Y PB 2 PR 3 REMOTE CONTROL IN OUT IN L L R CD R TAPE ANTENNA AM FM 75 SURROUND BACK SPEAKERS L VIDEO 2 V VIDEO 1 DVD MONITOR OUT R S IN IN L OUT OUT IN IN IN FRONT SURROUND CENTER SURR BACK L R VIDEO 2 VIDEO 1 R SUB WOOFER DVD SURROUND SPEAKERS FRONT SPEAKERS A L CENTER SPEAKER R PRE OUT SUB WOOFER...

Owner Manual
Page 15
... American model only). [ ]/[ ] buttons Used to select the input sources. M VOL [ ]/[ ] button (37) Adjusts the volume of the AV receiver regardless of each speaker. Play [ ] button Starts playback. The FF [ ] button starts fast forward. 15 C MULTI CH button (38) Selects the multichannel DVD input. These buttons work in parentheses. Q L NIGHT button (49) Used with the Sleep function. F Arrow and ENTER buttons Used to select the remote controller modes. K REMOTE MODE buttons (14) Used to select and adjust settings. When a remote controller button is pressed, the REMOTE MODE button...
... American model only). [ ]/[ ] buttons Used to select the input sources. M VOL [ ]/[ ] button (37) Adjusts the volume of the AV receiver regardless of each speaker. Play [ ] button Starts playback. The FF [ ] button starts fast forward. 15 C MULTI CH button (38) Selects the multichannel DVD input. These buttons work in parentheses. Q L NIGHT button (49) Used with the Sleep function. F Arrow and ENTER buttons Used to select the remote controller modes. K REMOTE MODE buttons (14) Used to select and adjust settings. When a remote controller button is pressed, the REMOTE MODE button...

Owner Manual
Page 22
...audio output. Jack OPTICAL COA XIAL L R Description This offers the best sound quality and allows you to connect composite video inputs and outputs. Note: The AV receiver does not support SCART connections. 22 The audio quality is inserted and close when it's removed. Use only dedicated composite video cables. Use red plugs to connect left-channel audio inputs and outputs (typically labeled "L"). Push plugs in all the way. And use yellow plugs to enjoy Dolby Digital and DTS. Video Component video cable Cable Y PB PR S-Video cable Composite video cable Audio Optical digital...
...audio output. Jack OPTICAL COA XIAL L R Description This offers the best sound quality and allows you to connect composite video inputs and outputs. Note: The AV receiver does not support SCART connections. 22 The audio quality is inserted and close when it's removed. Use only dedicated composite video cables. Use red plugs to connect left-channel audio inputs and outputs (typically labeled "L"). Push plugs in all the way. And use yellow plugs to enjoy Dolby Digital and DTS. Video Component video cable Cable Y PB PR S-Video cable Composite video cable Audio Optical digital...

Owner Manual
Page 32
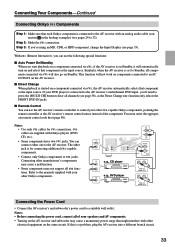
... W). Caution: R PRE OUT SUB WOOFER FRONT SPEAKERS B L R AV RECEIVER AC OUTLET AC 120V 60Hz SWITCHED 120W 1A MAX. • Make sure that the capacity of another AV component. R R IN OUT REC PLAY Connection a b c AV receiver TAPE IN L/R TAPE OUT L/R DIGITAL IN COAXIAL DIGITAL IN OPTICAL 3 Signal flow Cassette/CDR/MD/DAT recorder Analog audio L/R output Analog audio L/R input Digital coaxial output Digital optical output Connecting the Power Cord of Another Component The AV receiver has an AC...
... W). Caution: R PRE OUT SUB WOOFER FRONT SPEAKERS B L R AV RECEIVER AC OUTLET AC 120V 60Hz SWITCHED 120W 1A MAX. • Make sure that the capacity of another AV component. R R IN OUT REC PLAY Connection a b c AV receiver TAPE IN L/R TAPE OUT L/R DIGITAL IN COAXIAL DIGITAL IN OPTICAL 3 Signal flow Cassette/CDR/MD/DAT recorder Analog audio L/R output Analog audio L/R input Digital coaxial output Digital optical output Connecting the Power Cord of Another Component The AV receiver has an AC...
Owner Manual
Page 33
... AV receiver is set to Standby, all channels (see page 35). cables are supplied with your speakers and AV components. • Turning on and select that component as the input source. Notes: • Use only cables for connecting additional -capable components. • Connect only Onkyo components to jacks. With (Remote Interactive), you can use the AV receiver's remote controller to control your DVD player is connected to the AV receiver's multichannel DVD input, you'll need to press the [MULTI CH] button to hear all components connected...
... AV receiver is set to Standby, all channels (see page 35). cables are supplied with your speakers and AV components. • Turning on and select that component as the input source. Notes: • Use only cables for connecting additional -capable components. • Connect only Onkyo components to jacks. With (Remote Interactive), you can use the AV receiver's remote controller to control your DVD player is connected to the AV receiver's multichannel DVD input, you'll need to press the [MULTI CH] button to hear all components connected...

Owner Manual
Page 34
.../ON STANDBY PHONES TUNING PRESET MASTER VOLUME MULTI CH DVD VIDEO 1 VIDEO 2 VIDEO 3 TAPE TUNER C D ENTER RETURN SETUP SPEAKERS A B VCR TONE THX LISTENING MODE DIGITAL DISPLAY INPUT TUNING DIMMER MEMORY MODE CLEAR VIDEO 3 INPUT VIDEO L AUDIO R Turning On and Standby ON/STANDBY RECEIVER ON/STANDBY REMOTE MODE RECEIVER DVD TAPE INPUT SELECTOR M D/CDR 1 2 3 C D HDD V1 V2 V3 4 5 6 TV MULTI CH DVD 7 8 9 VCR TAPE TUNER 10 11 +10 0 C D 12 CABLE CLR SAT D TUN --/--- If you connected a component to the ON position (not North American models...
.../ON STANDBY PHONES TUNING PRESET MASTER VOLUME MULTI CH DVD VIDEO 1 VIDEO 2 VIDEO 3 TAPE TUNER C D ENTER RETURN SETUP SPEAKERS A B VCR TONE THX LISTENING MODE DIGITAL DISPLAY INPUT TUNING DIMMER MEMORY MODE CLEAR VIDEO 3 INPUT VIDEO L AUDIO R Turning On and Standby ON/STANDBY RECEIVER ON/STANDBY REMOTE MODE RECEIVER DVD TAPE INPUT SELECTOR M D/CDR 1 2 3 C D HDD V1 V2 V3 4 5 6 TV MULTI CH DVD 7 8 9 VCR TAPE TUNER 10 11 +10 0 C D 12 CABLE CLR SAT D TUN --/--- If you connected a component to the ON position (not North American models...
Owner Manual
Page 35
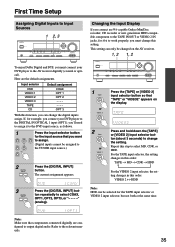
... MULTI CH DVD VIDEO 1 VIDEO 2 VIDEO 3 TAPE TUNER C D ENTER RETURN SETUP SPEAKERS A B VCR TONE THX LISTENING MODE DIGITAL DISPLAY INPUT TUNING DIMMER MEMORY MODE CLEAR MASTER VOLUME VIDEO 3 INPUT VIDEO L AUDIO R To enjoy Dolby Digital and DTS, you must connect your DVD player to the DIGITAL IN OPTICAL 1 input (OPT1), you'll need to assign it to the DVD input source, as follows. 1 Press the input selector button for the input source that you can only be changed on the AV receiver. 1, 2 1, 2 STANDBY/ON STANDBY PHONES TUNING PRESET MULTI CH DVD VIDEO 1 VIDEO...
... MULTI CH DVD VIDEO 1 VIDEO 2 VIDEO 3 TAPE TUNER C D ENTER RETURN SETUP SPEAKERS A B VCR TONE THX LISTENING MODE DIGITAL DISPLAY INPUT TUNING DIMMER MEMORY MODE CLEAR MASTER VOLUME VIDEO 3 INPUT VIDEO L AUDIO R To enjoy Dolby Digital and DTS, you must connect your DVD player to the DIGITAL IN OPTICAL 1 input (OPT1), you'll need to assign it to the DVD input source, as follows. 1 Press the input selector button for the input source that you can only be changed on the AV receiver. 1, 2 1, 2 STANDBY/ON STANDBY PHONES TUNING PRESET MULTI CH DVD VIDEO 1 VIDEO...

Owner Manual
Page 37
...; Speaker Set A&B → Speaker Set B → Off. To adjust the volume, use the INPUT SELECTOR buttons. Select a suitable listening mode and enjoy! ENT DIMMER SLEEP TV VOL INPUT GUIDE TOP MENU CH DISC ALBUM VOL PREVIOUS MENU SP A / B MUTING PLAYLIST/CAT ENTER PLAYLIST/CAT 1 4 Subwoofer's rear panel 1 AV receiver DVD VIDEO 1 VIDEO 2 Remote controller RECEIVER VIDEO 3 C D VCR TAPE TUNER 1 2 V1 V2 7 TAPE 8 TUNER 3 V3 6 DVD 9 C D Use the AV receiver's input selector buttons to the AV receiver's MONITOR OUT jack. The volume can be set the level of the subwoofer...
...; Speaker Set A&B → Speaker Set B → Off. To adjust the volume, use the INPUT SELECTOR buttons. Select a suitable listening mode and enjoy! ENT DIMMER SLEEP TV VOL INPUT GUIDE TOP MENU CH DISC ALBUM VOL PREVIOUS MENU SP A / B MUTING PLAYLIST/CAT ENTER PLAYLIST/CAT 1 4 Subwoofer's rear panel 1 AV receiver DVD VIDEO 1 VIDEO 2 Remote controller RECEIVER VIDEO 3 C D VCR TAPE TUNER 1 2 V1 V2 7 TAPE 8 TUNER 3 V3 6 DVD 9 C D Use the AV receiver's input selector buttons to the AV receiver's MONITOR OUT jack. The volume can be set the level of the subwoofer...

Owner Manual
Page 43
... select either Bass or Treble. 2 Use the TONE [-]/[+] buttons to adjust. ■ Bass You can boost or cut high-frequency sounds output by the front speakers from -10 dB to select: dim, dimmer, or normal brightness. Common Functions This section explains functions that can be used with any input source. DIMMER ON/STANDBY REMOTE MODE RECEIVER DVD TAPE INPUT SELECTOR 1 2 3 V1 V2 V3 M D/CDR C D HDD 4 5 6 TV MULTI CH DVD 7 8 9 VCR TAPE TUNER 10 11 +10 0 C D 12 CABLE...
... select either Bass or Treble. 2 Use the TONE [-]/[+] buttons to adjust. ■ Bass You can boost or cut high-frequency sounds output by the front speakers from -10 dB to select: dim, dimmer, or normal brightness. Common Functions This section explains functions that can be used with any input source. DIMMER ON/STANDBY REMOTE MODE RECEIVER DVD TAPE INPUT SELECTOR 1 2 3 V1 V2 V3 M D/CDR C D HDD 4 5 6 TV MULTI CH DVD 7 8 9 VCR TAPE TUNER 10 11 +10 0 C D 12 CABLE...

Owner Manual
Page 49
.../STANDBY REMOTE MODE RECEIVER DVD TAPE INPUT SELECTOR 1 2 3 V1 V2 V3 M D/CDR C D HDD 4 5 6 TV MULTI CH DVD 7 8 9 VCR TAPE TUNER 10 11 +10 0 C D 12 CABLE CLR SAT D TUN --/--- LEVEL+ PLAY MODE DISPLAY L NIGHT VCR DVD Re-EQ HDD RC-650M Re-EQ L NIGHT Using the Audio Adjust Settings The Audio Adjust settings only affect speaker set to Standby. High: Big reduction in dynamic range. Press the Down [ ] button to select "5. SETUP 2 Use the Up and Down [ ]/[ ] buttons to select the next setting...
.../STANDBY REMOTE MODE RECEIVER DVD TAPE INPUT SELECTOR 1 2 3 V1 V2 V3 M D/CDR C D HDD 4 5 6 TV MULTI CH DVD 7 8 9 VCR TAPE TUNER 10 11 +10 0 C D 12 CABLE CLR SAT D TUN --/--- LEVEL+ PLAY MODE DISPLAY L NIGHT VCR DVD Re-EQ HDD RC-650M Re-EQ L NIGHT Using the Audio Adjust Settings The Audio Adjust settings only affect speaker set to Standby. High: Big reduction in dynamic range. Press the Down [ ] button to select "5. SETUP 2 Use the Up and Down [ ]/[ ] buttons to select the next setting...
Owner Manual
Page 50
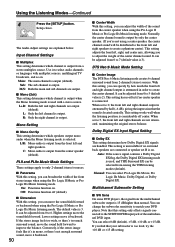
... surround back speakers are handled. The Audio Adjust settings are output (default). It can be adjusted from among the THX listening modes (default). DTS Neo:6 Music Mode Setting ■ Center Image The DTS Neo:6 Music listening mode creates 6-channel surround sound from the front left and right channel output is attenuated by how much surround sound, move it 's in order to only 2-channel (stereo) sources. ■ Panorama With this setting only affects signals connected to 6. Setup closes. Dolby Digital EX Input Signal Setting ■ Dolby EX This setting...
... surround back speakers are handled. The Audio Adjust settings are output (default). It can be adjusted from among the THX listening modes (default). DTS Neo:6 Music Mode Setting ■ Center Image The DTS Neo:6 Music listening mode creates 6-channel surround sound from the front left and right channel output is attenuated by how much surround sound, move it 's in order to only 2-channel (stereo) sources. ■ Panorama With this setting only affects signals connected to 6. Setup closes. Dolby Digital EX Input Signal Setting ■ Dolby EX This setting...

Owner Manual
Page 56
... MENU CH DISC ALBUM VOL PREVIOUS MENU SP A / B PLAYLIST/CAT ENTER MUTING PLAYLIST/CAT RETURN SETUP RECEIVER 1 RECEIVER Press the [RECEIVER] REMOTE MODE button. 2 Press and hold the AV receiver's [DIGITAL INPUT] button for the input source that the picture and sound are cut off, try the DTS setting. Format Dolby Digital DTS PCM Display PCM Normally, the AV receiver detects the signal format automatically. DVD This can be the [DVD], [VIDEO 1], [VIDEO 2], or [VIDEO 3] input source. 3 Use the Left and Right [ ]/[ ] buttons to adjust the delay from 0 to select: PCM...
... MENU CH DISC ALBUM VOL PREVIOUS MENU SP A / B PLAYLIST/CAT ENTER MUTING PLAYLIST/CAT RETURN SETUP RECEIVER 1 RECEIVER Press the [RECEIVER] REMOTE MODE button. 2 Press and hold the AV receiver's [DIGITAL INPUT] button for the input source that the picture and sound are cut off, try the DTS setting. Format Dolby Digital DTS PCM Display PCM Normally, the AV receiver detects the signal format automatically. DVD This can be the [DVD], [VIDEO 1], [VIDEO 2], or [VIDEO 3] input source. 3 Use the Left and Right [ ]/[ ] buttons to adjust the delay from 0 to select: PCM...
Owner Manual
Page 60
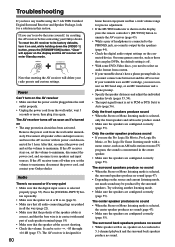
...;ed Digital Surround Receiver and Speaker Package, look for 1 hour. On some DVD-Video discs, you need to its power cord disconnected for a solution in the center speaker. • Make sure the speakers are configured correctly (page 55). Troubleshooting If you use the Pro Logic IIx Movie, Pro Logic IIx Music, or Pro Logic IIx Game listening mode with its factory defaults, turn on (page 8). • Make sure that all audio connecting plugs...
...;ed Digital Surround Receiver and Speaker Package, look for 1 hour. On some DVD-Video discs, you need to its power cord disconnected for a solution in the center speaker. • Make sure the speakers are configured correctly (page 55). Troubleshooting If you use the Pro Logic IIx Movie, Pro Logic IIx Music, or Pro Logic IIx Game listening mode with its factory defaults, turn on (page 8). • Make sure that all audio connecting plugs...

Owner Manual
Page 61
Increase the subwoofer level slightly on the HT-R940. • Make sure that the subwoofer's [POWER] switch is set to ON (not North American models). • The subwoofer's OUTPUT LEVEL control is selected, the video circuits are turned off . • With some DVD-Video discs, you need to select an audio output format from DTS to PCM, because the AV receiver does not switch formats immediately, you may be heard • Using cable ties to a component video input, your player may hear noise. On some...
Increase the subwoofer level slightly on the HT-R940. • Make sure that the subwoofer's [POWER] switch is set to ON (not North American models). • The subwoofer's OUTPUT LEVEL control is selected, the video circuits are turned off . • With some DVD-Video discs, you need to select an audio output format from DTS to PCM, because the AV receiver does not switch formats immediately, you may be heard • Using cable ties to a component video input, your player may hear noise. On some...


