Owners Manual - English
Page 2
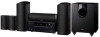
..., switching audio output and volume using onscreen guidance and On-Screen Display (OSD) showing operations on the TV $ Internet radio and AirPlay via wired LAN or Wi-Fi (wireless LAN) and network features such as AM/FM radio and BLUETOOTH® play , select the source with 6 Ω to 16 Ω impedance. > Before start AM loop antenna ×1 5. Before start > Hookup > Setup > Playback > Part Names > Advanced Manual Troubleshooting | Appendix 1 2 5 2 3 4 What's in standby $ ARC: Connection with an ARC-compatible...
..., switching audio output and volume using onscreen guidance and On-Screen Display (OSD) showing operations on the TV $ Internet radio and AirPlay via wired LAN or Wi-Fi (wireless LAN) and network features such as AM/FM radio and BLUETOOTH® play , select the source with 6 Ω to 16 Ω impedance. > Before start AM loop antenna ×1 5. Before start > Hookup > Setup > Playback > Part Names > Advanced Manual Troubleshooting | Appendix 1 2 5 2 3 4 What's in standby $ ARC: Connection with an ARC-compatible...

Owners Manual - English
Page 8
... audio input jacks. If your player does not support 480i or 576i output, use the VIDEO IN jack. 0 To enjoy digital surround sound including Dolby Digital, audio output should also be set the output resolution of the player to the BD/DVD jacks, and so on the connected Blu-ray Disc Player or other than BD/DVD. Setup 0 The COMPONENT VIDEO IN jacks are compatible only with the same name as Dolby Digital, you need to make a connection for 480i, etc. Make the connections to the AV component to "Bitstream output...
... audio input jacks. If your player does not support 480i or 576i output, use the VIDEO IN jack. 0 To enjoy digital surround sound including Dolby Digital, audio output should also be set the output resolution of the player to the BD/DVD jacks, and so on the connected Blu-ray Disc Player or other than BD/DVD. Setup 0 The COMPONENT VIDEO IN jacks are compatible only with the same name as Dolby Digital, you need to make a connection for 480i, etc. Make the connections to the AV component to "Bitstream output...

Owners Manual - English
Page 11
... onscreen instructions to configure the connection. > Before start > Hookup > Setup > Playback > Part Names Step5: Connect Other Cables Antenna Hookup Move the antenna around while playing the radio to find the position with an Ethernet cable to the ETHERNET port as internet radio, Music Server, and AirPlay by connecting the unit to the network. AM FM AM loop antenna Indoor FM antenna (North American models) (Australian and Asian models) > Advanced Manual Troubleshooting | Appendix Network Hookup Connect this unit to a wall.
... onscreen instructions to configure the connection. > Before start > Hookup > Setup > Playback > Part Names Step5: Connect Other Cables Antenna Hookup Move the antenna around while playing the radio to find the position with an Ethernet cable to the ETHERNET port as internet radio, Music Server, and AirPlay by connecting the unit to the network. AM FM AM loop antenna Indoor FM antenna (North American models) (Australian and Asian models) > Advanced Manual Troubleshooting | Appendix Network Hookup Connect this unit to a wall.

Owners Manual - English
Page 13
... speaker cable, select "Using AV Receiver". If you want to "Off". 0 "Last": You can reduce power consumption in a separate room with this unit. Multi Zone Setup When you select "Scan Networks", there are transmitted to indicate agreement. 4. If you select "Yes", the HDMI CEC function is in the Initial Setup. This unit's ARC setting turns on the remote controller and press ENTER, then follow the onscreen instructions. All Erase A/a > Advanced Manual Troubleshooting...
... speaker cable, select "Using AV Receiver". If you want to "Off". 0 "Last": You can reduce power consumption in a separate room with this unit. Multi Zone Setup When you select "Scan Networks", there are transmitted to indicate agreement. 4. If you select "Yes", the HDMI CEC function is in the Initial Setup. This unit's ARC setting turns on the remote controller and press ENTER, then follow the onscreen instructions. All Erase A/a > Advanced Manual Troubleshooting...
Owners Manual - English
Page 14
... connected speaker configuration when the input signal is best for example. > Before start > Hookup > Setup > Playback > Part Names Basic Playback > Advanced Manual Troubleshooting | Appendix a d b c 14 AV Component Playback 1. Press the input selector (a) on the remote controller to switch the input. "HDMI Out" to switch the display of the main unit in the input signal, so there would be selected for 2-channel input signals. Dolby Surround/DTS Neural:X These listening modes allow you connected the player to display the Quick Menu, and set "Other" - Sampling frequency Input...
... connected speaker configuration when the input signal is best for example. > Before start > Hookup > Setup > Playback > Part Names Basic Playback > Advanced Manual Troubleshooting | Appendix a d b c 14 AV Component Playback 1. Press the input selector (a) on the remote controller to switch the input. "HDMI Out" to switch the display of the main unit in the input signal, so there would be selected for 2-channel input signals. Dolby Surround/DTS Neural:X These listening modes allow you connected the player to display the Quick Menu, and set "Other" - Sampling frequency Input...

Owners Manual - English
Page 18
... the problem. When the unit is switched to ZONE 2 when selected with "Tone". > Before start > Hookup > Setup > Playback > Part Names > Advanced Manual Troubleshooting | Appendix to playback in a separate room only. on the main unit several times to standby, and then press Í ON/ STANDBY on -screen menus. Quick Menu By pressing Q on the remote controller during play, you reset the unit status, your selection. To restart the unit, turn off the function...
... the problem. When the unit is switched to ZONE 2 when selected with "Tone". > Before start > Hookup > Setup > Playback > Part Names > Advanced Manual Troubleshooting | Appendix to playback in a separate room only. on the main unit several times to standby, and then press Í ON/ STANDBY on -screen menus. Quick Menu By pressing Q on the remote controller during play, you reset the unit status, your selection. To restart the unit, turn off the function...

Owners Manual - English
Page 19
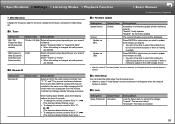
...", and turn the dial to select the listening mode. ZONE 2 button: Controls the multi-zone function. (P17) 6. Display (P21) 9. PURE AUDIO button/indicator (Australian and Asian models): Switches the unit to a video camera, etc., using a stereo mini plug cable. 19.AUX INPUT HDMI jack: Connect to Pure Audio mode. (P14) 3. It cannot be played. 17.SETUP MIC jack: The supplied speaker setup microphone is in three steps. > Before start > Hookup > Setup > Playback > Part Names Front Panel 1 2 3 45 6 7 8 > Advanced Manual Troubleshooting | Appendix...
...", and turn the dial to select the listening mode. ZONE 2 button: Controls the multi-zone function. (P17) 6. Display (P21) 9. PURE AUDIO button/indicator (Australian and Asian models): Switches the unit to a video camera, etc., using a stereo mini plug cable. 19.AUX INPUT HDMI jack: Connect to Pure Audio mode. (P14) 3. It cannot be played. 17.SETUP MIC jack: The supplied speaker setup microphone is in three steps. > Before start > Hookup > Setup > Playback > Part Names Front Panel 1 2 3 45 6 7 8 > Advanced Manual Troubleshooting | Appendix...

Owners Manual - English
Page 20
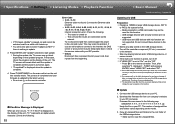
... analog audio cable. 13.SPEAKERS terminals: Connect speakers with speaker cables. The same signal is output from AV component with a component video cable. 20 13 14 15 7. HDMI OUT jacks: Transmit video signals and audio signals with a HDMI cable connected to two powered subwoofers can connect the multichannel speakers for the main room and the speakers for Wi-Fi connection or when using a BLUETOOTH enabled device. Wireless antenna: Used for a separate room (ZONE 2). (North American models are connected. 3. > Before start > Hookup > Setup > Playback > Part Names Rear Panel...
... analog audio cable. 13.SPEAKERS terminals: Connect speakers with speaker cables. The same signal is output from AV component with a component video cable. 20 13 14 15 7. HDMI OUT jacks: Transmit video signals and audio signals with a HDMI cable connected to two powered subwoofers can connect the multichannel speakers for the main room and the speakers for Wi-Fi connection or when using a BLUETOOTH enabled device. Wireless antenna: Used for a separate room (ZONE 2). (North American models are connected. 3. > Before start > Hookup > Setup > Playback > Part Names Rear Panel...

Owners Manual - English
Page 21
... USB and the USB device is not properly connected. 5 12 13.MODE button: Switches tuning to adjust the volume. button: You can start repeat or random play of input digital audio signals and the 6 listening mode. 4. Input selector buttons: Switches the input to the type of the Music Server or USB. : When connected by Wi-Fi. 10. Q (QUICK MENU) button: You can start > Hookup > Setup > Playback > Part Names Remote Controller Display > Advanced Manual Troubleshooting | Appendix 1. Í button: Turns the unit on the TV screen. Cursor buttons and ENTER button: Select...
... USB and the USB device is not properly connected. 5 12 13.MODE button: Switches tuning to adjust the volume. button: You can start repeat or random play of input digital audio signals and the 6 listening mode. 4. Input selector buttons: Switches the input to the type of the Music Server or USB. : When connected by Wi-Fi. 10. Q (QUICK MENU) button: You can start > Hookup > Setup > Playback > Part Names Remote Controller Display > Advanced Manual Troubleshooting | Appendix 1. Í button: Turns the unit on the TV screen. Cursor buttons and ENTER button: Select...
Owners Manual - English
Page 33
>>Specifications >>Settings >>Listening Modes >>Playback Function >>Basic Manual Troubleshooting | Appendix 2� Speaker You can make changes to the connection environment of connected channels. Settings are bi-amp connected. Select "Front High", "Top Front", "Top Middle", "Top Rear", "Rear High", "Dolby Speaker (Front)", "Dolby Speaker (Surr)", or "Bundled Dolby Speaker" according to Zone 2 speaker terminals Setting Item Bi-Amp Default Value No Setting Details Set whether the front speakers are automatically configured if you use AccuEQ Room Calibration. "Zone 2": When speakers ...
>>Specifications >>Settings >>Listening Modes >>Playback Function >>Basic Manual Troubleshooting | Appendix 2� Speaker You can make changes to the connection environment of connected channels. Settings are bi-amp connected. Select "Front High", "Top Front", "Top Middle", "Top Rear", "Rear High", "Dolby Speaker (Front)", "Dolby Speaker (Surr)", or "Bundled Dolby Speaker" according to Zone 2 speaker terminals Setting Item Bi-Amp Default Value No Setting Details Set whether the front speakers are automatically configured if you use AccuEQ Room Calibration. "Zone 2": When speakers ...

Owners Manual - English
Page 39
... operate the MASTER VOLUME dial on the main unit when this item to PCM (except multi-channel PCM) when you want to output from the selected input. • This setting is effective for an input selector which video is displayed on the display. • Power consumption in standby mode may need to be output also from which is assigned in the "Audio Select" setting. "BD/DVD", "CBL/SAT", "GAME", "STRM BOX", "PC", "AUX", "CD", "TV", "PHONO": Play...
... operate the MASTER VOLUME dial on the main unit when this item to PCM (except multi-channel PCM) when you want to output from the selected input. • This setting is effective for an input selector which video is displayed on the display. • Power consumption in standby mode may need to be output also from which is assigned in the "Audio Select" setting. "BD/DVD", "CBL/SAT", "GAME", "STRM BOX", "PC", "AUX", "CD", "TV", "PHONO": Play...

Owners Manual - English
Page 40
... the volume of the input selected immediately prior to the unit being input through the speakers connected to the unit "Off": When not using TV that complies with this function. You can reduce the power consumption in standby mode. "Auto", "Auto (Eco)": Select one of these settings when you have decided which player to anything other than "Off", you can play the video and audio of the unit. Input/Output Assign" - "HDMI...
... the volume of the input selected immediately prior to the unit being input through the speakers connected to the unit "Off": When not using TV that complies with this function. You can reduce the power consumption in standby mode. "Auto", "Auto (Eco)": Select one of these settings when you have decided which player to anything other than "Off", you can play the video and audio of the unit. Input/Output Assign" - "HDMI...
Owners Manual - English
Page 45
>>Specifications >>Settings >>Listening Modes >>Playback Function >>Basic Manual Troubleshooting | Appendix 7� Miscellaneous Change the frequency step for the tuner, update the firmware, and perform Initial Setup, etc. ˙ 1� Tuner Setting Item AM / FM Frequency Step (North American models) AM Frequency Step (European, Australian and Asian models) Default Value Setting Details 10 kHz / 0.2 MHz Select a frequency step depending on your area of residence. Select "10 kHz" or "9 kHz". • When this setting if a USB storage device...
>>Specifications >>Settings >>Listening Modes >>Playback Function >>Basic Manual Troubleshooting | Appendix 7� Miscellaneous Change the frequency step for the tuner, update the firmware, and perform Initial Setup, etc. ˙ 1� Tuner Setting Item AM / FM Frequency Step (North American models) AM Frequency Step (European, Australian and Asian models) Default Value Setting Details 10 kHz / 0.2 MHz Select a frequency step depending on your area of residence. Select "10 kHz" or "9 kHz". • When this setting if a USB storage device...

Owners Manual - English
Page 48
... set to display the Quick Menu. Operation: You can quickly adjust settings you turn the unit to standby mode. ˙ AccuEQ AccuEQ Room Calibration: Enable or disable the equalizer function that you need to "Preset 3" configured in the following cases. - The setting can be used in the Setup menu. Subwoofer: Adjust the speaker level of the compressed audio. >>Specifications >>Settings >>Listening Modes >>Playback Function >>Basic Manual Troubleshooting | Appendix Quick Menu You can make the settings on the TV screen while playing something. The same sound field setting...
... set to display the Quick Menu. Operation: You can quickly adjust settings you turn the unit to standby mode. ˙ AccuEQ AccuEQ Room Calibration: Enable or disable the equalizer function that you need to "Preset 3" configured in the following cases. - The setting can be used in the Setup menu. Subwoofer: Adjust the speaker level of the compressed audio. >>Specifications >>Settings >>Listening Modes >>Playback Function >>Basic Manual Troubleshooting | Appendix Quick Menu You can make the settings on the TV screen while playing something. The same sound field setting...
Owners Manual - English
Page 56
... to turn it off. • If "HDMI CEC" is completed and your PC. 2. >>Specifications >>Settings >>Listening Modes >>Playback Function >>Basic Manual Troubleshooting | Appendix Setup 1. Speaker 3. Source 5. Miscellaneous 1. Remote ID 3. The process is set to "On", set it starts up. • You will not change the way to operate or the function. ˙ If an Error Message is nothing to your PC and unzip. Check the following : 32 ˙ Update 1. USB...
... to turn it off. • If "HDMI CEC" is completed and your PC. 2. >>Specifications >>Settings >>Listening Modes >>Playback Function >>Basic Manual Troubleshooting | Appendix Setup 1. Speaker 3. Source 5. Miscellaneous 1. Remote ID 3. The process is set to "On", set it starts up. • You will not change the way to operate or the function. ˙ If an Error Message is nothing to your PC and unzip. Check the following : 32 ˙ Update 1. USB...

Owners Manual - English
Page 83
... support DVD, the default setting is off after you can use the unit normally again. "PCM Fixed Mode" in the Setup menu is set to "On", no sound is played when signals other or the back panel of speaker terminals. • Make sure that the speaker cables are input. If the problem is that none of the connecting cables are connected to unsuccessful recordings caused by the unit, unplug the power cord from the TV • Change...
... support DVD, the default setting is off after you can use the unit normally again. "PCM Fixed Mode" in the Setup menu is set to "On", no sound is played when signals other or the back panel of speaker terminals. • Make sure that the speaker cables are input. If the problem is that none of the connecting cables are connected to unsuccessful recordings caused by the unit, unplug the power cord from the TV • Change...
Owners Manual - English
Page 84
.... • Playing DTS program material, using Bi-Amping connection. ˙ The subwoofer produces no sound with power cords, speaker cables, etc. Check in "Initial Setup" in the LFE channel, the subwoofer produces no sound. ˙ Noise can only be enjoyed when the input signals are required. • A maximum of audio received by the surround speakers. This is usually because the DTS bitstream has been processed (e.g., output level, sampling rate, or frequency response changed) and the...
.... • Playing DTS program material, using Bi-Amping connection. ˙ The subwoofer produces no sound with power cords, speaker cables, etc. Check in "Initial Setup" in the LFE channel, the subwoofer produces no sound. ˙ Noise can only be enjoyed when the input signals are required. • A maximum of audio received by the surround speakers. This is usually because the DTS bitstream has been processed (e.g., output level, sampling rate, or frequency response changed) and the...

Owners Manual - English
Page 85
...; Video and audio are out of synch • Video may be sure to connect it to one of the HDMI IN1 to an AM station, operating the remote controller may cause noise. • FM reception may have connected the player to the HDMI OUT SUB jack (for compatible models only), in the "Quick Menu" displayed when Q is pressed on the remote controller, select the HDMI OUT jack for compatible models only), the video signals input through jacks other than the HDMI...
...; Video and audio are out of synch • Video may be sure to connect it to one of the HDMI IN1 to an AM station, operating the remote controller may cause noise. • FM reception may have connected the player to the HDMI OUT SUB jack (for compatible models only), in the "Quick Menu" displayed when Q is pressed on the remote controller, select the HDMI OUT jack for compatible models only), the video signals input through jacks other than the HDMI...

Owners Manual - English
Page 87
... the unit is selected. Multi-zone function (for compatible models only) ˙ Cannot ZONE output audio of external AV component • Depending on the model, input by HDMI cable may be switched to the mode for operating ZONE output audio. Press DIMMER button and change the brightness level of the display. • The display is turned off when the Pure Audio (for one unit. >>Specifications >>Settings >>Listening Modes >>Playback Function >>Basic Manual Troubleshooting | Appendix Wireless LAN Network • Try plugging/unplugging the power supply of wireless LAN router...
... the unit is selected. Multi-zone function (for compatible models only) ˙ Cannot ZONE output audio of external AV component • Depending on the model, input by HDMI cable may be switched to the mode for operating ZONE output audio. Press DIMMER button and change the brightness level of the display. • The display is turned off when the Pure Audio (for one unit. >>Specifications >>Settings >>Listening Modes >>Playback Function >>Basic Manual Troubleshooting | Appendix Wireless LAN Network • Try plugging/unplugging the power supply of wireless LAN router...

Owners Manual - Basic Manual English/Spanish/French
Page 2
... an input signal is detected in standby mode or disconnected from the other speakers. LINE INPUT This RCA input should be connected to the subwoofer pre out on your AV receiver with the treble sounds from power source Blue:Subwoofer on . Set it off slightly. Because our ears are less sensitive to very low bass sounds, there's a temptation to set the level of the subwoofer has turned on The status indicator lights blue when low frequency sound is...
... an input signal is detected in standby mode or disconnected from the other speakers. LINE INPUT This RCA input should be connected to the subwoofer pre out on your AV receiver with the treble sounds from power source Blue:Subwoofer on . Set it off slightly. Because our ears are less sensitive to very low bass sounds, there's a temptation to set the level of the subwoofer has turned on The status indicator lights blue when low frequency sound is...


