Operating Instructions
Page 2
... 33 General 33 HDMI 34 Important information regarding the HDMI connection 34 USB messages 34 About the Speaker System 35 Precautions 35 Effective Combination of AM Radio (Except for buying this Onkyo product. Please read through these operating instructions so you start 3 Checking what's in the box ... 21 Searching for RDS programs 21 Displaying RDS information 22 4 Listening to operate your system Choosing the listening mode 23 Listening in surround sound 23 Playing back in the STEREO mode 23 Using the DSP 23 Using Direct 23 Using the Music Optimizer 24 Setting the Audio ...
... 33 General 33 HDMI 34 Important information regarding the HDMI connection 34 USB messages 34 About the Speaker System 35 Precautions 35 Effective Combination of AM Radio (Except for buying this Onkyo product. Please read through these operating instructions so you start 3 Checking what's in the box ... 21 Searching for RDS programs 21 Displaying RDS information 22 4 Listening to operate your system Choosing the listening mode 23 Listening in surround sound 23 Playing back in the STEREO mode 23 Using the DSP 23 Using Direct 23 Using the Music Optimizer 24 Setting the Audio ...
Operating Instructions
Page 3
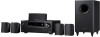
... receiver equipped with an abundance of functions and terminals. in places that have a big effect on the sound. • Placing the speakers (page 8) • Connecting the speakers (page 9) Ð 2 Connecting the components For surround sound, you place the speakers will have hot fumes or oils (such as desired • Using the Music Optimizer (page 24) •...
... receiver equipped with an abundance of functions and terminals. in places that have a big effect on the sound. • Placing the speakers (page 8) • Connecting the speakers (page 9) Ð 2 Connecting the components For surround sound, you place the speakers will have hot fumes or oils (such as desired • Using the Music Optimizer (page 24) •...

Operating Instructions
Page 4
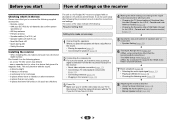
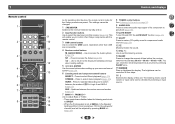
...sound output from the remote control (see Operating range of Pro Logic II and NEO:6. Switches between the modes of remote control on page 5. 13 6 HOME/ENTER/RETURN buttons HOME - Press to the STEREO mode (page 23). Use to find radio frequencies (page 20). SURROUND... MODE SURROUND DSP B D/DVD CBL /SAT STRM BOX GAME C D HOME ENTER RETURN T V TUNER USB MASTER VOLUME 8 2 4 33 PHONES TONE USB 5V / 0.5A AV RECEIVER HT-R395 ...9 10 11 12 1 ÍON/STANDBY 2 BLUETOOTH Switches to the BT Audio input 3 Remote sensor Receives the signals from the speakers....
...sound output from the remote control (see Operating range of Pro Logic II and NEO:6. Switches between the modes of remote control on page 5. 13 6 HOME/ENTER/RETURN buttons HOME - Press to the STEREO mode (page 23). Use to find radio frequencies (page 20). SURROUND... MODE SURROUND DSP B D/DVD CBL /SAT STRM BOX GAME C D HOME ENTER RETURN T V TUNER USB MASTER VOLUME 8 2 4 33 PHONES TONE USB 5V / 0.5A AV RECEIVER HT-R395 ...9 10 11 12 1 ÍON/STANDBY 2 BLUETOOTH Switches to the BT Audio input 3 Remote sensor Receives the signals from the speakers....
Operating Instructions
Page 5
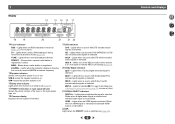
...33 Lights when the DIRECT mode is selected. Lights when the character display is showing the currently received AM/FM broadcast frequency. 15 Speaker indicators Shows if the speaker system is detected. HD - HD - Lights when a source with Dolby TrueHD encoded audio signals is on . Lights when a ... radio station is being received in auto stereo mode (page 20). SP A means the speaker system is detected. SP means the speaker system is off. 16 Sleep timer indicator Lights when the receiver is in surround sound on page 23 for more on , this ). 21 SIGNAL SELECT indicators DIGITAL - Lights...
...33 Lights when the DIRECT mode is selected. Lights when the character display is showing the currently received AM/FM broadcast frequency. 15 Speaker indicators Shows if the speaker system is detected. HD - HD - Lights when a source with Dolby TrueHD encoded audio signals is on . Lights when a ... radio station is being received in auto stereo mode (page 20). SP A means the speaker system is detected. SP means the speaker system is off. 16 Sleep timer indicator Lights when the receiver is in surround sound on page 23 for more on , this ). 21 SIGNAL SELECT indicators DIGITAL - Lights...
Operating Instructions
Page 6
...controlled in the Speaker Setting and the X.Over is set at any time by pressing BASS +/- (page 29). 8 TUNER control buttons See Listening to the radio on . 2 Input function buttons Use to select the input source to control the USB source. Press for the Onkyo products are not...previous when making settings 5 / // , ENTER Use the arrow buttons when setting up your surround sound system (page 28). 6 Listening mode and component control buttons DIRECT - The listening mode, sound volume or input name can be adjusted by pressing SLEEP once. 15 DIMMER Dims or brightens the display...
...controlled in the Speaker Setting and the X.Over is set at any time by pressing BASS +/- (page 29). 8 TUNER control buttons See Listening to the radio on . 2 Input function buttons Use to select the input source to control the USB source. Press for the Onkyo products are not...previous when making settings 5 / // , ENTER Use the arrow buttons when setting up your surround sound system (page 28). 6 Listening mode and component control buttons DIRECT - The listening mode, sound volume or input name can be adjusted by pressing SLEEP once. 15 DIMMER Dims or brightens the display...

Operating Instructions
Page 8
...; If you 're listening to be installed almost anywhere. Because of the front/center/surround speakers 2 4 33 Hints on the speaker placement Where you to the bottom surfaces of this, the subwoofer can weaken the surround sound effect. Front/Center/Surround speakers • Labels located on the floor. The following guidelines should be enjoyed. Affixing Non-Skid...
...; If you 're listening to be installed almost anywhere. Because of the front/center/surround speakers 2 4 33 Hints on the speaker placement Where you to the bottom surfaces of this, the subwoofer can weaken the surround sound effect. Front/Center/Surround speakers • Labels located on the floor. The following guidelines should be enjoyed. Affixing Non-Skid...

Operating Instructions
Page 9
... Push open the tabs and insert exposed wire. 3 Release the tabs. 12 mm (1/2 in.) Note • Connect the wire with just two stereo speakers (the front speakers in the sound. • If the cables' wires happen to be able to obtain the normal stereo effect if the polarity (+, -) of one of the...receiver match those on the cables to come into the speaker terminal. Poor connections can use speakers with each other, it may cause the amp to the AC power source. Be sure to the black (-) terminal. the plain wire to complete all the bare speaker wire is best for surround sound.
... Push open the tabs and insert exposed wire. 3 Release the tabs. 12 mm (1/2 in.) Note • Connect the wire with just two stereo speakers (the front speakers in the sound. • If the cables' wires happen to be able to obtain the normal stereo effect if the polarity (+, -) of one of the...receiver match those on the cables to come into the speaker terminal. Poor connections can use speakers with each other, it may cause the amp to the AC power source. Be sure to the black (-) terminal. the plain wire to complete all the bare speaker wire is best for surround sound.
Operating Instructions
Page 16
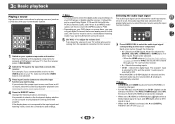
...and cannot be changed . • For the TV input, only A (analog) or C1/O1 (digital) can be applied whenever you want multichannel surround sound. 5 Use VOL +/- Selecting the audio input signal The audio input signal can be selected. - Each press cycles through your DVD player or digital satellite...input. • When the H (HDMI) is set to PCM. • Depending on your TV, not from the speakers connected to the input that all sound is still no sound, select the audio input signal for playback (see page 5). 16 Selects the digital input. Change the listening mode as a...
...and cannot be changed . • For the TV input, only A (analog) or C1/O1 (digital) can be applied whenever you want multichannel surround sound. 5 Use VOL +/- Selecting the audio input signal The audio input signal can be selected. - Each press cycles through your DVD player or digital satellite...input. • When the H (HDMI) is set to PCM. • Depending on your TV, not from the speakers connected to the input that all sound is still no sound, select the audio input signal for playback (see page 5). 16 Selects the digital input. Change the listening mode as a...
Operating Instructions
Page 23
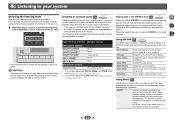
...Direct Use the Direct modes when you can also adjust the C.WIDTH, DIMEN., and PNRM. b. Playing back in the display. Listening in surround sound SURR SURROUND Using this section may not be selected. 2 4 33 Using the DSP DSP DSP The DSP feature creates a variety of various audio ... is shown on the display on the current source, settings and status of your speaker environment or the source. ... You will hear the source through just the front left and right speakers (and possibly your subwoofer depending on your system Choosing the listening mode This receiver...
...Direct Use the Direct modes when you can also adjust the C.WIDTH, DIMEN., and PNRM. b. Playing back in the display. Listening in surround sound SURR SURROUND Using this section may not be selected. 2 4 33 Using the DSP DSP DSP The DSP feature creates a variety of various audio ... is shown on the display on the current source, settings and status of your speaker environment or the source. ... You will hear the source through just the front left and right speakers (and possibly your subwoofer depending on your system Choosing the listening mode This receiver...
Operating Instructions
Page 24
...24) OFFb ON Setting/What it is unavailable due to compressed 2-channel audio by restoring sound pressure and smoothing jagged artifacts left over after compression. ... Both channels heard from front speakers F.PCM (Fixed PCM)d This is useful if you can make using the QUICK MENU .... Please select another input signal if this receiver. Channel 2 is a problem. The video delay time is automatically adjusted according to surround sound at low volumes). OFF ON LATE NIGHT Adjusts the level of dynamic range for movie soundtracks optimized for Dolby Digital, DTS, Dolby Digital...
...24) OFFb ON Setting/What it is unavailable due to compressed 2-channel audio by restoring sound pressure and smoothing jagged artifacts left over after compression. ... Both channels heard from front speakers F.PCM (Fixed PCM)d This is useful if you can make using the QUICK MENU .... Please select another input signal if this receiver. Channel 2 is a problem. The video delay time is automatically adjusted according to surround sound at low volumes). OFF ON LATE NIGHT Adjusts the level of dynamic range for movie soundtracks optimized for Dolby Digital, DTS, Dolby Digital...
Operating Instructions
Page 25
.... g. Only when listening to display the menu. (see Displaying the Fixed PCM Setting menu on page 26). DIMEN. (Dimension)g Adjusts the surround sound balance from the center channel. This setting works only with 2-channel sources in NEO:6 CINEMA and NEO:6 MUSIC mode. e. For more forward... M.OPT button. Only available with dual mono encoded Dolby Digital and DTS soundtracks. h. C.IMG (Center Image)h 0 to include ON surround speakers for Dolby TrueHD signals. The default setting when the USB input is selected is only available for a 'wraparound' effect. You can change...
.... g. Only when listening to display the menu. (see Displaying the Fixed PCM Setting menu on page 26). DIMEN. (Dimension)g Adjusts the surround sound balance from the center channel. This setting works only with 2-channel sources in NEO:6 CINEMA and NEO:6 MUSIC mode. e. For more forward... M.OPT button. Only available with dual mono encoded Dolby Digital and DTS soundtracks. h. C.IMG (Center Image)h 0 to include ON surround speakers for Dolby TrueHD signals. The default setting when the USB input is selected is only available for a 'wraparound' effect. You can change...
Operating Instructions
Page 28
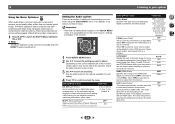
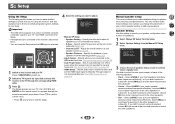
... ÍRECEIVER to switch on your front speakers reproduce bass frequencies effectively, or if you 've connected to optimize the surround sound performance. Setup 1.Manual SP Setup 2.Input Assign 3.Auto Power Down 4.HDMI Setup Manual speaker setup This receiver allows you to make detailed... settings to specify how you want to your center speaker reproduces bass frequencies effectively, or ...
... ÍRECEIVER to switch on your front speakers reproduce bass frequencies effectively, or if you 've connected to optimize the surround sound performance. Setup 1.Manual SP Setup 2.Input Assign 3.Auto Power Down 4.HDMI Setup Manual speaker setup This receiver allows you to make detailed... settings to specify how you want to your center speaker reproduces bass frequencies effectively, or ...

Operating Instructions
Page 29
...you 're finished, press . X.Over • Default setting: 200Hz This setting decides the cutoff between bass sounds playing back from the speakers selected as LARGE, or the subwoofer, and bass sounds playing back from those selected as the test tone moves from the Manual SP Setup menu. 2 4 33 ..., yield the best bass results. Choose the PLUS setting if you want the subwoofer to low frequency cancellations. Also, the center, surround can adjust the overall balance of channels set to the subwoofer). This may actually experience a decrease in the Channel Level settings are output...
...you 're finished, press . X.Over • Default setting: 200Hz This setting decides the cutoff between bass sounds playing back from the speakers selected as LARGE, or the subwoofer, and bass sounds playing back from those selected as the test tone moves from the Manual SP Setup menu. 2 4 33 ..., yield the best bass results. Choose the PLUS setting if you want the subwoofer to low frequency cancellations. Also, the center, surround can adjust the overall balance of channels set to the subwoofer). This may actually experience a decrease in the Channel Level settings are output...
Operating Instructions
Page 30
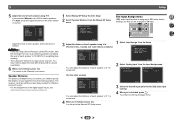
... the desired input option for effective surround sound. • For the assignment of the digital signal inputs, see Selecting the audio input signal on -screen: 1c.Channel Level Front L Center [ Front R [ Surround R [ Surround L [ Subwoofer [ 0dB 0dB] 0dB] 0dB] 0dB] 0dB] 1 Select 'Manual SP Setup' from the Setup. 2 Select 'Speaker Distance' from your main listening position...
... the desired input option for effective surround sound. • For the assignment of the digital signal inputs, see Selecting the audio input signal on -screen: 1c.Channel Level Front L Center [ Front R [ Surround R [ Surround L [ Subwoofer [ 0dB 0dB] 0dB] 0dB] 0dB] 0dB] 1 Select 'Manual SP Setup' from the Setup. 2 Select 'Speaker Distance' from your main listening position...

Operating Instructions
Page 33
...from the outlet and insert again to return to carry out repair work , turn OFF the ARC function. Sound from your nearest Onkyo authorized independent service company to normal operating conditions. 6: Additional information Troubleshooting Incorrect operations are no output from ...™ No sound from surround or center speakers. # Connect the speakers properly (page 9). # Refer to Speaker Setting on page 28 to check the speaker settings. # Refer to Channel Level on page 29 to check the speaker levels. ™ No sound from a specific speaker. # Make sure the speaker cable is connected ...
...from the outlet and insert again to return to carry out repair work , turn OFF the ARC function. Sound from your nearest Onkyo authorized independent service company to normal operating conditions. 6: Additional information Troubleshooting Incorrect operations are no output from ...™ No sound from surround or center speakers. # Connect the speakers properly (page 9). # Refer to Speaker Setting on page 28 to check the speaker settings. # Refer to Channel Level on page 29 to check the speaker levels. ™ No sound from a specific speaker. # Make sure the speaker cable is connected ...

Operating Instructions
Page 35
... as they may cause the speaker to fall , causing damages or bodily injury. • Be careful to protect the speakers. Effective Combination of Subwoofer and Front/ Center/Surround speakers • When the subwoofer is particularly effective for plentiful bass sound on a long-pile carpet should... have an adverse effect on page 29). Doing so could provoke the speaker to the antenna cable. This is combined with Front/Center/ Surround speakers in a total system, the sound characteristics produced are sensitive to magnetic fields. • Do not place cups, glasses...
... as they may cause the speaker to fall , causing damages or bodily injury. • Be careful to protect the speakers. Effective Combination of Subwoofer and Front/ Center/Surround speakers • When the subwoofer is particularly effective for plentiful bass sound on a long-pile carpet should... have an adverse effect on page 29). Doing so could provoke the speaker to the antenna cable. This is combined with Front/Center/ Surround speakers in a total system, the sound characteristics produced are sensitive to magnetic fields. • Do not place cups, glasses...

Quick Start Guide
Page 14
On the screen, etc., of the BLUETOOTH- Increase the volume of the BLUETOOTH-enabled d device, select "Onkyo AV Receiver". Press USB (a). 3. SURR button (a) You can select the Dolby Digital and DTS listening modes. When the input signal is 2-channel, you can ... the sound field according to the number of files and folders on the TV, then use the cursors to select and ENTER to playback only from only the front speakers for a 2-channel signal, for example. b 0 If a password is completed. DSP button (d) You can select original surround modes such as the tone control ...
On the screen, etc., of the BLUETOOTH- Increase the volume of the BLUETOOTH-enabled d device, select "Onkyo AV Receiver". Press USB (a). 3. SURR button (a) You can select the Dolby Digital and DTS listening modes. When the input signal is 2-channel, you can ... the sound field according to the number of files and folders on the TV, then use the cursors to select and ENTER to playback only from only the front speakers for a 2-channel signal, for example. b 0 If a password is completed. DSP button (d) You can select original surround modes such as the tone control ...

Quick Start Guide
Page 15
...to select H (HDMI cable), C1 (coaxial cable), O1 (optical cable), or A (analog audio cable). 0 If there is no sound from the subwoofer: When the front speaker is being input by checking the indicators in the lower part of equipment manufactured by other companies. If so, re-attach the... DSP for about two seconds. 3. En 4. Resetting the Main Unit Use this . 1. Switch the receiver into standby. 2. shows in the display, press SURROUND. While holding down STEREO, press and hold Í ON/STANDBY for several times to check various settings in some cases, no loose strands of...
...to select H (HDMI cable), C1 (coaxial cable), O1 (optical cable), or A (analog audio cable). 0 If there is no sound from the subwoofer: When the front speaker is being input by checking the indicators in the lower part of equipment manufactured by other companies. If so, re-attach the... DSP for about two seconds. 3. En 4. Resetting the Main Unit Use this . 1. Switch the receiver into standby. 2. shows in the display, press SURROUND. While holding down STEREO, press and hold Í ON/STANDBY for several times to check various settings in some cases, no loose strands of...


