
Owner Manual
Page 1
... ....... 36 Listening to obtain optimum performance and listening enjoyment from your new 7.1ch Home Theater System. 7.1ch Home Theater System HT-S790 AV Receiver (HT-R540) Front Speakers (SKF-540F) Center Speaker (SKC-540C) Surround Speakers (SKM-540S) Surround Back Speakers (SKB-540) Powered Subwoofer (SKW-540) Instruction Manual Thank you ... Listening Modes ..... 46 Advanced Operation 52 Troubleshooting 61 En Please read this manual thoroughly before making connections and plugging in this manual for purchasing an Onkyo 7.1ch Home Theater System.
... ....... 36 Listening to obtain optimum performance and listening enjoyment from your new 7.1ch Home Theater System. 7.1ch Home Theater System HT-S790 AV Receiver (HT-R540) Front Speakers (SKF-540F) Center Speaker (SKC-540C) Surround Speakers (SKM-540S) Surround Back Speakers (SKB-540) Powered Subwoofer (SKW-540) Instruction Manual Thank you ... Listening Modes ..... 46 Advanced Operation 52 Troubleshooting 61 En Please read this manual thoroughly before making connections and plugging in this manual for purchasing an Onkyo 7.1ch Home Theater System.
Owner Manual
Page 5
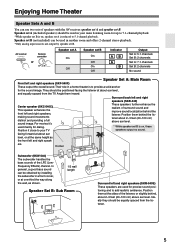
... bass sounds of the listener, or slightly behind the listener. Enjoying Home Theater Speaker Sets A and B You can use two sets of speakers with the AV receiver: speaker set A and speaker set B On Off On Off Indicator AB A B Output Set A: 5.1 channels Set B: 2 channels Set A: 7.1 channels ...and right speakers. Speaker set B (not included) can be used in a home theater is on , speaker set B is to 5.1-channel playback. AV receiver SPEAKERS A B Remote controller or Speaker set A On Off Speaker set B. Angle them behind the listener about 2-3 feet (60-100 cm) above ...
... bass sounds of the listener, or slightly behind the listener. Enjoying Home Theater Speaker Sets A and B You can use two sets of speakers with the AV receiver: speaker set A and speaker set B On Off On Off Indicator AB A B Output Set A: 5.1 channels Set B: 2 channels Set A: 7.1 channels ...and right speakers. Speaker set B (not included) can be used in a home theater is on , speaker set B is to 5.1-channel playback. AV receiver SPEAKERS A B Remote controller or Speaker set A On Off Speaker set B. Angle them behind the listener about 2-3 feet (60-100 cm) above ...
Owner Manual
Page 6
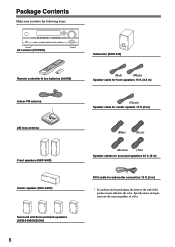
Package Contents Make sure you have the following items: AV receiver (HT-R540) Remote controller & two batteries (AA/R6) Indoor FM antenna AM loop antenna Front speakers (SKF-540F) Center speaker (SKC-540C) Surround and Surround back speakers (...
Package Contents Make sure you have the following items: AV receiver (HT-R540) Remote controller & two batteries (AA/R6) Indoor FM antenna AM loop antenna Front speakers (SKF-540F) Center speaker (SKC-540C) Surround and Surround back speakers (...
Owner Manual
Page 8
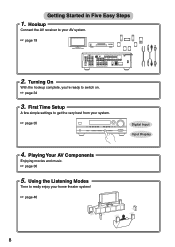
Hookup Connect the AV receiver to really enjoy your home theater system! ☞ page 46 8 Using the Listening Modes Time to your system....settings to switch on. ☞ page 34 3. Turning On With the hookup complete, you're ready to get the very best from your AV system. ☞ page 19 XM DIGITAL IN COA XIAL OPTICAL 1 COMPONENT VIDEO VIDEO 2 IN VIDEO 1 IN DVD IN OUT Y PB 2... 1 SUB WOOFER DVD SURROUND SPEAKERS FRONT SPEAKERS A L CENTER SPEAKER R PRE OUT SUB WOOFER FRONT SPEAKERS B L R 2. Playing Your AV Components Enjoying movies and music. ☞ page 36 5.
Hookup Connect the AV receiver to really enjoy your home theater system! ☞ page 46 8 Using the Listening Modes Time to your system....settings to switch on. ☞ page 34 3. Turning On With the hookup complete, you're ready to get the very best from your AV system. ☞ page 19 XM DIGITAL IN COA XIAL OPTICAL 1 COMPONENT VIDEO VIDEO 2 IN VIDEO 1 IN DVD IN OUT Y PB 2... 1 SUB WOOFER DVD SURROUND SPEAKERS FRONT SPEAKERS A L CENTER SPEAKER R PRE OUT SUB WOOFER FRONT SPEAKERS B L R 2. Playing Your AV Components Enjoying movies and music. ☞ page 36 5.
Owner Manual
Page 9
... MiniDisc, or DAT Recorder 32 Connecting the Power Cord of Another Component 32 Connecting Onkyo Components..........33 Connecting the Power Cord 33 Turning On & First Time Setup Turning On the AV Receiver 34 First Time Setup 35 Assigning Digital Inputs to Input Sources ....35 Changing the ...58 Entering Remote Control Codes 58 Remote Control Codes for Onkyo Components Connected via 59 Resetting REMOTE MODE Buttons 59 Resetting the Remote Controller 59 Troubleshooting 61 If you can't resolve an issue, try resetting the AV receiver by holding down the [VIDEO 1] button and pressing the...
... MiniDisc, or DAT Recorder 32 Connecting the Power Cord of Another Component 32 Connecting Onkyo Components..........33 Connecting the Power Cord 33 Turning On & First Time Setup Turning On the AV Receiver 34 First Time Setup 35 Assigning Digital Inputs to Input Sources ....35 Changing the ...58 Entering Remote Control Codes 58 Remote Control Codes for Onkyo Components Connected via 59 Resetting REMOTE MODE Buttons 59 Resetting the Remote Controller 59 Troubleshooting 61 If you can't resolve an issue, try resetting the AV receiver by holding down the [VIDEO 1] button and pressing the...
Owner Manual
Page 10
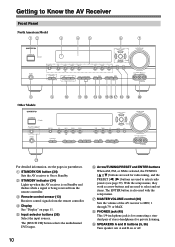
.... F Arrow/TUNING/PRESET and ENTER buttons When AM, FM, or XM is selected, the TUNING [ ] [ ] buttons are used for connecting a standard pair of the AV receiver to select and set items. The ENTER button is also used with the setup menus. A STANDBY/ON button (34) Sets the... on Standby and flashes while a signal is for radio tuning, and the PRESET [ ] [ ] buttons are used to Know the AV Receiver Front Panel North American Model 12 3 45 6 7 STANDBY/ON STANDBY PHONES TUNING PRESET MULTI CH DVD VIDEO 1 VIDEO 2 VIDEO 3 TAPE TUNER C D ENTER RETURN SETUP SPEAKERS A...
.... F Arrow/TUNING/PRESET and ENTER buttons When AM, FM, or XM is selected, the TUNING [ ] [ ] buttons are used for connecting a standard pair of the AV receiver to select and set items. The ENTER button is also used with the setup menus. A STANDBY/ON button (34) Sets the... on Standby and flashes while a signal is for radio tuning, and the PRESET [ ] [ ] buttons are used to Know the AV Receiver Front Panel North American Model 12 3 45 6 7 STANDBY/ON STANDBY PHONES TUNING PRESET MULTI CH DVD VIDEO 1 VIDEO 2 VIDEO 3 TAPE TUNER C D ENTER RETURN SETUP SPEAKERS A...

Owner Manual
Page 11
...model doesn't have this mode is selected. Indicator B lights up when speaker set B is on. 2 MUTING indicator (44) Flashes while the AV receiver is muted. 3 Listening mode and format indicators (48) Show the selected listening mode and the format of digital input signals. The indicator lights up...the digital inputs and to adjust the bass and treble. P MEMORY button (39) Used when storing or deleting radio presets. Getting to Know the AV Receiver-Continued J TONE, [-], and [+] buttons (44) Used to specify the format of digital audio signals. 4 Radio indicators TUNED (38): Lights ...
...model doesn't have this mode is selected. Indicator B lights up when speaker set B is on. 2 MUTING indicator (44) Flashes while the AV receiver is muted. 3 Listening mode and format indicators (48) Show the selected listening mode and the format of digital input signals. The indicator lights up...the digital inputs and to adjust the bass and treble. P MEMORY button (39) Used when storing or deleting radio presets. Getting to Know the AV Receiver-Continued J TONE, [-], and [+] buttons (44) Used to specify the format of digital audio signals. 4 Radio indicators TUNED (38): Lights ...
Owner Manual
Page 12
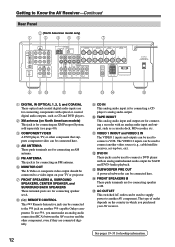
...IN The VIDEO 1 inputs and outputs can be connected here. L DVD IN These jacks can be connected to another AV component. B XM antenna (on another -capable Onkyo com- D AM ANTENNA These push terminals are for connecting an AM antenna. J TAPE IN/OUT This analog audio ...SURROUND CENTER SURR BACK R VIDEO 2 VIDEO 1 SUB WOOFER DVD SURROUND SPEAKERS FRONT SPEAKERS A L CENTER SPEAKER R PRE OUT SUB WOOFER FRONT SPEAKERS B L R AV RECEIVER AC OUTLET AC 120V 60Hz SWITCHED TOTAL 120W 1A MAX. 8 9J K L MN O A DIGITAL IN OPTICAL 1, 2, 3, and COAXIAL These optical and coaxial digital...
...IN The VIDEO 1 inputs and outputs can be connected here. L DVD IN These jacks can be connected to another AV component. B XM antenna (on another -capable Onkyo com- D AM ANTENNA These push terminals are for connecting an AM antenna. J TAPE IN/OUT This analog audio ...SURROUND CENTER SURR BACK R VIDEO 2 VIDEO 1 SUB WOOFER DVD SURROUND SPEAKERS FRONT SPEAKERS A L CENTER SPEAKER R PRE OUT SUB WOOFER FRONT SPEAKERS B L R AV RECEIVER AC OUTLET AC 120V 60Hz SWITCHED TOTAL 120W 1A MAX. 8 9J K L MN O A DIGITAL IN OPTICAL 1, 2, 3, and COAXIAL These optical and coaxial digital...

Owner Manual
Page 13
... Controller Installing the Batteries 1 To open the battery compartment, press the small hollow and slide open the cover. Remote control sensor STANDBY indicator AV receiver 2 Insert the two supplied batteries (AA/R6) in mind when installing. • The remote controller will not work reliably, try replacing ...compartment. 3 Slide the cover shut. Notes: • If the remote controller doesn't work if there's an obstacle between it toward the AV receiver's remote control sensor, as a book or magazine, because a button may be removed as soon as possible to bright light, such as ...
... Controller Installing the Batteries 1 To open the battery compartment, press the small hollow and slide open the cover. Remote control sensor STANDBY indicator AV receiver 2 Insert the two supplied batteries (AA/R6) in mind when installing. • The remote controller will not work reliably, try replacing ...compartment. 3 Slide the cover shut. Notes: • If the remote controller doesn't work if there's an obstacle between it toward the AV receiver's remote control sensor, as a book or magazine, because a button may be removed as soon as possible to bright light, such as ...
Owner Manual
Page 14
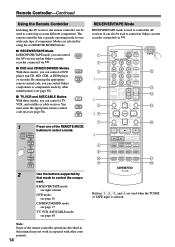
... M D/CDR C D HDD ■ TV, VCR and SAT/CABLE Modes With these modes, you can control RECEIVER the AV receiver and an Onkyo cassette TAPE recorder connected via . 1 2 3 1 4 2 5 36 7 4 8 9 J K ON/STANDBY REMOTE MODE RECEIVER DVD TAPE INPUT SELECTOR 1 2 3 V1 V2 V3 M D/CDR C D HDD 4 5 6 TV MULTI CH DVD...selected by that mode to control the compo- Remote Controller-Continued Using the Remote Controller Including the AV receiver, the remote controller can be used to control an Onkyo cassette recorder connected via . ■ DVD and CD/MD/CDR/HDD Modes With these modes...
... M D/CDR C D HDD ■ TV, VCR and SAT/CABLE Modes With these modes, you can control RECEIVER the AV receiver and an Onkyo cassette TAPE recorder connected via . 1 2 3 1 4 2 5 36 7 4 8 9 J K ON/STANDBY REMOTE MODE RECEIVER DVD TAPE INPUT SELECTOR 1 2 3 V1 V2 V3 M D/CDR C D HDD 4 5 6 TV MULTI CH DVD...selected by that mode to control the compo- Remote Controller-Continued Using the Remote Controller Including the AV receiver, the remote controller can be used to control an Onkyo cassette recorder connected via . ■ DVD and CD/MD/CDR/HDD Modes With these modes...
Owner Manual
Page 15
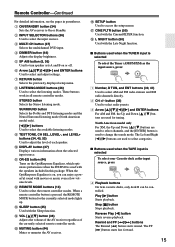
A ON/STANDBY button (34) Sets the AV receiver to access the setup menus. G RETURN button Selects the previously displayed setup menu. K OR-EQ button (44) Turns on the OptiResponse Equalizer, which optimizes performance when the HT-R540 is used with the speakers included in parentheses. M SLEEP button (45) ... 2 CH +/- L REMOTE MODE buttons (14) Used to select and adjust settings. N VOL [ ]/[ ] button (36) Adjusts the volume of the AV receiver regardless of each speaker. North American model only For XM, the Up and Down [ ]/[ ] buttons are used to select channels, and the [ENTER] ...
A ON/STANDBY button (34) Sets the AV receiver to access the setup menus. G RETURN button Selects the previously displayed setup menu. K OR-EQ button (44) Turns on the OptiResponse Equalizer, which optimizes performance when the HT-R540 is used with the speakers included in parentheses. M SLEEP button (45) ... 2 CH +/- L REMOTE MODE buttons (14) Used to select and adjust settings. N VOL [ ]/[ ] button (36) Adjusts the volume of the AV receiver regardless of each speaker. North American model only For XM, the Up and Down [ ]/[ ] buttons are used to select channels, and the [ENTER] ...
Owner Manual
Page 18
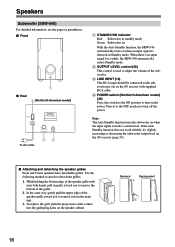
...grilles. 1. Removal Replacement 18 D POWER switch (Not North American model) (34) Press this switch to the ON position to turn on the AV receiver with your both hands, pull it gently toward you to remove it to the OFF position to turn off the power. C LINE INPUT (19)...control (36) This control is detected in standby mode Green: Subwoofer on With the Auto Standby function, the SKW-540 automatically turns on the AV receiver (page 53). ■ Attaching and detaching the speaker grilles Front and Center speakers have detachable grilles. Speakers Subwoofer (SKW-540) For detailed ...
...grilles. 1. Removal Replacement 18 D POWER switch (Not North American model) (34) Press this switch to the ON position to turn on the AV receiver with your both hands, pull it gently toward you to remove it to the OFF position to turn off the power. C LINE INPUT (19)...control (36) This control is detected in standby mode Green: Subwoofer on With the Auto Standby function, the SKW-540 automatically turns on the AV receiver (page 53). ■ Attaching and detaching the speaker grilles Front and Center speakers have detachable grilles. Speakers Subwoofer (SKW-540) For detailed ...
Owner Manual
Page 19
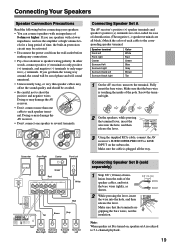
... SPEAKERS FRONT SPEAKERS A L CENTER SPEAKER R T SURROUND CENTER SURR BACK SUB WOOFER DVD PRE OUT SUB WOOFER FRONT SPEAKERS B L R AV RECEIVER AC OUTLET AC 120V 60Hz SWITCHED TOTAL 120W 1A MAX. Make sure that the terminals are gripping the bare wires, not the insulation. ... corresponding speaker terminal. Brown Gray Tan Surround Surround Surround Surround Back Right Back Left Right Left Connecting Speaker Set A The AV receiver's positive (+) speaker terminals and speaker's positive (+) terminals are all the way. Fully insert the bare wires. Connecting Your...
... SPEAKERS FRONT SPEAKERS A L CENTER SPEAKER R T SURROUND CENTER SURR BACK SUB WOOFER DVD PRE OUT SUB WOOFER FRONT SPEAKERS B L R AV RECEIVER AC OUTLET AC 120V 60Hz SWITCHED TOTAL 120W 1A MAX. Make sure that the terminals are gripping the bare wires, not the insulation. ... corresponding speaker terminal. Brown Gray Tan Surround Surround Surround Surround Back Right Back Left Right Left Connecting Speaker Set A The AV receiver's positive (+) speaker terminals and speaker's positive (+) terminals are all the way. Fully insert the bare wires. Connecting Your...
Owner Manual
Page 20
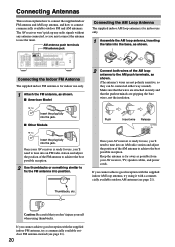
...SURR BACK R VIDEO 2 VIDEO 1 SUB WOOFER DVD SURROUND SPEAKERS FRONT SPEAKERS A L CENTER SPEAKER R PRE OUT SUB WOOFER FRONT SPEAKERS B L R AV RECEIVER AC OUTLET AC 120V 60Hz SWITCHED TOTAL 120W 1A MAX. Insert the plug fully into the jack. ■ Other Models Push Insert wire Release Insert...possible reception. Caution: Be careful that the push terminals are not polarity sensitive, so they can be connected either way around). The AV receiver won't pick up any radio signals without any antenna connected, so you don't injure yourself when using it with the supplied indoor ...
...SURR BACK R VIDEO 2 VIDEO 1 SUB WOOFER DVD SURROUND SPEAKERS FRONT SPEAKERS A L CENTER SPEAKER R PRE OUT SUB WOOFER FRONT SPEAKERS B L R AV RECEIVER AC OUTLET AC 120V 60Hz SWITCHED TOTAL 120W 1A MAX. Insert the plug fully into the jack. ■ Other Models Push Insert wire Release Insert...possible reception. Caution: Be careful that the push terminals are not polarity sensitive, so they can be connected either way around). The AV receiver won't pick up any radio signals without any antenna connected, so you don't injure yourself when using it with the supplied indoor ...
Owner Manual
Page 21
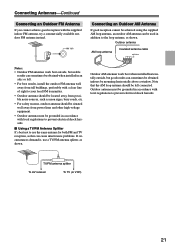
... possible noise sources, such as neon signs, busy roads, etc. • For safety reasons, outdoor antenna should be left connected. TV/FM antenna splitter To AV receiver To TV (or VCR) 21
... possible noise sources, such as neon signs, busy roads, etc. • For safety reasons, outdoor antenna should be left connected. TV/FM antenna splitter To AV receiver To TV (or VCR) 21
Owner Manual
Page 22
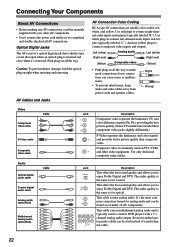
... plug straight when inserting and removing. Use white plugs to enjoy Dolby Digital and DTS. Composite video is commonly used on virtually all AV connections. The audio quality is inserted and close when it's removed. This cable carries multichannel analog audio and is the same as for...connection format for coaxial. Several standard analog audio cables can be used to connect composite video inputs and outputs. Optical Digital Jacks The AV receiver's optical digital jacks have shutter-type covers that open when an optical plug is the same as for analog audio and can be ...
... plug straight when inserting and removing. Use white plugs to enjoy Dolby Digital and DTS. Composite video is commonly used on virtually all AV connections. The audio quality is inserted and close when it's removed. This cable carries multichannel analog audio and is the same as for...connection format for coaxial. Several standard analog audio cables can be used to connect composite video inputs and outputs. Optical Digital Jacks The AV receiver's optical digital jacks have shutter-type covers that open when an optical plug is the same as for analog audio and can be ...
Owner Manual
Page 23
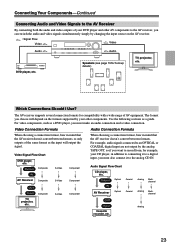
... between formats. Use the following sections as the input will depend on the formats supported by changing the input source on the AV receiver. : Signal Flow Video Video Audio Audio DVD player, etc. Analog 23 Video Connection Formats Audio Connection Formats When choosing a ... Input Cassette recorder, etc. For video components, such as a DVD player, you must also connect it to the analog CD IN. The AV receiver supports several connection formats for example, your other components. Audio Signal Flow Chart CD player, etc. Which Connections Should I Use? For example,...
... between formats. Use the following sections as the input will depend on the formats supported by changing the input source on the AV receiver. : Signal Flow Video Video Audio Audio DVD player, etc. Analog 23 Video Connection Formats Audio Connection Formats When choosing a ... Input Cassette recorder, etc. For video components, such as a DVD player, you must also connect it to the analog CD IN. The AV receiver supports several connection formats for example, your other components. Audio Signal Flow Chart CD player, etc. Which Connections Should I Use? For example,...
Owner Manual
Page 24
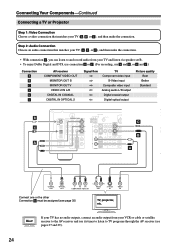
... the connection. • With connection a , you can listen to and record audio from your VCR or cable or satellite receiver to TV programs through the AV receiver (see page 35) TV, projector, etc. If your TV has no audio outputs, connect an audio output from your TV...8226; To enjoy Dolby Digital and DTS, use connection b or c . (For recording, use its tuner to listen to the AV receiver and use a and b , or a and c .) Connection A B C a b c AV receiver COMPONENT VIDEO OUT MONITOR OUT S MONITOR OUT V VIDEO 2 IN L/R DIGITAL IN COAXIAL DIGITAL IN OPTICAL 2 Signal flow TV...
... the connection. • With connection a , you can listen to and record audio from your VCR or cable or satellite receiver to TV programs through the AV receiver (see page 35) TV, projector, etc. If your TV has no audio outputs, connect an audio output from your TV...8226; To enjoy Dolby Digital and DTS, use connection b or c . (For recording, use its tuner to listen to the AV receiver and use a and b , or a and c .) Connection A B C a b c AV receiver COMPONENT VIDEO OUT MONITOR OUT S MONITOR OUT V VIDEO 2 IN L/R DIGITAL IN COAXIAL DIGITAL IN OPTICAL 2 Signal flow TV...
Owner Manual
Page 25
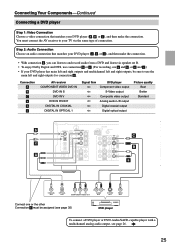
... connection b or c . (For recording, use a and b , or a and c .) • If your TV via the same type of connection. Connection A B C a b c AV receiver COMPONENT VIDEO DVD IN DVD IN S DVD IN V DVD IN FRONT DIGITAL IN COAXIAL DIGITAL IN OPTICAL 1 Signal flow DVD player Component video output... OUT Y PB PR COMPONENT VIDEO OUT L R AUDIO OUT S VIDEO OUT VIDEO OUT Connect one or the other Connection c must connect the AV receiver to your DVD player has main left and right outputs and multichannel left and right outputs, be assigned (see page 35) DVD player To connect...
... connection b or c . (For recording, use a and b , or a and c .) • If your TV via the same type of connection. Connection A B C a b c AV receiver COMPONENT VIDEO DVD IN DVD IN S DVD IN V DVD IN FRONT DIGITAL IN COAXIAL DIGITAL IN OPTICAL 1 Signal flow DVD player Component video output... OUT Y PB PR COMPONENT VIDEO OUT L R AUDIO OUT S VIDEO OUT VIDEO OUT Connect one or the other Connection c must connect the AV receiver to your DVD player has main left and right outputs and multichannel left and right outputs, be assigned (see page 35) DVD player To connect...

Owner Manual
Page 26
... 26 Connecting Your Components-Continued Hooking Up the Multichannel DVD Input If your DVD player has a 5.1-channel analog audio output, don't connect anything to the AV receiver's SURR BACK L/R jacks. If your DVD player supports multichannel audio formats such as DVD-Audio or SACD, and it has a multichannel analog audio output, you... connect it to the 7.1-channel analog audio output on your DVD player. Use a multichannel analog audio cable, or several normal audio cables, to connect the AV receiver's DVD IN FRONT L/R, CENTER, SURROUND L/R, SURR BACK L/R, and SUBWOOFER jacks to the...
... 26 Connecting Your Components-Continued Hooking Up the Multichannel DVD Input If your DVD player has a 5.1-channel analog audio output, don't connect anything to the AV receiver's SURR BACK L/R jacks. If your DVD player supports multichannel audio formats such as DVD-Audio or SACD, and it has a multichannel analog audio output, you... connect it to the 7.1-channel analog audio output on your DVD player. Use a multichannel analog audio cable, or several normal audio cables, to connect the AV receiver's DVD IN FRONT L/R, CENTER, SURROUND L/R, SURR BACK L/R, and SUBWOOFER jacks to the...


