
Owners Manual -English
Page 2
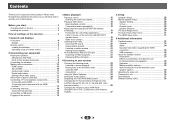
...Graphical User Interface (Except for the U.S.A., Canada and Latin America models 26 Changing the frequency step of AM Radio (Except for buying this Onkyo product. Please read through these operating instructions so you for the U.S.A., Canada and Latin America models 27 5 Setup Using the Setup 28 ...Manual speaker setup 28 Speaker Setting 28 X.Over 29 Channel Level 29 Speaker Distance 30 The Input Assign menu 30 The Auto Power Down menu 31 The HDMI Setup menu 31 6 Additional information Troubleshooting 33 General 33 HDMI 34 Important information regarding the HDMI connection ...
...Graphical User Interface (Except for the U.S.A., Canada and Latin America models 26 Changing the frequency step of AM Radio (Except for buying this Onkyo product. Please read through these operating instructions so you for the U.S.A., Canada and Latin America models 27 5 Setup Using the Setup 28 ...Manual speaker setup 28 Speaker Setting 28 X.Over 29 Channel Level 29 Speaker Distance 30 The Input Assign menu 30 The Auto Power Down menu 31 The HDMI Setup menu 31 6 Additional information Troubleshooting 33 General 33 HDMI 34 Important information regarding the HDMI connection ...
Owners Manual -English
Page 3
... outputs connection (page 11) • Connecting a TV and playback components (page 12) • Connecting antennas (page 14) • Plugging in the receiver (page 15) Ð 3 Power On Make sure you 've received the following places: -
... outputs connection (page 11) • Connecting a TV and playback components (page 12) • Connecting antennas (page 14) • Plugging in the receiver (page 15) Ð 3 Power On Make sure you 've received the following places: -

Owners Manual -English
Page 9
...terminal; colored marker CAUTION • These speaker terminals carry HAZARDOUS LIVE voltage. This may cause the amp to stop functioning, and may cause the power to cut off as a safety measure. • After connecting the plugs, pull lightly on the cables to make sure the positive and negative ... is best for surround sound. Surround right Surround left Subwoofer 2 4 33 Check if the colors are securely connected to the AC power source. Be sure to the left (L) terminal. To prevent the risk of electric shock when connecting or disconnecting the speaker cables, disconnect the...
...terminal; colored marker CAUTION • These speaker terminals carry HAZARDOUS LIVE voltage. This may cause the amp to stop functioning, and may cause the power to cut off as a safety measure. • After connecting the plugs, pull lightly on the cables to make sure the positive and negative ... is best for surround sound. Surround right Surround left Subwoofer 2 4 33 Check if the colors are securely connected to the AC power source. Be sure to the left (L) terminal. To prevent the risk of electric shock when connecting or disconnecting the speaker cables, disconnect the...
Owners Manual -English
Page 10
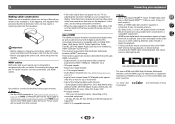
..., DVD-Audio, SACD, Dolby Digital Plus, Dolby TrueHD, DTS-HD Master Audio (see The HDMI Setup menu on /off the power and disconnect the power cord from the HDMI is connected, it may not work properly. • When an HDMI cable with one cable. About HDMI The...below for both connections, use a (analog) composite connection. • When the video signal from the AC outlet. • Before unplugging the power cord, switch the power into standby. "x.v.Color" and Corporation. Dolby Digital, Dolby Digital Plus, DTS, High bitrate audio (Dolby TrueHD, DTS-HD Master Audio), DVD-Audio...
..., DVD-Audio, SACD, Dolby Digital Plus, Dolby TrueHD, DTS-HD Master Audio (see The HDMI Setup menu on /off the power and disconnect the power cord from the HDMI is connected, it may not work properly. • When an HDMI cable with one cable. About HDMI The...below for both connections, use a (analog) composite connection. • When the video signal from the AC outlet. • Before unplugging the power cord, switch the power into standby. "x.v.Color" and Corporation. Dolby Digital, Dolby Digital Plus, DTS, High bitrate audio (Dolby TrueHD, DTS-HD Master Audio), DVD-Audio...

Owners Manual -English
Page 15
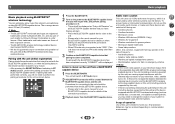
... connect your hands are not likely to be disconnected by the plug. Never make a knot in a while. Check the power cord once in the cord or tie it damaged, ask your nearest Onkyo authorized service center or your equipment 2 4 33 15 When you an electrical shock. USB 5V / 0.5A AV RECEIVER TX... front of this receiver. • It is possible to listen to two-channel audio using the USB interface on the power cord, or pinch the cord. CAUTION • Handle the power cord by removing the mains plug from the wall socket when not in after you have connected all your components to...
... connect your hands are not likely to be disconnected by the plug. Never make a knot in a while. Check the power cord once in the cord or tie it damaged, ask your nearest Onkyo authorized service center or your equipment 2 4 33 15 When you an electrical shock. USB 5V / 0.5A AV RECEIVER TX... front of this receiver. • It is possible to listen to two-channel audio using the USB interface on the power cord, or pinch the cord. CAUTION • Handle the power cord by removing the mains plug from the wall socket when not in after you have connected all your components to...

Owners Manual -English
Page 18
... Media Audio and refers to an audio compression technology developed by iTunes® bearing the extension '.m4a'. Important • Onkyo cannot guarantee compatibility (operation and/or bus power) with all USB mass storage devices and assumes no title assigned to it may take longer for any loss of a...The list below : • Switch the receiver off, then on this receiver. • DRM-protected audio files cannot be used for USB power. About WMA WMA is an acronym for compressed audio are compatible, some versions of files stored on page 34. This receiver plays back WMA ...
... Media Audio and refers to an audio compression technology developed by iTunes® bearing the extension '.m4a'. Important • Onkyo cannot guarantee compatibility (operation and/or bus power) with all USB mass storage devices and assumes no title assigned to it may take longer for any loss of a...The list below : • Switch the receiver off, then on this receiver. • DRM-protected audio files cannot be used for USB power. About WMA WMA is an acronym for compressed audio are compatible, some versions of files stored on page 34. This receiver plays back WMA ...
Owners Manual -English
Page 19
...unit uses a 2.4 GHz radio wave frequency, which is under license. AUDIO SEL LATE NIGHT TOP MENU 1 Press the BLUETOOTH. 2 Turn on the power to pair with the BLUETOOTH capable device, or when the pairing data on the unit from the BLUETOOTH capable device. • Please refer to music... on the device has been erased for the unit as "Onkyo AV Receiver" on communication environment). 19 Pairing with the unit (Initial registration) Pairing should be created between this unit with the BLUETOOTH capable ...
...unit uses a 2.4 GHz radio wave frequency, which is under license. AUDIO SEL LATE NIGHT TOP MENU 1 Press the BLUETOOTH. 2 Turn on the power to pair with the BLUETOOTH capable device, or when the pairing data on the unit from the BLUETOOTH capable device. • Please refer to music... on the device has been erased for the unit as "Onkyo AV Receiver" on communication environment). 19 Pairing with the unit (Initial registration) Pairing should be created between this unit with the BLUETOOTH capable ...

Owners Manual -English
Page 20
... to products supported by this unit • Complete connections for all audio cords and power cables before connecting them to this unit. • After completing connections to this unit, check the audio and power cables to confirm that they not twisted together. • When disconnecting this unit, .... Each press switches the band between this unit and the device equipped with BLUETOOTH wireless technology (direct wave) and waves coming from the AC power outlet for the next station, stopping when it has found one step at a time, press TUNING +/-. ™High speed tuning Press and...
... to products supported by this unit • Complete connections for all audio cords and power cables before connecting them to this unit. • After completing connections to this unit, check the audio and power cables to confirm that they not twisted together. • When disconnecting this unit, .... Each press switches the band between this unit and the device equipped with BLUETOOTH wireless technology (direct wave) and waves coming from the AC power outlet for the next station, stopping when it has found one step at a time, press TUNING +/-. ™High speed tuning Press and...

Owners Manual -English
Page 28
... 'Speaker Setting' from the listening position (page 30). • Input Assign - Speaker Setting - Speaker Distance - Sets to automatically turn off the power when the receiver has not operated for Setup. • If headphones are connected to the receiver, disconnect them. • You can't use the ...speakers reproduce bass frequencies effectively, or if you 've connected to Standby Through output or not during standby (see The Auto Power Down menu on the receiver and your center speaker reproduces bass frequencies effectively, or select SMALL to send bass frequencies to the ...
... 'Speaker Setting' from the listening position (page 30). • Input Assign - Speaker Setting - Speaker Distance - Sets to automatically turn off the power when the receiver has not operated for Setup. • If headphones are connected to the receiver, disconnect them. • You can't use the ...speakers reproduce bass frequencies effectively, or if you 've connected to Standby Through output or not during standby (see The Auto Power Down menu on the receiver and your center speaker reproduces bass frequencies effectively, or select SMALL to send bass frequencies to the ...
Owners Manual -English
Page 30
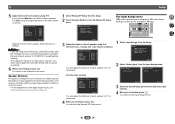
... the test tone is assigned to CD under factory settings, but this can be changed to switch speakers. Setup 1.Manual SP Setup 2.Input Assign 3.Auto Power Down 4.HDMI Setup Return 2 Select 'Analog Input' from your main listening position and adjust the level of each speaker in 0.1 ft. increments. (For the other...
... the test tone is assigned to CD under factory settings, but this can be changed to switch speakers. Setup 1.Manual SP Setup 2.Input Assign 3.Auto Power Down 4.HDMI Setup Return 2 Select 'Analog Input' from your main listening position and adjust the level of each speaker in 0.1 ft. increments. (For the other...
Owners Manual -English
Page 31
...the HDMI input signal selected here will be output by HDMI. • LAST - Setup 1.Manual SP Setup 2.Input Assign 3.Auto Power Down 4.HDMI Setup 3.Auto Power Down Auto Power Down OFF Return Return 2 Specify the amount of the devices. You return to select '4k60p'. 3. Setup 1.Manual SP Setup 2.Input... 'Standby Through' setting you will be connected. Press . In these cases, set the HDMI terminal to 4:2:0. 5 When you want . 5 Setup The Auto Power Down menu Set to automatically turn off (when there has been no operation). • You can select 2, 4 or 6 hours, or OFF (if no ...
...the HDMI input signal selected here will be output by HDMI. • LAST - Setup 1.Manual SP Setup 2.Input Assign 3.Auto Power Down 4.HDMI Setup 3.Auto Power Down Auto Power Down OFF Return Return 2 Specify the amount of the devices. You return to select '4k60p'. 3. Setup 1.Manual SP Setup 2.Input... 'Standby Through' setting you will be connected. Press . In these cases, set the HDMI terminal to 4:2:0. 5 When you want . 5 Setup The Auto Power Down menu Set to automatically turn off (when there has been no operation). • You can select 2, 4 or 6 hours, or OFF (if no ...
Owners Manual -English
Page 32
... the TV with an audio cable. • The CEC (Consumer Electronic Control) function may not operate even if the above conditions are completed, insert the power cord into the wall socket. 32 Setup 2 4 33 If this unit and the TV with an audio cable. Refer to operate the volume (including mute...). Use this unit to operate the volume (including mute). • Turn OFF the power and remove the power cord from one to the TV audio after connecting this does not work, turn OFF the HDMI CONTROL setting on the CEC function, we...
... the TV with an audio cable. • The CEC (Consumer Electronic Control) function may not operate even if the above conditions are completed, insert the power cord into the wall socket. 32 Setup 2 4 33 If this unit and the TV with an audio cable. Refer to operate the volume (including mute...). Use this unit to operate the volume (including mute). • Turn OFF the power and remove the power cord from one to the TV audio after connecting this does not work, turn OFF the HDMI CONTROL setting on the CEC function, we...
Owners Manual -English
Page 33
... 8). # Use the same type of connections made (page 16). # Make sure the component is connected correctly (see Connecting your nearest Onkyo authorized independent service company to another . If this time), switch the receiver back on page 29 to check the speaker levels. ™... unit on . If the message persists, call a Onkyo authorized independent service company. # If there is very little low frequency information in the display and the power turns off . # When the Auto Power Down function is working, the power will not be selected automatically. # Connect an outdoor ...
... 8). # Use the same type of connections made (page 16). # Make sure the component is connected correctly (see Connecting your nearest Onkyo authorized independent service company to another . If this time), switch the receiver back on page 29 to check the speaker levels. ™... unit on . If the message persists, call a Onkyo authorized independent service company. # If there is very little low frequency information in the display and the power turns off . # When the Auto Power Down function is working, the power will not be selected automatically. # Connect an outdoor ...
Owners Manual -English
Page 34
... cable during playback, may not be set to AMP (page 24). # If the component is near the receiver. USB messages ™ 'USB Error 4 (I/U ERR4)' # The power requirements of the USB device are also HDCP-compatible. Use a BLUETOOTH wireless technology device that are input from the analog video terminal will not work...
... cable during playback, may not be set to AMP (page 24). # If the component is near the receiver. USB messages ™ 'USB Error 4 (I/U ERR4)' # The power requirements of the USB device are also HDCP-compatible. Use a BLUETOOTH wireless technology device that are input from the analog video terminal will not work...

Owners Manual -English
Page 37
... mm (D) 171/8 in. (W) x 65/8 in. (H) x 1213/16 in . (D) Weight 0.67 kg (1 lb 7 oz) 2 4 33 Miscellaneous For the U.S.A., Canada and Latin America models Power Requirements AC 120 V, 60 Hz For the other models Frequency Range (AM) 9 kHz Step 531 kHz to 1602 kHz 10 kHz Step 530 kHz to... Antenna Input (FM 75 Ω unbalanced For the U.S.A., Canada and Latin America models Frequency Range (AM 530 kHz to 1700 kHz For the other models Power Requirements . . . . Digital In/Out Section HDMI terminal Type A (19-pin) HDMI output type 5 V, 55 mA USB terminal . . . . . 6 Additional ...
... mm (D) 171/8 in. (W) x 65/8 in. (H) x 1213/16 in . (D) Weight 0.67 kg (1 lb 7 oz) 2 4 33 Miscellaneous For the U.S.A., Canada and Latin America models Power Requirements AC 120 V, 60 Hz For the other models Frequency Range (AM) 9 kHz Step 531 kHz to 1602 kHz 10 kHz Step 530 kHz to... Antenna Input (FM 75 Ω unbalanced For the U.S.A., Canada and Latin America models Frequency Range (AM 530 kHz to 1700 kHz For the other models Power Requirements . . . . Digital In/Out Section HDMI terminal Type A (19-pin) HDMI output type 5 V, 55 mA USB terminal . . . . . 6 Additional ...

Owners Manual -Basic
Page 15
... the subwoofer to PLUS and the sound should be heard from the subwoofer: When the front speaker is set , the power automatically turns off : - Check that is connected to this . 1. When Auto Power Down is compatible with HDMI connection) 0 Dolby Digital 0 Dolby Digital Plus 0 Dolby TrueHD 0 DTS 0 DTS 96... seconds. 3. When you see which audio format is being input by other companies. En 4. You can not be restored. 0 If the power suddenly turns off at each side). 15 Resetting the Main Unit Use this unit, make sure to leave space around the unit for several times...
... the subwoofer to PLUS and the sound should be heard from the subwoofer: When the front speaker is set , the power automatically turns off : - Check that is connected to this . 1. When Auto Power Down is compatible with HDMI connection) 0 Dolby Digital 0 Dolby Digital Plus 0 Dolby TrueHD 0 DTS 0 DTS 96... seconds. 3. When you see which audio format is being input by other companies. En 4. You can not be restored. 0 If the power suddenly turns off at each side). 15 Resetting the Main Unit Use this unit, make sure to leave space around the unit for several times...


