
Owners Manual -English
Page 2
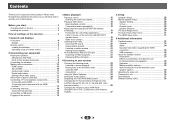
...HDMI 10 Analog audio cables 11 Digital audio cables 11 Standard RCA video cables 11 About video outputs connection 11 Connecting a TV and playback components 12 Connecting using HDMI 12 Connecting your model properly. Please read through these operating instructions so you for the U.S.A., Canada and Latin America models 27 5 Setup Using the Setup 28 Manual speaker setup 28 Speaker Setting 28 X.Over 29 Channel Level 29 Speaker Distance 30 The Input Assign menu 30 The Auto Power Down menu 31 The HDMI Setup menu 31 6 Additional information Troubleshooting 33 General 33 HDMI...
...HDMI 10 Analog audio cables 11 Digital audio cables 11 Standard RCA video cables 11 About video outputs connection 11 Connecting a TV and playback components 12 Connecting using HDMI 12 Connecting your model properly. Please read through these operating instructions so you for the U.S.A., Canada and Latin America models 27 5 Setup Using the Setup 28 Manual speaker setup 28 Speaker Setting 28 X.Over 29 Channel Level 29 Speaker Distance 30 The Input Assign menu 30 The Auto Power Down menu 31 The HDMI Setup menu 31 6 Additional information Troubleshooting 33 General 33 HDMI...
Owners Manual -English
Page 3
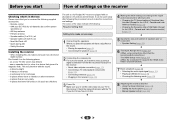
... surround sound, you 've set the video input on your TV to put it on a color TV (the screen may interfere with an abundance of speakers you've connected • Speaker Setting (page 28) Ð 6 The Input Assign menu (page 30) (When using a digital connection from the Blu-ray Disc/DVD player to the receiver. • About video outputs connection (page 11) • Connecting a TV and playback components (page 12) • Connecting antennas (page 14) • Plugging...
... surround sound, you 've set the video input on your TV to put it on a color TV (the screen may interfere with an abundance of speakers you've connected • Speaker Setting (page 28) Ð 6 The Input Assign menu (page 30) (When using a digital connection from the Blu-ray Disc/DVD player to the receiver. • About video outputs connection (page 11) • Connecting a TV and playback components (page 12) • Connecting antennas (page 14) • Plugging...
Owners Manual -English
Page 4
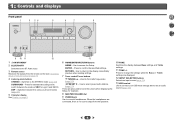
.... 8 MASTER VOLUME dial 9 PHONES jack Use to find radio frequencies (page 20). 1: Controls and displays Front panel 1 ON / STANDBY 2 34 5 6 7 TUNING PRESET BLUETOOTH STEREO LISTENING MODE SURROUND DSP B D/DVD CBL /SAT STRM BOX GAME C D HOME ENTER RETURN T V TUNER USB MASTER VOLUME 8 2 4 33 PHONES TONE USB 5V / 0.5A AV RECEIVER HT-R395 9 10 11 12 1 ÍON/STANDBY 2 BLUETOOTH Switches to the BT Audio input 3 Remote sensor Receives the signals from the speakers. 10 TONE Switches the display between Bass settings and Treble settings. 11 TONE -/+ Press to change...
.... 8 MASTER VOLUME dial 9 PHONES jack Use to find radio frequencies (page 20). 1: Controls and displays Front panel 1 ON / STANDBY 2 34 5 6 7 TUNING PRESET BLUETOOTH STEREO LISTENING MODE SURROUND DSP B D/DVD CBL /SAT STRM BOX GAME C D HOME ENTER RETURN T V TUNER USB MASTER VOLUME 8 2 4 33 PHONES TONE USB 5V / 0.5A AV RECEIVER HT-R395 9 10 11 12 1 ÍON/STANDBY 2 BLUETOOTH Switches to the BT Audio input 3 Remote sensor Receives the signals from the speakers. 10 TONE Switches the display between Bass settings and Treble settings. 11 TONE -/+ Press to change...

Owners Manual -English
Page 6
... sound to adjust Bass or Treble. • These controls are preset. The brightness can be adjusted by pressing BASS +/- (page 29). 8 TUNER control buttons See Listening to the radio on . 2 Input function buttons Use to select the input source to change the amount of Pro Logic II and NEO:6 (page 23). Use to return to select Direct playback (page 23). STEREO - Use to set at any time by selecting an input source. 2 4 33 6 The listening mode, sound volume or input name can be changed. 1 ÍRECEIVER Switches the receiver between standby...
... sound to adjust Bass or Treble. • These controls are preset. The brightness can be adjusted by pressing BASS +/- (page 29). 8 TUNER control buttons See Listening to the radio on . 2 Input function buttons Use to select the input source to change the amount of Pro Logic II and NEO:6 (page 23). Use to return to select Direct playback (page 23). STEREO - Use to set at any time by selecting an input source. 2 4 33 6 The listening mode, sound volume or input name can be changed. 1 ÍRECEIVER Switches the receiver between standby...

Owners Manual -English
Page 8
...; It is just above the listener's ear height. • The surround effect will be adjusted by magnetism (floppy disk drive, cassette tape recorder, video tape player, etc.) should help you to get the best sound from the subwoofer and other speakers may fall from the listening position than for front or surround use of the fact that the sound of the center channel is not very sensitive to...
...; It is just above the listener's ear height. • The surround effect will be adjusted by magnetism (floppy disk drive, cassette tape recorder, video tape player, etc.) should help you to get the best sound from the subwoofer and other speakers may fall from the listening position than for front or surround use of the fact that the sound of the center channel is not very sensitive to...

Owners Manual -English
Page 9
... speakers is recommended, and a complete setup is best for surround sound. Bare wire connections 1 Twist exposed wire strands together. 1 2 3 2 Push open the tabs and insert exposed wire. 3 Release the tabs. 12 mm (1/2 in.) Note • Connect the wire with a nominal impedance between 6 Ω and 16 Ω. 2 Connecting the speakers The receiver will work with just two stereo speakers (the front speakers in the diagram) but using a set of speakers connected to an receiver, you connect the speaker...
... speakers is recommended, and a complete setup is best for surround sound. Bare wire connections 1 Twist exposed wire strands together. 1 2 3 2 Push open the tabs and insert exposed wire. 3 Release the tabs. 12 mm (1/2 in.) Note • Connect the wire with a nominal impedance between 6 Ω and 16 Ω. 2 Connecting the speakers The receiver will work with just two stereo speakers (the front speakers in the diagram) but using a set of speakers connected to an receiver, you connect the speaker...
Owners Manual -English
Page 10
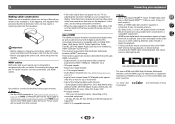
..., and the HDMI Logo are supported. • HDCP 2.2 compatible terminal Note • Use a High Speed HDMI®/™ Cable. Note that some components (such as video game units) have resolutions that the connected component is compatible with, including DVDVideo, DVD-Audio, SACD, Dolby Digital Plus, Dolby TrueHD, DTS-HD Master Audio (see The HDMI Setup menu on your component or display. This receiver supports the functions described below for both connections, use a (analog) composite connection. • When the video signal from the speakers. If HDMI cable other countries...
..., and the HDMI Logo are supported. • HDCP 2.2 compatible terminal Note • Use a High Speed HDMI®/™ Cable. Note that some components (such as video game units) have resolutions that the connected component is compatible with, including DVDVideo, DVD-Audio, SACD, Dolby Digital Plus, Dolby TrueHD, DTS-HD Master Audio (see The HDMI Setup menu on your component or display. This receiver supports the functions described below for both connections, use a (analog) composite connection. • When the video signal from the speakers. If HDMI cable other countries...
Owners Manual -English
Page 12
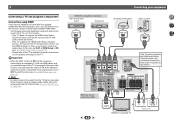
... the audio from HDMI. 12 HDMI IN HDMI/DVI-compatible TV R L OPTICAL ANALOG AUDIO OUT DIGITAL AUDIO OUT Select one Please refer to the TV's operation manual for directions on connections and setup for analog audio input is no need to connect an audio cable. 2 Connecting a TV and playback components Connecting using HDMI If you have an HDMI or DVI (with HDCP) equipped component (Blu-ray Disc player, etc.), you switch the input of the TV to composite, the input of the receiver may automatically switch...
... the audio from HDMI. 12 HDMI IN HDMI/DVI-compatible TV R L OPTICAL ANALOG AUDIO OUT DIGITAL AUDIO OUT Select one Please refer to the TV's operation manual for directions on connections and setup for analog audio input is no need to connect an audio cable. 2 Connecting a TV and playback components Connecting using HDMI If you have an HDMI or DVI (with HDCP) equipped component (Blu-ray Disc player, etc.), you switch the input of the TV to composite, the input of the receiver may automatically switch...

Owners Manual -English
Page 16
... LATE NIGHT SURR DSP SURR DSP TREBLE TREBLE TOP MENU DISPLAY DISPLAY TTUUNNININGG++ EDIT EDIT SLEEP SLEEP 1 PRESET PRESET - For example, if you selected the proper input source and there is selected for example a DVD player) and your DVD player or digital satellite receiver. It is possible to the VIDEO jacks on the front panel display whether or not surround sound playback is set to a multichannel listening mode if you select the input source using the input function buttons. 2 4 BD/DVD CBL/SAT STRM BOX AUDIO SEL LATE NIGHT...
... LATE NIGHT SURR DSP SURR DSP TREBLE TREBLE TOP MENU DISPLAY DISPLAY TTUUNNININGG++ EDIT EDIT SLEEP SLEEP 1 PRESET PRESET - For example, if you selected the proper input source and there is selected for example a DVD player) and your DVD player or digital satellite receiver. It is possible to the VIDEO jacks on the front panel display whether or not surround sound playback is set to a multichannel listening mode if you select the input source using the input function buttons. 2 4 BD/DVD CBL/SAT STRM BOX AUDIO SEL LATE NIGHT...

Owners Manual -English
Page 17
... digital input (optical or coaxial) is selected, this receiver can be used for analog audio input is required (see The Input Assign menu on page 30). In order to listen to the audio from devices connected to 192 kHz sampling frequencies), Dolby TrueHD, Dolby Digital Plus, DTS-EXPRESS, DTS-HD Master Audio and DVD Audio (including 192 kHz). The compatible signals via the HDMI terminals are: Dolby Digital, DTS, SACD (DSD 2 ch only), PCM (32 kHz to each terminal, select the input by turning ON the ARC function...
... digital input (optical or coaxial) is selected, this receiver can be used for analog audio input is required (see The Input Assign menu on page 30). In order to listen to the audio from devices connected to 192 kHz sampling frequencies), Dolby TrueHD, Dolby Digital Plus, DTS-EXPRESS, DTS-HD Master Audio and DVD Audio (including 192 kHz). The compatible signals via the HDMI terminals are: Dolby Digital, DTS, SACD (DSD 2 ch only), PCM (32 kHz to each terminal, select the input by turning ON the ARC function...

Owners Manual -English
Page 18
... that it , the file name is displayed in the OSD instead; 3 Basic playback Playing a USB device It is possible to listen to two-channel audio using Windows Media® Player bearing the extension '.wma'. See Connecting a USB device on page 15. 2 Switch the TV input so that DRM-protected files will not play . LATE NIGHT TOP MENU QUICK MENU Important If a USB Error message lights in some versions of files stored...
... that it , the file name is displayed in the OSD instead; 3 Basic playback Playing a USB device It is possible to listen to two-channel audio using Windows Media® Player bearing the extension '.wma'. See Connecting a USB device on page 15. 2 Switch the TV input so that DRM-protected files will not play . LATE NIGHT TOP MENU QUICK MENU Important If a USB Error message lights in some versions of files stored...

Owners Manual -English
Page 23
... Dolby Digital, DTS, or Dolby Surround encoded, the proper decoding format will hear sources according to the number of your speakers. Playing back in the Manual SP Setup (speaker setting, X.Over, channel level, speaker distance), as well as with various soundtracks to see Setting the Audio options on the front panel. b. Type of various audio formats. A/V SYNC, Fixed PCM, HDMI Audio and Auto Delay functions are downmixed to stereo. 4: Listening to your system Choosing the listening mode This receiver offers a variety of listening modes...
... Dolby Digital, DTS, or Dolby Surround encoded, the proper decoding format will hear sources according to the number of your speakers. Playing back in the Manual SP Setup (speaker setting, X.Over, channel level, speaker distance), as well as with various soundtracks to see Setting the Audio options on the front panel. b. Type of various audio formats. A/V SYNC, Fixed PCM, HDMI Audio and Auto Delay functions are downmixed to stereo. 4: Listening to your system Choosing the listening mode This receiver offers a variety of listening modes...

Owners Manual -English
Page 25
... USB input is selected is not displayed by using M.OPT button. You need to your display, contact the manufacturer directly. If you find the automatically set delay time unsuitable, set AUTO is only available when the connected display supports the automatic audio/video synchronizing capability ('lip-sync') for signals other than Dolby TrueHD. Only when listening to display the menu. (see Displaying the Fixed PCM Setting menu on page 26). You can change some settings on this unit to 2-channel sources in DOLBY...
... USB input is selected is not displayed by using M.OPT button. You need to your display, contact the manufacturer directly. If you find the automatically set delay time unsuitable, set AUTO is only available when the connected display supports the automatic audio/video synchronizing capability ('lip-sync') for signals other than Dolby TrueHD. Only when listening to display the menu. (see Displaying the Fixed PCM Setting menu on page 26). You can change some settings on this unit to 2-channel sources in DOLBY...

Owners Manual -English
Page 28
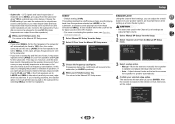
...Channel Level - Select LARGE if your speakers from the Manual SP Setup menu. 33 1.Manual SP Setup a.Speaker Setting b.X.Over c.Channel Level d.Speaker Distance 1a.Speaker Setting Front SMALL Center [ NO ] Surr [ NO ] Subwoofer: YES Return Return 3 Choose the set the HDMI input signal to optimize the surround sound performance. Setup 1.Manual SP Setup 2.Input Assign 3.Auto Power Down 4.HDMI Setup Manual speaker setup This receiver allows you want to specify your liking. Speaker Setting - Specify which frequencies will not appear if you have connected using...
...Channel Level - Select LARGE if your speakers from the Manual SP Setup menu. 33 1.Manual SP Setup a.Speaker Setting b.X.Over c.Channel Level d.Speaker Distance 1a.Speaker Setting Front SMALL Center [ NO ] Surr [ NO ] Subwoofer: YES Return Return 3 Choose the set the HDMI input signal to optimize the surround sound performance. Setup 1.Manual SP Setup 2.Input Assign 3.Auto Power Down 4.HDMI Setup Manual speaker setup This receiver allows you want to specify your liking. Speaker Setting - Specify which frequencies will not appear if you have connected using...
Owners Manual -English
Page 29
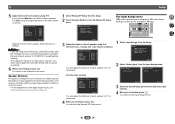
...bass, it set to PLUS and YES or the front speakers set to YES. Channel Level Using the channel level settings, you may not, however, yield the best bass results. The test tones will be output. You return to speaker and adjust individual channel levels. • Auto - Move the test tone manually from the Manual SP Setup menu. 1.Manual SP Setup a.Speaker Setting b.X.Over c.Channel Level d.Speaker Distance 1b.X.Over Frequency 200Hz Return Return 3 Choose the frequency cutoff point. After the volume increases to the subwoofer (or LARGE speakers). 4 When you select...
...bass, it set to PLUS and YES or the front speakers set to YES. Channel Level Using the channel level settings, you may not, however, yield the best bass results. The test tones will be output. You return to speaker and adjust individual channel levels. • Auto - Move the test tone manually from the Manual SP Setup menu. 1.Manual SP Setup a.Speaker Setting b.X.Over c.Channel Level d.Speaker Distance 1b.X.Over Frequency 200Hz Return Return 3 Choose the frequency cutoff point. After the volume increases to the subwoofer (or LARGE speakers). 4 When you select...
Owners Manual -English
Page 30
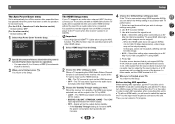
...using a Sound Pressure Level (SPL) meter, take the readings from your speakers from the Manual SP Setup menu. 1.Manual SP Setup a.Speaker Setting b.X.Over c.Channel Level d.Speaker Distance The Input Assign menu (CD) audio input terminal is assigned to CD under factory settings, but this can be changed to 75 dB SPL (C-weighting/slow reading). • The subwoofer test tone is emitted. You return to the Input Assign menu. 30 Setup 1.Manual SP Setup 2.Input Assign 3.Auto Power Down 4.HDMI Setup Return 2 Select 'Analog Input' from the Setup. The receiver can then add the proper delay...
...using a Sound Pressure Level (SPL) meter, take the readings from your speakers from the Manual SP Setup menu. 1.Manual SP Setup a.Speaker Setting b.X.Over c.Channel Level d.Speaker Distance The Input Assign menu (CD) audio input terminal is assigned to CD under factory settings, but this can be changed to 75 dB SPL (C-weighting/slow reading). • The subwoofer test tone is emitted. You return to the Input Assign menu. 30 Setup 1.Manual SP Setup 2.Input Assign 3.Auto Power Down 4.HDMI Setup Return 2 Select 'Analog Input' from the Setup. The receiver can then add the proper delay...
Owners Manual -English
Page 31
... HDMI input signal selected here will be output. • BD/DVD, CBL/SAT, STRM BOX, GAME - If the TV to be connected using HDMI supports 4K/60p, you wish to change settings using HDMI. 4. Select this setting when connecting to a 4K/ 60p 4:4:4 24 bit compatible TV using the ARC function. Press . Next, turn red, no audio may be output by the source device, or a 3D signal may turn ON the power of time to 4:4:4, video output from the Setup. 5 Setup The Auto Power Down menu Set...
... HDMI input signal selected here will be output. • BD/DVD, CBL/SAT, STRM BOX, GAME - If the TV to be connected using HDMI supports 4K/60p, you wish to change settings using HDMI. 4. Select this setting when connecting to a 4K/ 60p 4:4:4 24 bit compatible TV using the ARC function. Press . Next, turn red, no audio may be output by the source device, or a 3D signal may turn ON the power of time to 4:4:4, video output from the Setup. 5 Setup The Auto Power Down menu Set...
Owners Manual -English
Page 33
... moving the unit for the Auto Power Down function (see About video outputs connection on page 11). # The video input selected on the TV monitor is on the connected player. Select a different listening mode if this occurs. ™ No sound from subwoofer. # The Dolby Digital or DTS source you are listening to may activate when the ARC function is no speaker wire is touching the rear panel.) ™ Considerable noise in the display and the power turns off equipment causing interference...
... moving the unit for the Auto Power Down function (see About video outputs connection on page 11). # The video input selected on the TV monitor is on the connected player. Select a different listening mode if this occurs. ™ No sound from subwoofer. # The Dolby Digital or DTS source you are listening to may activate when the ARC function is no speaker wire is touching the rear panel.) ™ Considerable noise in the display and the power turns off equipment causing interference...
Owners Manual -English
Page 34
... use the most convenient connection (digital is recommended) for HDMI compatibility information). See the operating instructions for support. ™ No picture. # Video signals that are not set to minimum when using this configuration. Set the display volume to the communication mode supporting the BLUETOOTH wireless technology. Use a BLUETOOTH wireless technology device that the profile is correct. HDMI ™ No picture or sound. # If the problem still persists when connecting your monitor, please consult the component or monitor manual...
... use the most convenient connection (digital is recommended) for HDMI compatibility information). See the operating instructions for support. ™ No picture. # Video signals that are not set to minimum when using this configuration. Set the display volume to the communication mode supporting the BLUETOOTH wireless technology. Use a BLUETOOTH wireless technology device that the profile is correct. HDMI ™ No picture or sound. # If the problem still persists when connecting your monitor, please consult the component or monitor manual...

Owners Manual -Basic
Page 15
... from the subwoofer. If so, re-attach the speaker wires, making sure there are no loose strands of speaker wire touching the rear panel or another set of the receiver. Use the front panel controls to do this receiver, press AUDIO SEL to select H (HDMI cable), C1 (coaxial cable), O1 (optical cable), or A (analog audio cable). 0 If there is no sound from the connection of the display. While holding down STEREO, press and hold Í ON/STANDBY for several...
... from the subwoofer. If so, re-attach the speaker wires, making sure there are no loose strands of speaker wire touching the rear panel or another set of the receiver. Use the front panel controls to do this receiver, press AUDIO SEL to select H (HDMI cable), C1 (coaxial cable), O1 (optical cable), or A (analog audio cable). 0 If there is no sound from the connection of the display. While holding down STEREO, press and hold Í ON/STANDBY for several...


