
WS-710M Instructions (English)
Page 2
The utmost care has been taken to ensure the integrity of this manual may be the trademarks or registered trademarks of the product, repair performed by a defect of their respective owners. Other product and brand names mentioned herein ... 2 Contact our Customer Support Center for passive damages or damage of any kind occurred due to data loss incurred by the third party other than Olympus or an Olympus authorized service station, or any other reason is a trademark of the screen and the recorder shown in the future without advanced notice.
The utmost care has been taken to ensure the integrity of this manual may be the trademarks or registered trademarks of the product, repair performed by a defect of their respective owners. Other product and brand names mentioned herein ... 2 Contact our Customer Support Center for passive damages or damage of any kind occurred due to data loss incurred by the third party other than Olympus or an Olympus authorized service station, or any other reason is a trademark of the screen and the recorder shown in the future without advanced notice.
WS-710M Instructions (English)
Page 4
..., as alcohol and lacquer thinner to ensure that you experience noise, move the recorder further away from the Olympus's liability. If you always read this manual in hot, humid locations such as cellular phones, televisions, florescent lights etc. Precautions relating to recording: •...; Olympus will vary substantially depending on where you are using your PC. • Content you know how to reception: &#...
..., as alcohol and lacquer thinner to ensure that you experience noise, move the recorder further away from the Olympus's liability. If you always read this manual in hot, humid locations such as cellular phones, televisions, florescent lights etc. Precautions relating to recording: •...; Olympus will vary substantially depending on where you are using your PC. • Content you know how to reception: &#...
WS-710M Instructions (English)
Page 19
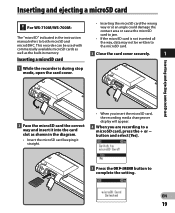
..., press the + or − button and select [Yes]. 5 Press the OK `/MENU button to both microSD and microSDHC. Inserting and ejecting a microSD card For WS-710M/WS-700M: The "microSD" indicated in memory. EN 19 Inserting a microSD card 1 While the recorder is during stop mode, open the card cover. • Inserting the... cards as well as shown in the diagram. • Insert the microSD card keeping it into the card slot as the built-in the instruction manual refers to complete the setting.
..., press the + or − button and select [Yes]. 5 Press the OK `/MENU button to both microSD and microSDHC. Inserting and ejecting a microSD card For WS-710M/WS-700M: The "microSD" indicated in memory. EN 19 Inserting a microSD card 1 While the recorder is during stop mode, open the card cover. • Inserting the... cards as well as shown in the diagram. • Insert the microSD card keeping it into the card slot as the built-in the instruction manual refers to complete the setting.
WS-710M Instructions (English)
Page 42
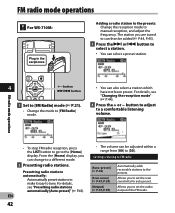
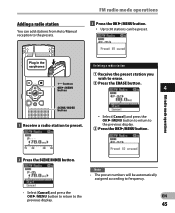
...tuned to can then be adjusted within a range from [00] to set the audio output of the FM radio. FM radio mode operations For WS-710M: Plug in the earphones Adding a radio station to the presets: Change the reception mode to tune. For details, see "Presetting radio stations .... • You can also select a station which have not been preset. Presetting radio stations automatically: Automatically preset stations to make it easy to manual reception, and adjust the frequency. FM radio mode operations • To stop FM radio reception, press the LIST button to go to the presets....
...tuned to can then be adjusted within a range from [00] to set the audio output of the FM radio. FM radio mode operations For WS-710M: Plug in the earphones Adding a radio station to the presets: Change the reception mode to tune. For details, see "Presetting radio stations .... • You can also select a station which have not been preset. Presetting radio stations automatically: Automatically preset stations to make it easy to manual reception, and adjust the frequency. FM radio mode operations • To stop FM radio reception, press the LIST button to go to the presets....

WS-710M Instructions (English)
Page 44
... to select a preset station. a Preset number 9 0 a button OK `/MENU button FM radio mode operations b Auto/Manual mode: • Press the 9 or 0 button to adjust the frequency and receive a signal (Manual reception). • Repeatedly press the 9 or 0 buttons to scan through 3 from "FM radio mode operations" (☞... P.42). 2 Press the OK `/MENU button to select a reception mode. • The reception mode will change to manual reception and fine tune the frequency. 1 Perform Steps 1 through the receivable stations (Auto reception). b Tuning frequency EN 44
... to select a preset station. a Preset number 9 0 a button OK `/MENU button FM radio mode operations b Auto/Manual mode: • Press the 9 or 0 button to adjust the frequency and receive a signal (Manual reception). • Repeatedly press the 9 or 0 buttons to scan through 3 from "FM radio mode operations" (☞... P.42). 2 Press the OK `/MENU button to select a reception mode. • The reception mode will change to manual reception and fine tune the frequency. 1 Perform Steps 1 through the receivable stations (Auto reception). b Tuning frequency EN 44
WS-710M Instructions (English)
Page 45
... operations 2 Press the SCENE/INDEX button. FM radio mode operations 3 Press the OK `/MENU button. • Up to 30 stations can add stations from Auto/Manual reception to the previous display. 3 Press the OK `/MENU button.
... operations 2 Press the SCENE/INDEX button. FM radio mode operations 3 Press the OK `/MENU button. • Up to 30 stations can add stations from Auto/Manual reception to the previous display. 3 Press the OK `/MENU button.
WS-710M Instructions (English)
Page 67
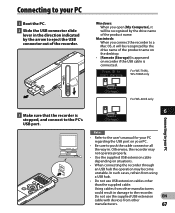
... your PC regarding the USB port on situations. • When connecting the recorder through an USB hub the operation may become unstable. For WS-710M, WS-700M only For WS-600S only 3 Make sure that the recorder is connected. Connecting to your PC 1 Boot the PC. 2 Slide the USB connector slide lever in the... on recorder if the USB cable is stopped, and connect to the PC's USB port. 6 Connecting to your PC Notes • Refer to the user's manual for your PC. • Be sure to push the cable connector all the way in damage to the recorder.
... your PC regarding the USB port on situations. • When connecting the recorder through an USB hub the operation may become unstable. For WS-710M, WS-700M only For WS-600S only 3 Make sure that the recorder is connected. Connecting to your PC 1 Boot the PC. 2 Slide the USB connector slide lever in the... on recorder if the USB cable is stopped, and connect to the PC's USB port. 6 Connecting to your PC Notes • Refer to the user's manual for your PC. • Be sure to push the cable connector all the way in damage to the recorder.


