
TG-320 Instruction Manual (English)
Page 2
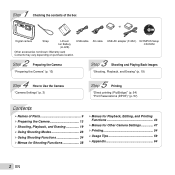
AV cable USB-AC adapter (F-2AC) OLYMPUS Setup CD-ROM 2 Step Preparing the Camera 3 Step Shooting and Playing Back Images "Preparing the Camera" (p. 13) "Shooting, Playback, and Erasing" (p. 19) 4 Step How ...Camera "Camera Settings" (p. 3) 5 Step Printing "Direct printing (PictBridge)" (p. 54) "Print Reservations (DPOF)" (p. 57) Contents ¾ Names of the box or Digital camera Strap Lithium Ion Battery (LI-42B) USB cable Other accessories not shown: Warranty card Contents may vary depending on purchase location. 1 Step Checking the contents of Parts 9 ¾ Preparing...
AV cable USB-AC adapter (F-2AC) OLYMPUS Setup CD-ROM 2 Step Preparing the Camera 3 Step Shooting and Playing Back Images "Preparing the Camera" (p. 13) "Shooting, Playback, and Erasing" (p. 19) 4 Step How ...Camera "Camera Settings" (p. 3) 5 Step Printing "Direct printing (PictBridge)" (p. 54) "Print Reservations (DPOF)" (p. 57) Contents ¾ Names of the box or Digital camera Strap Lithium Ion Battery (LI-42B) USB cable Other accessories not shown: Warranty card Contents may vary depending on purchase location. 1 Step Checking the contents of Parts 9 ¾ Preparing...
TG-320 Instruction Manual (English)
Page 11
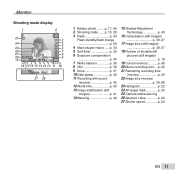
... 20 00:34 19 4 14M NORM P 3 4 5 P0.0 6 7 WB AUTO 8 ISO AUTO 9 DATE 18 17 16 15 14 13 12 11 10 1/100 F3.5 27 26 1 Battery check..........p. 17, 60 2 Shooting mode .......p. 19, 28 3 Flash p. 34 Flash standby/flash charge p. 59 4 Macro/super macro ......p. 34 5 Self-timer p. 35 6 Exposure compensation p. 35...
... 20 00:34 19 4 14M NORM P 3 4 5 P0.0 6 7 WB AUTO 8 ISO AUTO 9 DATE 18 17 16 15 14 13 12 11 10 1/100 F3.5 27 26 1 Battery check..........p. 17, 60 2 Shooting mode .......p. 19, 28 3 Flash p. 34 Flash standby/flash charge p. 59 4 Macro/super macro ......p. 34 5 Self-timer p. 35 6 Exposure compensation p. 35...

TG-320 Instruction Manual (English)
Page 12
... 100 AUTO 15 16 NORM 14M 17 FILE 100 0004 18 FILE 100 0004 '11/02/26 00:00 '11/02/26 00:00 19 1 Battery check..........p. 17, 60 2 3D images p. 26 3 Print reservation/number of prints p. 57/p. 56 4 Protect p. 46 5 Adding sound .........p. 42, 44 6 Current memory ...........p. 66 7 Frame number/total...
... 100 AUTO 15 16 NORM 14M 17 FILE 100 0004 18 FILE 100 0004 '11/02/26 00:00 '11/02/26 00:00 19 1 Battery check..........p. 17, 60 2 3D images p. 26 3 Print reservation/number of prints p. 57/p. 56 4 Protect p. 46 5 Adding sound .........p. 42, 44 6 Current memory ...........p. 66 7 Frame number/total...

TG-320 Instruction Manual (English)
Page 13
...using the camera, be sure to close and lock the battery/card/connector cover. Damage to the battery exterior (scratches, etc.) may not be functioning as expected. Charging the battery and setting up to 3 hours. The camera battery can be charged while the camera is connected to a ... of ib computer software is available on Windows computers only. Preparing the Camera Inserting the battery 3 1 Battery/card/connector cover lock 1 2 12 1 Battery/card/connector cover 2 When removing the battery or card, be sure to turn off when charging is complete. When using the supplied...
...using the camera, be sure to close and lock the battery/card/connector cover. Damage to the battery exterior (scratches, etc.) may not be functioning as expected. Charging the battery and setting up to 3 hours. The camera battery can be charged while the camera is connected to a ... of ib computer software is available on Windows computers only. Preparing the Camera Inserting the battery 3 1 Battery/card/connector cover lock 1 2 12 1 Battery/card/connector cover 2 When removing the battery or card, be sure to turn off when charging is complete. When using the supplied...
TG-320 Instruction Manual (English)
Page 14
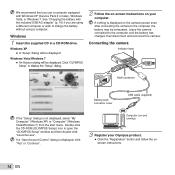
...7) from the start menu. Windows XP ● A "Setup" dialog will be displayed. Double-click the CD-ROM (OLYMPUS Setup) icon to the computer, the battery may be exhausted. Leave the camera connected to display the "Setup" dialog. 2 Follow the on-screen instructions on and ... be displayed. Computer (on your Olympus product. ● Click the "Registration" button and follow the onscreen instructions. 14 EN Click "OLYMPUS Setup" to the computer until the battery has charged, then disconnect and reconnect the camera. See "Charging the battery with Windows XP (Service Pack 2...
...7) from the start menu. Windows XP ● A "Setup" dialog will be displayed. Double-click the CD-ROM (OLYMPUS Setup) icon to the computer, the battery may be exhausted. Leave the camera connected to display the "Setup" dialog. 2 Follow the on-screen instructions on and ... be displayed. Computer (on your Olympus product. ● Click the "Registration" button and follow the onscreen instructions. 14 EN Click "OLYMPUS Setup" to the computer until the battery has charged, then disconnect and reconnect the camera. See "Charging the battery with Windows XP (Service Pack 2...
TG-320 Instruction Manual (English)
Page 16
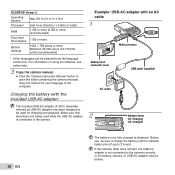
...USB cable (supplied) AC outlet 2 Indicator lamp On: Charging Off: Charged 16 EN The battery is not fully charged at shipment. If the indicator lamp does not light, the USB-AC adapter is connected to the camera. OLYMPUS Viewer 2 Operating System Mac OS X v10.4.11-v10.6 Processor Intel Core Solo/Duo 1.5...Settings 1024 × 768 pixels or more Minimum 32,000 colors (16,770,000 colors recommended) * Other languages can be sure to charge the battery until the indicator lamp turns off (up to 3 hours). Make sure that shooting is not being used while the USB-AC adapter is not ...
...USB cable (supplied) AC outlet 2 Indicator lamp On: Charging Off: Charged 16 EN The battery is not fully charged at shipment. If the indicator lamp does not light, the USB-AC adapter is connected to the camera. OLYMPUS Viewer 2 Operating System Mac OS X v10.4.11-v10.6 Processor Intel Core Solo/Duo 1.5...Settings 1024 × 768 pixels or more Minimum 32,000 colors (16,770,000 colors recommended) * Other languages can be sure to charge the battery until the indicator lamp turns off (up to 3 hours). Make sure that shooting is not being used while the USB-AC adapter is not ...
TG-320 Instruction Manual (English)
Page 17
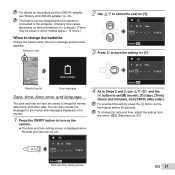
... EN 17 You can be cases in Steps 2 and 3, use FGHI and the A button to set . Charging time varies depending on the battery and the USB-AC adapter, see "Battery and USB-AC adapter" (p. 64). X Y M D Time 2011 Y/M/D Cancel MENU 3 Press I to save the setting for [Y]. X Y M D Time 2011. 01 ...Y/M/D Cancel MENU 4 As in which it takes approx. 10 hours.) When to charge the batteries Charge the battery when the error message shown below appears. For precise time setting, press the A button as the time signal strikes 00 seconds. The...
... EN 17 You can be cases in Steps 2 and 3, use FGHI and the A button to set . Charging time varies depending on the battery and the USB-AC adapter, see "Battery and USB-AC adapter" (p. 64). X Y M D Time 2011 Y/M/D Cancel MENU 3 Press I to save the setting for [Y]. X Y M D Time 2011. 01 ...Y/M/D Cancel MENU 4 As in which it takes approx. 10 hours.) When to charge the batteries Charge the battery when the error message shown below appears. For precise time setting, press the A button as the time signal strikes 00 seconds. The...

TG-320 Instruction Manual (English)
Page 18
... other types of the following procedure show the SD memory card. The illustrations of card. Do not touch the contact area directly. 2 12 1 Close the battery/card/connector cover firmly so that lock makes the clicking sound. "Number of storable pictures (still images)/Continuous recording length (movies) in the internal...
... other types of the following procedure show the SD memory card. The illustrations of card. Do not touch the contact area directly. 2 12 1 Close the battery/card/connector cover firmly so that lock makes the clicking sound. "Number of storable pictures (still images)/Continuous recording length (movies) in the internal...

TG-320 Instruction Manual (English)
Page 30
... has been applied. The user composes the shots using the supplied CD" (p. 13). 30 EN For details on installing the PC software, see "Charging the battery and setting up using the guide frame and manually releases the shutter. Panorama 3D AUTO 0.0 WB AUTO 00:34 4 14M Icon indicating P mode that is...
... has been applied. The user composes the shots using the supplied CD" (p. 13). 30 EN For details on installing the PC software, see "Charging the battery and setting up using the guide frame and manually releases the shutter. Panorama 3D AUTO 0.0 WB AUTO 00:34 4 14M Icon indicating P mode that is...

TG-320 Instruction Manual (English)
Page 43
...; Starts the slideshow. *1 The [Collection] that are not displayed, press the A button when selecting an item. For information on using the menus, see "Charging the battery and setting up using some functions. Playing back pictures automatically [Slideshow] q (Playback menu) X Slideshow Submenu 2 Slide BGM Type Start Submenu 3 Application All/Event/ Collection*1 Selects...
...; Starts the slideshow. *1 The [Collection] that are not displayed, press the A button when selecting an item. For information on using the menus, see "Charging the battery and setting up using some functions. Playing back pictures automatically [Slideshow] q (Playback menu) X Slideshow Submenu 2 Slide BGM Type Start Submenu 3 Application All/Event/ Collection*1 Selects...
TG-320 Instruction Manual (English)
Page 47
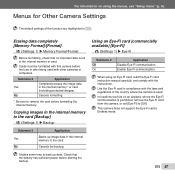
.... Cancels formatting. *1 Be sure to [Off]. Enable Eye-Fi communication. Erasing data completely [Memory Format]/[Format] r (Settings 1) X Memory Format/Format Before formatting, check that the battery has sufficient power before formatting the internal memory.
.... Cancels formatting. *1 Be sure to [Off]. Enable Eye-Fi communication. Erasing data completely [Memory Format]/[Format] r (Settings 1) X Memory Format/Format Before formatting, check that the battery has sufficient power before formatting the internal memory.

TG-320 Instruction Manual (English)
Page 51
Open the battery/card/connector cover in the direction of the TV, the signal format is connected to the computer by both an AV cable and an HDMI ... the HDMI cable to 480p/576p. For details on the TV. HDMI cable (type D/sold separately: CB-HD1) EN 51 HDMI micro connector Open the battery/card/ connector cover in the direction of the arrow. ● Connection via AV cable 1 Use the camera to select the same video signal system as...
Open the battery/card/connector cover in the direction of the TV, the signal format is connected to the computer by both an AV cable and an HDMI ... the HDMI cable to 480p/576p. For details on the TV. HDMI cable (type D/sold separately: CB-HD1) EN 51 HDMI micro connector Open the battery/card/ connector cover in the direction of the arrow. ● Connection via AV cable 1 Use the camera to select the same video signal system as...
TG-320 Instruction Manual (English)
Page 52
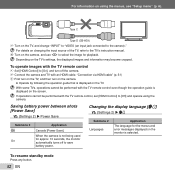
To operate images with the TV remote control, set [HDMI Control] to the camera)." Saving battery power between shots [Power Save] s (Settings 2) X Power Save Submenu 2 Off On Application Cancels [Power Save]. Changing the display language [l] s (Settings 2) X l Submenu 2 Languages Application The ... the operation guide that is displayed on the screen. "Connection via HDMI cable" (p. 51) 3 First turn on the TV, and then turn off to save battery power. Type C Type D (CB-HD1) 3 Turn on the TV, and change "INPUT" to "VIDEO (an input jack connected to [Off] and operate using the ...
To operate images with the TV remote control, set [HDMI Control] to the camera)." Saving battery power between shots [Power Save] s (Settings 2) X Power Save Submenu 2 Off On Application Cancels [Power Save]. Changing the display language [l] s (Settings 2) X l Submenu 2 Languages Application The ... the operation guide that is displayed on the screen. "Connection via HDMI cable" (p. 51) 3 First turn on the TV, and then turn off to save battery power. Type C Type D (CB-HD1) 3 Turn on the TV, and change "INPUT" to "VIDEO (an input jack connected to [Off] and operate using the ...

TG-320 Instruction Manual (English)
Page 59
... performs actions of auto focus as far as intended, or if an error message is pressed". ● Cancel sleep mode. To save battery power, the camera automatically goes into a warm, humid room. The camera's external temperature may also increase during use , the internal temperature... language" (p. 17) Miscellaneous "The camera makes a noise when taking pictures. ● With prolonged camera use , however this occurs, remove the battery from sleep mode before taking a picture. EN 59 Turn off the power, and wait for the camera body to become acclimated to the surrounding temperature...
... performs actions of auto focus as far as intended, or if an error message is pressed". ● Cancel sleep mode. To save battery power, the camera automatically goes into a warm, humid room. The camera's external temperature may also increase during use , the internal temperature... language" (p. 17) Miscellaneous "The camera makes a noise when taking pictures. ● With prolonged camera use , however this occurs, remove the battery from sleep mode before taking a picture. EN 59 Turn off the power, and wait for the camera body to become acclimated to the surrounding temperature...

TG-320 Instruction Manual (English)
Page 60
... be erased. *3 This is corrupted. 60 EN Error message Corrective action Problem with selected image Use photo retouch software, etc. Be Edited Battery Empty No Connection Battery problem Charge the battery. Card problem The card write-protect switch is displayed on again. Printer problem Turn off the camera and printer, check the printer...
... be erased. *3 This is corrupted. 60 EN Error message Corrective action Problem with selected image Use photo retouch software, etc. Be Edited Battery Empty No Connection Battery problem Charge the battery. Card problem The card write-protect switch is displayed on again. Printer problem Turn off the camera and printer, check the printer...
TG-320 Instruction Manual (English)
Page 63
... longer" ● Avoid any of the following operations when not actually taking pictures because they deplete the battery power ● Repeatedly pressing the shutter button halfway. ● Repeatedly using the zoom. ● Set [Power Save] (p. 52) to [On] Playback/Editing tips ...Playback "Playing images in the internal memory and card" ● Remove the card and display the images in internal memory ● "Inserting the battery" (p. 13), "Inserting an SD/SDHC/SDXC memory card or Eye-Fi card (commercially available)" (p. 18) "Viewing images with high picture quality on a ...
... longer" ● Avoid any of the following operations when not actually taking pictures because they deplete the battery power ● Repeatedly pressing the shutter button halfway. ● Repeatedly using the zoom. ● Set [Power Save] (p. 52) to [On] Playback/Editing tips ...Playback "Playing images in the internal memory and card" ● Remove the card and display the images in internal memory ● "Inserting the battery" (p. 13), "Inserting an SD/SDHC/SDXC memory card or Eye-Fi card (commercially available)" (p. 18) "Viewing images with high picture quality on a ...

TG-320 Instruction Manual (English)
Page 64
...; During the conditions described below, power is consumed continuously and the battery becomes exhausted quickly. • The zoom is well ventilated. • Periodically insert the battery and test the camera functions. Battery and USB-AC adapter • This camera uses one Olympus lithium ion battery (LI-42B). Wipe the camera with a dry cloth. Lens •...
...; During the conditions described below, power is consumed continuously and the battery becomes exhausted quickly. • The zoom is well ventilated. • Periodically insert the battery and test the camera functions. Battery and USB-AC adapter • This camera uses one Olympus lithium ion battery (LI-42B). Wipe the camera with a dry cloth. Lens •...

TG-320 Instruction Manual (English)
Page 65
... sold separately) can be used to the charger. Do not use of larger capacity cards enables you set the battery to charge the battery. In this case, remove the battery from the camera and exchanged, but this is intended to be used only with the camera. Using your charger and...Use of a computer. LOCK Cards compatible with this camera SD/SDHC/SDXC memory cards and Eye-Fi cards (for compatibility card details, visit the Olympus website.) EN 65 Using a separately sold charger A charger (LI-41C/sold USB-AC adapter This camera can be correctly orientated in a vertical or...
... sold separately) can be used to the charger. Do not use of larger capacity cards enables you set the battery to charge the battery. In this case, remove the battery from the camera and exchanged, but this is intended to be used only with the camera. Using your charger and...Use of a computer. LOCK Cards compatible with this camera SD/SDHC/SDXC memory cards and Eye-Fi cards (for compatibility card details, visit the Olympus website.) EN 65 Using a separately sold charger A charger (LI-41C/sold USB-AC adapter This camera can be correctly orientated in a vertical or...

TG-320 Instruction Manual (English)
Page 66
... with this camera before first use or after being used P Current memory indicator Readout/recording process of personal data. 66 EN Never open the battery/card/connector cover or unplug the USB cable. Image], or [All Erase] is performed, the data in the card is being used during shooting and...
... with this camera before first use or after being used P Current memory indicator Readout/recording process of personal data. 66 EN Never open the battery/card/connector cover or unplug the USB cable. Image], or [All Erase] is performed, the data in the card is being used during shooting and...

TG-320 Instruction Manual (English)
Page 68
Movies Image Size L 1280×720 8 640×480 9 320×240 Image Quality L M L M L Continuous recording length ...For additional information on our warranty, please visit to the Olympus website for your camera to the nearest Olympus Authorized Service Center to close the battery/card/connector cover firmly so that lock makes the ...feature warrants*2 the operation of the camera against accidental impact incurred from everyday use of your camera. *1 As determined by Olympus' testing conditions in a damp or dusty environment (e.g. beach). 68 EN Image] (p. 46), [All Erase] (p. ...
Movies Image Size L 1280×720 8 640×480 9 320×240 Image Quality L M L M L Continuous recording length ...For additional information on our warranty, please visit to the Olympus website for your camera to the nearest Olympus Authorized Service Center to close the battery/card/connector cover firmly so that lock makes the ...feature warrants*2 the operation of the camera against accidental impact incurred from everyday use of your camera. *1 As determined by Olympus' testing conditions in a damp or dusty environment (e.g. beach). 68 EN Image] (p. 46), [All Erase] (p. ...


