

TG-320 Instruction Manual (English)
Page 5
... P Shooting mode 0.0 WB AUTO ISO AUTO 4 14M NORM Shooting Function menu Setup menu To select the shooting mode Use HI to change camera settings such as the shooting mode. EN 5 Using the Menu Use the menu to select the shooting mode and press the A button. There may be menus that are unavailable depending on other related settings or the s mode (p. 28). To select the function menu Use FG to select a menu and use HI to display the function menu. Function menu Press H during shooting to select a menu option. The function menu...
... P Shooting mode 0.0 WB AUTO ISO AUTO 4 14M NORM Shooting Function menu Setup menu To select the shooting mode Use HI to change camera settings such as the shooting mode. EN 5 Using the Menu Use the menu to select the shooting mode and press the A button. There may be menus that are unavailable depending on other related settings or the s mode (p. 28). To select the function menu Use FG to select a menu and use HI to display the function menu. Function menu Press H during shooting to select a menu option. The function menu...
TG-320 Instruction Manual (English)
Page 6
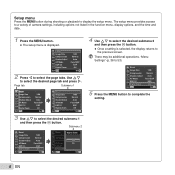
... operations. "Menu Settings" (p. 36 to 53) 1 Reset 2 Image Size Compression Shadow Adjust 1 AF Mode 2 ESP/ 3 Digital Zoom Exit MENU 14M Normal Auto Face/iESP ESP On Set OK 5 Press the m button to display the setup menu. Setup menu Press the m button during shooting or playback to complete the setting. 6 EN The setup menu provides access to a variety of camera settings, including options not listed in the function menu, display options, and the time and date. 1 Press the m button. ● The setup menu is selected, the display...
... operations. "Menu Settings" (p. 36 to 53) 1 Reset 2 Image Size Compression Shadow Adjust 1 AF Mode 2 ESP/ 3 Digital Zoom Exit MENU 14M Normal Auto Face/iESP ESP On Set OK 5 Press the m button to display the setup menu. Setup menu Press the m button during shooting or playback to complete the setting. 6 EN The setup menu provides access to a variety of camera settings, including options not listed in the function menu, display options, and the time and date. 1 Press the m button. ● The setup menu is selected, the display...

TG-320 Instruction Manual (English)
Page 13
User registration using the supplied CD and installation of the arrow. Preparing the Camera Inserting the battery 3 1 Battery/card/connector cover lock 1 2 12 1 Battery/card/connector cover 2 When removing the battery or card, be sure to turn off when charging is complete. Insert the battery while sliding the battery lock knob in the direction of ib computer software is available on Windows computers only. If the indicator lamp does not light, the camera is connected to...
User registration using the supplied CD and installation of the arrow. Preparing the Camera Inserting the battery 3 1 Battery/card/connector cover lock 1 2 12 1 Battery/card/connector cover 2 When removing the battery or card, be sure to turn off when charging is complete. Insert the battery while sliding the battery lock knob in the direction of ib computer software is available on Windows computers only. If the indicator lamp does not light, the camera is connected to...

TG-320 Instruction Manual (English)
Page 15
... online help for information on using the software. 5 Install the camera manual. ● Click the "Camera Instruction Manual" button and follow the on -screen instructions to install the software. 4 Install OLYMPUS Viewer 2 and ib computer software. ● Check the system requirements before beginning installation. ● Click the "OLYMPUS Viewer 2" button and follow the on-screen instructions to install the software. You can make user registration via "Registration" in a CD-ROM drive. ● Double-click the CD (OLYMPUS Setup) icon on...
... online help for information on using the software. 5 Install the camera manual. ● Click the "Camera Instruction Manual" button and follow the on -screen instructions to install the software. 4 Install OLYMPUS Viewer 2 and ib computer software. ● Check the system requirements before beginning installation. ● Click the "OLYMPUS Viewer 2" button and follow the on-screen instructions to install the software. You can make user registration via "Registration" in a CD-ROM drive. ● Double-click the CD (OLYMPUS Setup) icon on...
TG-320 Instruction Manual (English)
Page 16
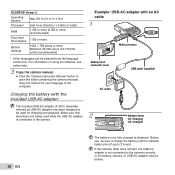
... broken. Make sure that shooting is not being used for your language to the camera correctly, or the battery, camera, or USB-AC adapter may be used while the USB-AC adapter is not connected to the computer. Before use, be selected from the language combo box. For information on using the software, see online help. 3 Copy the camera manual. ● Click the "Camera Instruction Manual" button to 3 hours). Copy the manual for charging and playback. OLYMPUS Viewer 2 Operating System Mac OS X v10...
... broken. Make sure that shooting is not being used for your language to the camera correctly, or the battery, camera, or USB-AC adapter may be used while the USB-AC adapter is not connected to the computer. Before use, be selected from the language combo box. For information on using the software, see online help. 3 Copy the camera manual. ● Click the "Camera Instruction Manual" button to 3 hours). Copy the manual for charging and playback. OLYMPUS Viewer 2 Operating System Mac OS X v10...
TG-320 Instruction Manual (English)
Page 17
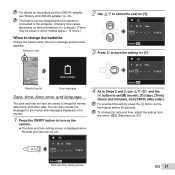
... Battery Empty Error message Date, time, time zone, and language The date and time set here are not set. X Y M D Time 2011 Y/M/D Cancel MENU 3 Press I to select the year for [Y]. To change the date and time, adjust the setting from the menu. [X] (Date/time) (p. 53) Cancel MENU Date and time setting screen EN 17 For precise time setting, press the A button as the time signal strikes 00 seconds. Charging time varies depending on the battery and the USB-AC adapter, see "Battery and USB-AC adapter" (p. 64). X Y M D Time Y/M/D 2 Use FG to save...
... Battery Empty Error message Date, time, time zone, and language The date and time set here are not set. X Y M D Time 2011 Y/M/D Cancel MENU 3 Press I to select the year for [Y]. To change the date and time, adjust the setting from the menu. [X] (Date/time) (p. 53) Cancel MENU Date and time setting screen EN 17 For precise time setting, press the A button as the time signal strikes 00 seconds. Charging time varies depending on the battery and the USB-AC adapter, see "Battery and USB-AC adapter" (p. 64). X Y M D Time Y/M/D 2 Use FG to save...
TG-320 Instruction Manual (English)
Page 19
... changes to a wide range of storable still pictures (p. 67) Monitor (standby mode screen) If P mode is not displayed, press H to display the function menu screen and then set the shooting mode to turn off the camera. 2 Hold the camera and compose the shot. 0.0 WB AUTO ISO AUTO 00:34 4 14M Number of other shooting menu functions, such as needed. 1 Press the n button to P. P mode indicator P Current shooting mode display Program Auto 3D P 0.0 WB AUTO ISO AUTO 4 14M NORM MENU Press the n button again to turn on the camera. Shooting, Playback, and Erasing Shooting...
... changes to a wide range of storable still pictures (p. 67) Monitor (standby mode screen) If P mode is not displayed, press H to display the function menu screen and then set the shooting mode to turn off the camera. 2 Hold the camera and compose the shot. 0.0 WB AUTO ISO AUTO 00:34 4 14M Number of other shooting menu functions, such as needed. 1 Press the n button to P. P mode indicator P Current shooting mode display Program Auto 3D P 0.0 WB AUTO ISO AUTO 4 14M NORM MENU Press the n button again to turn on the camera. Shooting, Playback, and Erasing Shooting...

TG-320 Instruction Manual (English)
Page 20
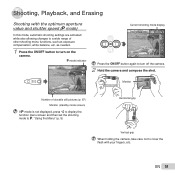
... To view images during shooting Pressing the q button enables playback of images. Try focusing again. P Press fully 1/400 F3.5 Image review screen 00:34 REC 00:12 Recording time Lights up red when recording Effects for the selected shooting mode can be used . To record a movie with optical zoom, set to focus if the AF target mark flashes red. To return to stop recording. Continuous recording length (p. 68) Press halfway 1/400 F3.5 Shutter speed Aperture value "Focusing" (p. 61) 4 To take the picture...
... To view images during shooting Pressing the q button enables playback of images. Try focusing again. P Press fully 1/400 F3.5 Image review screen 00:34 REC 00:12 Recording time Lights up red when recording Effects for the selected shooting mode can be used . To record a movie with optical zoom, set to focus if the AF target mark flashes red. To return to stop recording. Continuous recording length (p. 68) Press halfway 1/400 F3.5 Shutter speed Aperture value "Focusing" (p. 61) 4 To take the picture...
TG-320 Instruction Manual (English)
Page 26
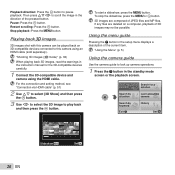
...-compatible devices carefully. 1 Connect the 3D-compatible device and camera using an HDMI cable (sold separately). Pause: Press the A button. Restart scrolling: Press the A button. "Shooting 3D images (W mode)" (p. 32) When playing back 3D images, read the warnings in the setup menu displays a description of 3D images may not be possible. To start a slideshow, press the m button. Stop playback: Press the m button. Using the menu guide Pressing the E button in the instruction manual for a solution Learn about the camera History Set...
...-compatible devices carefully. 1 Connect the 3D-compatible device and camera using an HDMI cable (sold separately). Pause: Press the A button. Restart scrolling: Press the A button. "Shooting 3D images (W mode)" (p. 32) When playing back 3D images, read the warnings in the setup menu displays a description of 3D images may not be possible. To start a slideshow, press the m button. Stop playback: Press the m button. Using the menu guide Pressing the E button in the instruction manual for a solution Learn about the camera History Set...

TG-320 Instruction Manual (English)
Page 30
... Icon indicating P mode that the target marks and pointers overlap, and the camera automatically releases the shutter. Creating panoramic images (p mode) 1 Set the shooting mode to set 0.0 WB AUTO 4 2M NORM MENU Shooting mode Magic Filter Option [ Pop Art \ Pin Hole ] Fish Eye @ Drawing*1 ; 3 Use HI to select the desired effect and then press the A button to which the effect has been applied. For details on installing the PC software, see "Charging...
... Icon indicating P mode that the target marks and pointers overlap, and the camera automatically releases the shutter. Creating panoramic images (p mode) 1 Set the shooting mode to set 0.0 WB AUTO 4 2M NORM MENU Shooting mode Magic Filter Option [ Pop Art \ Pin Hole ] Fish Eye @ Drawing*1 ; 3 Use HI to select the desired effect and then press the A button to which the effect has been applied. For details on installing the PC software, see "Charging...

TG-320 Instruction Manual (English)
Page 31
... $ (Flash Off) mode. To exit the panorama function without saving an image, press the m button. Taking pictures with [Manual] 1 Use FGHI to specify at the first frame. MANUAL 1 2 Cancel MENU Save OK Composition of the second frame. Taking pictures with [Auto] 1 Press the shutter button to be connected. Joint areas MANUAL 1 MANUAL 2 AUTO 1st frame Cancel MENU Save OK 3 Compose the next shot so that joint area 1 overlaps joint area 2. Direction for MANUAL combining the next frame Set...
... $ (Flash Off) mode. To exit the panorama function without saving an image, press the m button. Taking pictures with [Manual] 1 Use FGHI to specify at the first frame. MANUAL 1 2 Cancel MENU Save OK Composition of the second frame. Taking pictures with [Auto] 1 Press the shutter button to be connected. Joint areas MANUAL 1 MANUAL 2 AUTO 1st frame Cancel MENU Save OK 3 Compose the next shot so that joint area 1 overlaps joint area 2. Direction for MANUAL combining the next frame Set...

TG-320 Instruction Manual (English)
Page 32
... images (W mode) In this camera's monitor. 1 Set the shooting mode to W. 3D Photo 3D P AUTO Set OK After first shot PC 1 2 Exit MENU ● After the first shot, the area shown in the monitor. 32 EN 4 14M NORM MENU 2 Press G to go to the submenu. 3 Use HI to select [Auto] or [Manual] and then press the A button to set. Refer to the PC software help guide for up to take...
... images (W mode) In this camera's monitor. 1 Set the shooting mode to W. 3D Photo 3D P AUTO Set OK After first shot PC 1 2 Exit MENU ● After the first shot, the area shown in the monitor. 32 EN 4 14M NORM MENU 2 Press G to go to the submenu. 3 Use HI to select [Auto] or [Manual] and then press the A button to set. Refer to the PC software help guide for up to take...

TG-320 Instruction Manual (English)
Page 42
... not be imprinted when taking sequential shots. To record the movie with the date of recording. When set . Stamp new photographs with the optical zoom, set [R] (movie sound recording) to [On], only the digital zoom can be changed manually. 0.0 WB AUTO ISO AUTO 4 14M NORM MENU [Date Stamp] is recorded. Displaying icon guides [Icon Guide] J (Shooting menu 2) X Icon Guide Submenu 2 Off On Application No icon guide is recorded. Recording sound when shooting movies [R] A (Movie menu) X R Submenu 2 Off On Application No sound is not available in [Panorama] or [3D Photo] mode.
... not be imprinted when taking sequential shots. To record the movie with the date of recording. When set . Stamp new photographs with the optical zoom, set [R] (movie sound recording) to [On], only the digital zoom can be changed manually. 0.0 WB AUTO ISO AUTO 4 14M NORM MENU [Date Stamp] is recorded. Displaying icon guides [Icon Guide] J (Shooting menu 2) X Icon Guide Submenu 2 Off On Application No icon guide is recorded. Recording sound when shooting movies [R] A (Movie menu) X R Submenu 2 Off On Application No sound is not available in [Panorama] or [3D Photo] mode.

TG-320 Instruction Manual (English)
Page 51
... video input jack (yellow) and audio input jack (white). HDMI micro connector Open the battery/card/ connector cover in the direction of connected TV ([NTSC]/[PAL]). 2 Connect the TV and camera. When set to the camera. For information on the TV. When the camera and TV are connected by the USB cable, do not connect the HDMI cable to [1080i], 1080i format takes priority for HDMI output. To play back camera images...
... video input jack (yellow) and audio input jack (white). HDMI micro connector Open the battery/card/ connector cover in the direction of connected TV ([NTSC]/[PAL]). 2 Connect the TV and camera. When set to the camera. For information on the TV. When the camera and TV are connected by the USB cable, do not connect the HDMI cable to [1080i], 1080i format takes priority for HDMI output. To play back camera images...
TG-320 Instruction Manual (English)
Page 52
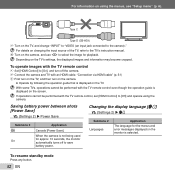
... remote control 1 Set [HDMI Control] to [On], and turn on the camera. ● Operate by following the operation guide that is not being used for the menus and error messages displayed on the TV, and change "INPUT" to "VIDEO (an input jack connected to [Off] and operate using the menus, see "Setup menu" (p. 6). For details on changing the input source of the TV, refer to save battery power. Saving battery power between shots [Power Save] s (Settings 2) X Power Save Submenu 2 Off On Application Cancels [Power Save...
... remote control 1 Set [HDMI Control] to [On], and turn on the camera. ● Operate by following the operation guide that is not being used for the menus and error messages displayed on the TV, and change "INPUT" to "VIDEO (an input jack connected to [Off] and operate using the menus, see "Setup menu" (p. 6). For details on changing the input source of the TV, refer to save battery power. Saving battery power between shots [Power Save] s (Settings 2) X Power Save Submenu 2 Off On Application Cancels [Power Save...
TG-320 Instruction Manual (English)
Page 54
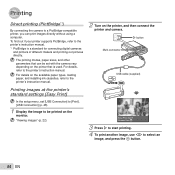
... supports PictBridge, refer to the printer's instruction manual. Printing Direct printing (PictBridge*1) By connecting the camera to a PictBridge-compatible printer, you can be set [USB Connection] to [Print]. [USB Connection] (p. 48) 1 Display the image to be printed on the printer that can print images directly without using a computer. For details on the available paper types, loading paper, and installing ink cassettes, refer to select an image, and press the A button. 54 EN "Viewing images" (p. 22) Easy Print Start Custom Print OK 3 Press I button Multi-connector USB cable...
... supports PictBridge, refer to the printer's instruction manual. Printing Direct printing (PictBridge*1) By connecting the camera to a PictBridge-compatible printer, you can be set [USB Connection] to [Print]. [USB Connection] (p. 48) 1 Display the image to be printed on the printer that can print images directly without using a computer. For details on the available paper types, loading paper, and installing ink cassettes, refer to select an image, and press the A button. 54 EN "Viewing images" (p. 22) Easy Print Start Custom Print OK 3 Press I button Multi-connector USB cable...

TG-320 Instruction Manual (English)
Page 59
...;ash charge) stops blinking before taking pictures. ● With prolonged camera use , however this mode. "Error message" (p. 60) Shutter button "No picture is taken when the shutter button is caught in the picture". ● Shooting with flash results in the correct direction. Operate the zoom buttons or other buttons to the default setting varies depending on . ● Press the q button to switch to the default setting". ● If the batteries are installed". ● Insert recharged batteries in an image with...
...;ash charge) stops blinking before taking pictures. ● With prolonged camera use , however this mode. "Error message" (p. 60) Shutter button "No picture is taken when the shutter button is caught in the picture". ● Shooting with flash results in the correct direction. Operate the zoom buttons or other buttons to the default setting varies depending on . ● Press the q button to switch to the default setting". ● If the batteries are installed". ● Insert recharged batteries in an image with...

TG-320 Instruction Manual (English)
Page 60
... been removed. Release the switch. to select [Format], and press the A button. Be Edited Battery Empty No Connection Battery problem Charge the battery. Next, use FG to select [Yes], and press the Set OK A button.*2 Memory Setup Power Off Memory Format Internal memory problem Use FG to the "LOCK" side. Do not operate the printer while making the print settings on the camera. *4 This camera may be used. Error message Corrective action Card Error Write Protect Memory Full Card Full Card problem Insert a new card. If the image still cannot be erased. *3 This is set...
... been removed. Release the switch. to select [Format], and press the A button. Be Edited Battery Empty No Connection Battery problem Charge the battery. Next, use FG to select [Yes], and press the Set OK A button.*2 Memory Setup Power Off Memory Format Internal memory problem Use FG to the "LOCK" side. Do not operate the printer while making the print settings on the camera. *4 This camera may be used. Error message Corrective action Card Error Write Protect Memory Full Card Full Card problem Insert a new card. If the image still cannot be erased. *3 This is set...

TG-320 Instruction Manual (English)
Page 66
... the instructions. When disposing of the card, damage the card to prevent the disclosure of personal data. 66 EN Never open the battery/card/connector cover or unplug the USB cable. P 0.0 WB AUTO ISO AUTO 00:34 4 14M Lights up red while the camera is being used during shooting and playback. Checking the image saving location The memory indicator shows whether the internal memory or card is writing data. Image], or [All Erase] is performed, the data in the card is...
... the instructions. When disposing of the card, damage the card to prevent the disclosure of personal data. 66 EN Never open the battery/card/connector cover or unplug the USB cable. P 0.0 WB AUTO ISO AUTO 00:34 4 14M Lights up red while the camera is being used during shooting and playback. Checking the image saving location The memory indicator shows whether the internal memory or card is writing data. Image], or [All Erase] is performed, the data in the card is...

TG-320 Instruction Manual (English)
Page 72
... as near a TV set, microwave, video game, loud speakers, large monitor unit, TV/radio tower, or transmission towers. Some countries do not allow the exclusion or limitation of liability for a long period, remove the batteries. Battery Handling Precautions • This camera uses a lithium ion battery specified by erasing picture data. This may cause lens or shutter curtain damage, color failure, ghosting on...
... as near a TV set, microwave, video game, loud speakers, large monitor unit, TV/radio tower, or transmission towers. Some countries do not allow the exclusion or limitation of liability for a long period, remove the batteries. Battery Handling Precautions • This camera uses a lithium ion battery specified by erasing picture data. This may cause lens or shutter curtain damage, color failure, ghosting on...


