Stylus Verve Advanced Manual (English)
Page 1
Advanced Manual DIGITAL CAMERA 1 Taking Pictures 2 Viewing 3 Setting Up 4 Printing Pictures 5 Connecting Computer 6 Appendix
Advanced Manual DIGITAL CAMERA 1 Taking Pictures 2 Viewing 3 Setting Up 4 Printing Pictures 5 Connecting Computer 6 Appendix
Stylus Verve Advanced Manual (English)
Page 2
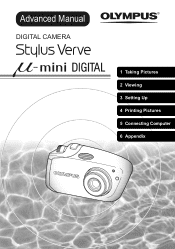
... you want to use or learn out more about . When you come across a word in the manual that you are looking for, then look under E for "ESP....35" Using the menu list gP.180 The camera's menus are listed here, grouped into chapters. For example... The chapters are composed of contents gP....5 All the titles in the manual are laid out in the form of the manual and look for the reference page number for each function. How...
... you want to use or learn out more about . When you come across a word in the manual that you are looking for, then look under E for "ESP....35" Using the menu list gP.180 The camera's menus are listed here, grouped into chapters. For example... The chapters are composed of contents gP....5 All the titles in the manual are laid out in the form of the manual and look for the reference page number for each function. How...
Stylus Verve Advanced Manual (English)
Page 3
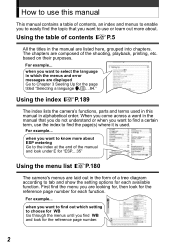
... are shown. It is shown below to explain how to a malfunction or operational problems. Also warns of the zoom button in this manual. 3 "Selecting the number of pictures " (P.51) Press the side of operations that will help you view several pictures at once ...7 8 9 This shows the buttons and button locations for the function concerned. Useful information and hints that should be absolutely avoided. zIndications used in this manual Important information on the monitor at it carefully before the top left frame) 7 8 9 : Jumps to single-frame 100-0005 HQ Procedure and the...
... are shown. It is shown below to explain how to a malfunction or operational problems. Also warns of the zoom button in this manual. 3 "Selecting the number of pictures " (P.51) Press the side of operations that will help you view several pictures at once ...7 8 9 This shows the buttons and button locations for the function concerned. Useful information and hints that should be absolutely avoided. zIndications used in this manual Important information on the monitor at it carefully before the top left frame) 7 8 9 : Jumps to single-frame 100-0005 HQ Procedure and the...
Stylus Verve Advanced Manual (English)
Page 5
... this manual 2 How to read the instructions 3 Menu operations 4 1 Taking Pictures 9 Focusing on a subject that is not in center of frame (Focus lock) .........10 Changing focus zone (AF 12 Changing shooting scene modes l 14 Shooting scene modes 15 Recording movies N 18 Using zoom systems 20 Using the optical zoom 20 Enabling digital...
... this manual 2 How to read the instructions 3 Menu operations 4 1 Taking Pictures 9 Focusing on a subject that is not in center of frame (Focus lock) .........10 Changing focus zone (AF 12 Changing shooting scene modes l 14 Shooting scene modes 15 Recording movies N 18 Using zoom systems 20 Using the optical zoom 20 Enabling digital...

Stylus Verve Advanced Manual (English)
Page 64
Plug the yellow plug and the white plug of the TV. 64 Multi-connector For information on your TV audio/video input jacks, refer to your manual of the AV cable into the Multiconnector on a TV Press or to exit the menu. Press the OK/MENU button again to select [NTSC] or [PAL] and press the OK/MENU button. Viewing Playback on the camera. SETUP CARD EDIT PLAY VOLUME 8 s X VIDEO OUT NTSC PAL Turn the camera and the TV off. 2 Plug the AV cable into the TV video (yellow) and audio (white) input jacks respectively. The video signal system is set.
Plug the yellow plug and the white plug of the TV. 64 Multi-connector For information on your TV audio/video input jacks, refer to your manual of the AV cable into the Multiconnector on a TV Press or to exit the menu. Press the OK/MENU button again to select [NTSC] or [PAL] and press the OK/MENU button. Viewing Playback on the camera. SETUP CARD EDIT PLAY VOLUME 8 s X VIDEO OUT NTSC PAL Turn the camera and the TV off. 2 Plug the AV cable into the TV video (yellow) and audio (white) input jacks respectively. The video signal system is set.

Stylus Verve Advanced Manual (English)
Page 65
Press the POWER switch to turn the camera on. 2 The picture is displayed on your manual of the TV. Viewing Playback on a TV Turn the TV on the video input mode, refer to your TV. Press the POWER switch to turn the camera off before disconnecting the AV cable. 65 When the pictures are... video input mode. For information on and switch to display pictures on the TV. 100-0020 HQ $04.12.18 15:30 20 Operate the camera in the...
Press the POWER switch to turn the camera on. 2 The picture is displayed on your manual of the TV. Viewing Playback on a TV Turn the TV on the video input mode, refer to your TV. Press the POWER switch to turn the camera off before disconnecting the AV cable. 65 When the pictures are... video input mode. For information on and switch to display pictures on the TV. 100-0020 HQ $04.12.18 15:30 20 Operate the camera in the...

Stylus Verve Advanced Manual (English)
Page 122
Printing with PictBridge-compatible printer Using the direct printing function By connecting the camera to a PictBridge-compatible printer with the USB cable, you want to print and set the number of prints on the camera's monitor. g"Making print reservations It is also possible to the printer, select the pictures you can print out recorded pictures directly. With the camera connected to print out pictures using the print reservation data.
Printing with PictBridge-compatible printer Using the direct printing function By connecting the camera to a PictBridge-compatible printer with the USB cable, you want to print and set the number of prints on the camera's monitor. g"Making print reservations It is also possible to the printer, select the pictures you can print out recorded pictures directly. With the camera connected to print out pictures using the print reservation data.

Stylus Verve Advanced Manual (English)
Page 123
gGo to print even with PictBridge-compatible printer Connecting the camera to a printer Use the USB cable provided to connect the camera to the printer's instruction manual. The camera turns on the monitor. Printing Pictures [ONE MOMENT] is displayed, then the [PRINT MODE SELECT] screen is displayed on automatically. Make the print settings using ...
gGo to print even with PictBridge-compatible printer Connecting the camera to a printer Use the USB cable provided to connect the camera to the printer's instruction manual. The camera turns on the monitor. Printing Pictures [ONE MOMENT] is displayed, then the [PRINT MODE SELECT] screen is displayed on automatically. Make the print settings using ...

Stylus Verve Advanced Manual (English)
Page 124
... the following print modes. g"PRINT mode/MULTI PRINT mode" (P.127) Prints an index of your printer's manufacture or to the printer manual. 124 g"ALL PRINT mode" (P.131) Prints the same picture in multiple layout format on the card. Please consult with PictBridge-compatible... printer Printing pictures When the camera is properly connected to a PictBridge-compatible printer, the [PRINT MODE SELECT] screen is not available. Printing with the services of all ...
... the following print modes. g"PRINT mode/MULTI PRINT mode" (P.127) Prints an index of your printer's manufacture or to the printer manual. 124 g"ALL PRINT mode" (P.131) Prints the same picture in multiple layout format on the card. Please consult with PictBridge-compatible... printer Printing pictures When the camera is properly connected to a PictBridge-compatible printer, the [PRINT MODE SELECT] screen is not available. Printing with the services of all ...

Stylus Verve Advanced Manual (English)
Page 137
For details, refer to the on the card to computer, and how to transfer pictures stored on -line "Help" and the manual of OLYMPUS Master. Connecting Computer 5 Connecting Computer This chapter describes how to use various functions of OLYMPUS Master. 5 137
For details, refer to the on the card to computer, and how to transfer pictures stored on -line "Help" and the manual of OLYMPUS Master. Connecting Computer 5 Connecting Computer This chapter describes how to use various functions of OLYMPUS Master. 5 137
Stylus Verve Advanced Manual (English)
Page 139
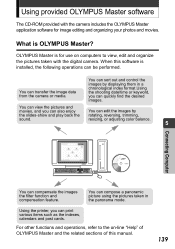
...and movies, and you can be performed. What is installed, the following operations can quickly find the desired images. When this manual. 139 You can compose a panoramic picture using the pictures taken in a chronological index format.Using the shooting date/time or ... to view, edit and organize the pictures taken with the camera includes the OLYMPUS Master application software for use on -line "Help" of OLYMPUS Master and the related sections of this software is OLYMPUS Master? Using provided OLYMPUS Master software The CD-ROM provided with the digital camera.
...and movies, and you can be performed. What is installed, the following operations can quickly find the desired images. When this manual. 139 You can compose a panoramic picture using the pictures taken in a chronological index format.Using the shooting date/time or ... to view, edit and organize the pictures taken with the camera includes the OLYMPUS Master application software for use on -line "Help" of OLYMPUS Master and the related sections of this software is OLYMPUS Master? Using provided OLYMPUS Master software The CD-ROM provided with the digital camera.

Stylus Verve Advanced Manual (English)
Page 143
... the label pasted on the CD-ROM package. When the software license agreement window is displayed, type in your resident country and click [Next]. The OLYMPUS Master installation window will be displayed. When the software license agreement window is displayed, review the agreement and click [Yes]. 5 When the user information window... Computer Adobe Reader is displayed, review the contents and click [Yes]. The Adobe Reader installation dialog window appears asking whether you wish to view the manual. When the DirectX license agreement window is required to install it or not.
... the label pasted on the CD-ROM package. When the software license agreement window is displayed, type in your resident country and click [Next]. The OLYMPUS Master installation window will be displayed. When the software license agreement window is displayed, review the agreement and click [Yes]. 5 When the user information window... Computer Adobe Reader is displayed, review the contents and click [Yes]. The Adobe Reader installation dialog window appears asking whether you wish to view the manual. When the DirectX license agreement window is required to install it or not.

Stylus Verve Advanced Manual (English)
Page 146
... For the location of the USB cable to display the Multi-connector connection selection window for the computer. Connecting the camera to computer Use the provided USB cable to connect the camera to select [PC] and press the OK/MENU button. Connect the labeled end of the USB port on to... the USB port on the camera. Press or to a computer. The camera turns on automatically and the camera monitor turns on your computer, see the manual for the USB 5 ...
... For the location of the USB cable to display the Multi-connector connection selection window for the computer. Connecting the camera to computer Use the provided USB cable to connect the camera to select [PC] and press the OK/MENU button. Connect the labeled end of the USB port on to... the USB port on the camera. Press or to a computer. The camera turns on automatically and the camera monitor turns on your computer, see the manual for the USB 5 ...

Stylus Verve Advanced Manual (English)
Page 163
... using products with the tripod head. The card is a precision electronic device. To find out whether your camera's manual. The battery may vary depending on a tripod, adjust the position of dust. When operating the camera with Olympus digital cameras. Always unload the battery from static electricity. A recommended battery may be difficult to water or leave it...
... using products with the tripod head. The card is a precision electronic device. To find out whether your camera's manual. The battery may vary depending on a tripod, adjust the position of dust. When operating the camera with Olympus digital cameras. Always unload the battery from static electricity. A recommended battery may be difficult to water or leave it...
Stylus Verve Advanced Manual (English)
Page 164
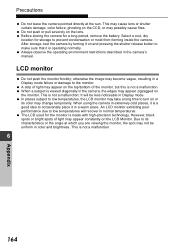
...characteristics or the angle at the sun. Precautions Do not leave the camera pointed directly at which you are viewing the monitor, the spot may not be less noticeable in the camera's manual. When using the camera in a Display mode failure or damage to prevent condensation or mold ...from forming inside the camera. Due to occasionally place it is not a malfunction. 6 164 Appendix This is ...
...characteristics or the angle at the sun. Precautions Do not leave the camera pointed directly at which you are viewing the monitor, the spot may not be less noticeable in the camera's manual. When using the camera in a Display mode failure or damage to prevent condensation or mold ...from forming inside the camera. Due to occasionally place it is not a malfunction. 6 164 Appendix This is ...

Stylus Verve Advanced Manual (English)
Page 165
...the problem persists, format the card. Insert a new card. Use the computer again to the computer and for- 6 mat the card with the camera. CARD ERROR There is a problem with a commercially available cleaning paper and insert the card again. Before erasing, transfer all important pictures to a ...computer. Record pictures before playing back. 165 WRITE-PROTECT Read-only has been set using a computer. g See the separate Basic manual provided. Appendix NO PICTURE The card contains no pictures. If the card cannot be formatted, use another card. CARD FULL Replace the card ...
...the problem persists, format the card. Insert a new card. Use the computer again to the computer and for- 6 mat the card with the camera. CARD ERROR There is a problem with a commercially available cleaning paper and insert the card again. Before erasing, transfer all important pictures to a ...computer. Record pictures before playing back. 165 WRITE-PROTECT Read-only has been set using a computer. g See the separate Basic manual provided. Appendix NO PICTURE The card contains no pictures. If the card cannot be formatted, use another card. CARD FULL Replace the card ...

Stylus Verve Advanced Manual (English)
Page 166
If that cannot be done, the image file is damaged. CARD SETUP POWER OFF FORMAT SELECT GO Format the card. g(P.86) Appendix BATTERY EMPTY Charge the battery. 166 g(P.107) Close the card cover. Error messages Monitor indication Corrective action PICTURE ERROR Use image editing software such as the OLYMPUS Master provided to view the pictures on a computer. g See the separate Basic manual provided. 6 CARD-COVER OPEN Y/M/D Set the date/time.
If that cannot be done, the image file is damaged. CARD SETUP POWER OFF FORMAT SELECT GO Format the card. g(P.86) Appendix BATTERY EMPTY Charge the battery. 166 g(P.107) Close the card cover. Error messages Monitor indication Corrective action PICTURE ERROR Use image editing software such as the OLYMPUS Master provided to view the pictures on a computer. g See the separate Basic manual provided. 6 CARD-COVER OPEN Y/M/D Set the date/time.

Stylus Verve Advanced Manual (English)
Page 169
...pocket for a while. Press any button such as the zoom button. s The camera turned off auto- s To save battery power, the cam- *1 matically in the 173 P.173 *1 memory gauge. *1 See the separate Basic manual provided. 169 Appendix era on n The power is room in the shooting mode.... computer. The camera does not work properly 6 n You used a card that had been n This may also make the ...
...pocket for a while. Press any button such as the zoom button. s The camera turned off auto- s To save battery power, the cam- *1 matically in the 173 P.173 *1 memory gauge. *1 See the separate Basic manual provided. 169 Appendix era on n The power is room in the shooting mode.... computer. The camera does not work properly 6 n You used a card that had been n This may also make the ...

Stylus Verve Advanced Manual (English)
Page 170
...The camera was excessively o If you want the flash to fire on the card with your - press the QUICK VIEW button. The date P.86 and time are reset to [OFF]. P.88 without saving the settings. The monitor is hard to [$]. hand. *1 See the separate Basic manual provided...Ref. The picture cannot be reset. the battery/AC adapter during opera- When normal operation is set at the time of purchase. 6 o The camera has been left with static date and time again. P.109 properly. brightly illuminated subject, set - on a P.23 illuminated. P.86 electricity was...
...The camera was excessively o If you want the flash to fire on the card with your - press the QUICK VIEW button. The date P.86 and time are reset to [OFF]. P.88 without saving the settings. The monitor is hard to [$]. hand. *1 See the separate Basic manual provided...Ref. The picture cannot be reset. the battery/AC adapter during opera- When normal operation is set at the time of purchase. 6 o The camera has been left with static date and time again. P.109 properly. brightly illuminated subject, set - on a P.23 illuminated. P.86 electricity was...
Stylus Verve Advanced Manual (English)
Page 171
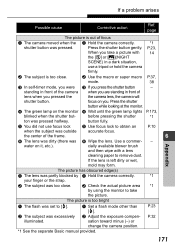
...Press the shutter button while looking at the monitor. r You did not use a tripod or hold the camera firmly. o Check the actual picture area *1 by n Hold the camera correctly. *1 your finger or the strap. o The subject was outside accurate focus. P.32 illuminated. ...173, blinked when the shutter but- sation toward minus (-) or change the camera position. *1 See the separate Basic manual provided. 171 Appendix q The green lamp on you pressed the the camera lens, the camera will shutter button. water on it, etc.). The picture has obscured edge...
...Press the shutter button while looking at the monitor. r You did not use a tripod or hold the camera firmly. o Check the actual picture area *1 by n Hold the camera correctly. *1 your finger or the strap. o The subject was outside accurate focus. P.32 illuminated. ...173, blinked when the shutter but- sation toward minus (-) or change the camera position. *1 See the separate Basic manual provided. 171 Appendix q The green lamp on you pressed the the camera lens, the camera will shutter button. water on it, etc.). The picture has obscured edge...


