Stylus Verve Advanced Manual (English)
Page 1
Advanced Manual DIGITAL CAMERA 1 Taking Pictures 2 Viewing 3 Setting Up 4 Printing Pictures 5 Connecting Computer 6 Appendix
Advanced Manual DIGITAL CAMERA 1 Taking Pictures 2 Viewing 3 Setting Up 4 Printing Pictures 5 Connecting Computer 6 Appendix
Stylus Verve Advanced Manual (English)
Page 2
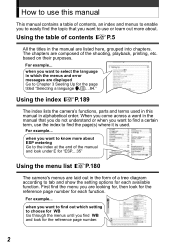
... do not understand or when you are listed here, grouped into chapters. Using the index gP.189 The index lists the camera's functions, parts and terms used in this manual This manual contains a table of contents, an index and menus to enable you to easily find the page(s) where it is used. ... and show the setting options for each available function. When you come across a word in the manual that you want to find 0 and look under E for "ESP....35" Using the menu list gP.180 The camera's menus are displayed Go to Chapter 3 Seeting Up for the reference page number. 2 How to ...
... do not understand or when you are listed here, grouped into chapters. Using the index gP.189 The index lists the camera's functions, parts and terms used in this manual This manual contains a table of contents, an index and menus to enable you to easily find the page(s) where it is used. ... and show the setting options for each available function. When you come across a word in the manual that you want to find 0 and look under E for "ESP....35" Using the menu list gP.180 The camera's menus are displayed Go to Chapter 3 Seeting Up for the reference page number. 2 How to ...
Stylus Verve Advanced Manual (English)
Page 3
... used in the playback mode. 2 1 2 3 The index display appears. 4 5 6 7 8 9 This shows the buttons and button locations for your camera. It may differ from the actual page in this manual Important information on factors which may lead to a malfunction or operational problems. Also warns of your reference. Displaying several pictures at once This... bottom right frame) Press the side of pictures displayed. You can change the number of the zoom button. How to read the instructions in this manual. 3
... used in the playback mode. 2 1 2 3 The index display appears. 4 5 6 7 8 9 This shows the buttons and button locations for your camera. It may differ from the actual page in this manual Important information on factors which may lead to a malfunction or operational problems. Also warns of your reference. Displaying several pictures at once This... bottom right frame) Press the side of pictures displayed. You can change the number of the zoom button. How to read the instructions in this manual. 3
Stylus Verve Advanced Manual (English)
Page 5
... this manual 2 How to read the instructions 3 Menu operations 4 1 Taking Pictures 9 Focusing on a subject that is not in center of frame (Focus lock) .........10 Changing focus zone (AF 12 Changing shooting scene modes l 14 Shooting scene modes 15 Recording movies N 18 Using zoom systems 20 Using the optical zoom 20 Enabling digital...
... this manual 2 How to read the instructions 3 Menu operations 4 1 Taking Pictures 9 Focusing on a subject that is not in center of frame (Focus lock) .........10 Changing focus zone (AF 12 Changing shooting scene modes l 14 Shooting scene modes 15 Recording movies N 18 Using zoom systems 20 Using the optical zoom 20 Enabling digital...

Stylus Verve Advanced Manual (English)
Page 64
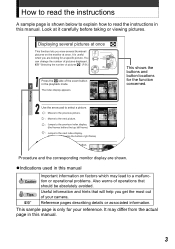
Viewing Playback on the camera. Plug the yellow plug and the white plug of the TV. 64 Press the OK/MENU button again to select [NTSC] or [PAL] and press the OK/MENU button. Multi-connector For information on your TV audio/video input jacks, refer to your manual of the AV cable into the Multiconnector on a TV Press or to exit the menu. The video signal system is set. SETUP CARD EDIT PLAY VOLUME 8 s X VIDEO OUT NTSC PAL Turn the camera and the TV off. 2 Plug the AV cable into the TV video (yellow) and audio (white) input jacks respectively.
Viewing Playback on the camera. Plug the yellow plug and the white plug of the TV. 64 Press the OK/MENU button again to select [NTSC] or [PAL] and press the OK/MENU button. Multi-connector For information on your TV audio/video input jacks, refer to your manual of the AV cable into the Multiconnector on a TV Press or to exit the menu. The video signal system is set. SETUP CARD EDIT PLAY VOLUME 8 s X VIDEO OUT NTSC PAL Turn the camera and the TV off. 2 Plug the AV cable into the TV video (yellow) and audio (white) input jacks respectively.

Stylus Verve Advanced Manual (English)
Page 65
... on and switch to the video input mode. Press the POWER switch to turn the camera off before disconnecting the AV cable. 65 Press the POWER switch to turn the camera on. 2 The picture is displayed on your manual of the TV. Viewing Playback on a TV Turn the TV on the video input... power in the same way as normal playback to display pictures on the TV. 100-0020 HQ $04.12.18 15:30 20 Operate the camera in the...
... on and switch to the video input mode. Press the POWER switch to turn the camera off before disconnecting the AV cable. 65 Press the POWER switch to turn the camera on. 2 The picture is displayed on your manual of the TV. Viewing Playback on a TV Turn the TV on the video input... power in the same way as normal playback to display pictures on the TV. 100-0020 HQ $04.12.18 15:30 20 Operate the camera in the...

Stylus Verve Advanced Manual (English)
Page 122
g"Making print reservations Printing with the USB cable, you want to a PictBridge-compatible printer with PictBridge-compatible printer Using the direct printing function By connecting the camera to print and set the number of prints on the camera's monitor. With the camera connected to the printer, select the pictures you can print out recorded pictures directly. It is also possible to print out pictures using the print reservation data.
g"Making print reservations Printing with the USB cable, you want to a PictBridge-compatible printer with PictBridge-compatible printer Using the direct printing function By connecting the camera to print and set the number of prints on the camera's monitor. With the camera connected to the printer, select the pictures you can print out recorded pictures directly. It is also possible to print out pictures using the print reservation data.

Stylus Verve Advanced Manual (English)
Page 123
..."Printing pictures" (P.124) SELECT USB P C PRINT EXIT GO If [PC] is displayed. 4 Multi-connector Press or to the printer's instruction manual. The camera's monitor turns on automatically. Printing Pictures [ONE MOMENT] is displayed, then the [PRINT MODE SELECT] screen is displayed on and locate the USB port..., refer to select [PRINT] and press the OK/MENU button. The camera turns on and the screen for details. 123 You may be able to a PictBridgecompatible printer. Contact the printer's manufacturer for selecting the...
..."Printing pictures" (P.124) SELECT USB P C PRINT EXIT GO If [PC] is displayed. 4 Multi-connector Press or to the printer's instruction manual. The camera's monitor turns on automatically. Printing Pictures [ONE MOMENT] is displayed, then the [PRINT MODE SELECT] screen is displayed on and locate the USB port..., refer to select [PRINT] and press the OK/MENU button. The camera turns on and the screen for details. 123 You may be able to a PictBridgecompatible printer. Contact the printer's manufacturer for selecting the...

Stylus Verve Advanced Manual (English)
Page 124
... mode/MULTI PRINT mode" (P.127) Prints all the pictures stored on the card. Please consult with PictBridge-compatible printer Printing pictures When the camera is not available. g"PRINT mode/MULTI PRINT mode" (P.127) Prints an index of your printer's manufacture or to the print reservation (DPOF... properly connected to select the print mode. g"ALL INDEX mode/PRINT ORDER mode" (P.134) Prints the pictures according to the printer manual. 124 PRINT MODE SELECT PRINT ALL PRINT MULTI PRINT ALL INDEX EXIT SELECT GO PRINT MODE SELECT PRINT ORDER Printing Pictures 4 EXIT SELECT...
... mode/MULTI PRINT mode" (P.127) Prints all the pictures stored on the card. Please consult with PictBridge-compatible printer Printing pictures When the camera is not available. g"PRINT mode/MULTI PRINT mode" (P.127) Prints an index of your printer's manufacture or to the print reservation (DPOF... properly connected to select the print mode. g"ALL INDEX mode/PRINT ORDER mode" (P.134) Prints the pictures according to the printer manual. 124 PRINT MODE SELECT PRINT ALL PRINT MULTI PRINT ALL INDEX EXIT SELECT GO PRINT MODE SELECT PRINT ORDER Printing Pictures 4 EXIT SELECT...

Stylus Verve Advanced Manual (English)
Page 137
For details, refer to the on the card to computer, and how to transfer pictures stored on -line "Help" and the manual of OLYMPUS Master. Connecting Computer 5 Connecting Computer This chapter describes how to use various functions of OLYMPUS Master. 5 137
For details, refer to the on the card to computer, and how to transfer pictures stored on -line "Help" and the manual of OLYMPUS Master. Connecting Computer 5 Connecting Computer This chapter describes how to use various functions of OLYMPUS Master. 5 137
Stylus Verve Advanced Manual (English)
Page 139
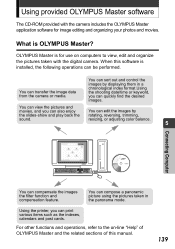
When this manual. 139 You can compensate the images the filter function and compensation feature. resizing, or adjusting color balance. 5 Connecting Computer You can transfer the image data from the camera or media. You can quickly find the desired images. For other functions and...to view, edit and organize the pictures taken with the digital camera. Using provided OLYMPUS Master software The CD-ROM provided with the camera includes the OLYMPUS Master application software for use on -line "Help" of OLYMPUS Master and the related sections of this software is installed...
When this manual. 139 You can compensate the images the filter function and compensation feature. resizing, or adjusting color balance. 5 Connecting Computer You can transfer the image data from the camera or media. You can quickly find the desired images. For other functions and...to view, edit and organize the pictures taken with the digital camera. Using provided OLYMPUS Master software The CD-ROM provided with the camera includes the OLYMPUS Master application software for use on -line "Help" of OLYMPUS Master and the related sections of this software is installed...

Stylus Verve Advanced Manual (English)
Page 143
... Reader is required to install it or not. Operate according to the window messages. The OLYMPUS Master installation window will be displayed. Adobe Reader is already installed in [Name] and the [OLYMPUS Master Serial Number]. Then, select your computer, the installation dialog window does not appear. ...label pasted on the CD-ROM package. The serial number is displayed, review the contents and click [Yes]. Using provided OLYMPUS Master software Click [Next], the operation message window appears. The Adobe Reader installation dialog window appears asking whether you wish to view ...
... Reader is required to install it or not. Operate according to the window messages. The OLYMPUS Master installation window will be displayed. Adobe Reader is already installed in [Name] and the [OLYMPUS Master Serial Number]. Then, select your computer, the installation dialog window does not appear. ...label pasted on the CD-ROM package. The serial number is displayed, review the contents and click [Yes]. Using provided OLYMPUS Master software Click [Next], the operation message window appears. The Adobe Reader installation dialog window appears asking whether you wish to view ...

Stylus Verve Advanced Manual (English)
Page 146
... on automatically and the camera monitor turns on to the USB port on the computer. Connect the labeled end of the USB cable to display the Multi-connector connection selection ... a computer. Connect the other end of the USB port on your computer, see the manual for the USB 5 cable. Connecting the camera to computer Use the provided USB cable to connect the camera to the multi-connector on the camera. SELECT USB P C PRINT EXIT GO Connecting Computer 146 Press or to select [PC] and...
... on automatically and the camera monitor turns on to the USB port on the computer. Connect the labeled end of the USB cable to display the Multi-connector connection selection ... a computer. Connect the other end of the USB port on your computer, see the manual for the USB 5 cable. Connecting the camera to computer Use the provided USB cable to connect the camera to the multi-connector on the camera. SELECT USB P C PRINT EXIT GO Connecting Computer 146 Press or to select [PC] and...

Stylus Verve Advanced Manual (English)
Page 163
... power at room temperature. The card is a precision electronic device. Do not twist the camera. To find out whether your camera's manual. The number of the camera with these batteries, read their manuals as well. • In places prone to obtain while traveling. When using or storing...it to keep it where there is saved in places of dust. When operating the camera with weatherproof designs, read your camera can take may become hot during prolonged use only with Olympus digital cameras. The data stored on the card contacts may be used for a long period....
... power at room temperature. The card is a precision electronic device. Do not twist the camera. To find out whether your camera's manual. The number of the camera with these batteries, read their manuals as well. • In places prone to obtain while traveling. When using or storing...it to keep it where there is saved in places of dust. When operating the camera with weatherproof designs, read your camera can take may become hot during prolonged use only with Olympus digital cameras. The data stored on the card contacts may be used for a long period....
Stylus Verve Advanced Manual (English)
Page 164
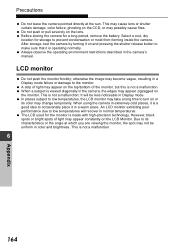
...is viewed diagonally in the camera, the edges may appear zigzagged on the monitor. Before storing the camera for storage to the monitor...or damage to prevent condensation or mold from forming inside the camera. The LCD used for the monitor is not a malfunction; ...the top/bottom of light may possibly cause fires. When using the camera in extremely cold places, it is not a malfunction. 6 164 ... angle at the sun. Precautions Do not leave the camera pointed directly at which you are viewing the monitor, ... After storage, test the camera by turning it on and pressing the shutter release button to turn ...
...is viewed diagonally in the camera, the edges may appear zigzagged on the monitor. Before storing the camera for storage to the monitor...or damage to prevent condensation or mold from forming inside the camera. The LCD used for the monitor is not a malfunction; ...the top/bottom of light may possibly cause fires. When using the camera in extremely cold places, it is not a malfunction. 6 164 ... angle at the sun. Precautions Do not leave the camera pointed directly at which you are viewing the monitor, ... After storage, test the camera by turning it on and pressing the shutter release button to turn ...

Stylus Verve Advanced Manual (English)
Page 165
Use the computer again to a computer. Appendix NO PICTURE The card contains no pictures. g See the separate Basic manual provided. If the card cannot be formatted, use another card. Before erasing, transfer all important pictures to cancel the readonly setting. WRITE-PROTECT Read-...FULL Replace the card or erase unwanted pictures. If the problem persists, format the card. Insert a new card. CARD ERROR There is a problem with the camera. If this indication does not disappear, save the pictures on the card to the computer and for- 6 mat the card with the card and it...
Use the computer again to a computer. Appendix NO PICTURE The card contains no pictures. g See the separate Basic manual provided. If the card cannot be formatted, use another card. Before erasing, transfer all important pictures to cancel the readonly setting. WRITE-PROTECT Read-...FULL Replace the card or erase unwanted pictures. If the problem persists, format the card. Insert a new card. CARD ERROR There is a problem with the camera. If this indication does not disappear, save the pictures on the card to the computer and for- 6 mat the card with the card and it...

Stylus Verve Advanced Manual (English)
Page 166
If that cannot be done, the image file is damaged. g(P.107) Close the card cover. CARD SETUP POWER OFF FORMAT SELECT GO Format the card. g(P.86) Appendix BATTERY EMPTY Charge the battery. 166 g See the separate Basic manual provided. 6 CARD-COVER OPEN Y/M/D Set the date/time. Error messages Monitor indication Corrective action PICTURE ERROR Use image editing software such as the OLYMPUS Master provided to view the pictures on a computer.
If that cannot be done, the image file is damaged. g(P.107) Close the card cover. CARD SETUP POWER OFF FORMAT SELECT GO Format the card. g(P.86) Appendix BATTERY EMPTY Charge the battery. 166 g See the separate Basic manual provided. 6 CARD-COVER OPEN Y/M/D Set the date/time. Error messages Monitor indication Corrective action PICTURE ERROR Use image editing software such as the OLYMPUS Master provided to view the pictures on a computer.

Stylus Verve Advanced Manual (English)
Page 169
s To save battery power, the cam- *1 matically in the 173 P.173 *1 memory gauge. *1 See the separate Basic manual provided. 169 Appendix It may damage the card or P.107 formatted on a computer. vent playback. n Erase unwanted pictures or insert a new card. ...to function because of no activity. r To save battery power, the *1 matically in your pocket for a while. era on the card. t The camera is charging. No picture is taken when the shutter button is pressed n The card is connected to a computer. lamp stops blinking. era automatically enters the...
s To save battery power, the cam- *1 matically in the 173 P.173 *1 memory gauge. *1 See the separate Basic manual provided. 169 Appendix It may damage the card or P.107 formatted on a computer. vent playback. n Erase unwanted pictures or insert a new card. ...to function because of no activity. r To save battery power, the *1 matically in your pocket for a while. era on the card. t The camera is charging. No picture is taken when the shutter button is pressed n The card is connected to a computer. lamp stops blinking. era automatically enters the...

Stylus Verve Advanced Manual (English)
Page 170
...The date/time is operation. p The camera may be played back n The power is exposed to [OFF]. When normal operation is not set at q or *1 mode. P.88 without saving the settings. hand. *1 See the separate Basic manual provided. 170 Appendix page The flash ...does not fire n The flash is not adjusted n Adjust the monitor brightness. q The picture information (file q To avoid camera malfunction, - restored, all the camera set the flash to fire on a P.23 illuminated...
...The date/time is operation. p The camera may be played back n The power is exposed to [OFF]. When normal operation is not set at q or *1 mode. P.88 without saving the settings. hand. *1 See the separate Basic manual provided. 170 Appendix page The flash ...does not fire n The flash is not adjusted n Adjust the monitor brightness. q The picture information (file q To avoid camera malfunction, - restored, all the camera set the flash to fire on a P.23 illuminated...
Stylus Verve Advanced Manual (English)
Page 171
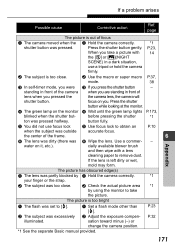
...to take the picture. P.32 illuminated. o The subject is left dirty or wet, mold may form. o Check the actual picture area *1 by n Hold the camera correctly. *1 your finger or the strap. o Use the macro or super macro P.37, mode. 38 p In self-timer mode, you were p If you ...subject was set to [#]. page The picture is too bright n The flash was outside accurate focus. P.23, When you pressed the the camera lens, the camera will shutter button. sation toward minus (-) or change the camera position. *1 See the separate Basic manual provided. 171 Appendix
...to take the picture. P.32 illuminated. o The subject is left dirty or wet, mold may form. o Check the actual picture area *1 by n Hold the camera correctly. *1 your finger or the strap. o Use the macro or super macro P.37, mode. 38 p In self-timer mode, you were p If you ...subject was set to [#]. page The picture is too bright n The flash was outside accurate focus. P.23, When you pressed the the camera lens, the camera will shutter button. sation toward minus (-) or change the camera position. *1 See the separate Basic manual provided. 171 Appendix


