E-420 Instruction Manual (English)
Page 10
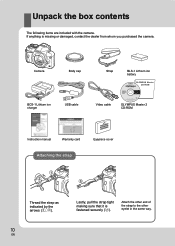
Unpack the box contents The following items are included with the camera. Attach the other end of the strap to the other eyelet in the same way. If anything is fastened securely (3). Camera Body cap Strap BLS-1 Lithium ion battery BCS-1 Lithium ion charger USB cable Video cable OLYMPUS Master 2 CD-ROM Instruction manual Warranty card Eyepiece cover Attaching the strap 1 2 3 Thread the strap as indicated by the arrows (1, 2). 10 EN Lastly, pull the strap tight making sure that it is missing or damaged, contact the dealer from whom you purchased the camera.
Unpack the box contents The following items are included with the camera. Attach the other end of the strap to the other eyelet in the same way. If anything is fastened securely (3). Camera Body cap Strap BLS-1 Lithium ion battery BCS-1 Lithium ion charger USB cable Video cable OLYMPUS Master 2 CD-ROM Instruction manual Warranty card Eyepiece cover Attaching the strap 1 2 3 Thread the strap as indicated by the arrows (1, 2). 10 EN Lastly, pull the strap tight making sure that it is missing or damaged, contact the dealer from whom you purchased the camera.
E-420 Instruction Manual (English)
Page 86
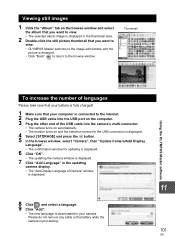
For details on how to connect the camera to either device, refer to "Connecting the camera to a printer" (gP. 94) and "Connecting the camera to a computer" (gP. 98). [AUTO] The selection screen for a specified period of time elapses with the provided USB cable. Also, select to use the OLYMPUS 9 Master software via PC connection. [MTP] Allows you...
For details on how to connect the camera to either device, refer to "Connecting the camera to a printer" (gP. 94) and "Connecting the camera to a computer" (gP. 98). [AUTO] The selection screen for a specified period of time elapses with the provided USB cable. Also, select to use the OLYMPUS 9 Master software via PC connection. [MTP] Allows you...
E-420 Instruction Manual (English)
Page 93
Resetting the print reservation data for a selected picture 2 Select [
Resetting the print reservation data for a selected picture 2 Select [
E-420 Instruction Manual (English)
Page 94
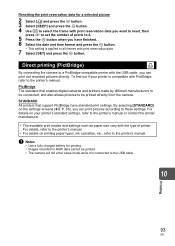
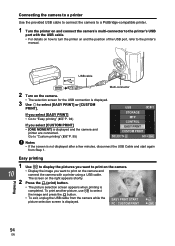
...8226; Go to select the image and press the < button. • To exit, unplug the USB cable from the camera while the picture selection screen is not displayed after a few minutes, disconnect the USB Cable and start again from Step 1. To print another picture, use bd to "Easy printing" (gP...you want to the printer's manual. Connecting the camera to a printer Use the provided USB cable to connect the camera to a PictBridge-compatible printer. 1 Turn the printer on and connect the camera's multi-connector to the printer's USB port with the USB cable. • For details on how to turn ...
...8226; Go to select the image and press the < button. • To exit, unplug the USB cable from the camera while the picture selection screen is not displayed after a few minutes, disconnect the USB Cable and start again from Step 1. To print another picture, use bd to "Easy printing" (gP...you want to the printer's manual. Connecting the camera to a printer Use the provided USB cable to connect the camera to a PictBridge-compatible printer. 1 Turn the printer on and connect the camera's multi-connector to the printer's USB port with the USB cable. • For details on how to turn ...
E-420 Instruction Manual (English)
Page 97
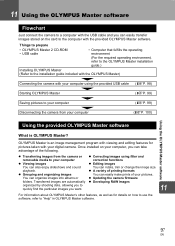
...'s other features, as well as for pictures taken with your digital camera. z Transferring images from your computer, you want. z Correcting images using the provided USB cable (gP. 98) Starting OLYMPUS Master (gP. 99) Saving pictures to your computer (gP. 99) Disconnecting the camera from the camera or removable media to your pictures. Transferred images are automatically organized...
...'s other features, as well as for pictures taken with your digital camera. z Transferring images from your computer, you want. z Correcting images using the provided USB cable (gP. 98) Starting OLYMPUS Master (gP. 99) Saving pictures to your computer (gP. 99) Disconnecting the camera from the camera or removable media to your pictures. Transferred images are automatically organized...
E-420 Instruction Manual (English)
Page 98
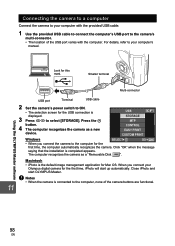
...GO • When you connect your Olympus digital camera for Mac OS. x Notes • When the camera is displayed. 3 Press ac to select [STORAGE]. Smaller terminal Multi-connector 11 Using the OLYMPUS Master software USB port Terminal USB cable 2 Set the camera's power switch to ON. •...; The selection screen for the USB connection is connected to the computer, none of the USB port varies with the computer. Click "OK...
...GO • When you connect your Olympus digital camera for Mac OS. x Notes • When the camera is displayed. 3 Press ac to select [STORAGE]. Smaller terminal Multi-connector 11 Using the OLYMPUS Master software USB port Terminal USB cable 2 Set the camera's power switch to ON. •...; The selection screen for the USB connection is connected to the computer, none of the USB port varies with the computer. Click "OK...
E-420 Instruction Manual (English)
Page 100
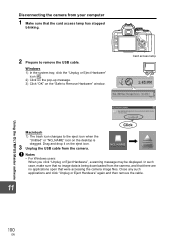
... are no applications open that the card access lamp has stopped blinking. 2 Prepare to remove the USB cable. Disconnecting the camera from your computer 1 Make sure that were accessing the camera image files. Card access lamp Using the OLYMPUS Master software Macintosh 1) The trash icon changes to Remove Hardware" window. x Notes • For Windows users... the pop-up message. 3) Click "OK" on the "Safe to the eject icon when the "Untitled" or "NO_NAME" icon on the eject icon. 3 Unplug the USB cable from the camera. In such case, make sure that no image data is dragged.
... are no applications open that the card access lamp has stopped blinking. 2 Prepare to remove the USB cable. Disconnecting the camera from your computer 1 Make sure that were accessing the camera image files. Card access lamp Using the OLYMPUS Master software Macintosh 1) The trash icon changes to Remove Hardware" window. x Notes • For Windows users... the pop-up message. 3) Click "OK" on the "Safe to the eject icon when the "Untitled" or "NO_NAME" icon on the eject icon. 3 Unplug the USB cable from the camera. In such case, make sure that no image data is dragged.
E-420 Instruction Manual (English)
Page 101
... • OLYMPUS Master switches to the image edit window and the picture is enlarged. • Click "Back" to return to the Internet. 2 Plug the USB cable into the USB port on the computer. 3 Plug the other end of the USB cable into the camera's multi-connector. • The camera turns on... automatically. • The monitor turns on and the selection screen for the USB connection is displayed. 4 Select [STORAGE] ...
... • OLYMPUS Master switches to the image edit window and the picture is enlarged. • Click "Back" to return to the Internet. 2 Plug the USB cable into the USB port on the computer. 3 Plug the other end of the USB cable into the camera's multi-connector. • The camera turns on... automatically. • The monitor turns on and the selection screen for the USB connection is displayed. 4 Select [STORAGE] ...
E-420 Instruction Manual (English)
Page 102
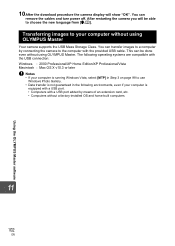
... transfer is equipped with a USB port. • Computers with the provided USB cable. After restarting the camera you will show "OK". You can transfer images to a computer by connecting the camera to the computer with a USB port added by means of an extension card, etc. • Computers without using OLYMPUS Master. Using the OLYMPUS Master software 10 After...
... transfer is equipped with a USB port. • Computers with the provided USB cable. After restarting the camera you will show "OK". You can transfer images to a computer by connecting the camera to the computer with a USB port added by means of an extension card, etc. • Computers without using OLYMPUS Master. Using the OLYMPUS Master software 10 After...
E-420 Instruction Manual (English)
Page 134
...are designed to which are caused by using this manual. Increase the distance between the camera and receiver. - Olympus assumes no responsibility for unauthorized photographing, use within this equipment would void the user's ... this temperature range. Adjust or relocate the receiving antenna. - Only the OLYMPUS-supplied USB cable should be liable for any implied warranty of merchantability or fitness for any ... outlet on , the user is assumed with the limits for a Class B digital device, pursuant to the use of the information contained in no representations or warranties...
...are designed to which are caused by using this manual. Increase the distance between the camera and receiver. - Olympus assumes no responsibility for unauthorized photographing, use within this equipment would void the user's ... this temperature range. Adjust or relocate the receiving antenna. - Only the OLYMPUS-supplied USB cable should be liable for any implied warranty of merchantability or fitness for any ... outlet on , the user is assumed with the limits for a Class B digital device, pursuant to the use of the information contained in no representations or warranties...
E-420 System Chart (English)
Page 1
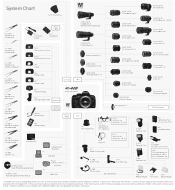
...Digital SLR Camera VA-1 Varimagni Angle Finder View nder ZUIKO DIGITAL ED 70-300mm f4.0-5.6 ZUIKO DIGITAL ED 40-150mm f4.0-5.6 ZUIKO DIGITAL ED 18-180m f3.5-6.3 ZUIKO DIGITAL ED 14-42mm f3.5-5.6 ZUIKO DIGITAL ED 12-60mm f2.8-4.0 SWD ZUIKO DIGITAL ED 7-14mm f4.0*2 ZUIKO DIGITAL ED 8mm f3.5 Fisheye*2 ZUIKO DIGITAL...OLYMPUS Master Digital Photo Managing Software OLYMPUS Studio Advanced Digital Work Flow Software CompactFlash/ Microdrive PC USB Cable Printer (PictBridge compatible) USB Cable TV Video Cable... function when attached to the E-420. Use the camera's shutter button instead. *5 Wireless...
...Digital SLR Camera VA-1 Varimagni Angle Finder View nder ZUIKO DIGITAL ED 70-300mm f4.0-5.6 ZUIKO DIGITAL ED 40-150mm f4.0-5.6 ZUIKO DIGITAL ED 18-180m f3.5-6.3 ZUIKO DIGITAL ED 14-42mm f3.5-5.6 ZUIKO DIGITAL ED 12-60mm f2.8-4.0 SWD ZUIKO DIGITAL ED 7-14mm f4.0*2 ZUIKO DIGITAL ED 8mm f3.5 Fisheye*2 ZUIKO DIGITAL...OLYMPUS Master Digital Photo Managing Software OLYMPUS Studio Advanced Digital Work Flow Software CompactFlash/ Microdrive PC USB Cable Printer (PictBridge compatible) USB Cable TV Video Cable... function when attached to the E-420. Use the camera's shutter button instead. *5 Wireless...


