
E-1 Reference Manual (English)
Page 1
Before you start to use your camera before taking important photographs. ● In the interest of continually improving products, Olympus reserves the right to enjoy optimum performance and a longer service life. DIGITAL CAMERA REFERENCE MANUAL ● Thank you take test shots to get accustomed to your new camera, please read these instructions carefully to update or modify information contained in this manual in a safe place for future reference. ● We recommend that you for purchasing an Olympus digital camera. Keep this manual.
Before you start to use your camera before taking important photographs. ● In the interest of continually improving products, Olympus reserves the right to enjoy optimum performance and a longer service life. DIGITAL CAMERA REFERENCE MANUAL ● Thank you take test shots to get accustomed to your new camera, please read these instructions carefully to update or modify information contained in this manual in a safe place for future reference. ● We recommend that you for purchasing an Olympus digital camera. Keep this manual.

E-1 Reference Manual (English)
Page 2
... other company and product names are registered trademarks and/or trademarks of their respective owners. • The standards for Camera File System/DCF" standards stipulated by the Japan Electronics and Information Technology Industries Association (JEITA). 2 For customers in USA... Declaration of Conformity Model Number : E-1 Trade Name : OLYMPUS Responsible Party : Olympus America Inc. For customers in North and South America For customers in Canada This Class B digital apparatus meets all requirements of the Canadian InterferenceCausing Equipment Regulations.
... other company and product names are registered trademarks and/or trademarks of their respective owners. • The standards for Camera File System/DCF" standards stipulated by the Japan Electronics and Information Technology Industries Association (JEITA). 2 For customers in USA... Declaration of Conformity Model Number : E-1 Trade Name : OLYMPUS Responsible Party : Olympus America Inc. For customers in North and South America For customers in Canada This Class B digital apparatus meets all requirements of the Canadian InterferenceCausing Equipment Regulations.

E-1 Reference Manual (English)
Page 3
Contents Names of parts Introduction to the camera's functions 1 Getting started 2 Shooting and playback basics 3 Buttons and menus Find out how to adjust settings manually for more creative control when conditions are unsuitable ...for auto shooting 4 Focus 5 Exposure 6 Image, image quality and color How to use optional flashes View images on your camera and adjust them with built-in image processing Personalize your camera for easier operation 7 Flash 8 Playback 9 Function/setting customizing How to prepare pictures for printing How to download images to your...
Contents Names of parts Introduction to the camera's functions 1 Getting started 2 Shooting and playback basics 3 Buttons and menus Find out how to adjust settings manually for more creative control when conditions are unsuitable ...for auto shooting 4 Focus 5 Exposure 6 Image, image quality and color How to use optional flashes View images on your camera and adjust them with built-in image processing Personalize your camera for easier operation 7 Flash 8 Playback 9 Function/setting customizing How to prepare pictures for printing How to download images to your...

E-1 Reference Manual (English)
Page 4
Contents Names of parts 9 Camera 9 Control panel indications 11 Viewfinder indications 12 Monitor indications (only for playback 13 Battery check ...17 Loading the battery 18 Unloading the battery 19 Other power sources 21 Attaching a lens to the camera 21 Inserting a card 23 How to insert/remove the card 24 Power ON/OFF 26 Adjusting the viewfinder's diopter 27... Holding the camera 28 2 Shooting and playback basics 29 3 Buttons and menus 32 Functions available using the buttons and menus 32...
Contents Names of parts 9 Camera 9 Control panel indications 11 Viewfinder indications 12 Monitor indications (only for playback 13 Battery check ...17 Loading the battery 18 Unloading the battery 19 Other power sources 21 Attaching a lens to the camera 21 Inserting a card 23 How to insert/remove the card 24 Power ON/OFF 26 Adjusting the viewfinder's diopter 27... Holding the camera 28 2 Shooting and playback basics 29 3 Buttons and menus 32 Functions available using the buttons and menus 32...

E-1 Reference Manual (English)
Page 5
CANCEL 77 ANTI-SHOCK 78 5 Contents 4 Focus 47 Auto focus (AF 47 Subjects that are difficult to focus on 48 Focus lock 49 AF frame selection 50 Focus mode 51 S-AF (single AF) shooting 51 C-AF (continuous AF) shooting 53 RELEASE PRIORITY S & RELEASE PRIORITY C 54 Manual focus (MF 54 AF ILLUMINATOR 55 5 Exposure 56 Exposure mode 56 P : Program shooting 57 A : Aperture priority shooting 59 S : Shutter priority shooting 61 M: Manual shooting 63 Preview function 65 Exposure compensation 65 Metering mode 68 AE lock 69 Auto bracketing BKT 70 AE ...
CANCEL 77 ANTI-SHOCK 78 5 Contents 4 Focus 47 Auto focus (AF 47 Subjects that are difficult to focus on 48 Focus lock 49 AF frame selection 50 Focus mode 51 S-AF (single AF) shooting 51 C-AF (continuous AF) shooting 53 RELEASE PRIORITY S & RELEASE PRIORITY C 54 Manual focus (MF 54 AF ILLUMINATOR 55 5 Exposure 56 Exposure mode 56 P : Program shooting 57 A : Aperture priority shooting 59 S : Shutter priority shooting 61 M: Manual shooting 63 Preview function 65 Exposure compensation 65 Metering mode 68 AE lock 69 Auto bracketing BKT 70 AE ...

E-1 Reference Manual (English)
Page 6
Contents 6 Image, image quality and color 79 Record mode 79 Selecting a record mode 81 Setting the SQ mode 81 RAW record mode (RAW•JPEG 82 ISO sensitivity 83 Setting the ISO sensitivity 83 ISO BOOST 84 White balance 85 Setting the white balance WB 87 Setting the one-touch white balance 89 WB compensation 90 SHARPNESS 92 CONTRAST 93 SATURATION 94 NOISE FILTER 95 NOISE REDUCTION 95 SHADING COMP 97 COLOR SPACE 97 7 Flash 98 Optional electronic flashes 98 Using the electronic flash 99 Flash mode 100 Types of flash modes 100 Setting the ...
Contents 6 Image, image quality and color 79 Record mode 79 Selecting a record mode 81 Setting the SQ mode 81 RAW record mode (RAW•JPEG 82 ISO sensitivity 83 Setting the ISO sensitivity 83 ISO BOOST 84 White balance 85 Setting the white balance WB 87 Setting the one-touch white balance 89 WB compensation 90 SHARPNESS 92 CONTRAST 93 SATURATION 94 NOISE FILTER 95 NOISE REDUCTION 95 SHADING COMP 97 COLOR SPACE 97 7 Flash 98 Optional electronic flashes 98 Using the electronic flash 99 Flash mode 100 Types of flash modes 100 Setting the ...

E-1 Reference Manual (English)
Page 7
Contents 8 Playback 107 Single-frame playback 107 Close-up playback /Index display 108 Information display INFO 109 Slideshow 111 Picture rotation 111 Playback on a TV 112 RAW DATA EDIT 113 Protecting pictures 114 Erasing pictures 115 Single-frame erase 115 Erasing selected frames 116 All-frame erase 117 9 Function/setting customizing 118 CUSTOM RESET SETTING 118 AEL/AFL 122 EV STEP 125 DIAL 126 RESET LENS 127 FOCUS RING 127 ERASE SETTING 127 FILE NAME 128 REC VIEW 129 Beep sound 129 Monitor brightness adjustment 129 SLEEP 130 FORMAT...
Contents 8 Playback 107 Single-frame playback 107 Close-up playback /Index display 108 Information display INFO 109 Slideshow 111 Picture rotation 111 Playback on a TV 112 RAW DATA EDIT 113 Protecting pictures 114 Erasing pictures 115 Single-frame erase 115 Erasing selected frames 116 All-frame erase 117 9 Function/setting customizing 118 CUSTOM RESET SETTING 118 AEL/AFL 122 EV STEP 125 DIAL 126 RESET LENS 127 FOCUS RING 127 ERASE SETTING 127 FILE NAME 128 REC VIEW 129 Beep sound 129 Monitor brightness adjustment 129 SLEEP 130 FORMAT...

E-1 Reference Manual (English)
Page 8
...a computer 143 Flowchart 144 Identifying the OS 146 Installing the USB driver for Windows 98 (When using Windows 98/98SE 146 Connecting the camera to your computer using the cable 148 Downloading image files to your computer 150 Windows 98/98 SE/Me/2000/XP 150 Macintosh 152 ...Disconnecting the camera from your computer 156 12 Miscellaneous 158 Error codes 158 Troubleshooting 160 Menu directory 166 Maintenance 169 PIXEL MAPPING and dust reduction 170 ...
...a computer 143 Flowchart 144 Identifying the OS 146 Installing the USB driver for Windows 98 (When using Windows 98/98SE 146 Connecting the camera to your computer using the cable 148 Downloading image files to your computer 150 Windows 98/98 SE/Me/2000/XP 150 Macintosh 152 ...Disconnecting the camera from your computer 156 12 Miscellaneous 158 Error codes 158 Troubleshooting 160 Menu directory 166 Maintenance 169 PIXEL MAPPING and dust reduction 170 ...

E-1 Reference Manual (English)
Page 9
Names of parts Camera Control panel ~ P. 11 (Exposure compensation) button ~ P. 65 Mode dial ~ P. 56 Power switch ~ P. 26 Mode dial lock ~ P. 56 WB (White balance) button ~ P. 87 Sub dial ~ P. 33 ... ~ P. 81 Lens attachment mark ~ P. 22 Lens lock pin Lens release button ~ P. 22 Mirror ~ P. 171 Mount (Attach the lens after removing the body cap from the camera to prevent dust and dirt from entering the...
Names of parts Camera Control panel ~ P. 11 (Exposure compensation) button ~ P. 65 Mode dial ~ P. 56 Power switch ~ P. 26 Mode dial lock ~ P. 56 WB (White balance) button ~ P. 87 Sub dial ~ P. 33 ... ~ P. 81 Lens attachment mark ~ P. 22 Lens lock pin Lens release button ~ P. 22 Mirror ~ P. 171 Mount (Attach the lens after removing the body cap from the camera to prevent dust and dirt from entering the...

E-1 Reference Manual (English)
Page 10
Names of parts Diopter adjustment dial ~ P. 27 Eyepiece shutter lever ~ P. 75 Strap eyelet ~ P. 16 Viewfinder ~ P. 12, 27, 47 Monitor (A monitor cover is attached.) ~ P. 13, 27, 38, 107 INFO (Information display) button ~ P. 109 (Protect) button ~ P. 114 (Erase) button ~ P. 115 (Metering) button ~ P. 68 BKT (Auto bracket) button ~ P. 70 External flash connector ~ P. 105, 106 Remote cable connector ~ P. 64 DC-IN jack Main dial ~ P. 33 AEL button ~ P. 69 Card access lamp ~ P. 19, 49, 152 (AF frame selection) button ~ P. 50 Arrow pad ~ P. 38 (Playback mode) button ~ P. 107 (Menu) button ~ ...
Names of parts Diopter adjustment dial ~ P. 27 Eyepiece shutter lever ~ P. 75 Strap eyelet ~ P. 16 Viewfinder ~ P. 12, 27, 47 Monitor (A monitor cover is attached.) ~ P. 13, 27, 38, 107 INFO (Information display) button ~ P. 109 (Protect) button ~ P. 114 (Erase) button ~ P. 115 (Metering) button ~ P. 68 BKT (Auto bracket) button ~ P. 70 External flash connector ~ P. 105, 106 Remote cable connector ~ P. 64 DC-IN jack Main dial ~ P. 33 AEL button ~ P. 69 Card access lamp ~ P. 19, 49, 152 (AF frame selection) button ~ P. 50 Arrow pad ~ P. 38 (Playback mode) button ~ P. 107 (Menu) button ~ ...

E-1 Reference Manual (English)
Page 11
Names of parts Control panel indications 1 23 4 5 15 16 6 17 18 19 7 8 10 11 12 14 9 13 1 Flash mode ...P. 102 2 Metering mode P. 68 3 Focus mode ...P. 51 4 Record mode P. 80 5 Aperture value P. 57 - 64 6 Shutter speed P. 57 - 64 7 Battery check P. 14 8 Number of storable still pictures P. 57, 80 9 Image quality adjustment P. 92 - 95, 97 10 ISO ...P. 83 11 Color space...P. 97 12 White balance P. 88 13 Remote control P. 75 14 Self-timer ...P. 74 15 Exposure level indicator P. 64 Exposure compensation indicator P. 66 AF frame ...P. 50 16 Number of storable sequential ...
Names of parts Control panel indications 1 23 4 5 15 16 6 17 18 19 7 8 10 11 12 14 9 13 1 Flash mode ...P. 102 2 Metering mode P. 68 3 Focus mode ...P. 51 4 Record mode P. 80 5 Aperture value P. 57 - 64 6 Shutter speed P. 57 - 64 7 Battery check P. 14 8 Number of storable still pictures P. 57, 80 9 Image quality adjustment P. 92 - 95, 97 10 ISO ...P. 83 11 Color space...P. 97 12 White balance P. 88 13 Remote control P. 75 14 Self-timer ...P. 74 15 Exposure level indicator P. 64 Exposure compensation indicator P. 66 AF frame ...P. 50 16 Number of storable sequential ...

E-1 Reference Manual (English)
Page 12
Names of parts Viewfinder indications 1 234 5 6 7 89 10 1112 13 14 15 1 AF frame ...P. 49, 50 2 Super FP flash P. 104 3 AF lock ...P. 69 4 AE lock ...P. 69 5 Shutter speed P. 57 - 64 6 Aperture value P. 57 - 64 7 Exposure mode P. 58 8 Auto bracket ...P. 70 9 White balance P. 88 10 Flash ...P. 102 11 AF confirmation mark P. 47 12 AF frame ...P. 50 13 Metering mode P. 68 14 Exposure level indicator Exposure compensation indicator P. 64 15 Number of storable sequential pictures P. 73 Exposure compensation value indication [appears only when the (exposure compensation) button has ...
Names of parts Viewfinder indications 1 234 5 6 7 89 10 1112 13 14 15 1 AF frame ...P. 49, 50 2 Super FP flash P. 104 3 AF lock ...P. 69 4 AE lock ...P. 69 5 Shutter speed P. 57 - 64 6 Aperture value P. 57 - 64 7 Exposure mode P. 58 8 Auto bracket ...P. 70 9 White balance P. 88 10 Flash ...P. 102 11 AF confirmation mark P. 47 12 AF frame ...P. 50 13 Metering mode P. 68 14 Exposure level indicator Exposure compensation indicator P. 64 15 Number of storable sequential pictures P. 73 Exposure compensation value indication [appears only when the (exposure compensation) button has ...

E-1 Reference Manual (English)
Page 13
Names of parts Monitor indications (only for playback) You can switch the monitor display using the INFO (information display) button and dials. ~ "Information display" (P. 109) 1 2 3 x10 4 SQ [1024x768 , 1/8] 5 '03.01.01 00:00 6 FILE:123-3456 Single-frame playback information 8 7 P ESP SQ 9 ISO 100 10 sRGB / CS3 13 11 45mm 14 12 1/200 F5.6 0.0 0.0 15 16 WB: AUTO - 2STEP 17 18 CONTRAST: -2 19 SHARPNESS: -2 Shooting information 1 Battery check P. 14 2 Print reservation P. 136 Number of prints P. 136 3 Protect...P. 114 4 Record mode P. 80 5 Date and time P. 132 6 File ...
Names of parts Monitor indications (only for playback) You can switch the monitor display using the INFO (information display) button and dials. ~ "Information display" (P. 109) 1 2 3 x10 4 SQ [1024x768 , 1/8] 5 '03.01.01 00:00 6 FILE:123-3456 Single-frame playback information 8 7 P ESP SQ 9 ISO 100 10 sRGB / CS3 13 11 45mm 14 12 1/200 F5.6 0.0 0.0 15 16 WB: AUTO - 2STEP 17 18 CONTRAST: -2 19 SHARPNESS: -2 Shooting information 1 Battery check P. 14 2 Print reservation P. 136 Number of prints P. 136 3 Protect...P. 114 4 Record mode P. 80 5 Date and time P. 132 6 File ...

E-1 Reference Manual (English)
Page 14
Replace the battery with a charged battery. * The digital camera's power consumption varies greatly depending on the monitor and control panel as follows: Battery check Control panel Monitor Viewfinder indications Remaining power level* Lights Lights (... Turns off without warning that battery power is being operated, the battery check indication changes on usage and operating conditions. Under some operating conditions, the camera may turn off Low. High Blinks Lights (red) No indication Turns off Turns off Number of parts Battery check indication When the...
Replace the battery with a charged battery. * The digital camera's power consumption varies greatly depending on the monitor and control panel as follows: Battery check Control panel Monitor Viewfinder indications Remaining power level* Lights Lights (... Turns off without warning that battery power is being operated, the battery check indication changes on usage and operating conditions. Under some operating conditions, the camera may turn off Low. High Blinks Lights (red) No indication Turns off Turns off Number of parts Battery check indication When the...

E-1 Reference Manual (English)
Page 15
... RESET 3 NO DATA RESET 4 NO DATA CANCEL SELECT GO CUSTOM RESET SETTING RESET 1 SET RESET 2 CLEAR RESET 3 RESET 4 CANCEL SELECT GO The buttons for your camera. ~ Reference pages describing details or associated information. 15 indicate which may lead to a malfunction or operational problems. Also warns of your reference. Press the OK...
... RESET 3 NO DATA RESET 4 NO DATA CANCEL SELECT GO CUSTOM RESET SETTING RESET 1 SET RESET 2 CLEAR RESET 3 RESET 4 CANCEL SELECT GO The buttons for your camera. ~ Reference pages describing details or associated information. 15 indicate which may lead to a malfunction or operational problems. Also warns of your reference. Press the OK...

E-1 Reference Manual (English)
Page 16
... by the arrows. 1 Getting started 3 Thread the strap back through the other hole of the stopper. If the strap is attached incorrectly and the camera falls off, Olympus is fastened securely. 5 Repeat steps 1 - 4 to attach the other end of the strap to the other side of the strap tight, making sure... that the camera does not fall off. Note ● Be careful with the strap when you carry the camera, since it through the stopper as shown ...
... by the arrows. 1 Getting started 3 Thread the strap back through the other hole of the stopper. If the strap is attached incorrectly and the camera falls off, Olympus is fastened securely. 5 Repeat steps 1 - 4 to attach the other end of the strap to the other side of the strap tight, making sure... that the camera does not fall off. Note ● Be careful with the strap when you carry the camera, since it through the stopper as shown ...

E-1 Reference Manual (English)
Page 17
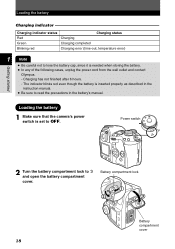
Loading the battery This camera uses an Olympus lithium ion battery (BLM-1). Charging indicator Align the battery with the guideline ( ) on the charger as shown in about 2 hours. Slide the battery into an ...
Loading the battery This camera uses an Olympus lithium ion battery (BLM-1). Charging indicator Align the battery with the guideline ( ) on the charger as shown in about 2 hours. Slide the battery into an ...
E-1 Reference Manual (English)
Page 18
... when storing the battery. ● In any of the following cases, unplug the power cord from the wall outlet and contact Olympus. - Loading the battery 1 Make sure that the camera's power switch is inserted properly as described in the battery's manual. The indicator blinks red even though the battery is set to...
... when storing the battery. ● In any of the following cases, unplug the power cord from the wall outlet and contact Olympus. - Loading the battery 1 Make sure that the camera's power switch is inserted properly as described in the battery's manual. The indicator blinks red even though the battery is set to...

E-1 Reference Manual (English)
Page 19
Loading the battery Direction indicating mark 1 Getting started Unloading the battery 1 Make sure the power switch is not blinking. Power switch Card access lamp 19 3 Load the battery as shown in the illustration. 4 Push the battery in all the way so that the battery compartment cover closes. Turn the battery compartment lock to OFF and the card access lamp is set to .
Loading the battery Direction indicating mark 1 Getting started Unloading the battery 1 Make sure the power switch is not blinking. Power switch Card access lamp 19 3 Load the battery as shown in the illustration. 4 Push the battery in all the way so that the battery compartment cover closes. Turn the battery compartment lock to OFF and the card access lamp is set to .

E-1 Reference Manual (English)
Page 20
Getting started Loading the battery 2 Turn the battery compartment lock to and open the compartment cover. 1 3 Take out the battery. ● Hold the camera sideways or upside down to keep the battery from falling out. 4 Close the battery compartment cover and turn the battery compartment lock to . Battery compartment cover When using the optional power battery holder, remove the battery compartment cover by sliding the pin in the direction of the arrow. 20 Battery compartment cover detaching pin
Getting started Loading the battery 2 Turn the battery compartment lock to and open the compartment cover. 1 3 Take out the battery. ● Hold the camera sideways or upside down to keep the battery from falling out. 4 Close the battery compartment cover and turn the battery compartment lock to . Battery compartment cover When using the optional power battery holder, remove the battery compartment cover by sliding the pin in the direction of the arrow. 20 Battery compartment cover detaching pin
