
D-590 Zoom Advanced Manual
Page 2
... 10 ALL RESET 80 All-frame reservation U ...... 106 Arrow pads 169 AUTO (white balance 28 Auto-flash 21 AV cable 60 A/V OUT jack 61 B Battery 180 Battery charger 180 Battery check indicator 165, 170 Battery compartment/card cover 169 DC-IN jack 167 DIGITAL ZOOM 19 DPOF 105 DRIVE 36 E Enlarging pictures U 49 Erasing all pictures R 73 Erasing one picture S 72 The index lists the camera's functions, parts and terms used . For example... Using the table...
... 10 ALL RESET 80 All-frame reservation U ...... 106 Arrow pads 169 AUTO (white balance 28 Auto-flash 21 AV cable 60 A/V OUT jack 61 B Battery 180 Battery charger 180 Battery check indicator 165, 170 Battery compartment/card cover 169 DC-IN jack 167 DIGITAL ZOOM 19 DPOF 105 DRIVE 36 E Enlarging pictures U 49 Erasing all pictures R 73 Erasing one picture S 72 The index lists the camera's functions, parts and terms used . For example... Using the table...

D-590 Zoom Advanced Manual
Page 4
... o DIGITAL ZOOM OFF R OFF PANORAMA Function Use the arrow pads to use the menus. To cancel the menu display, press the OK/MENU button again. The arrow mark ( or ) at the bottom or top of the menu indicates that appears on the monitor when you turn the camera on and press the OK/MENU button is called the "Top menu." F K MODE MENU WB m INFO MODE MENU ERASE MOVIE PLAYBACK INFO MODE MENU ERASE Shooting mode Playback mode (still picture) Playback mode (movie) The shooting mode screens will be used...
... o DIGITAL ZOOM OFF R OFF PANORAMA Function Use the arrow pads to use the menus. To cancel the menu display, press the OK/MENU button again. The arrow mark ( or ) at the bottom or top of the menu indicates that appears on the monitor when you turn the camera on and press the OK/MENU button is called the "Top menu." F K MODE MENU WB m INFO MODE MENU ERASE MOVIE PLAYBACK INFO MODE MENU ERASE Shooting mode Playback mode (still picture) Playback mode (movie) The shooting mode screens will be used...

D-590 Zoom Advanced Manual
Page 5
...modes 13 Recording movies N 16 Using zoom systems 18 Using the optical zoom 18 Enabling digital zoom 19 Using flash 21 Changing resolution and quality K 23 Picture quality modes for still pictures 23 Picture quality modes for movie 26 Selecting white balance according to surrounding lighting 0 ..........28 Setting Exposure Compensation F 30 When brightness of subject and background differs n 31 Taking close-up pictures 33 Setting up Super macro mode 34 Using self-timer Y 35 Taking successive pictures j 36 Panoramic shooting 38 Stitching together two pictures 41 Recording sound...
...modes 13 Recording movies N 16 Using zoom systems 18 Using the optical zoom 18 Enabling digital zoom 19 Using flash 21 Changing resolution and quality K 23 Picture quality modes for still pictures 23 Picture quality modes for movie 26 Selecting white balance according to surrounding lighting 0 ..........28 Setting Exposure Compensation F 30 When brightness of subject and background differs n 31 Taking close-up pictures 33 Setting up Super macro mode 34 Using self-timer Y 35 Taking successive pictures j 36 Panoramic shooting 38 Stitching together two pictures 41 Recording sound...

D-590 Zoom Advanced Manual
Page 6
... Editing pictures 64 Creating black and white pictures 64 Creating sepia-toned pictures 66 Changing the resolution Q 68 Protecting pictures 0 70 Erasing one picture S 72 Erasing all pictures R 73 3 Setting Up 75 Selecting a language W 76 Setting date and time X 78 Saving settings 80 Checking picture you have just taken 82 Setting beep/alert sound 8 84 Setting shutter sound 86 Setting volume 88 Setting power-on screen and sound 90 Setting screen color 92 Setting file names 94 Formatting a card 97 Adjusting brightness of monitor s 99 Adjust CCD and image processing functions...
... Editing pictures 64 Creating black and white pictures 64 Creating sepia-toned pictures 66 Changing the resolution Q 68 Protecting pictures 0 70 Erasing one picture S 72 Erasing all pictures R 73 3 Setting Up 75 Selecting a language W 76 Setting date and time X 78 Saving settings 80 Checking picture you have just taken 82 Setting beep/alert sound 8 84 Setting shutter sound 86 Setting volume 88 Setting power-on screen and sound 90 Setting screen color 92 Setting file names 94 Formatting a card 97 Adjusting brightness of monitor s 99 Adjust CCD and image processing functions...
D-590 Zoom Advanced Manual
Page 88
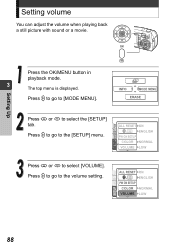
Press d to go to the volume setting. ALL RESET ON W ENGLISH PW ON SETUP COLOR NORMAL VOLUME LOW Press a or c to [MODE MENU]. Press d to go to select the [SETUP] tab. SETUP CARD EDIT PLAY ALL RESET ON W ENGLISH PW ON SETUP COLOR NORMAL VOLUME LOW 88 Press the OK/MENU button in playback mode. 3 The top menu is displayed. Press d to go to select [VOLUME]. Setting Up Setting volume You can adjust the volume when playing back a still picture with sound or a movie. m INFO MODE MENU ERASE SETUP CARD EDIT PLAY Press a or c to the [SETUP] menu.
Press d to go to the volume setting. ALL RESET ON W ENGLISH PW ON SETUP COLOR NORMAL VOLUME LOW Press a or c to [MODE MENU]. Press d to go to select the [SETUP] tab. SETUP CARD EDIT PLAY ALL RESET ON W ENGLISH PW ON SETUP COLOR NORMAL VOLUME LOW 88 Press the OK/MENU button in playback mode. 3 The top menu is displayed. Press d to go to select [VOLUME]. Setting Up Setting volume You can adjust the volume when playing back a still picture with sound or a movie. m INFO MODE MENU ERASE SETUP CARD EDIT PLAY Press a or c to the [SETUP] menu.

D-590 Zoom Advanced Manual
Page 89
H is set. 3 Press the OK/MENU button again to select [HIGH], [LOW] or [OFF]. Press a or c to exit the menu. The volume is displayed on the monitor while recorded pictures with sound are played back. Setting volume ALL RESET W PW ON SETUP COLOR VOLUME OFF LOW HIGH SETUP CARD EDIT PLAY Press the OK/MENU button. Setting Up 89 To disable the sound, select [OFF].
H is set. 3 Press the OK/MENU button again to select [HIGH], [LOW] or [OFF]. Press a or c to exit the menu. The volume is displayed on the monitor while recorded pictures with sound are played back. Setting volume ALL RESET W PW ON SETUP COLOR VOLUME OFF LOW HIGH SETUP CARD EDIT PLAY Press the OK/MENU button. Setting Up 89 To disable the sound, select [OFF].
D-590 Zoom Advanced Manual
Page 90
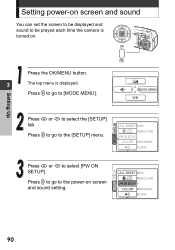
Setting Up Setting power-on screen and sound You can set the screen to be played each time the camera is displayed. SETUP CARD CAM ALL RESET ON W W ENGLISH PW ON SETUP COLOR NORMAL 8 LOW 90 F K MODE MENU WB Press a or c to be displayed and sound to select the [SETUP] tab. Press d to go to the [SETUP] menu. Press d to go to select [PW ON SETUP]. Press d to go to the power-on . SETUP CARD CAM ALL RESET ON W ENGLISH PW...
Setting Up Setting power-on screen and sound You can set the screen to be played each time the camera is displayed. SETUP CARD CAM ALL RESET ON W W ENGLISH PW ON SETUP COLOR NORMAL 8 LOW 90 F K MODE MENU WB Press a or c to be displayed and sound to select the [SETUP] tab. Press d to go to the [SETUP] menu. Press d to go to select [PW ON SETUP]. Press d to go to the power-on . SETUP CARD CAM ALL RESET ON W ENGLISH PW...
D-590 Zoom Advanced Manual
Page 101
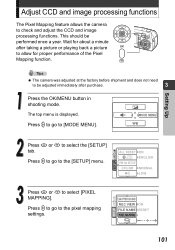
.../MENU button in shooting mode. SETUP CARD CAM SHUTTER SOUND REC VIEW ON FILE NAME RESET PIXEL MAPPING s 101 Adjust CCD and image processing functions The Pixel Mapping feature allows the camera to select the [SETUP] tab. F K MODE MENU WB Press a or c to check and adjust the CCD and image processing functions. The top menu is displayed. SETUP CARD CAM ALL RESET ON W ENGLISH PW ON SETUP COLOR NORMAL 8 LOW Press a or c to the [SETUP] menu. Setting Up The camera was adjusted at the factory...
.../MENU button in shooting mode. SETUP CARD CAM SHUTTER SOUND REC VIEW ON FILE NAME RESET PIXEL MAPPING s 101 Adjust CCD and image processing functions The Pixel Mapping feature allows the camera to select the [SETUP] tab. F K MODE MENU WB Press a or c to check and adjust the CCD and image processing functions. The top menu is displayed. SETUP CARD CAM ALL RESET ON W ENGLISH PW ON SETUP COLOR NORMAL 8 LOW Press a or c to the [SETUP] menu. Setting Up The camera was adjusted at the factory...

D-590 Zoom Advanced Manual
Page 112
It is also possible to print out pictures using the print reservation data. g"Making print reservations With the camera connected to the printer, select the pictures you can print out recorded pictures directly. Printing with PictBridge-compatible printer Using the direct printing function By connecting the camera to a PictBridge-compatible printer with the USB cable, you want to print and set the number of prints on the camera's monitor.
It is also possible to print out pictures using the print reservation data. g"Making print reservations With the camera connected to the printer, select the pictures you can print out recorded pictures directly. Printing with PictBridge-compatible printer Using the direct printing function By connecting the camera to a PictBridge-compatible printer with the USB cable, you want to print and set the number of prints on the camera's monitor.

D-590 Zoom Advanced Manual
Page 130
... battery power is exhausted, the camera 5 will continuously discharge (use the battery, make sure that the camera's battery will stop operating and the computer may malfunction and the image data (files) being transferred may cause damage to the computer with a computer. For details, see OLYMPUS homepage. If the camera is recommended when using graphic software. Installing OLYMPUS Master gP.132 Connecting the camera to computer using supplied USB cable gP.138 Activating OLYMPUS Master gP.140 Saving pictures...
... battery power is exhausted, the camera 5 will continuously discharge (use the battery, make sure that the camera's battery will stop operating and the computer may malfunction and the image data (files) being transferred may cause damage to the computer with a computer. For details, see OLYMPUS homepage. If the camera is recommended when using graphic software. Installing OLYMPUS Master gP.132 Connecting the camera to computer using supplied USB cable gP.138 Activating OLYMPUS Master gP.140 Saving pictures...

D-590 Zoom Advanced Manual
Page 131
... software is OLYMPUS Master? resizing, or adjusting color balance. 5 Connecting Computer You can be performed. For other functions and operations, refer to the on computers to view, edit and organize the pictures taken with the digital camera. You can compose a panoramic picture using the pictures taken in a chronological index format. you can edit the images by displaying them in the panorama mode. You can view the pictures and movies, and you can transfer the image data the shooting date/time...
... software is OLYMPUS Master? resizing, or adjusting color balance. 5 Connecting Computer You can be performed. For other functions and operations, refer to the on computers to view, edit and organize the pictures taken with the digital camera. You can compose a panoramic picture using the pictures taken in a chronological index format. you can edit the images by displaying them in the panorama mode. You can view the pictures and movies, and you can transfer the image data the shooting date/time...

D-590 Zoom Advanced Manual
Page 149
... versions (only for Mac OS 8.6 originally equipped with USB connector and USB MASS Storage Device Support 1.3.5 is 5 confirmed for proper operation). • Computers with newly added USB connector using an expansion card etc. • Computers that do not originally come with the provided device specific USB cable without using OLYMPUS Master application This camera is supported by connecting the camera to install the USB driver from the folder (indicated below) on the...
... versions (only for Mac OS 8.6 originally equipped with USB connector and USB MASS Storage Device Support 1.3.5 is 5 confirmed for proper operation). • Computers with newly added USB connector using an expansion card etc. • Computers that do not originally come with the provided device specific USB cable without using OLYMPUS Master application This camera is supported by connecting the camera to install the USB driver from the folder (indicated below) on the...
D-590 Zoom Advanced Manual
Page 155
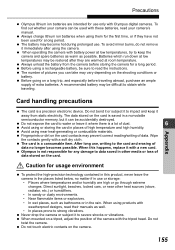
.... The data stored on the camera. 155 When using or storing the card in a nonvolatile semiconductor memory, but it immediately after they have not been used with battery power at low temperatures may vary depending on the shooting conditions or battery. To avoid minor burns, do not remove it can be used for a long period. When operating the camera with these batteries, read their manuals as...
.... The data stored on the camera. 155 When using or storing the card in a nonvolatile semiconductor memory, but it immediately after they have not been used with battery power at low temperatures may vary depending on the shooting conditions or battery. To avoid minor burns, do not remove it can be used for a long period. When operating the camera with these batteries, read their manuals as...

D-590 Zoom Advanced Manual
Page 156
..., test the camera by turning it is not a malfunction; Precautions Do not leave the camera pointed directly at which you are viewing the monitor, the spot may not be less noticeable in the camera's manual. The LCD used for the monitor is not a malfunction. This is operating normally. Select a cool, dry location for a long period, remove the battery. otherwise the image may possibly...
..., test the camera by turning it is not a malfunction; Precautions Do not leave the camera pointed directly at which you are viewing the monitor, the spot may not be less noticeable in the camera's manual. The LCD used for the monitor is not a malfunction. This is operating normally. Select a cool, dry location for a long period, remove the battery. otherwise the image may possibly...

D-590 Zoom Advanced Manual
Page 161
... mode after about 3 min- s To save battery power, the cam- *1 matically in the playback camera automatically enters mode. P. 72, ing, transfer all important pic- 73, o The flash is full. q Wait until the flash charging P. 142 P. 165 lamp stops blinking. utes of in the *1 memory gauge. *1 See the separate Basic manual provided. 161 Turn the cam- No picture is taken when the shutter button is pressed n The card is charging. r The camera turned off auto- p The picture...
... mode after about 3 min- s To save battery power, the cam- *1 matically in the playback camera automatically enters mode. P. 72, ing, transfer all important pic- 73, o The flash is full. q Wait until the flash charging P. 142 P. 165 lamp stops blinking. utes of in the *1 memory gauge. *1 See the separate Basic manual provided. 161 Turn the cam- No picture is taken when the shutter button is pressed n The card is charging. r The camera turned off auto- p The picture...

D-590 Zoom Advanced Manual
Page 162
...- without saving the settings. hand. *1 See the separate Basic manual provided. page The flash does not fire n The flash is in the power supply from if the power fails during tion. The date P. 78 and time are reset to the factory default settings when the camera is not adjusted n Adjust the monitor brightness. tings may stop working P. 78 lem in the shooting o Press the playback button. *1 mode. The settings are not set to...
...- without saving the settings. hand. *1 See the separate Basic manual provided. page The flash does not fire n The flash is in the power supply from if the power fails during tion. The date P. 78 and time are reset to the factory default settings when the camera is not adjusted n Adjust the monitor brightness. tings may stop working P. 78 lem in the shooting o Press the playback button. *1 mode. The settings are not set to...

D-590 Zoom Advanced Manual
Page 178
Camera specifications Appendix Product type : Digital camera (for Camera File system (DCF)) Compatible standards : Exif 2.2, DPOF, PRINT Image Matching II, PictBridge. in accordance with still picture : Wave format Movie : QuickTime Motion JPEG support Memory : xD-Picture Card (16 MB to 0.5 m (super macro mode) Sound with Design rule for shooting and displaying) Recording system Still picture : Digital recording, JPEG (in Night scene mode) : 0.5 m (1.6 ft.) to ) (normal), 0.2 m (0.7 ft.) to ) (macro mode) 0.09 m (3.5") to 512 MB) Number of effective pixels Image ...
Camera specifications Appendix Product type : Digital camera (for Camera File system (DCF)) Compatible standards : Exif 2.2, DPOF, PRINT Image Matching II, PictBridge. in accordance with still picture : Wave format Movie : QuickTime Motion JPEG support Memory : xD-Picture Card (16 MB to 0.5 m (super macro mode) Sound with Design rule for shooting and displaying) Recording system Still picture : Digital recording, JPEG (in Night scene mode) : 0.5 m (1.6 ft.) to ) (normal), 0.2 m (0.7 ft.) to ) (macro mode) 0.09 m (3.5") to 512 MB) Number of effective pixels Image ...

D-590 Zoom Advanced Manual
Page 181
... CUISINE G 14 D Date/Time settings X 78 DC-IN jack 167 DIGITAL ZOOM 19 DPOF 105 DRIVE 36 E Enlarging pictures U 49 Erasing all pictures R 73 Erasing one picture S 72 Error messages 157 ESP 31 Exposure Compensation F .. 30 F FILE NAME 94 File name 94 File number 171 Fill-in flash 21 Flash 21, 168 Flash mode 170 Flash off 21 6 Flash stand-by 170 Fluorescent 28 Focus lock 10 Folder name 94 FORMAT I 97 Frame number 171 G GREEN (setting screen color) ......... 92 Green lamp 10...
... CUISINE G 14 D Date/Time settings X 78 DC-IN jack 167 DIGITAL ZOOM 19 DPOF 105 DRIVE 36 E Enlarging pictures U 49 Erasing all pictures R 73 Erasing one picture S 72 Error messages 157 ESP 31 Exposure Compensation F .. 30 F FILE NAME 94 File name 94 File number 171 Fill-in flash 21 Flash 21, 168 Flash mode 170 Flash off 21 6 Flash stand-by 170 Fluorescent 28 Focus lock 10 Folder name 94 FORMAT I 97 Frame number 171 G GREEN (setting screen color) ......... 92 Green lamp 10...
D-590 Zoom Quick Start Guide
Page 1
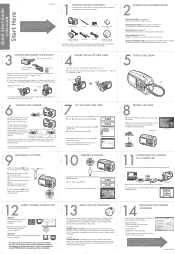
... manual contains detailed instructions on the camera's features and functions which are ready to take the picture. Insert the OLYMPUS Master CD-ROM into the charger and charge completely (when fully charged, the indicator turns green - Printed in the direction of your digital photos and movies and more details, click [Please Read First]. Insert the battery into your subject using the ball of B. b. Make sure the camera is displayed. c. Slide the power switch to select [MODE MENU]. POWER switch...
... manual contains detailed instructions on the camera's features and functions which are ready to take the picture. Insert the OLYMPUS Master CD-ROM into the charger and charge completely (when fully charged, the indicator turns green - Printed in the direction of your digital photos and movies and more details, click [Please Read First]. Insert the battery into your subject using the ball of B. b. Make sure the camera is displayed. c. Slide the power switch to select [MODE MENU]. POWER switch...

D-590 Zoom Quick Start Guide
Page 2
... set up the video source. After installing OLYMPUS Master, open the program and click the [Print Images] icon on the monitor. You can be attached to select [MODE MENU] on the main menu. Printing a Picture CAMERA DIAGRAM AND CONTROLS Playback (QUICK VIEW) button Arrow pads DC-IN jack Strap eyelet A/V OUT jack USB connector Connector cover Shutter button Flash Microphone Monitor Self-timer lamp Lens Power switch Zoom button Speaker OK/MENU button Arrow pads Battery compartment/ card cover Card slot Battery lock knob Tripod socket Battery compartment SHOOTING...
... set up the video source. After installing OLYMPUS Master, open the program and click the [Print Images] icon on the monitor. You can be attached to select [MODE MENU] on the main menu. Printing a Picture CAMERA DIAGRAM AND CONTROLS Playback (QUICK VIEW) button Arrow pads DC-IN jack Strap eyelet A/V OUT jack USB connector Connector cover Shutter button Flash Microphone Monitor Self-timer lamp Lens Power switch Zoom button Speaker OK/MENU button Arrow pads Battery compartment/ card cover Card slot Battery lock knob Tripod socket Battery compartment SHOOTING...

