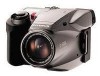
D-500/D-600L Instruction Manual (English, Français, Español)
Page 12
...of Conformity Model Number: Trade Name: Responsible party: Address: Telephone number: D-600L/D-500L OLYMPUS Olympus America Inc. 2 Corporate Center Drive, Melville, New York 11747-3157 U.S.A. ... the following measures: • Reorient or relocate the receiving antenna. • Increase the distance between the camera and receiver. • Connect the equipment to an outlet on , the user is no guarantee that may... to which can be used to connect the camera to a personal computer (PC). Only the included RS-232C serial cable should be determined by one or more of the FCC rules.
D-500/D-600L Instruction Manual (English, Français, Español)
Page 130
... P-300U E PRINTING PICTURES HOW TO CONNECT TO THE PRINTER Make sure that the power of the P-300U printer and the camera are off before connecting. 1 Connect the exclusive (parallel) cable (provided with the P-300U) to the Parallel port of the printer. 2 Open the connector cover of the... camera. 3 Connect the exclusive (parallel) cable to the Printer output connector of the camera. 4 Turn on the power of the printer and the camera. ● The Selftimer signal blinks while printing, and other operations are disabled. ...
D-500/D-600L Instruction Manual (English, Français, Español)
Page 148
... exchange Files can download picture data files and thumbnails into your camera. camera data), BMP (only for Windows version), and PICT (only for Macintosh version), TIFF (used with the provided Olympus utility software. Connect your camera to the software's online manual. Ⅵ Download image data....Ⅵ Printing Single image, thumbnail, A4-sized layout (4 images) For installation and operation, refer to your computer via the RS-232C cable and you can be saved in several different formats: JPEG (JFIF - 148 E INSTALLING PROVIDED SOFTWARE To take advantage of a wide range ...
D-500/D-600L Instruction Manual (English, Français, Español)
Page 150
...: x Features supported are slightly different for Macintosh to printer or modem serial port on your computer, and then connect the provided computer cable. (Turn off AppleTalk if connected to the printer port.) The enclosed Macintosh conversion connector allows you to connect your computer. ● ... COMPUTER Use the appropriate connector according to your computer's platform. ● IBM PC/AT compatible Connect the provided communication cable to the D-SUB 9Pin COM 1 or COM 2 serial port on your camera to a printer. It cannot be used to connect a Macintosh to a Macintosh computer.
D-500/D-600L Instruction Manual (English, Français, Español)
Page 152
152 E Make sure that the power of the PC and the camera are OFF and the utility software is installed on the computer before connecting. (Refer to the software's online manual for the installation.) 1 Connect the communication cable to the computer's serial port. 2 Open the connector cover. 3 Insert the plug and push it in as far as it will go. 4 Turn on the power of the PC to activate the software.
D-500/D-600L Instruction Manual (English, Français, Español)
Page 164
164 E When the camera is connected to a computer, an error message appears while data is being transferred to the computer. 1 The cable is not plugged in correctly. [ Connect the cable correctly. (P. 150) 2 The power is OFF. [ Press the power button to turn it ON. (P. 106) 3 The batteries are exhausted. [ Replace the batteries with new...