

User Manual
Page 8
... -2.0 - +2.0 9 White Balance WB AUTO, 5, 3, 1, w, V 10 ISO ISO 100, ISO 200, ISO 400 11 Date and time '03.06.17 15:30 12 File number, Frame number FILE : 100 - 0030, 30 Playing time/ 0"/20" total recording time 8 En Playback mode SQ1 1600 1200 Still picture Movie Item Indications En 1 Battery check 2 Print reservation, Number of prints Movie e, f < × 10 n 3 Protect 9 4 Record mode TIFF, SHQ, HQ, SQ1, SQ2 5 Resolution 2048 × 1536, 1280 × 960, 640 × 480, 320 × 240 etc. 6 Aperture...
... -2.0 - +2.0 9 White Balance WB AUTO, 5, 3, 1, w, V 10 ISO ISO 100, ISO 200, ISO 400 11 Date and time '03.06.17 15:30 12 File number, Frame number FILE : 100 - 0030, 30 Playing time/ 0"/20" total recording time 8 En Playback mode SQ1 1600 1200 Still picture Movie Item Indications En 1 Battery check 2 Print reservation, Number of prints Movie e, f < × 10 n 3 Protect 9 4 Record mode TIFF, SHQ, HQ, SQ1, SQ2 5 Resolution 2048 × 1536, 1280 × 960, 640 × 480, 320 × 240 etc. 6 Aperture...

User Manual
Page 20
... to a card. W Selects a language for errors. En SLEEP MY MODE SETUP Sets the sleep timer. FILE NAME Changes how file names are activated in the r mode. PIXEL MAPPING Checks the CCD and image processing functions for on-screen display. m/ft Sets the measurement unit (m/ft) used for button operations and warnings on and off the power. CONTRAST SATURATION Adjusts the contrast of color depth without changing the tint. Adjusts the level of the image. PW...
... to a card. W Selects a language for errors. En SLEEP MY MODE SETUP Sets the sleep timer. FILE NAME Changes how file names are activated in the r mode. PIXEL MAPPING Checks the CCD and image processing functions for on-screen display. m/ft Sets the measurement unit (m/ft) used for button operations and warnings on and off the power. CONTRAST SATURATION Adjusts the contrast of color depth without changing the tint. Adjusts the level of the image. PW...

User Manual
Page 21
SEt CARD EDIt Playback mode EDIT tab CARD tab SETUP tab EDIT tab∗1 Q Makes the file size smaller and saves it as a new file. ∗1 The EDIT tab is not displayed during movie playback. SETUP tab ALL RESET W PW ON/OFF SETUP SCREEN SETUP s X VIDEO OUT G 8 Selects whether to your TV's video signal type. Selects a language for button operations and warnings on -screen display. P Crops part of frames in the index display. Turns the beep sound used for on and off...
SEt CARD EDIt Playback mode EDIT tab CARD tab SETUP tab EDIT tab∗1 Q Makes the file size smaller and saves it as a new file. ∗1 The EDIT tab is not displayed during movie playback. SETUP tab ALL RESET W PW ON/OFF SETUP SCREEN SETUP s X VIDEO OUT G 8 Selects whether to your TV's video signal type. Selects a language for button operations and warnings on -screen display. P Crops part of frames in the index display. Turns the beep sound used for on and off...
User Manual
Page 22
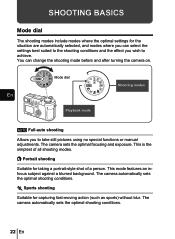
i Portrait shooting Suitable for taking a portrait-style shot of all shooting modes. You can select the settings best suited to the shooting conditions and the effect you wish to take still pictures using no special functions or manual adjustments. The camera automatically sets the optimal shooting conditions. This is the simplest of a person. j Sports shooting Suitable for capturing fast-moving action (such as sports) without blur. This mode features...
i Portrait shooting Suitable for taking a portrait-style shot of all shooting modes. You can select the settings best suited to the shooting conditions and the effect you wish to take still pictures using no special functions or manual adjustments. The camera automatically sets the optimal shooting conditions. This is the simplest of a person. j Sports shooting Suitable for capturing fast-moving action (such as sports) without blur. This mode features...

User Manual
Page 30
... normal sequential En shooting. In this mode, a subject can be performed when the record mode is set , the exposure is changed automatically for each frame. The focus and white balance are locked at a faster speed than for each frame when you start shooting. The AF sequential shooting speed is individually locked for normal sequential shooting. J METERING There are 4 sequential shooting modes: sequential shooting, high speed sequential shooting, AF sequential shooting and auto bracketing. This method...
... normal sequential En shooting. In this mode, a subject can be performed when the record mode is set , the exposure is changed automatically for each frame. The focus and white balance are locked at a faster speed than for each frame when you start shooting. The AF sequential shooting speed is individually locked for normal sequential shooting. J METERING There are 4 sequential shooting modes: sequential shooting, high speed sequential shooting, AF sequential shooting and auto bracketing. This method...
User Manual
Page 38
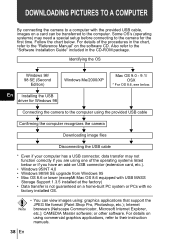
... Installing the USB driver for the first time. Also refer to their instruction manuals. 38 En CAMEDIA Master software; DOWNLOADING PICTURES TO A COMPUTER By connecting the camera to a computer with no factory installed OS. • You can be transferred to the computer. Connecting the camera to the computer using the provided USB cable Confirming the computer recognizes the camera Downloading image files Disconnecting the USB cable * Even if your computer has a USB connector, data transfer may need a special setup before connecting...
... Installing the USB driver for the first time. Also refer to their instruction manuals. 38 En CAMEDIA Master software; DOWNLOADING PICTURES TO A COMPUTER By connecting the camera to a computer with no factory installed OS. • You can be transferred to the computer. Connecting the camera to the computer using the provided USB cable Confirming the computer recognizes the camera Downloading image files Disconnecting the USB cable * Even if your computer has a USB connector, data transfer may need a special setup before connecting...
Reference Manual
Page 4
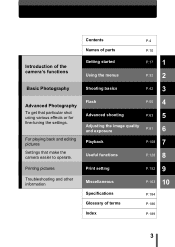
... playing back and editing pictures Settings that particular shot using various effects or for fine-tuning the settings. Printing pictures Troubleshooting and other information Contents Names of parts Getting started P.4 P.10 1 P.17 Using the menus 2 P.32 Shooting basics 3 P.42 Flash 4 P.55 Advanced shooting 5 P.63 Adjusting the image quality and exposure P.91 6 Playback 7 P.108 Useful functions 8 P.128 Print setting 9 P.152 Miscellaneous 10 P.163 Specifications Glossary of the camera's functions Basic Photography Advanced Photography To get that make the camera...
... playing back and editing pictures Settings that particular shot using various effects or for fine-tuning the settings. Printing pictures Troubleshooting and other information Contents Names of parts Getting started P.4 P.10 1 P.17 Using the menus 2 P.32 Shooting basics 3 P.42 Flash 4 P.55 Advanced shooting 5 P.63 Adjusting the image quality and exposure P.91 6 Playback 7 P.108 Useful functions 8 P.128 Print setting 9 P.152 Miscellaneous 10 P.163 Specifications Glossary of the camera's functions Basic Photography Advanced Photography To get that make the camera...

Reference Manual
Page 15
... mode SQ1 1600 1200 Still picture Movie Item Indications 1 Battery check e, f 2 Print reservation, Number of prints Movie < × 10 n 3 Protect 9 4 Record mode TIFF, SHQ, HQ, SQ1, SQ2 5 Resolution 2048 × 1536, 1280 × 960, 640 × 480, 320 × 240 etc. 6 Aperture value F2.8 - F8.0 7 Shutter speed 16 - 1/1000 8 Exposure compensation -2.0 - +2.0 9 White Balance WB AUTO, 5, 3, 1, w, V 10 ISO ISO 100, ISO 200, ISO 400 11 Date and time '03.06.17 15:30 12 File number, Frame number Playing time/ total recording time FILE...
... mode SQ1 1600 1200 Still picture Movie Item Indications 1 Battery check e, f 2 Print reservation, Number of prints Movie < × 10 n 3 Protect 9 4 Record mode TIFF, SHQ, HQ, SQ1, SQ2 5 Resolution 2048 × 1536, 1280 × 960, 640 × 480, 320 × 240 etc. 6 Aperture value F2.8 - F8.0 7 Shutter speed 16 - 1/1000 8 Exposure compensation -2.0 - +2.0 9 White Balance WB AUTO, 5, 3, 1, w, V 10 ISO ISO 100, ISO 200, ISO 400 11 Date and time '03.06.17 15:30 12 File number, Frame number Playing time/ total recording time FILE...

Reference Manual
Page 40
...'s video signal type. P.142 X Sets the date and time. P.150 Selects NTSC or PAL according to a card. P.133 CUSTOM BUTTON Assigns a frequently used during manual focus. P.145 39 P.136 FILE NAME Changes how file names are activated in the r mode. P.26 PW ON/OFF SETUP Sets the picture displayed on the monitor when the power is turned on and off. P.148 PIXEL MAPPING Checks the CCD and image processing functions for button operations...
...'s video signal type. P.142 X Sets the date and time. P.150 Selects NTSC or PAL according to a card. P.133 CUSTOM BUTTON Assigns a frequently used during manual focus. P.145 39 P.136 FILE NAME Changes how file names are activated in the r mode. P.26 PW ON/OFF SETUP Sets the picture displayed on the monitor when the power is turned on and off. P.148 PIXEL MAPPING Checks the CCD and image processing functions for button operations...
Reference Manual
Page 43
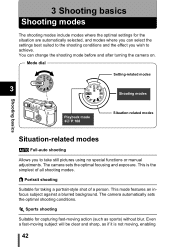
... of a person. 3 Shooting basics Shooting modes The shooting modes include modes where the optimal settings for the situation are automatically selected, and modes where you can change the shooting mode before and after turning the camera on. Mode dial Setting-related modes 3 Shooting modes Shooting basics Playback mode gP.108 Situation-related modes Situation-related modes h Full-auto shooting Allows you wish to take still pictures using no special functions or manual adjustments. The camera sets the optimal focusing and exposure. This mode features an infocus...
... of a person. 3 Shooting basics Shooting modes The shooting modes include modes where the optimal settings for the situation are automatically selected, and modes where you can change the shooting mode before and after turning the camera on. Mode dial Setting-related modes 3 Shooting modes Shooting basics Playback mode gP.108 Situation-related modes Situation-related modes h Full-auto shooting Allows you wish to take still pictures using no special functions or manual adjustments. The camera sets the optimal focusing and exposure. This mode features an infocus...

Reference Manual
Page 46
g"MY MODE SETUP" (P.136) g"Using My Mode" (P.67) n Movie record Allows you to record movies. M Manual shooting 3 Allows you to set the aperture and shutter speed manually. This mode gives you more creative control, allowing you to make the settings you need to the exposure differential. Current settings can also be clear and sharp, as your own personal mode and use these customized settings when taking pictures. Even if the subject moves during recording or the distance to save your...
g"MY MODE SETUP" (P.136) g"Using My Mode" (P.67) n Movie record Allows you to record movies. M Manual shooting 3 Allows you to set the aperture and shutter speed manually. This mode gives you more creative control, allowing you to make the settings you need to the exposure differential. Current settings can also be clear and sharp, as your own personal mode and use these customized settings when taking pictures. Even if the subject moves during recording or the distance to save your...

Reference Manual
Page 84
... shooting speed is pressed. (Normal shooting mode, single-frame shooting) j : Focus, exposure and white balance are 4 sequential shooting modes: sequential shooting, high speed sequential shooting, AF sequential shooting and auto bracketing. g"How to use the menus" (P.33) • Press e again to TIFF. Drive mode o : Shoots 1 frame at a time when the shutter button is slower than normal sequential shooting. The sequential shooting speed varies depending on the record mode setting. Approx. 3 frames at 2 frames/sec. k : Focus is set to exit the menu...
... shooting speed is pressed. (Normal shooting mode, single-frame shooting) j : Focus, exposure and white balance are 4 sequential shooting modes: sequential shooting, high speed sequential shooting, AF sequential shooting and auto bracketing. g"How to use the menus" (P.33) • Press e again to TIFF. Drive mode o : Shoots 1 frame at a time when the shutter button is slower than normal sequential shooting. The sequential shooting speed varies depending on the record mode setting. Approx. 3 frames at 2 frames/sec. k : Focus is set to exit the menu...

Reference Manual
Page 94
... certain instances, the number of remaining pictures may change even when you take pictures or stored images are erased. • If movies are shot with VIDEO OUT set to PAL and the video cable connected, the movie recording time will differ from the time listed in the same direction as a shortcut menu, press the arrow pad in the Movie Record Modes table. Record mode • The card memory capacity listed in the table is displayed on the top...
... certain instances, the number of remaining pictures may change even when you take pictures or stored images are erased. • If movies are shot with VIDEO OUT set to PAL and the video cable connected, the movie recording time will differ from the time listed in the same direction as a shortcut menu, press the arrow pad in the Movie Record Modes table. Record mode • The card memory capacity listed in the table is displayed on the top...

Reference Manual
Page 153
... application software's instructions. Or pictures can print out your software before printing. For details, refer to save printing data (number of prints, date/time information, etc.) with the pictures stored on the card. • What is taken to a photo lab that supports DPOF or printing on a DPOF-compatible printer Store the print reservation data on an Olympus CAMEDIA P-400 or P-200 digital printer Printing is short for Digital Print Order Format. Use the card adapter (sold separately). 9 Print setting How to print pictures Several different printing options...
... application software's instructions. Or pictures can print out your software before printing. For details, refer to save printing data (number of prints, date/time information, etc.) with the pictures stored on the card. • What is taken to a photo lab that supports DPOF or printing on a DPOF-compatible printer Store the print reservation data on an Olympus CAMEDIA P-400 or P-200 digital printer Printing is short for Digital Print Order Format. Use the card adapter (sold separately). 9 Print setting How to print pictures Several different printing options...

Reference Manual
Page 167
... batteries removed, the date/time setting is connected to see. on the image in the mode menu and adjust the brightness. The date recorded with 9) and press to appear on . The picture you have taken do not appear on the card. Page The diopter is Block the sunlight with the card. P.142 The monitor is not adjusted properly. sunlight. Pictures you want Display the protected image (with the image data is protected. 0 to "Error codes...
... batteries removed, the date/time setting is connected to see. on the image in the mode menu and adjust the brightness. The date recorded with 9) and press to appear on . The picture you have taken do not appear on the card. Page The diopter is Block the sunlight with the card. P.142 The monitor is not adjusted properly. sunlight. Pictures you want Display the protected image (with the image data is protected. 0 to "Error codes...

Reference Manual
Page 169
... away from the flash. Adjust the exposure compensation toward minus (-) or change the camera position. Adjust the white balance according to make the flash pop up. The subject was not enabled. When shooting a bright subject such as a landscape, the picture comes out darker than fill-in flash. The colors of the flash. Set the white balance according to fill-in mode, or use the spot metering mode. Troubleshooting 10 zThe image quality is...
... away from the flash. Adjust the exposure compensation toward minus (-) or change the camera position. Adjust the white balance according to make the flash pop up. The subject was not enabled. When shooting a bright subject such as a landscape, the picture comes out darker than fill-in flash. The colors of the flash. Set the white balance according to fill-in mode, or use the spot metering mode. Troubleshooting 10 zThe image quality is...
Reference Manual
Page 189
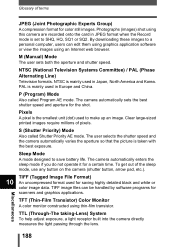
... mode if you do not operate it for the shot. TTL (Through-The taking-Lens) System To help adjust exposure, a light receptor built into the camera directly measures the light passing through the lens. 188 Miscellaneous The user selects the shutter speed and the camera automatically varies the aperture so that the picture is set to a personal computer, users can be handled by software programs for saving highly detailed black and white or color image data. Clear large-sized printed images...
... mode if you do not operate it for the shot. TTL (Through-The taking-Lens) System To help adjust exposure, a light receptor built into the camera directly measures the light passing through the lens. 188 Miscellaneous The user selects the shutter speed and the camera automatically varies the aperture so that the picture is set to a personal computer, users can be handled by software programs for saving highly detailed black and white or color image data. Clear large-sized printed images...

Reference Manual
Page 195
DIGITAL CAMERA PERSONAL COMPUTER DIGITAL CAMERA - This manual provides instructions on how to get the most from images taken with your PC to install the USB driver. PC CONNECTION OPERATION MANUAL How to use your digital camera. To ensure correct installation, refer only to these installation procedures. Thank you for purchasing an Olympus digital camera.
DIGITAL CAMERA PERSONAL COMPUTER DIGITAL CAMERA - This manual provides instructions on how to get the most from images taken with your PC to install the USB driver. PC CONNECTION OPERATION MANUAL How to use your digital camera. To ensure correct installation, refer only to these installation procedures. Thank you for purchasing an Olympus digital camera.
Reference Manual
Page 198
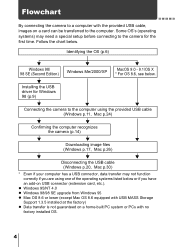
... By connecting the camera to a computer with USB MASS Storage Support 1.3.5 installed at the factory) Data transfer is not guaranteed on USB connector (extension card, etc.). Follow the chart below . Some OS's (operating systems) may need a special setup before connecting to the camera for Windows 98 (p.9) Connecting the camera to the computer using the provided USB cable (Windows p.11, Mac p.24) Confirming the computer recognizes the camera (p.14) Downloading image files (Windows p.17, Mac p.26) Disconnecting the USB cable (Windows p.20, Mac p.30...
... By connecting the camera to a computer with USB MASS Storage Support 1.3.5 installed at the factory) Data transfer is not guaranteed on USB connector (extension card, etc.). Follow the chart below . Some OS's (operating systems) may need a special setup before connecting to the camera for Windows 98 (p.9) Connecting the camera to the computer using the provided USB cable (Windows p.11, Mac p.24) Confirming the computer recognizes the camera (p.14) Downloading image files (Windows p.17, Mac p.26) Disconnecting the USB cable (Windows p.20, Mac p.30...

Reference Manual
Page 208
... and connect again, or proceed to "Confirming the USB driver is installed" ( p.15) to make sure that the USB driver is recognized as a removable media drive or USB SmartMedia Reader/ Writer. There may already be other "Removable Disk" icons for other devices, such as another "Removable Disk". Turn the camera off, disconnect the camera from the "Start" menu. 2 Make sure the "Removable Disk" icon appears in the window. In this case, the digital camera is fully installed...
... and connect again, or proceed to "Confirming the USB driver is installed" ( p.15) to make sure that the USB driver is recognized as a removable media drive or USB SmartMedia Reader/ Writer. There may already be other "Removable Disk" icons for other devices, such as another "Removable Disk". Turn the camera off, disconnect the camera from the "Start" menu. 2 Make sure the "Removable Disk" icon appears in the window. In this case, the digital camera is fully installed...


