
Network User's Guide for OkiLAN 6020e
Page 7
... the use of commercial software packages. Consult our web site at 1-800-OKI-DATA (1-800-654-3282). In the U.S. Our customer service representatives are trained on all current Oki Data products They can answer your questions regarding: • Installation • Determination of printer issues that you are calling from a telephone close to your printer, so you can describe your software user's manual for the latest network operating systems. (Customer service...
... the use of commercial software packages. Consult our web site at 1-800-OKI-DATA (1-800-654-3282). In the U.S. Our customer service representatives are trained on all current Oki Data products They can answer your questions regarding: • Installation • Determination of printer issues that you are calling from a telephone close to your printer, so you can describe your software user's manual for the latest network operating systems. (Customer service...
Network User's Guide for OkiLAN 6020e
Page 15
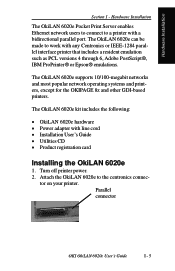
... parallel port. tor on your printer. The OkiLAN 6020e can be made to the centronics connec- Parallel connector OKI OkiLAN 6020e User's Guide I - The OkiLAN 6020e supports 10/100-megabit networks and most popular network operating systems and printers, except for the OKIPAGE 8z and other GDI-based printers. Turn off printer power. 2. Hardware Installation Section I - 5 Hardware Installation The OkiLAN 6020e Pocket Print Server enables Ethernet network users to connect to a printer with line cord · Installation User's Guide · Utilities CD · Product registration card...
... parallel port. tor on your printer. The OkiLAN 6020e can be made to the centronics connec- Parallel connector OKI OkiLAN 6020e User's Guide I - The OkiLAN 6020e supports 10/100-megabit networks and most popular network operating systems and printers, except for the OKIPAGE 8z and other GDI-based printers. Turn off printer power. 2. Hardware Installation Section I - 5 Hardware Installation The OkiLAN 6020e Pocket Print Server enables Ethernet network users to connect to a printer with line cord · Installation User's Guide · Utilities CD · Product registration card...
Network User's Guide for OkiLAN 6020e
Page 26
... 3 HP Web JetAdmin Support II-8 Overview II-8 Configuring the OkiLAN 6020e Using Web JetAdmin II-8 Installing a Windows NT Printer for the OkiLAN 6020e II-8 Obtaining Diagnostic Information from the OkiLAN 6020e II-9 Chapter 4 OkiLAN 6020e Web Configuration .....II-10 Overview II-10 Connecting to the OkiLAN 6020e II-10 Configuration II-12 Status II-15 Print Job Log II-15 Support II-15 Reset II-16 OkiLAN 6020e Server Discovery II-16 Troubleshooting II-17...
... 3 HP Web JetAdmin Support II-8 Overview II-8 Configuring the OkiLAN 6020e Using Web JetAdmin II-8 Installing a Windows NT Printer for the OkiLAN 6020e II-8 Obtaining Diagnostic Information from the OkiLAN 6020e II-9 Chapter 4 OkiLAN 6020e Web Configuration .....II-10 Overview II-10 Connecting to the OkiLAN 6020e II-10 Configuration II-12 Status II-15 Print Job Log II-15 Support II-15 Reset II-16 OkiLAN 6020e Server Discovery II-16 Troubleshooting II-17...

Network User's Guide for OkiLAN 6020e
Page 32
.... Make any necessary changes to install. 2. On the Properties page, click the Install Printer button. 3. II - 8 OKI OkiLAN 6020e User's Guide From the main Web JetAdmin page, select the OkiLAN 6020e port you wish to install a printer for the OkiLAN 6020e 1. For example, to configure. 2. Chapter 3 - Configuring the OkiLAN 6020e Using Web JetAdmin 1. Section 2 - On the Properties page, click the Config button. 3. field, enter the print server IP address, followed by a comma and then the output port number. From...
.... Make any necessary changes to install. 2. On the Properties page, click the Install Printer button. 3. II - 8 OKI OkiLAN 6020e User's Guide From the main Web JetAdmin page, select the OkiLAN 6020e port you wish to install a printer for the OkiLAN 6020e 1. For example, to configure. 2. Chapter 3 - Configuring the OkiLAN 6020e Using Web JetAdmin 1. Section 2 - On the Properties page, click the Config button. 3. field, enter the print server IP address, followed by a comma and then the output port number. From...
MICROLINE Reference Manual
Page 54
... used to select the pitch in your printer manual). or ML320/1 Turbo. Pitch Setting Commands for Compressed Printing (IBM) ߜ ML320 E/I, ML321 E/I , ML320/1 Std. or ML320/1 Turbo. The number of characters printed: • Pitch Setting Commands • Superscript & Subscript Commands • Double Width & Height Commands • Combined Print Features Command • Character Spacing Commands Pitch Setting Commands These commands are used to set pitch using the printer's front panel or the menu (see "Menu Mode" in characters per Line Narrow Carriage Models...
... used to select the pitch in your printer manual). or ML320/1 Turbo. Pitch Setting Commands for Compressed Printing (IBM) ߜ ML320 E/I, ML321 E/I , ML320/1 Std. or ML320/1 Turbo. The number of characters printed: • Pitch Setting Commands • Superscript & Subscript Commands • Double Width & Height Commands • Combined Print Features Command • Character Spacing Commands Pitch Setting Commands These commands are used to set pitch using the printer's front panel or the menu (see "Menu Mode" in characters per Line Narrow Carriage Models...

MICROLINE Reference Manual
Page 64
... the Epson mode. Because the characters have different widths, proportionally spaced fonts have no fixed pitch; For example, to set 10 cpi, emphasized, NLQ and underlining using the printer menu or the front panel buttons. In addition, proportional spacing is available only with Near Letter Quality (NLQ) and Utility (UTL) printing. The resulting print is more horizontal space to wide characters, like w or M, and less to narrow characters, like this command, you would...
... the Epson mode. Because the characters have different widths, proportionally spaced fonts have no fixed pitch; For example, to set 10 cpi, emphasized, NLQ and underlining using the printer menu or the front panel buttons. In addition, proportional spacing is available only with Near Letter Quality (NLQ) and Utility (UTL) printing. The resulting print is more horizontal space to wide characters, like w or M, and less to narrow characters, like this command, you would...
MICROLINE Reference Manual
Page 100
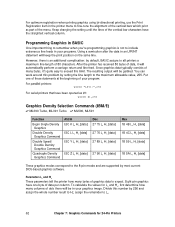
... data to expect. Keep changing the setting until the lines of the vertical bar characters have been opened as part of the menu. Put one byte of data per column. For optimum registration when printing graphics using bi-directional printing, use the Print Registration item in the printer menu to fine-tune the alignment of the vertical bars which print as #1: WIDTH #1,255 Graphics Density Selection Commands (IBM/E) ߜ ML390 Turbo, ML391 Turbo...
... data to expect. Keep changing the setting until the lines of the vertical bar characters have been opened as part of the menu. Put one byte of data per column. For optimum registration when printing graphics using bi-directional printing, use the Print Registration item in the printer menu to fine-tune the alignment of the vertical bars which print as #1: WIDTH #1,255 Graphics Density Selection Commands (IBM/E) ߜ ML390 Turbo, ML391 Turbo...
MICROLINE Reference Manual
Page 109
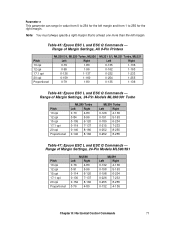
... 0-252 8-255 Table 47: Epson ESC L and ESC Q Commands - Note: You must always specify a right margin that is at least one more than the left margin and from 1 to 254 for the right margin. Range of Margin Settings, All 9-Pin Printers Pitch 10 cpi 12 cpi 17.1 cpi 20 cpi Proportional ML320 E/I, ML320 Turbo, ML520 Left Right 0-79 1-80 0-95 1-96 0-136 1-137 0-159 1-160 0-79 1-80 ML321 E/I, ML321 Turbo, ML521 Left Right 0-135...
... 0-252 8-255 Table 47: Epson ESC L and ESC Q Commands - Note: You must always specify a right margin that is at least one more than the left margin and from 1 to 254 for the right margin. Range of Margin Settings, All 9-Pin Printers Pitch 10 cpi 12 cpi 17.1 cpi 20 cpi Proportional ML320 E/I, ML320 Turbo, ML520 Left Right 0-79 1-80 0-95 1-96 0-136 1-137 0-159 1-160 0-79 1-80 ML321 E/I, ML321 Turbo, ML521 Left Right 0-135...

MICROLINE Reference Manual
Page 123
... length in inches in either inches or lines. If you wish to change it 's a good idea to use the printer menu to set the page length by lines in either the IBM or Epson emulation, use a zero for vertical control including the following: • Page Length Commands • Form Feed Command • Line Feed Commands • Line Spacing Commands • Vertical Position Commands • Top of Form Commands • Top & Bottom Margin Command • Skip Over Perforation Commands • Vertical Tab Commands Set Page Length Commands Set Page Length in Inches Command...
... length in inches in either inches or lines. If you wish to change it 's a good idea to use the printer menu to set the page length by lines in either the IBM or Epson emulation, use a zero for vertical control including the following: • Page Length Commands • Form Feed Command • Line Feed Commands • Line Spacing Commands • Vertical Position Commands • Top of Form Commands • Top & Bottom Margin Command • Skip Over Perforation Commands • Vertical Tab Commands Set Page Length Commands Set Page Length in Inches Command...
MICROLINE Reference Manual
Page 180
... summary xxxii-xxxvi emulation drivers 1-2 Microsoft Windows 3 Word 3 Most significant bit commands 128 Move to left/right commands 76-81 MSB commands 128 Multilingual code page command 11-13 Multiple print positions command 77-78 N NLQ print mode command 29-32 Norway code page command 10-11 Norwegian character set commands 11-13 O Okidata Microline Std command summary xxxii-xxxvi Okidata software drivers....... 2-3 Overscore commands 37 P Page format command 98 length commands.........85-86 Paper-out sensor commands 128 Parallel interface 133 Pitch commands 15-19 Plotter...
... summary xxxii-xxxvi emulation drivers 1-2 Microsoft Windows 3 Word 3 Most significant bit commands 128 Move to left/right commands 76-81 MSB commands 128 Multilingual code page command 11-13 Multiple print positions command 77-78 N NLQ print mode command 29-32 Norway code page command 10-11 Norwegian character set commands 11-13 O Okidata Microline Std command summary xxxii-xxxvi Okidata software drivers....... 2-3 Overscore commands 37 P Page format command 98 length commands.........85-86 Paper-out sensor commands 128 Parallel interface 133 Pitch commands 15-19 Plotter...
Product Update
Page 13
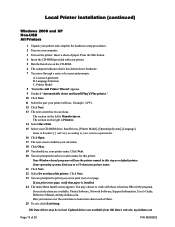
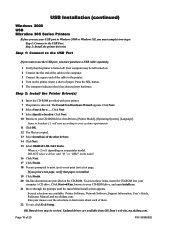
... the right is Manufacturers. Local Printer Installation (continued) Windows 2000 and XP Non-USB All Printers 1 Unpack your printer and complete the hardware setup procedures. 2 Turn on your CD-ROM drive, then Drivers, [Printer Model], [Operating System], [Language]. Language Selection C. Items in this step as a default printer. Click Next. 23 You are available from Oki Data's web site, my.okidata.com Page 13 of screens and prompts. Press the SEL button. 4 Insert...
... the right is Manufacturers. Local Printer Installation (continued) Windows 2000 and XP Non-USB All Printers 1 Unpack your printer and complete the hardware setup procedures. 2 Turn on your CD-ROM drive, then Drivers, [Printer Model], [Operating System], [Language]. Language Selection C. Items in this step as a default printer. Click Next. 23 You are available from Oki Data's web site, my.okidata.com Page 13 of screens and prompts. Press the SEL button. 4 Insert...

Product Update
Page 15
... from Oki Data's web site, my.okidata.com. To access these items, insert the CD-ROM into your CD-ROM drive, and open install.exe. 27 Move through the prompts until the main Menu Install screen appears. Several selections are copied. If you are, follow the instructions. 25 The files are available: Printer Software, Network Software, Support Information, User's Guide, Reference Manual, and my.okidata.com. If you print a test page...
... from Oki Data's web site, my.okidata.com. To access these items, insert the CD-ROM into your CD-ROM drive, and open install.exe. 27 Move through the prompts until the main Menu Install screen appears. Several selections are copied. If you are, follow the instructions. 25 The files are available: Printer Software, Network Software, Support Information, User's Guide, Reference Manual, and my.okidata.com. If you print a test page...
Product Update
Page 16
... You are available: Printer Software, Network Software, Support Information, User's Guide, Reference Manual, and my.okidata.com. USB Installation (continued) Windows 2000 USB Microline 300 Series Printers Before you use the USB port, you must complete two steps: Step 1: Connect to the USB Port. Step 2: Install the Printer Driver(s) 6 Insert the CD-ROM provided with "D" or "IBM" in Windows 2000 or Windows XP, you must purchase a USB cable separately. 1 Verify that the printer is detected. If you print a test page, verify that...
... You are available: Printer Software, Network Software, Support Information, User's Guide, Reference Manual, and my.okidata.com. USB Installation (continued) Windows 2000 USB Microline 300 Series Printers Before you use the USB port, you must complete two steps: Step 1: Connect to the USB Port. Step 2: Install the Printer Driver(s) 6 Insert the CD-ROM provided with "D" or "IBM" in Windows 2000 or Windows XP, you must purchase a USB cable separately. 1 Verify that the printer is detected. If you print a test page, verify that...

Users' Guide for the ML520/1
Page 5
... Ribbon Cartridge 15 Clearing Paper Jams 15 Clearing Rear Feed Jams 15 Clearing Single Sheet Feed Jams 16 Cleaning the Housing 17 Section 3: Using Your Printer 19 Control Panel Indicator Lights 19 Control Panel Buttons: Print Mode 20 Control Panel Buttons: Menu Mode 21 Print Mode 22 Selecting Print Quality 22 Selecting Character Pitch 23 Menu Mode 24 Entering The Menu Mode 24 Exiting The Menu Mode 24 Resetting The Menu 24 Printing Out the Menu 24 Sample Default Menu Printout 25 Summary of Menu Settings 26 Explanation of Menu Items 29 Using the Printer's Features 32 Tear...
... Ribbon Cartridge 15 Clearing Paper Jams 15 Clearing Rear Feed Jams 15 Clearing Single Sheet Feed Jams 16 Cleaning the Housing 17 Section 3: Using Your Printer 19 Control Panel Indicator Lights 19 Control Panel Buttons: Print Mode 20 Control Panel Buttons: Menu Mode 21 Print Mode 22 Selecting Print Quality 22 Selecting Character Pitch 23 Menu Mode 24 Entering The Menu Mode 24 Exiting The Menu Mode 24 Resetting The Menu 24 Printing Out the Menu 24 Sample Default Menu Printout 25 Summary of Menu Settings 26 Explanation of Menu Items 29 Using the Printer's Features 32 Tear...

Users' Guide for the ML520/1
Page 36
... consistently double spaced, select No (factory default); Choose USA (factory default), Canada French, Multilingual, Portugal, or Norway. Explanation of data and damage the printhead. Code Page. Auto LF. If your printout is selected. Character Set. Change the setting to Invalid if you always use the same Top of the parallel interface to control automatic line feed, change the setting to Yes. Using Your Printer E-29 Line Spacing, Form Tear-Off, Skip Over Perforation, Page Length, and Gap Control appear several times in paper so that...
... consistently double spaced, select No (factory default); Choose USA (factory default), Canada French, Multilingual, Portugal, or Norway. Explanation of data and damage the printhead. Code Page. Auto LF. If your printout is selected. Character Set. Change the setting to Invalid if you always use the same Top of the parallel interface to control automatic line feed, change the setting to Yes. Using Your Printer E-29 Line Spacing, Form Tear-Off, Skip Over Perforation, Page Length, and Gap Control appear several times in paper so that...

Users' Guide for the ML520/1
Page 37
... bi-directional printing. Language Set. Operator Panel Function. Choose 8" for faster printing: optimize by the Print Registration setting in the Menu. Semi Auto Gap is set. Caution!! Change the setting as a solid box. Page Length. Choose Yes to +5V (factory default) or Open. Pitch. Print Registration. Change to wait before resetting. Selects the length of paper remains and stops printing. Page Width (Model 521 only). Paper Out Override. Print Mode. Senses when less than one inch of the paper you're using the printer and...
... bi-directional printing. Language Set. Operator Panel Function. Choose 8" for faster printing: optimize by the Print Registration setting in the Menu. Semi Auto Gap is set. Caution!! Change the setting as a solid box. Page Length. Choose Yes to +5V (factory default) or Open. Pitch. Print Registration. Change to wait before resetting. Selects the length of paper remains and stops printing. Page Width (Model 521 only). Paper Out Override. Print Mode. Senses when less than one inch of the paper you're using the printer and...

Users' Guide for the ML520/1
Page 62
...1-2 Pull tractors and push tractors 47 Q QUIET button 20 light 19 R Rear feed paper jams ...... 15-16 Receive buffer size menu item 28, 31 Replacement parts 47 Reset button 20 inhibit menu item ......28, 31 printer commands ...........50, 52, 54 Resident fonts 39 Resolution, graphics 39 Ribbon cartridge install/replace 3-4 life 4 MSDS 63 replacement 46 shield 3 Roll paper stand 47 Rolling ASCII test 13 S SEL button 20 light 19 Self tests 13 Semi auto gap (gap control 30 Serial interface 47 SET button 20 Shield, ribbon 3 SHIFT button 20 Shipping retainers 2-3 SI select...
...1-2 Pull tractors and push tractors 47 Q QUIET button 20 light 19 R Rear feed paper jams ...... 15-16 Receive buffer size menu item 28, 31 Replacement parts 47 Reset button 20 inhibit menu item ......28, 31 printer commands ...........50, 52, 54 Resident fonts 39 Resolution, graphics 39 Ribbon cartridge install/replace 3-4 life 4 MSDS 63 replacement 46 shield 3 Roll paper stand 47 Rolling ASCII test 13 S SEL button 20 light 19 Self tests 13 Semi auto gap (gap control 30 Serial interface 47 SET button 20 Shield, ribbon 3 SHIFT button 20 Shipping retainers 2-3 SI select...
ML500 Series Quick Start
Page 2
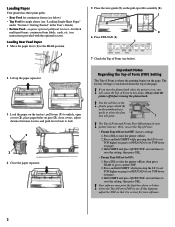
... multi-part forms, coninuous-form labels, cards, etc. (see instructions provided with the optional tractor). Use the red line on the plastic paper shield (1) on , you set TOF higher on page) or FF/LOAD (to lock. 1 3 2 4 Close the paper separator. 5 Place the wire guide (1) on page). 3. The Top of Form and Forms Tear-Off settings of the page. ! Press SEL to save the setting, then press SEL. • Forms Tear-Off set TOF lower on the pull-up roller assembly...
... multi-part forms, coninuous-form labels, cards, etc. (see instructions provided with the optional tractor). Use the red line on the plastic paper shield (1) on , you set TOF higher on page) or FF/LOAD (to lock. 1 3 2 4 Close the paper separator. 5 Place the wire guide (1) on page). 3. The Top of Form and Forms Tear-Off settings of the page. ! Press SEL to save the setting, then press SEL. • Forms Tear-Off set TOF lower on the pull-up roller assembly...
ML500 Series Quick Start
Page 3
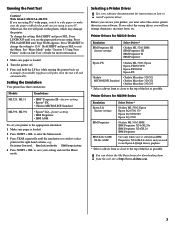
...; LQ-factory setting • IBM Proprinter • IBM AGM To set to install a printer driver. Before you can obtain the Oki Data drivers by downloading them from as possible. ! Wide Models ML521 & ML591: If you are using is set your software documentation for more information. 1 Make sure paper is loaded. 2 Press SHIFT + SEL to enter the Menu mode. 3 Press TEAR repeatedly until Page Width appears. See "Menu Mode" under "Section 3: Using Your Printer" in the right-hand column, e.g.: Printer Control Emulation Mode IBM Proprinter...
...; LQ-factory setting • IBM Proprinter • IBM AGM To set to install a printer driver. Before you can obtain the Oki Data drivers by downloading them from as possible. ! Wide Models ML521 & ML591: If you are using is set your software documentation for more information. 1 Make sure paper is loaded. 2 Press SHIFT + SEL to enter the Menu mode. 3 Press TEAR repeatedly until Page Width appears. See "Menu Mode" under "Section 3: Using Your Printer" in the right-hand column, e.g.: Printer Control Emulation Mode IBM Proprinter...
Pull Tractor Kit for ML500 Series Printers
Page 11
... contacting the Oki Data dealer from the date of the service locations listed on the clear plastic paper shield. A written receipt for work to start printing. OKI DATA SHALL NOT BE RESPONSIBLE OR LIABLE FOR ANY SPECIAL, INCIDENTAL OR CONSEQUENTIAL DAMAGES OR LOSS ARISING FROM THE USE OF THIS PRODUCT. If it needs adjustment, set the Top of Form, indicated by the red line (1) on...
... contacting the Oki Data dealer from the date of the service locations listed on the clear plastic paper shield. A written receipt for work to start printing. OKI DATA SHALL NOT BE RESPONSIBLE OR LIABLE FOR ANY SPECIAL, INCIDENTAL OR CONSEQUENTIAL DAMAGES OR LOSS ARISING FROM THE USE OF THIS PRODUCT. If it needs adjustment, set the Top of Form, indicated by the red line (1) on...


