PrintSuperVision Configuration Guide
Page 61
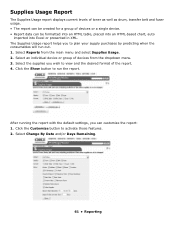
... and select Supplies Usage. 2. Select Reports from the dropdown menu. 3. Supplies Usage Report The Supplies Usage report displays current levels of toner as well as drum, transfer belt and fuser usage. • The report can be formatted into an HTML table, placed into an HTML-based chart, auto imported into Excel...
... and select Supplies Usage. 2. Select Reports from the dropdown menu. 3. Supplies Usage Report The Supplies Usage report displays current levels of toner as well as drum, transfer belt and fuser usage. • The report can be formatted into an HTML table, placed into an HTML-based chart, auto imported into Excel...

PrintSuperVision Configuration Guide
Page 69
... no Alerts and no action is required when the information icon is printing. The information icon indicates an event has occurred, such as toner or drum replacement, cassette drawer is open or the device is displayed. Highlight a group name and the devices associated with the computer you may click on autopilot...
... no Alerts and no action is required when the information icon is printing. The information icon indicates an event has occurred, such as toner or drum replacement, cassette drawer is open or the device is displayed. Highlight a group name and the devices associated with the computer you may click on autopilot...
C6000n Safety, Warranty, and Regulatory Information
Page 4
... and will try to the original purchaser of the exchange product: failure to consumable items or supplies, such as toner cartridges, image drums, ribbon cartridges, fuses, etc. If the product casing gets extremely hot or smoke, unusual smells or abnormal noises are allowed to prevent...If the product is a risk of entrapment or personal injury. and Canada only Oki Data Americas, Inc. (Oki Data) warrants this C6000n (hereinafter "the Product") to be made available for use liquid or aerosol cleaners. Oki Data will be new or reconditioned, at its functional equivalent, at all times ...
... and will try to the original purchaser of the exchange product: failure to consumable items or supplies, such as toner cartridges, image drums, ribbon cartridges, fuses, etc. If the product casing gets extremely hot or smoke, unusual smells or abnormal noises are allowed to prevent...If the product is a risk of entrapment or personal injury. and Canada only Oki Data Americas, Inc. (Oki Data) warrants this C6000n (hereinafter "the Product") to be made available for use liquid or aerosol cleaners. Oki Data will be new or reconditioned, at its functional equivalent, at all times ...
C6000n Handy Reference
Page 5
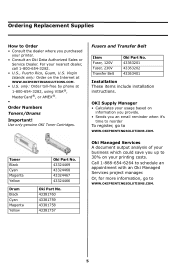
... To register, go to WWW.OKIPRINTINGSOLUTIONS.COM. 5 Toner Black Cyan Magenta Yellow Drum Black Cyan Magenta Yellow Oki Part No. 43324469 43324468 43324467 43324466 Oki Part No. 43381760 43381759 43381758 43381757 Oki Managed Services A document output analysis of your usage based on information you provide.... include installation instructions. Use only genuine OKI Toner Cartridges. Or, for more information, go to 30% on the Internet at 1-800-654-3282, using VISA®, MasterCard®, or AMEX®. • Order Numbers Toners/Drums Important! Virgin Islands only: Order on...
... To register, go to WWW.OKIPRINTINGSOLUTIONS.COM. 5 Toner Black Cyan Magenta Yellow Drum Black Cyan Magenta Yellow Oki Part No. 43324469 43324468 43324467 43324466 Oki Part No. 43381760 43381759 43381758 43381757 Oki Managed Services A document output analysis of your usage based on information you provide.... include installation instructions. Use only genuine OKI Toner Cartridges. Or, for more information, go to 30% on the Internet at 1-800-654-3282, using VISA®, MasterCard®, or AMEX®. • Order Numbers Toners/Drums Important! Virgin Islands only: Order on...

C6000n Handy Reference
Page 25
Note To remove a sheet trapped in the fuser: Caution! Clearing Media Jams Internal (381) Jam 381 1. To avoid damage to the drums: • Be sure to set the drums on a flat surface. • Do not expose the drums to light for more than 5 minutes. • Do not touch the shiny green area on the bottom. 3. 25 Caution! C M Y K 5. The fuser behind the cyan (C) toner may be HOT. 4. 2.
Note To remove a sheet trapped in the fuser: Caution! Clearing Media Jams Internal (381) Jam 381 1. To avoid damage to the drums: • Be sure to set the drums on a flat surface. • Do not expose the drums to light for more than 5 minutes. • Do not touch the shiny green area on the bottom. 3. 25 Caution! C M Y K 5. The fuser behind the cyan (C) toner may be HOT. 4. 2.

C6000n Handy Reference
Page 28
... top cover. XXX TONER SENSOR ERROR Open the cover. To continue printing, you have a genuine OKI replacement toner cartridge on -line User's Guide. XXXX DRUM LIFE Replace the xxxx image drum. (See the instructions supplied with a genuine OKI Toner Cartridge (5). When this message appears, the printer stops after every 20 pages. Push the XXX...
... top cover. XXX TONER SENSOR ERROR Open the cover. To continue printing, you have a genuine OKI replacement toner cartridge on -line User's Guide. XXXX DRUM LIFE Replace the xxxx image drum. (See the instructions supplied with a genuine OKI Toner Cartridge (5). When this message appears, the printer stops after every 20 pages. Push the XXX...

C6000n User's Guide
Page 4
Multi-purpose Tray 68 Consumables and Replacement Supplies 72 Life Expectancy 72 Part Numbers 72 Replace a Toner Cartridge 73 Replace an Image Drum 79 Replace the Fuser 87 Replace the Belt Unit 91 Printer Settings (Menu Settings 96 Print a list of the current settings 96 Changing Settings 97 ... 161 Which Printer Driver to Use 162 Change Driver Settings 163 Save Driver Settings 164 Check to see if saved Driver Settings are used . . . . . 166 C6000n Series User's Guide 4
Multi-purpose Tray 68 Consumables and Replacement Supplies 72 Life Expectancy 72 Part Numbers 72 Replace a Toner Cartridge 73 Replace an Image Drum 79 Replace the Fuser 87 Replace the Belt Unit 91 Printer Settings (Menu Settings 96 Print a list of the current settings 96 Changing Settings 97 ... 161 Which Printer Driver to Use 162 Change Driver Settings 163 Save Driver Settings 164 Check to see if saved Driver Settings are used . . . . . 166 C6000n Series User's Guide 4

C6000n User's Guide
Page 19
... paper or thermal transfer paper. Driver Settings To select a paper type in the driver, see: Windows: page 15 Macintosh OS 10.2 and 10.3: page 17 C6000n User's Guide 19 Paper with perforations, cut-outs or ragged edges. - Damp, damaged or curled paper. - Recommendations • Check www.okiprintingsolutions.com for the latest... sunlight and heat sources. • The use of heavily laid or textured paper will reduce the output speed and prevent the use of the image drum and give proper toner fusion, you can try the Label settings. • Avoid: -
... paper or thermal transfer paper. Driver Settings To select a paper type in the driver, see: Windows: page 15 Macintosh OS 10.2 and 10.3: page 17 C6000n User's Guide 19 Paper with perforations, cut-outs or ragged edges. - Damp, damaged or curled paper. - Recommendations • Check www.okiprintingsolutions.com for the latest... sunlight and heat sources. • The use of heavily laid or textured paper will reduce the output speed and prevent the use of the image drum and give proper toner fusion, you can try the Label settings. • Avoid: -

C6000n User's Guide
Page 21
... difference between the two sides. - Driver Settings To select a paper type in the driver, see: Windows: page 15 Macintosh OS 10.2 and 10.3: page 17 C6000n User's Guide 21 However, this will reduce the output speed and prevent the use of heavily laid or textured paper will seriously affect the life... of the image drum and give proper toner fusion, you can be stored flat, away from moisture, direct sunlight and heat sources. • The use of the duplex option...
... difference between the two sides. - Driver Settings To select a paper type in the driver, see: Windows: page 15 Macintosh OS 10.2 and 10.3: page 17 C6000n User's Guide 21 However, this will reduce the output speed and prevent the use of heavily laid or textured paper will seriously affect the life... of the image drum and give proper toner fusion, you can be stored flat, away from moisture, direct sunlight and heat sources. • The use of the duplex option...

C6000n User's Guide
Page 22
Letterhead General Information The size, weight, and type of the image drum is also known as simplex printing. This will improve print quality. Application settings override driver settings. C6000n User's Guide 22 When using 'Ultra Heavy': • print speed slows • duplexing cannot be made in the printer menu or in the printer...
Letterhead General Information The size, weight, and type of the image drum is also known as simplex printing. This will improve print quality. Application settings override driver settings. C6000n User's Guide 22 When using 'Ultra Heavy': • print speed slows • duplexing cannot be made in the printer menu or in the printer...

C6000n User's Guide
Page 23
... of heavily laid or textured paper will reduce the output speed and prevent the use very smooth, shiny or glossy paper. C6000n User's Guide 23 Don't use of the image drum and give proper toner fusion, you can be stored flat, away from moisture, direct sunlight and heat sources. • The use...
... of heavily laid or textured paper will reduce the output speed and prevent the use very smooth, shiny or glossy paper. C6000n User's Guide 23 Don't use of the image drum and give proper toner fusion, you can be stored flat, away from moisture, direct sunlight and heat sources. • The use...

C6000n User's Guide
Page 72
Consumables and Replacement Supplies Life Expectancy See "Specifications" on page 121 Part Numbers Toner Black 43324469 Cyan 43324468 Magenta Yellow 43324467 43324466 Image Drum Black Cyan Magenta Yellow 43381760 43381759 43381758 43381757 Fuser 120 V 230 V 43363201 43363202 Belt Belt 43363401 C6000n User's Guide 72
Consumables and Replacement Supplies Life Expectancy See "Specifications" on page 121 Part Numbers Toner Black 43324469 Cyan 43324468 Magenta Yellow 43324467 43324466 Image Drum Black Cyan Magenta Yellow 43381760 43381759 43381758 43381757 Fuser 120 V 230 V 43363201 43363202 Belt Belt 43363401 C6000n User's Guide 72

C6000n User's Guide
Page 76
Do not touch the toner release lever until the toner cartridge is installed in the image drum. Insert the left end of the cartridge into the top of the cartridge. c53_80_tonrout.jpg C6000n User's Guide 76 Remove the adhesive tape from the underside of the image drum. If you do, it firmly against the spring on the drum unit. Hold the cartridge by its top center with the colored release lever to the right. Push it will open the toner release slot and spill toner. 7. 6. CAUTION!
Do not touch the toner release lever until the toner cartridge is installed in the image drum. Insert the left end of the cartridge into the top of the cartridge. c53_80_tonrout.jpg C6000n User's Guide 76 Remove the adhesive tape from the underside of the image drum. If you do, it firmly against the spring on the drum unit. Hold the cartridge by its top center with the colored release lever to the right. Push it will open the toner release slot and spill toner. 7. 6. CAUTION!

C6000n User's Guide
Page 77
Press it in place. c53_75_tonrlvrclose.jpg C6000n User's Guide 77 Lower the right end of the cartridge into the image drum unit. Then, push the colored lock lever back to open the toner slot and lock it firmly down in place. c53_73_tonerdrum.jpg 8.
Press it in place. c53_75_tonrlvrclose.jpg C6000n User's Guide 77 Lower the right end of the cartridge into the image drum unit. Then, push the colored lock lever back to open the toner slot and lock it firmly down in place. c53_73_tonerdrum.jpg 8.

C6000n User's Guide
Page 78
To avoid toner spillage, DO NOT open the toner release lever until the toner cartridge is properly seated in the image drum. 9. Push down on the lever again. Gently wipe the LED. c5x_ledarray_bw.jpg 10. Press back on the toner cartridge to be sure that it does not, STOP! Close and latch the top cover. IMPORTANT! Use the provided LED lens cleaner. c53_45_latchcvr.jp g C6000n User's Guide 78 The lever should move easily. If it is firmly seated in the image drum.
To avoid toner spillage, DO NOT open the toner release lever until the toner cartridge is properly seated in the image drum. 9. Push down on the lever again. Gently wipe the LED. c5x_ledarray_bw.jpg 10. Press back on the toner cartridge to be sure that it does not, STOP! Close and latch the top cover. IMPORTANT! Use the provided LED lens cleaner. c53_45_latchcvr.jp g C6000n User's Guide 78 The lever should move easily. If it is firmly seated in the image drum.

C6000n User's Guide
Page 79
Press the cover release and open the top cover fully. The life expectancy of the cartridge will be reduced as the toner charges the new drum. 1. Replace an Image Drum c53_31_drumREV.jpg and c53_30_single_toner.JPG REPLACE IMAGE DRUM nnn: ZZZZ DRUM LIFE nnn: ZZZZ = 350: YELLOW 351: MAGENTA 352: CYAN 353: BLACK Important! You must replace the toner cartridge when you replace the image drum. c53_02_opencvr.jpg C6000n User's Guide 79
Press the cover release and open the top cover fully. The life expectancy of the cartridge will be reduced as the toner charges the new drum. 1. Replace an Image Drum c53_31_drumREV.jpg and c53_30_single_toner.JPG REPLACE IMAGE DRUM nnn: ZZZZ DRUM LIFE nnn: ZZZZ = 350: YELLOW 351: MAGENTA 352: CYAN 353: BLACK Important! You must replace the toner cartridge when you replace the image drum. c53_02_opencvr.jpg C6000n User's Guide 79

C6000n User's Guide
Page 80
Note the positions of the printer. Discard it . 2. WARNING! c53_53_drumremove.jpg C6000n User's Guide 80 Lift the image drum, complete with your local regulations. This area is HOT. c53_09_lidup.jpg 3. If the printer has been powered on, the fuser is clearly labelled. Do not touch it in accordance with its toner cartridge, out of the four image drums: Cyan (1), Magenta (2), Yellow (3), Black (4).
Note the positions of the printer. Discard it . 2. WARNING! c53_53_drumremove.jpg C6000n User's Guide 80 Lift the image drum, complete with your local regulations. This area is HOT. c53_09_lidup.jpg 3. If the printer has been powered on, the fuser is clearly labelled. Do not touch it in accordance with its toner cartridge, out of the four image drums: Cyan (1), Magenta (2), Yellow (3), Black (4).

C6000n User's Guide
Page 81
c53_31_drum.jpg, Checkmark.bmp c53_79_drumtilt_3.jpg c53_78_drumtilt_2.jpg C6000n User's Guide 81 Unpack the new image drum. Image drum handling The image drum contains toner. To avoid spilling toner, be careful to keep it upright. CAUTION! 4.
c53_31_drum.jpg, Checkmark.bmp c53_79_drumtilt_3.jpg c53_78_drumtilt_2.jpg C6000n User's Guide 81 Unpack the new image drum. Image drum handling The image drum contains toner. To avoid spilling toner, be careful to keep it upright. CAUTION! 4.

C6000n User's Guide
Page 82
...The green surface at the base of each image drum is very delicate and light sensitive. • Do not touch the green surface. • Never expose the drum to direct sunlight or to very bright room lighting.... • Do not expose it to normal room light for more than 5 minutes. • If the image drum must be out of ...the printer for longer than 5 minutes, place the image drum inside a black plastic bag or carefully place it in a drawer or...
...The green surface at the base of each image drum is very delicate and light sensitive. • Do not touch the green surface. • Never expose the drum to direct sunlight or to very bright room lighting.... • Do not expose it to normal room light for more than 5 minutes. • If the image drum must be out of ...the printer for longer than 5 minutes, place the image drum inside a black plastic bag or carefully place it in a drawer or...

C6000n User's Guide
Page 84
Remove the orange drum seal. Place the image drum in the printer. c53_84_removedrumwithorange.jpg 10. c53_83_removeorangething.jpg C6000n User's Guide 84 9.
Remove the orange drum seal. Place the image drum in the printer. c53_84_removedrumwithorange.jpg 10. c53_83_removeorangething.jpg C6000n User's Guide 84 9.


