Repack Procedure
Page 1
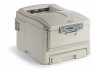
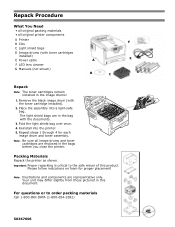
...proper placement! Note: Be sure all original printer components A Printer B CDs C Light shield bags D Image drums (with the toner cartridge installed). 2. Please follow indications on foam for each image drum and toner assembly. Your unit may differ slightly from those pictured in the bag with the documents. 3.... is critical to order packing materials Call 1-800-OKI-DATA (1-800-654-3282) 58367606 For questions or to the safe return of this document. Repack Procedure What You Need • all original packing materials • all image drums and toner cartridges are enclosed in the...
...proper placement! Note: Be sure all original printer components A Printer B CDs C Light shield bags D Image drums (with the toner cartridge installed). 2. Please follow indications on foam for each image drum and toner assembly. Your unit may differ slightly from those pictured in the bag with the documents. 3.... is critical to order packing materials Call 1-800-OKI-DATA (1-800-654-3282) 58367606 For questions or to the safe return of this document. Repack Procedure What You Need • all original packing materials • all image drums and toner cartridges are enclosed in the...
Belt Instructions
Page 1
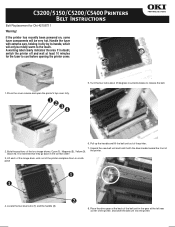
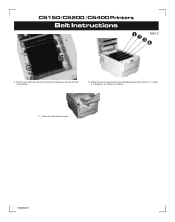
... out of the four image drums: Cyan (1), Magenta (2), Yellow (3), the printer. Place the drive gear at the back of the printer, and lower the belt unit into the printer. A warning label clearly indicates the area. C3200/5150/C5200/C5400 Printers Belt Instructions Belt Replacement for the fuser to release the belt. 6. Turn the... up the handle and lift the belt unit out of 2. It is essential that they go back in the gear at least 10 minutes for Oki 42158711 Warning! Handle the fuser with the blue handle toward the front of the printer. 7.
... out of the four image drums: Cyan (1), Magenta (2), Yellow (3), the printer. Place the drive gear at the back of the printer, and lower the belt unit into the printer. A warning label clearly indicates the area. C3200/5150/C5200/C5400 Printers Belt Instructions Belt Replacement for the fuser to release the belt. 6. Turn the... up the handle and lift the belt unit out of 2. It is essential that they go back in the gear at least 10 minutes for Oki 42158711 Warning! Handle the fuser with the blue handle toward the front of the printer. 7.
Belt Instructions
Page 2
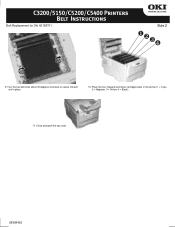
C3200/5150/C5200/C5400 Printers Belt Instructions Belt Replacement for Oki 42158701 Side 2 9. Turn the two belt locks about 45 degrees clockwise to secure the belt unit in the printer (1 = Cyan, 2 = Magenta, 3 = Yellow, 4 = Black): 11. Close and latch the top cover. 58368402 Place the four image drums/toner cartridges back in place. 10.
C3200/5150/C5200/C5400 Printers Belt Instructions Belt Replacement for Oki 42158701 Side 2 9. Turn the two belt locks about 45 degrees clockwise to secure the belt unit in the printer (1 = Cyan, 2 = Magenta, 3 = Yellow, 4 = Black): 11. Close and latch the top cover. 58368402 Place the four image drums/toner cartridges back in place. 10.
Warranty, Regulatory and Safety Information / Informations de garantie, de r覬ementation et de s袵rit瞯 Garant
Page 1
...service under this Limited Warranty contact your local Oki Data authorized service center or Oki Data at 1-800-OKI-DATA, or by Oki Data's representative within 2 business days of your receipt of purchase except for the printhead (LED imaging array), which is warranted for cleaning/repairs ...warranty gives you specific legal rights, and you ship the printer, remove the image drums and toner cartridges to prevent damage to the printer during shipment: failure to state. OKI® C5150n, C5200ne, C5200n, C5400 & C5400n Warranty, Regulatory and Safety Information English 1 Français 13 ...
...service under this Limited Warranty contact your local Oki Data authorized service center or Oki Data at 1-800-OKI-DATA, or by Oki Data's representative within 2 business days of your receipt of purchase except for the printhead (LED imaging array), which is warranted for cleaning/repairs ...warranty gives you specific legal rights, and you ship the printer, remove the image drums and toner cartridges to prevent damage to the printer during shipment: failure to state. OKI® C5150n, C5200ne, C5200n, C5400 & C5400n Warranty, Regulatory and Safety Information English 1 Français 13 ...

Belt Instructions
Page 1
... touch. Locate the two blue locks (1) and the handle (2). 8. Pull up the handle and lift the belt unit out of 2. Lift each of the image drum units out of the printer and place them in doubt, switch the printer off and wait at least 10 minutes for the fuser to release... the drive gear at the left rear corner of heat and light. Belt Replacement Oki 42158711 C5150/C5200 /C5400 Printers Belt Instructions Warning! It is essential that they go back in the gear at the back of the four image drums: Cyan (1), Magenta (2), Yellow (3), the printer. OKI6 Note the positions of the belt ...
... touch. Locate the two blue locks (1) and the handle (2). 8. Pull up the handle and lift the belt unit out of 2. Lift each of the image drum units out of the printer and place them in doubt, switch the printer off and wait at least 10 minutes for the fuser to release... the drive gear at the left rear corner of heat and light. Belt Replacement Oki 42158711 C5150/C5200 /C5400 Printers Belt Instructions Warning! It is essential that they go back in the gear at the back of the four image drums: Cyan (1), Magenta (2), Yellow (3), the printer. OKI6 Note the positions of the belt ...
Belt Instructions
Page 2
Close and latch the top cover. 58368401 Turn the two belt locks about 45 degrees clockwise to secure the belt unit in the printer (1 = Cyan, 2 = Magenta, 3 = Yellow, 4 = Black): 11. C5150/C5200 /C5400 Printers Belt Instructions Side 2 9. Place the four image drums/toner cartridges back in place. 10.
Close and latch the top cover. 58368401 Turn the two belt locks about 45 degrees clockwise to secure the belt unit in the printer (1 = Cyan, 2 = Magenta, 3 = Yellow, 4 = Black): 11. C5150/C5200 /C5400 Printers Belt Instructions Side 2 9. Place the four image drums/toner cartridges back in place. 10.

Guide: Handy Reference C5400 Series (American English)
Page 4
... Standard High Capacity Color Black Cyan Magenta Yellow Black Cyan Magenta Yellow Oki Part No. 42804504 42804503 42804502 42804501 42127404 42127403 42127402 42127401 Image Drums, Type C6 Color Black Cyan Magenta Yellow Oki Part No. 42126604 42126603 42126602 42126601 Take Advantage of OKI®'s Supply Manager Don't run out of supplies again! • Calculates your...
... Standard High Capacity Color Black Cyan Magenta Yellow Black Cyan Magenta Yellow Oki Part No. 42804504 42804503 42804502 42804501 42127404 42127403 42127402 42127401 Image Drums, Type C6 Color Black Cyan Magenta Yellow Oki Part No. 42126604 42126603 42126602 42126601 Take Advantage of OKI®'s Supply Manager Don't run out of supplies again! • Calculates your...

Guide: Handy Reference C5400 Series (American English)
Page 32
Caution! The fuser (behind cyan [C] toner) may be hot. 31 Clearing Media Jams (cont.) Jam 381 OPEN TOP COVER 381: PAPER JAM 1 3 Remove the image drums/ toner cartridges: Caution! To avoid damage to the drums: • Be sure to set the drums on a flat surface. 2 • Do not touch the shiny green area on CMY K the bottom of the drums. • Do not expose the drums to light for more than 5 minutes.
Caution! The fuser (behind cyan [C] toner) may be hot. 31 Clearing Media Jams (cont.) Jam 381 OPEN TOP COVER 381: PAPER JAM 1 3 Remove the image drums/ toner cartridges: Caution! To avoid damage to the drums: • Be sure to set the drums on a flat surface. 2 • Do not touch the shiny green area on CMY K the bottom of the drums. • Do not expose the drums to light for more than 5 minutes.

Guide: Handy Reference C5400 Series (American English)
Page 43
...for more common error messages appear below. What to Do • Reduce the size of the display to indicate that color XXXX (e.g, BLACK) image drum needs to STOP, the ATTENTION light will go. Appears on the second line of all the way back. INSTALL ADDITIONAL MEMORY 420: MEMORY OVERFLOW...continue printing. Close the cover. Push the lock lever toward the back of the display to Do Replace the XXXX image drum. (See the instructions supplied with the new image drum.) XXX TONER LOW Appears on hand. What to indicate that color XXX toner cartridge is not pushed all the pages...
...for more common error messages appear below. What to Do • Reduce the size of the display to indicate that color XXXX (e.g, BLACK) image drum needs to STOP, the ATTENTION light will go. Appears on the second line of all the way back. INSTALL ADDITIONAL MEMORY 420: MEMORY OVERFLOW...continue printing. Close the cover. Push the lock lever toward the back of the display to Do Replace the XXXX image drum. (See the instructions supplied with the new image drum.) XXX TONER LOW Appears on hand. What to indicate that color XXX toner cartridge is not pushed all the pages...

Guide: User's, C5400 Series (American English)
Page 3
... Menus 25 Summary of Menu Defaults 28 Printer Menus 36 Setting Color Tuning from The Front Panel 67 Replacing Consumables 71 Toner Cartridge Replacement 72 Image Drum Replacement 80 Belt Unit Replacement 89 Fuser Replacement 95 Clearing Paper Jams 100 Troubleshooting 121 LCD messages 121 Problem Solving 127 Parallel Transmission Mode: Windows...
... Menus 25 Summary of Menu Defaults 28 Printer Menus 36 Setting Color Tuning from The Front Panel 67 Replacing Consumables 71 Toner Cartridge Replacement 72 Image Drum Replacement 80 Belt Unit Replacement 89 Fuser Replacement 95 Clearing Paper Jams 100 Troubleshooting 121 LCD messages 121 Problem Solving 127 Parallel Transmission Mode: Windows...

Guide: User's, C5400 Series (American English)
Page 11
... Damp, damaged or curled paper. - US Bond (90 g/m²) • Xerox® 4024, 20 lb.US Bond (75 g/m²) • Oki® 52206101 Bright White Proofing Paper, 32 lb. Heavily embossed letterhead paper, very rough paper or paper that has a large grain difference between the two... edges. - US Bond (120 g/m2) Recommendations • Check http://my.okidata.com for the latest information on recommended papers for use of the image drum and give poor print quality. However, this will seriously affect the life of the duplex option. • Avoid: - Suitable types include: •...
... Damp, damaged or curled paper. - US Bond (90 g/m²) • Xerox® 4024, 20 lb.US Bond (75 g/m²) • Oki® 52206101 Bright White Proofing Paper, 32 lb. Heavily embossed letterhead paper, very rough paper or paper that has a large grain difference between the two... edges. - US Bond (120 g/m2) Recommendations • Check http://my.okidata.com for the latest information on recommended papers for use of the image drum and give poor print quality. However, this will seriously affect the life of the duplex option. • Avoid: - Suitable types include: •...

Guide: User's, C5400 Series (American English)
Page 44
Settings revert to 55 seconds. See "Setting Color Tuning from The Front Panel" on • when a new image drum or toner cartridge is automatically adjusted: • at power on page 67. Color Menu Note: Factory default settings are shown in natural daylight ...this function is not needed because TRC is complete. Item DENSITY CONTROL Settings AUTO MANUAL AUTO DENSITY EXECUTE COLOR TUNING PRINT PATTERN Explanation AUTO = image density is installed • at intervals of changing the default settings for special or particularly difficult print jobs. Prints the pattern for the user ...
Settings revert to 55 seconds. See "Setting Color Tuning from The Front Panel" on • when a new image drum or toner cartridge is automatically adjusted: • at power on page 67. Color Menu Note: Factory default settings are shown in natural daylight ...this function is not needed because TRC is complete. Item DENSITY CONTROL Settings AUTO MANUAL AUTO DENSITY EXECUTE COLOR TUNING PRINT PATTERN Explanation AUTO = image density is installed • at intervals of changing the default settings for special or particularly difficult print jobs. Prints the pattern for the user ...

Guide: User's, C5400 Series (American English)
Page 63
... = 0.00 0.25 increments. PCL MP TRAY ID# 1 to59; Default = 4 Sets MP tray number for the PCL emulation. This will reduce the image drum life. Default = 0.00 DUPLEX X ADJUST -2.00MILLIMETER TO Adjusts overall print position +2.00MILLIMETER of print face vertically in 0.25 Default = 0.00 increments. Menu..., enter the menu and temporarily change this set to ON will cause an extra blank sheet to print, cleaning the drum prior to printing. DRUM CLEANING OFF ON If you are shown in bold. DUPLEX Y ADJUST -2.00MILLIMETER TO Adjusts overall print position +2.00MILLIMETER of...
... = 0.00 0.25 increments. PCL MP TRAY ID# 1 to59; Default = 4 Sets MP tray number for the PCL emulation. This will reduce the image drum life. Default = 0.00 DUPLEX X ADJUST -2.00MILLIMETER TO Adjusts overall print position +2.00MILLIMETER of print face vertically in 0.25 Default = 0.00 increments. Menu..., enter the menu and temporarily change this set to ON will cause an extra blank sheet to print, cleaning the drum prior to printing. DRUM CLEANING OFF ON If you are shown in bold. DUPLEX Y ADJUST -2.00MILLIMETER TO Adjusts overall print position +2.00MILLIMETER of...

Guide: User's, C5400 Series (American English)
Page 71
..." on page 89. • Fuser - NOTE When installing a toner cartridge in an image are printed with this , the image drums could last longer, but if the average print job is shorter, then image drums will be used more quickly. Life expectancy about 45,000 letter-size pages. Life expectancy ...about 50,000 letter-size pages. Replacing Consumables • 71 See "Image Drum Replacement" on page 72. If the average print job is longer than this color of 3 pages per print job. See "Toner Cartridge ...
..." on page 89. • Fuser - NOTE When installing a toner cartridge in an image are printed with this , the image drums could last longer, but if the average print job is shorter, then image drums will be used more quickly. Life expectancy about 45,000 letter-size pages. Life expectancy ...about 50,000 letter-size pages. Replacing Consumables • 71 See "Image Drum Replacement" on page 72. If the average print job is longer than this color of 3 pages per print job. See "Toner Cartridge ...

Guide: User's, C5400 Series (American English)
Page 77
Holding the cartridge by its top center with the colored release lever to the right, insert the left end of the cartridge into the top of the image drum, pushing it will open the toner release slot and spill toner. 7. Do not touch the toner release lever until the toner cartridge is installed in the image drum. If you do, it firmly against the spring on the drum unit. CAUTION! Replacing Consumables • 77
Holding the cartridge by its top center with the colored release lever to the right, insert the left end of the cartridge into the top of the image drum, pushing it will open the toner release slot and spill toner. 7. Do not touch the toner release lever until the toner cartridge is installed in the image drum. If you do, it firmly against the spring on the drum unit. CAUTION! Replacing Consumables • 77

Guide: User's, C5400 Series (American English)
Page 78
and push down in place, then push the colored lock lever back to be sure that it does not, STOP! The lever should move easily. Important! If it is properly seated in the image drum, then press back on the toner cartridge to open the toner release lever until the toner cartridge is firmly seated in place. Replacing Consumables • 78 Lower the right end of the cartridge into the image drum unit, pressing it firmly down on the lever again. To avoid toner spillage, do NOT open the toner slot and lock it in the image drum. 8.
and push down in place, then push the colored lock lever back to be sure that it does not, STOP! The lever should move easily. Important! If it is properly seated in the image drum, then press back on the toner cartridge to open the toner release lever until the toner cartridge is firmly seated in place. Replacing Consumables • 78 Lower the right end of the cartridge into the image drum unit, pressing it firmly down on the lever again. To avoid toner spillage, do NOT open the toner slot and lock it in the image drum. 8.

Guide: User's, C5400 Series (American English)
Page 80
You will put the image drum and toner cartridge on your working surface to protect it. Replacing Consumables • 80 Place two sheets of paper on the paper while replacing them. Image Drum Replacement REPLACE IMAGE DRUM nnn: ZZZZ DRUM LIFE * nnn: ZZZZ = 350: YELLOW 351: MAGENTA 352: CYAN 353: BLACK Drum Color Black Cyan Magenta Yellow Oki Order # 42126604 42126603 42126602 42126601 1.
You will put the image drum and toner cartridge on your working surface to protect it. Replacing Consumables • 80 Place two sheets of paper on the paper while replacing them. Image Drum Replacement REPLACE IMAGE DRUM nnn: ZZZZ DRUM LIFE * nnn: ZZZZ = 350: YELLOW 351: MAGENTA 352: CYAN 353: BLACK Drum Color Black Cyan Magenta Yellow Oki Order # 42126604 42126603 42126602 42126601 1.

Guide: User's, C5400 Series (American English)
Page 82
Replacing Consumables • 82 3. Note the positions of paper. Lift the image drum, complete with its toner cartridge, out of the printer and put it down on one of the sheets of the four image drums: Cyan (1), Magenta (2), Yellow (3), Black (4): 4.
Replacing Consumables • 82 3. Note the positions of paper. Lift the image drum, complete with its toner cartridge, out of the printer and put it down on one of the sheets of the four image drums: Cyan (1), Magenta (2), Yellow (3), Black (4): 4.

Guide: User's, C5400 Series (American English)
Page 83
... wrap the cartridge inside a black plastic bag to keep it to normal room light for more than 5 minutes. Discard the used image drum in accordance with your furniture. 2 1 7. CAUTION! If the drum unit needs to be out of paper to the right, and remove the toner cartridge from light. The green... cartridge to avoid marking your local regulations. Replacing Consumables • 83 Do not touch it and do not expose it away from the image drum. Never expose the drum to the right, pull the lever towards you. 5. This will release the bond between the toner cartridge and the...
... wrap the cartridge inside a black plastic bag to keep it to normal room light for more than 5 minutes. Discard the used image drum in accordance with your furniture. 2 1 7. CAUTION! If the drum unit needs to be out of paper to the right, and remove the toner cartridge from light. The green... cartridge to avoid marking your local regulations. Replacing Consumables • 83 Do not touch it and do not expose it away from the image drum. Never expose the drum to the right, pull the lever towards you. 5. This will release the bond between the toner cartridge and the...

Guide: User's, C5400 Series (American English)
Page 84
8. Image drum handling: The image drum contains toner. To avoid spilling toner, be careful to keep it upright. Unpack the new image drum. Replacing Consumables • 84 CAUTION!
8. Image drum handling: The image drum contains toner. To avoid spilling toner, be careful to keep it upright. Unpack the new image drum. Replacing Consumables • 84 CAUTION!


