
PrintSuperVision Configuration Guide
Page 4
...(Optional Link 55 Supplies Ordering Calendar 56 Reporting 57 Available Reports 57 Selecting Report Attributes 57 Toner Changes Report 58 Generating a Toner Changes Report 58 Scheduling a Toner Changes Report 59 Schedule Log Report 60 Supplies Usage Report 61 Printed Pages Report 62 Color/...69 Quickly Access a Group of Devices 69 Changing the Device Properties Displayed 70 Searching for a Device 72 Changing Languages 72 Downloading Oki Drivers 73 Print to Remote Locations 74 Creating a Maintenance Log / Managing Supplies Inventory 75 Viewing a Login Log 76 Clearing (Deleting...
...(Optional Link 55 Supplies Ordering Calendar 56 Reporting 57 Available Reports 57 Selecting Report Attributes 57 Toner Changes Report 58 Generating a Toner Changes Report 58 Scheduling a Toner Changes Report 59 Schedule Log Report 60 Supplies Usage Report 61 Printed Pages Report 62 Color/...69 Quickly Access a Group of Devices 69 Changing the Device Properties Displayed 70 Searching for a Device 72 Changing Languages 72 Downloading Oki Drivers 73 Print to Remote Locations 74 Creating a Maintenance Log / Managing Supplies Inventory 75 Viewing a Login Log 76 Clearing (Deleting...

PrintSuperVision Configuration Guide
Page 57
... depend on the PSV edition installed and user access rights. Most reports can generate several reports that are available for reporting. Available Reports • Toner Changes Report (see page 58) • Schedule Log Report (see page 60) • Supplied Usage Report (see page 61) • ... have the option to be scheduled to add or delete the device attributes and properties that identify supplies use, predict toner replacement dates, indicate pages printed and export device properties. Reports can be periodically generated and delivered by email. To select reporting attributes 1....
... depend on the PSV edition installed and user access rights. Most reports can generate several reports that are available for reporting. Available Reports • Toner Changes Report (see page 58) • Schedule Log Report (see page 60) • Supplied Usage Report (see page 61) • ... have the option to be scheduled to add or delete the device attributes and properties that identify supplies use, predict toner replacement dates, indicate pages printed and export device properties. Reports can be periodically generated and delivered by email. To select reporting attributes 1....

PrintSuperVision Configuration Guide
Page 58
... Reports from the main menu and Toner Changes Report from the drop down box. 58 • Reporting Toner Changes Report The "Toner Changes" Report shows the dates of the last toner cartridge replacement for a group of devices and indicates if there was any toner remaining at the bottom of the ...screen (not shown in screen shot) to include in all reports generated. 4. This report is not available in identifying wasted toner as a result of replacement. Click the Save button at the time of changing the cartridge too soon. 3. Select the desired device attributes ...
... Reports from the main menu and Toner Changes Report from the drop down box. 58 • Reporting Toner Changes Report The "Toner Changes" Report shows the dates of the last toner cartridge replacement for a group of devices and indicates if there was any toner remaining at the bottom of the ...screen (not shown in screen shot) to include in all reports generated. 4. This report is not available in identifying wasted toner as a result of replacement. Click the Save button at the time of changing the cartridge too soon. 3. Select the desired device attributes ...

PrintSuperVision Configuration Guide
Page 59
...that can be scheduled to run periodically and configured to be sent via email to generate the report. Scheduling a Toner Changes Report A Toner Changes report can help you pinpoint toner remaining at on . Select a group of dates or click on the calendar icons to report on a particular date.... 2. Enter a range of devices to select dates. Additional details for toner replacement are available by various table sizes to display results; Click the Schedule button. 59 • Reporting Indicate either HTML or Excel ...
...that can be scheduled to run periodically and configured to be sent via email to generate the report. Scheduling a Toner Changes Report A Toner Changes report can help you pinpoint toner remaining at on . Select a group of dates or click on the calendar icons to report on a particular date.... 2. Enter a range of devices to select dates. Additional details for toner replacement are available by various table sizes to display results; Click the Schedule button. 59 • Reporting Indicate either HTML or Excel ...

PrintSuperVision Configuration Guide
Page 60
Click Schedule Logs. 2. Enter a date range and select the desired activity. 60 • Reporting Select a starting date and time, select a recurring interval for the report to be generated and sent to the recipient on the dates and times indicated. The toner changes report will be generated and sent, indicate email recipients and click Save. Schedule Log Report The Schedule Log Report provides an activity status log. 1. 2.
Click Schedule Logs. 2. Enter a date range and select the desired activity. 60 • Reporting Select a starting date and time, select a recurring interval for the report to be generated and sent to the recipient on the dates and times indicated. The toner changes report will be generated and sent, indicate email recipients and click Save. Schedule Log Report The Schedule Log Report provides an activity status log. 1. 2.
PrintSuperVision Configuration Guide
Page 61
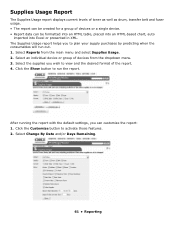
... select Supplies Usage. 2. Select Change By Date and/or Days Remaining. 61 • Reporting Supplies Usage Report The Supplies Usage report displays current levels of toner as well as drum, transfer belt and fuser usage. • The report can be created for a group of devices or a single device. • Report data...
... select Supplies Usage. 2. Select Change By Date and/or Days Remaining. 61 • Reporting Supplies Usage Report The Supplies Usage report displays current levels of toner as well as drum, transfer belt and fuser usage. • The report can be created for a group of devices or a single device. • Report data...
PrintSuperVision Configuration Guide
Page 69
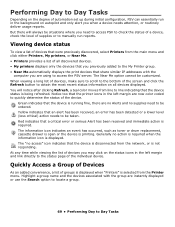
... Day Tasks Depending on all devices displayed. Notice too that the device is being refreshed. The information icon indicates an event has occurred, such as toner or drum replacement, cassette drawer is open or the device is not responding. Red indicates that the device is disconnected from the main menu and...
... Day Tasks Depending on all devices displayed. Notice too that the device is being refreshed. The information icon indicates an event has occurred, such as toner or drum replacement, cassette drawer is open or the device is not responding. Red indicates that the device is disconnected from the main menu and...
B6250 Setup Guide (E, Fr, Sp, BPort)
Page 3
... material and box for future use if there is a possibility that the printer will be moved over long distances. • Printer • Drum-toner cartridge (for approximately 6,000 Letter pages at 5% coverage, i.e. 5% of the addressable print area is contained in either of installing and setting up ...Checking the package contents Check that all items listed below are missing or damaged, contact your dealer. If any area other from an application. Oki has provided an interface, under MS Windows, to your printer depend on each other than these recessed areas. • When lifting the ...
... material and box for future use if there is a possibility that the printer will be moved over long distances. • Printer • Drum-toner cartridge (for approximately 6,000 Letter pages at 5% coverage, i.e. 5% of the addressable print area is contained in either of installing and setting up ...Checking the package contents Check that all items listed below are missing or damaged, contact your dealer. If any area other from an application. Oki has provided an interface, under MS Windows, to your printer depend on each other than these recessed areas. • When lifting the ...
B6250 Setup Guide (E, Fr, Sp, BPort)
Page 5
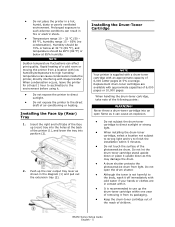
...reach of the printer (1), and lower the tray into position (2). 2. Installing the Face Up (Rear) Tray 1. Installing the Drum-Toner Cartridge NOTE Your printer is supplied with a drum-toner cartridge with an approximate capacity of 6,000 Letter pages at the back of children. Insert the right and left tabs of... light. B6250 Series Setup Guide English - 5 Rapid heating of the face up (rear) tray into an open the drum shutter. • Although the toner is recommended to the direct draft of 6,000 pages or 10,000 pages. Humidity should be 70% or below at 32 °C (89 °F), ...
...reach of the printer (1), and lower the tray into position (2). 2. Installing the Face Up (Rear) Tray 1. Installing the Drum-Toner Cartridge NOTE Your printer is supplied with a drum-toner cartridge with an approximate capacity of 6,000 Letter pages at the back of children. Insert the right and left tabs of... light. B6250 Series Setup Guide English - 5 Rapid heating of the face up (rear) tray into an open the drum shutter. • Although the toner is recommended to the direct draft of 6,000 pages or 10,000 pages. Humidity should be 70% or below at 32 °C (89 °F), ...
B6250 Setup Guide (E, Fr, Sp, BPort)
Page 6
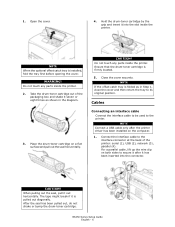
... it seven or eight times as shown in the diagram. 3. Close the cover securely. Connect the interface cable to its original position. Take the drum-toner cartridge out of the printer: serial (1), USB (2), network (3), parallel (4). NOTE If the offset catch tray is firmly located. 5. When pulling out the... printer. 2. After the seal has been pulled out, do not shake or bump the drum-toner cartridge. For a parallel cable, lift up the wire clip on the computer. 1. Hold the drum-toner cartridge by the grip and insert it out horizontally. NOTE Connect a USB cable only after it...
... it seven or eight times as shown in the diagram. 3. Close the cover securely. Connect the interface cable to its original position. Take the drum-toner cartridge out of the printer: serial (1), USB (2), network (3), parallel (4). NOTE If the offset catch tray is firmly located. 5. When pulling out the... printer. 2. After the seal has been pulled out, do not shake or bump the drum-toner cartridge. For a parallel cable, lift up the wire clip on the computer. 1. Hold the drum-toner cartridge by the grip and insert it out horizontally. NOTE Connect a USB cable only after it...
B6250 Users Guide
Page 8
... 98 When the Print Quality is Poor 104 Message List 108 Network Related Troubles 112 Mail Related Troubles 117 Daily Care 118 Replacing the Drum/Toner Cartridge 118 Printing Reports/Lists 121 Checking/Managing the Printer Status on the Computer 123 Checking Printer Status via E-mail 126 Checking Printed Pages 129...
... 98 When the Print Quality is Poor 104 Message List 108 Network Related Troubles 112 Mail Related Troubles 117 Daily Care 118 Replacing the Drum/Toner Cartridge 118 Printing Reports/Lists 121 Checking/Managing the Printer Status on the Computer 123 Checking Printer Status via E-mail 126 Checking Printed Pages 129...
B6250 Users Guide
Page 11
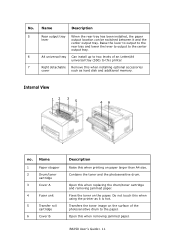
...tray and lower the lever to output to this when printing on paper larger than A4 size. Right detachable Remove this when replacing the drum/toner cartridge and removing jammed paper. No. 5 6 7 Name Description Rear output tray lever When the rear tray has been installed, the ... install up to two levels of the photosensitive drum to the paper. Name 1 Paper stopper 2 Drum/toner cartridge 3 Cover A 4 Fuser unit 5 Transfer roll cartridge 6 Cover B Description Raise this printer. Fixes the toner on the surface of an Letter/A4 universal tray (550) to the center output tray.
...tray and lower the lever to output to this when printing on paper larger than A4 size. Right detachable Remove this when replacing the drum/toner cartridge and removing jammed paper. No. 5 6 7 Name Description Rear output tray lever When the rear tray has been installed, the ... install up to two levels of the photosensitive drum to the paper. Name 1 Paper stopper 2 Drum/toner cartridge 3 Cover A 4 Fuser unit 5 Transfer roll cartridge 6 Cover B Description Raise this printer. Fixes the toner on the surface of an Letter/A4 universal tray (550) to the center output tray.

B6250 Users Guide
Page 44
... until [Media Menu] is displayed (X = the tray number you wish to set the paper types on the control panel are not reflected in trays 1 to 4. Toner may not fuse properly on the paper, resulting in dirty and poor quality printouts. • Changes in paper type settings on page 36 B6250 User...
... until [Media Menu] is displayed (X = the tray number you wish to set the paper types on the control panel are not reflected in trays 1 to 4. Toner may not fuse properly on the paper, resulting in dirty and poor quality printouts. • Changes in paper type settings on page 36 B6250 User...
B6250 Users Guide
Page 56
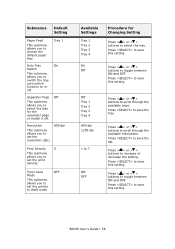
... ON and OFF. Resolution This submenu allows you to set the resolution (dpi). 600 dpi Print Density 5 This submenu allows you to save this setting. Toner Save OFF Mode This submenu allows you to set the printer to draft mode Available Settings Tray 1 Tray 2 Tray 3 Tray 4 On Off Procedure for the...
... ON and OFF. Resolution This submenu allows you to set the resolution (dpi). 600 dpi Print Density 5 This submenu allows you to save this setting. Toner Save OFF Mode This submenu allows you to set the printer to draft mode Available Settings Tray 1 Tray 2 Tray 3 Tray 4 On Off Procedure for the...
B6250 Users Guide
Page 64
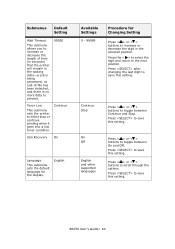
... decrease the length of -file has been detected, and there is no more data to process. 00020 Toner Low This submenu sets the printer to either stop or continue printing when it goes into a low toner condition. Continue Stop Press < > or < > buttons to toggle between On and Off. On Off English and...
... decrease the length of -file has been detected, and there is no more data to process. 00020 Toner Low This submenu sets the printer to either stop or continue printing when it goes into a low toner condition. Continue Stop Press < > or < > buttons to toggle between On and Off. On Off English and...
B6250 Users Guide
Page 84
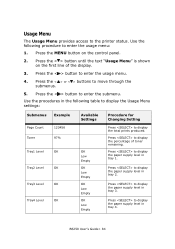
Press the MENU button on the first line of toner remaining. Press the < > button until the text "Usage Menu" is shown on the control panel. 2. Press the < > button to enter the submenu. Press to display ... level in tray 2. Press to display the percentage of the display. 3. Use the following table to display the Usage Menu settings: Submenus Example Page Count Toner 123456 97% Tray1 Level OK Tray2 Level OK Tray3 Level OK Tray4 Level OK Available Settings OK Low Empty OK Low Empty OK Low Empty...
Press the MENU button on the first line of toner remaining. Press the < > button until the text "Usage Menu" is shown on the control panel. 2. Press the < > button to enter the submenu. Press to display ... level in tray 2. Press to display the percentage of the display. 3. Use the following table to display the Usage Menu settings: Submenus Example Page Count Toner 123456 97% Tray1 Level OK Tray2 Level OK Tray3 Level OK Tray4 Level OK Available Settings OK Low Empty OK Low Empty OK Low Empty...
B6250 Users Guide
Page 94
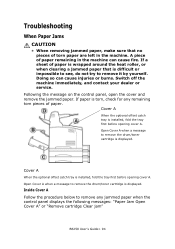
... Open Cover A" or "Remove cartridge Clear jam" B6250 User's Guide> 94 Open Cover A when a message to remove the drum/toner cartridge is displayed. Open Cover A when a message to remove the drum/toner cartridge is displayed. Cover A When the optional offset catch tray is installed, fold the tray first before opening cover A. Cover...
... Open Cover A" or "Remove cartridge Clear jam" B6250 User's Guide> 94 Open Cover A when a message to remove the drum/toner cartridge is displayed. Open Cover A when a message to remove the drum/toner cartridge is displayed. Cover A When the optional offset catch tray is installed, fold the tray first before opening cover A. Cover...
B6250 Users Guide
Page 95
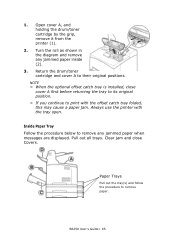
... Trays Pull out the tray(s) and follow the procedure to print with the tray open. Pull out all trays. Open cover A, and holding the drum/toner cartridge by the grip, remove it from the printer (1). 2. Turn the roll as shown in the diagram and remove any jammed paper when messages are... displayed. Inside Paper Tray Follow the procedure below to their original positions. B6250 User's Guide> 95 Return the drum/toner cartridge and cover A to remove any jammed paper inside (2). 3.
... Trays Pull out the tray(s) and follow the procedure to print with the tray open. Pull out all trays. Open cover A, and holding the drum/toner cartridge by the grip, remove it from the printer (1). 2. Turn the roll as shown in the diagram and remove any jammed paper when messages are... displayed. Inside Paper Tray Follow the procedure below to their original positions. B6250 User's Guide> 95 Return the drum/toner cartridge and cover A to remove any jammed paper inside (2). 3.

B6250 Users Guide
Page 104
... on . Open cover B of this printer and push down the levers at both sides of the fuser unit are printed. " Replacing the Drum/Toner Cartridge" (P. 118) B6250 User's Guide> 104 Replace with paper from the following table to rectify the problem. Online Help for the printer driver ... of the printer driver. If the print quality does not improve after carrying out the appropriate action, contact service. " Replacing the Drum/Toner Cartridge" (P. 118) The Toner Saving feature is damp. Black spots or streaks are raised. The paper is on the [Graphics] tab of the fuser unit. When...
... on . Open cover B of this printer and push down the levers at both sides of the fuser unit are printed. " Replacing the Drum/Toner Cartridge" (P. 118) B6250 User's Guide> 104 Replace with paper from the following table to rectify the problem. Online Help for the printer driver ... of the printer driver. If the print quality does not improve after carrying out the appropriate action, contact service. " Replacing the Drum/Toner Cartridge" (P. 118) The Toner Saving feature is damp. Black spots or streaks are raised. The paper is on the [Graphics] tab of the fuser unit. When...

B6250 Users Guide
Page 105
...type of the paper loaded in black filled areas. Set the appropriate paper type of paper. Replace with a new drum/toner cartridge. " Usable Paper" (P. 36) The drum/toner cartridge is defective or damaged. " Loading Paper" (P. 40) The paper used is stained. " Usable Paper" (P. 36) ...be due to remove the stains. Load the correct type of paper is not suitable. " Replacing the Drum/Toner Cartridge" (P. 118) The paper used is printed black. Replace with toner. The drum/toner cartridge is damp. " Usable Paper" (P. 36) " Setting Paper Types" (P. 44) The paper is ...
...type of the paper loaded in black filled areas. Set the appropriate paper type of paper. Replace with a new drum/toner cartridge. " Usable Paper" (P. 36) The drum/toner cartridge is defective or damaged. " Loading Paper" (P. 40) The paper used is stained. " Usable Paper" (P. 36) ...be due to remove the stains. Load the correct type of paper is not suitable. " Replacing the Drum/Toner Cartridge" (P. 118) The paper used is printed black. Replace with toner. The drum/toner cartridge is damp. " Usable Paper" (P. 36) " Setting Paper Types" (P. 44) The paper is ...


