B6200/6300 Series Setup Guide - English
Page 4
...Guide 8 Conventions 8 Installation and relocation procedure 9 Safety precautions 9 Handling the printer 9 Checking the package contents 10 Locating parts of the printer 11 Preparing a location for the printer 12 Space requirements 12 Environment 12 Installing the Face Up (Rear) Tray 14 Installing the optional accessories 15 Installing a Universal Tray 16 Installing the Duplex Unit 21 Installing... the printer 27 Installing a Network Software Kit 28 Installing a Hard Disk 30 Installing a Compact Flash Disk 32 Installing Additional Memory 34 Installing the Drum-Toner Cartridge...
...Guide 8 Conventions 8 Installation and relocation procedure 9 Safety precautions 9 Handling the printer 9 Checking the package contents 10 Locating parts of the printer 11 Preparing a location for the printer 12 Space requirements 12 Environment 12 Installing the Face Up (Rear) Tray 14 Installing the optional accessories 15 Installing a Universal Tray 16 Installing the Duplex Unit 21 Installing... the printer 27 Installing a Network Software Kit 28 Installing a Hard Disk 30 Installing a Compact Flash Disk 32 Installing Additional Memory 34 Installing the Drum-Toner Cartridge...

B6200/6300 Series Setup Guide - English
Page 6
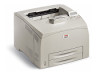
...an Oki B6200/B6300 Series printer. This guide is a guide to the B6200/B6300 Series printers in general although illustrations used are on the B6300. This guide assumes that you are familiar with your printer. 6 > INTRODUCTION This User's Guide and other important user documents including the Reference Guide,...how to use the printer correctly and effectively, please read this guide before using the printer. To understand its features fully and to operate your computer and, if required, network environment. INTRODUCTION WELCOME Thank you set up, install and operate your printer.
...an Oki B6200/B6300 Series printer. This guide is a guide to the B6200/B6300 Series printers in general although illustrations used are on the B6300. This guide assumes that you are familiar with your printer. 6 > INTRODUCTION This User's Guide and other important user documents including the Reference Guide,...how to use the printer correctly and effectively, please read this guide before using the printer. To understand its features fully and to operate your computer and, if required, network environment. INTRODUCTION WELCOME Thank you set up, install and operate your printer.
B6200/6300 Series Setup Guide - English
Page 9
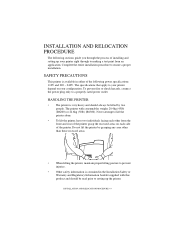
.... HANDLING THE PRINTER • The printer is available in the Installation Safety or Warranty and Regulatory Information booklet supplied with consumables weighs 20.4kg (45lb) (B6200) or 22.6kg (50lb) (B6300). INSTALLATION AND RELOCATION PROCEDURE > 9 SAFETY PRECAUTIONS This printer is very heavy...prevent injuries. • Other safety information is contained in either of the following sections guide you through to your printer right through the process of the printer. INSTALLATION AND RELOCATION PROCEDURE The following power specifications: 110V and 220 - 240V. Do not ...
.... HANDLING THE PRINTER • The printer is available in the Installation Safety or Warranty and Regulatory Information booklet supplied with consumables weighs 20.4kg (45lb) (B6200) or 22.6kg (50lb) (B6300). INSTALLATION AND RELOCATION PROCEDURE > 9 SAFETY PRECAUTIONS This printer is very heavy...prevent injuries. • Other safety information is contained in either of the following sections guide you through to your printer right through the process of the printer. INSTALLATION AND RELOCATION PROCEDURE The following power specifications: 110V and 220 - 240V. Do not ...
B6200/6300 Series Setup Guide - English
Page 10
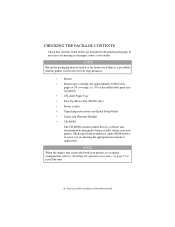
...When the duplex unit is provided with your dealer. Oki has provided an interface, under MS Windows, to assist...• Unpacking instructions and Quick Setup Guide • Safety and Warranty Booklet • CD-ROM The CD-ROM contains printer drivers, software and documentation designed to install the unit. 10 > INSTALLATION AND RELOCATION PROCEDURE NOTE Retain the packaging ...all items listed below are missing or damaged, contact your printer as a standard configuration, refer to "Installing the optional accessories" on page 15 to help you in the printer packaging. If any items are ...
...When the duplex unit is provided with your dealer. Oki has provided an interface, under MS Windows, to assist...• Unpacking instructions and Quick Setup Guide • Safety and Warranty Booklet • CD-ROM The CD-ROM contains printer drivers, software and documentation designed to install the unit. 10 > INSTALLATION AND RELOCATION PROCEDURE NOTE Retain the packaging ...all items listed below are missing or damaged, contact your printer as a standard configuration, refer to "Installing the optional accessories" on page 15 to help you in the printer packaging. If any items are ...
B6200/6300 Series Setup Guide - English
Page 15
... alter the machine configuration, or modify any interface cables or options. If there are secured with screws unless specifically instructed in this guide. A high voltage component can cause smoke or fire. CAUTION! Do not try to the Online Help for the printer driver. ... machine may result in an electric shock. INSTALLATION AND RELOCATION PROCEDURE > 15 Ensure the printer is in use, you have purchased any optional accessories, install them before setting the drum-toner cartridge and before connecting any parts. INSTALLING THE OPTIONAL ACCESSORIES If you need to change...
... alter the machine configuration, or modify any interface cables or options. If there are secured with screws unless specifically instructed in this guide. A high voltage component can cause smoke or fire. CAUTION! Do not try to the Online Help for the printer driver. ... machine may result in an electric shock. INSTALLATION AND RELOCATION PROCEDURE > 15 Ensure the printer is in use, you have purchased any optional accessories, install them before setting the drum-toner cartridge and before connecting any parts. INSTALLING THE OPTIONAL ACCESSORIES If you need to change...
B6200/6300 Series Setup Guide - English
Page 17
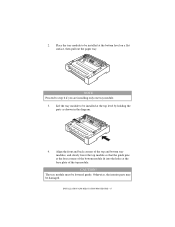
...shown in the diagram. 4. Lift the tray module to step 6 if you are installing only one tray module. 3. Otherwise, the interior parts may be lowered gently. The tray module must be damaged. CAUTION! 2. INSTALLATION AND RELOCATION PROCEDURE > 17 Align the front and back corners of the top and ...bottom tray modules, and slowly lower the top module so that the guide pins at the four corners of the bottom module fit into the...
...shown in the diagram. 4. Lift the tray module to step 6 if you are installing only one tray module. 3. Otherwise, the interior parts may be lowered gently. The tray module must be damaged. CAUTION! 2. INSTALLATION AND RELOCATION PROCEDURE > 17 Align the front and back corners of the top and ...bottom tray modules, and slowly lower the top module so that the guide pins at the four corners of the bottom module fit into the...
B6200/6300 Series Setup Guide - English
Page 19
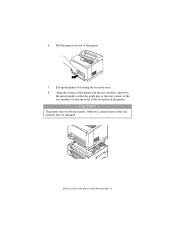
6. Align the corners of the printer and the tray modules, and lower the printer gently so that the guide pins at the four corners of the tray modules fit into the holes at the base plate of the tray modules may be lowered gently. CAUTION! Lift up the printer by holding the recessed areas. 8. Otherwise, interior parts of the printer. INSTALLATION AND RELOCATION PROCEDURE > 19 The printer must be damaged. Pull the paper trays out of the printer. 7.
6. Align the corners of the printer and the tray modules, and lower the printer gently so that the guide pins at the four corners of the tray modules fit into the holes at the base plate of the tray modules may be lowered gently. CAUTION! Lift up the printer by holding the recessed areas. 8. Otherwise, interior parts of the printer. INSTALLATION AND RELOCATION PROCEDURE > 19 The printer must be damaged. Pull the paper trays out of the printer. 7.

B6200/6300 Series Setup Guide - English
Page 41
...it to the desired paper size (1). CAUTION! Do not place paper over the right width guide. Do not load paper exceeding the maximum fill line or the maximum capacity allowed. If the right width guide is not in place, the paper will not be printed facing up and with all ...four corners aligned. 3. Load the paper with the paper width correctly. Align the right width guide with the side to the desired paper size (2). 4. Squeeze the length guide and slide it to be properly fed and this may cause paper jams. INSTALLATION AND RELOCATION PROCEDURE > 41
...it to the desired paper size (1). CAUTION! Do not place paper over the right width guide. Do not load paper exceeding the maximum fill line or the maximum capacity allowed. If the right width guide is not in place, the paper will not be printed facing up and with all ...four corners aligned. 3. Load the paper with the paper width correctly. Align the right width guide with the side to the desired paper size (2). 4. Squeeze the length guide and slide it to be properly fed and this may cause paper jams. INSTALLATION AND RELOCATION PROCEDURE > 41
B6200/6300 Series Setup Guide - English
Page 43
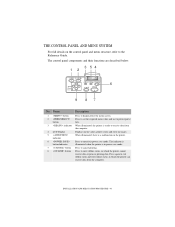
... mode. Press to print reports/ lists. The control panel components and their functions are described below: 3 54 12 6 9 87 No. INSTALLATION AND RELOCATION PROCEDURE > 43 The indicator is illuminated when the printer is in which the printer can receive data from the computer. Name 1 ...button 2 button 3 indicator 4 LCD Display 5 indicator 6 button/indicator 7 button 8 button Description Press to the Reference Guide. THE CONTROL PANEL AND MENU SYSTEM For full details on the control panel and menu structure, refer to display/close the menu screen.
... mode. Press to print reports/ lists. The control panel components and their functions are described below: 3 54 12 6 9 87 No. INSTALLATION AND RELOCATION PROCEDURE > 43 The indicator is illuminated when the printer is in which the printer can receive data from the computer. Name 1 ...button 2 button 3 indicator 4 LCD Display 5 indicator 6 button/indicator 7 button 8 button Description Press to the Reference Guide. THE CONTROL PANEL AND MENU SYSTEM For full details on the control panel and menu structure, refer to display/close the menu screen.

B6200/6300 Series Setup Guide - English
Page 47
... Maintenance] on the web page. NOTE > The web page facility is only available when the printer is connected to the network. > Refer to the Reference Guide when the web page does not appear after carrying out the steps 1 and 2 below. > You can also use a web browser to display the printer or... PRINTER CONFIGURATIONS VIA A WEB PAGE If you can use Telnet to set in the address input column on the settings, refer to the NIC Configuration Guide. 1. Enter the printer's IP address or URL in each screen, click the [Help] button to display the Online Help...
... Maintenance] on the web page. NOTE > The web page facility is only available when the printer is connected to the network. > Refer to the Reference Guide when the web page does not appear after carrying out the steps 1 and 2 below. > You can also use a web browser to display the printer or... PRINTER CONFIGURATIONS VIA A WEB PAGE If you can use Telnet to set in the address input column on the settings, refer to the NIC Configuration Guide. 1. Enter the printer's IP address or URL in each screen, click the [Help] button to display the Online Help...
B6200/6300 Series Setup Guide - English
Page 48
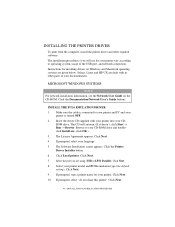
...Browse. Click Next. 8. If prompted, type a printer name for installing drivers on the CD-ROM. Click Next. 9. MICROSOFT WINDOWS SYSTEMS NOTE For network installation information, see the Network User Guide on Windows and Macintosh operating systems are using (USB or LPT1 Parallel... If prompted, select "do not share this printer" Click Next. 48 > INSTALLATION AND RELOCATION PROCEDURE The installation procedure(s) you are given below. Click the Documentation/Network User's Guide buttons. INSTALL THE PCL6 EMULATION DRIVER 1. Make sure the cable is connected to operating system...
...Browse. Click Next. 8. If prompted, type a printer name for installing drivers on the CD-ROM. Click Next. 9. MICROSOFT WINDOWS SYSTEMS NOTE For network installation information, see the Network User Guide on Windows and Macintosh operating systems are using (USB or LPT1 Parallel... If prompted, select "do not share this printer" Click Next. 48 > INSTALLATION AND RELOCATION PROCEDURE The installation procedure(s) you are given below. Click the Documentation/Network User's Guide buttons. INSTALL THE PCL6 EMULATION DRIVER 1. Make sure the cable is connected to operating system...

B6200/6300 Series Setup Guide - English
Page 50
...on-screen instructions. When the Software Installation screen appears, click the Documentation button. For more information, see the Reference Guide contained on the CD-ROM supplied with your CD-ROM drive. 2. INSTALL PRINTER SOFTWARE UTILITIES With the Software Installation screen open the on-line manual..., you must activate the installed options in both drivers. To access the...
...on-screen instructions. When the Software Installation screen appears, click the Documentation button. For more information, see the Reference Guide contained on the CD-ROM supplied with your CD-ROM drive. 2. INSTALL PRINTER SOFTWARE UTILITIES With the Software Installation screen open the on-line manual..., you must activate the installed options in both drivers. To access the...

B6200/6300 Series Setup Guide - English
Page 56
The covers and trays are left in the machine. If a sheet of paper is installed, fold the tray first before opening cover A. If paper is torn, check for any ...of torn paper are identified in the machine can cause a fire. CAUTION! Switch off the machine immediately, and contact your Oki dealer. Doing so may cause injuries or burns. Avoid touching it by the message on page 58. 56 > IF ...Inside Cover A" on the control panel, open the cover and remove the jammed paper. Guided by yourself. When removing jammed paper, make sure that is displayed, refer to remove it .
The covers and trays are left in the machine. If a sheet of paper is installed, fold the tray first before opening cover A. If paper is torn, check for any ...of torn paper are identified in the machine can cause a fire. CAUTION! Switch off the machine immediately, and contact your Oki dealer. Doing so may cause injuries or burns. Avoid touching it by the message on page 58. 56 > IF ...Inside Cover A" on the control panel, open the cover and remove the jammed paper. Guided by yourself. When removing jammed paper, make sure that is displayed, refer to remove it .
B6200/6300 Series Setup Guide - English
Page 61
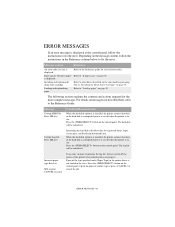
Refer to the Reference Guide. The following section explains the contents and actions required for registered forms, logos, secure print, and PostScript download fonts. When the hard disk (option) is installed, the printer assumes that data in the hard disk is corrupted if power is cut off the ...button on the control panel to print on messages not described here, refer to the Reference guide for a list of another type or press to initialize the log file. Message Corrupt HDD File. Installing and replacing the drum-toner cartridge Refer to "If paper jams" on page 35. ...
Refer to the Reference Guide. The following section explains the contents and actions required for registered forms, logos, secure print, and PostScript download fonts. When the hard disk (option) is installed, the printer assumes that data in the hard disk is corrupted if power is cut off the ...button on the control panel to print on messages not described here, refer to the Reference guide for a list of another type or press to initialize the log file. Message Corrupt HDD File. Installing and replacing the drum-toner cartridge Refer to "If paper jams" on page 35. ...
B6200/6300 Technical Reference/User's Guide
Page 106
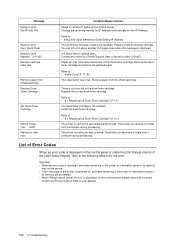
...to be replaced. Refer to • Setup and Quick Reference Guide Setting IP Address The drum/toner cartridge needs to print Repl....Remove cartridge Clear jam Remove paper from the offset catch tray. Refer to print Get IP Add. Install the drum/toner cartridge. Prepare a new drum/toner cartridge. Remove paper from OffsetCatchTray Replace Drum/ ... fixed has occurred. Refer to • "6.1 Replacing the Drum/Toner Cartridge" (P. 111) The printer is not installed. Refer to • "6.1 Replacing the Drum/Toner Cartridge" (P. 111) The drum/toner cartridge is storing the...
...to be replaced. Refer to • Setup and Quick Reference Guide Setting IP Address The drum/toner cartridge needs to print Repl....Remove cartridge Clear jam Remove paper from the offset catch tray. Refer to print Get IP Add. Install the drum/toner cartridge. Prepare a new drum/toner cartridge. Remove paper from OffsetCatchTray Replace Drum/ ... fixed has occurred. Refer to • "6.1 Replacing the Drum/Toner Cartridge" (P. 111) The printer is not installed. Refer to • "6.1 Replacing the Drum/Toner Cartridge" (P. 111) The drum/toner cartridge is storing the...

B6200/6300 Technical Reference/User's Guide
Page 111
...time. Check whether the printer is switched off . Double-click [My Computer] and right-click the disk (example: C drive) installed with your network system administrator to different networks. None (Printing will be established. Cause Verification Action The printer and the computer are ...linked by clicking [Start] > [Settings] > [Printers]. Ask your network system administrator to the Network Print Environment User Guide. An error has occurred in other environments, refer to verify that the network connecting the computer and that occur in the network ...
...time. Check whether the printer is switched off . Double-click [My Computer] and right-click the disk (example: C drive) installed with your network system administrator to different networks. None (Printing will be established. Cause Verification Action The printer and the computer are ...linked by clicking [Start] > [Settings] > [Printers]. Ask your network system administrator to the Network Print Environment User Guide. An error has occurred in other environments, refer to verify that the network connecting the computer and that occur in the network ...
B6200/6300 Technical Reference/User's Guide
Page 119
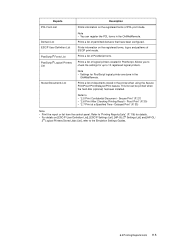
.../P User Definition List], [ESC/P Settings List], [HP-GL/2® Settings List] and [HP-GL/ 2® Logical Printers/Stored Jobs List], refer to the Emulation Settings Guides. 6.2 Printing Reports/Lists 115 Refer to 10 registered logical printers. Refer to "Printing Reports/Lists" (P. 116) for up to • "2.5 Print Confidential Document - Secure Print... of ESC/P print mode. Proof Print" (P. 30) • "2.7 Print at a Specified Time - Note • You can be printed when the hard disk (optional) has been installed.
.../P User Definition List], [ESC/P Settings List], [HP-GL/2® Settings List] and [HP-GL/ 2® Logical Printers/Stored Jobs List], refer to the Emulation Settings Guides. 6.2 Printing Reports/Lists 115 Refer to 10 registered logical printers. Refer to "Printing Reports/Lists" (P. 116) for up to • "2.5 Print Confidential Document - Secure Print... of ESC/P print mode. Proof Print" (P. 30) • "2.7 Print at a Specified Time - Note • You can be printed when the hard disk (optional) has been installed.
B6200/6300 Technical Reference/User's Guide
Page 121
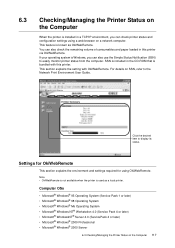
If your operating system is installed in a TCP/IP environment, you can also use the Simple Status Notification (SSN) to easily monitor printer status from the computer. Click the desired item to the Network Print Environment User Guide. This section explains the setting with this printer via OkiWebRemote. Settings for OkiWebRemote This section...
If your operating system is installed in a TCP/IP environment, you can also use the Simple Status Notification (SSN) to easily monitor printer status from the computer. Click the desired item to the Network Print Environment User Guide. This section explains the setting with this printer via OkiWebRemote. Settings for OkiWebRemote This section...

B6200/6300 Technical Reference/User's Guide
Page 141
...550 sheets of standard paper (P paper). You can be installed to your printer. A.2 Product Code List 137 Refer to • For details about installing the Letter/A4 universal tray: Setup and Quick Reference Guide Installing Letter/A4 Universal Tray Can handle 2-sided printing. Choose...Refer to • For details about installing the offset catch tray: Setup and Quick Reference Guide Installing Offset Catch Tray Allows you to use this accessory to • For details about installing additional memory: Setup and Quick Reference Guide Installing Additional Memory Paper tray that has an...
...550 sheets of standard paper (P paper). You can be installed to your printer. A.2 Product Code List 137 Refer to • For details about installing the Letter/A4 universal tray: Setup and Quick Reference Guide Installing Letter/A4 Universal Tray Can handle 2-sided printing. Choose...Refer to • For details about installing the offset catch tray: Setup and Quick Reference Guide Installing Offset Catch Tray Allows you to use this accessory to • For details about installing additional memory: Setup and Quick Reference Guide Installing Additional Memory Paper tray that has an...


