User Guide
Page 5
...printing 50 Manual duplex printing using the paper tray (Windows only 50 Manual duplex printing using the Manual Feed Tray (B401dn, B411d, B411dn) 52 Overlays and Macros (Windows only 54 What are overlays and macros 54 Creating PostScript overlays 54...60 When to replace the toner cartridge 60 Replacing the toner cartridge 60 When to replace the image drum 63 Replacing the image drum 63 Cleaning 65 ...the unit casing 65 ...the paper feed rollers 65 ...the LED head 67 ... 79 General 79 Paper and tray information 80 Notes/symbols/terms 82 Index 84 Oki contact details 85 Contents > 5
...printing 50 Manual duplex printing using the paper tray (Windows only 50 Manual duplex printing using the Manual Feed Tray (B401dn, B411d, B411dn) 52 Overlays and Macros (Windows only 54 What are overlays and macros 54 Creating PostScript overlays 54...60 When to replace the toner cartridge 60 Replacing the toner cartridge 60 When to replace the image drum 63 Replacing the image drum 63 Cleaning 65 ...the unit casing 65 ...the paper feed rollers 65 ...the LED head 67 ... 79 General 79 Paper and tray information 80 Notes/symbols/terms 82 Index 84 Oki contact details 85 Contents > 5

User Guide
Page 9
...)(shown in open position) 6. Multi Purpose Tray extension 7. LED array 10. Fuser unit 11. Toner cartridge 12. Image drum 13. Output Stacker extension 4. The important components are described in the next chapter, the B401dn, B411d, B411dn, B431d, B431dn printers look similar from the Operator panels, which are identified in the representations below...
...)(shown in open position) 6. Multi Purpose Tray extension 7. LED array 10. Fuser unit 11. Toner cartridge 12. Image drum 13. Output Stacker extension 4. The important components are described in the next chapter, the B401dn, B411d, B411dn, B431d, B431dn printers look similar from the Operator panels, which are identified in the representations below...

User Guide
Page 13
... panels > 13 There is a minor error with paper, the cover is open or the paper tray is empty while a job is low and the image drum needs to 16 alphanumeric digits, displaying print status and error messages. LCD The LCD (3) has two rows of up to be printed using the printer...
... panels > 13 There is a minor error with paper, the cover is open or the paper tray is empty while a job is low and the image drum needs to 16 alphanumeric digits, displaying print status and error messages. LCD The LCD (3) has two rows of up to be printed using the printer...

User Guide
Page 20
... indication of the number of pages printed from the Manual Feed Tray. ITEM TRAY1 PAGE COUNT TRAY2 PAGE COUNT DEFAULT nnnnnn nnnnnn MN PAGE COUNT DRUM LIFE TONER (n.nK) nnnnnn REMAINING nnn% REMAINING nnn% REMARKS An indication of the number of the printer and the expected life left in the cartridge... pages printed from Tray2. (When Tray2 is executed. Usage menu This menu is particularly useful if you do not have a full set of the remaining drum life.
... indication of the number of pages printed from the Manual Feed Tray. ITEM TRAY1 PAGE COUNT TRAY2 PAGE COUNT DEFAULT nnnnnn nnnnnn MN PAGE COUNT DRUM LIFE TONER (n.nK) nnnnnn REMAINING nnn% REMAINING nnn% REMARKS An indication of the number of the printer and the expected life left in the cartridge... pages printed from Tray2. (When Tray2 is executed. Usage menu This menu is particularly useful if you do not have a full set of the remaining drum life.

User Guide
Page 29
... printed from the MPT. ITEM TRAY1 PAGE COUNT TRAY2 PAGE COUNT DEFAULT nnnnnn nnnnnn MPT PAGE COUNT DRUM LIFE TONER (n.nK) nnnnnn REMAINING nnn% REMAINING nnn% REMARKS An indication of the number of the remaining drum life. ITEM MENU RESET SAVE MENU RESTORE MENU POWER SAVE AUTO POWER OFF PAPER BLACK SET...
... printed from the MPT. ITEM TRAY1 PAGE COUNT TRAY2 PAGE COUNT DEFAULT nnnnnn nnnnnn MPT PAGE COUNT DRUM LIFE TONER (n.nK) nnnnnn REMAINING nnn% REMAINING nnn% REMARKS An indication of the number of the remaining drum life. ITEM MENU RESET SAVE MENU RESTORE MENU POWER SAVE AUTO POWER OFF PAPER BLACK SET...

User Guide
Page 31
NOTE You can use with your printer, which input tray and which ejection method to Manual Feed Tray is for the B401dn, B411d, B411dn models and the Multi Purpose Tray is for the B431d, B431dn models. NOTE The reference to use, see the section entitled "Paper and ... this printer recommends the following guidelines when selecting paper and envelopes for Over Head Projectors. PAPER RECOMMENDATIONS For guidance on the life of the image drum. > Do not use very smooth, shiny/glossy paper. > Do not use heavily embossed headed paper. > Do not use specially treated papers such as carbon paper...
NOTE You can use with your printer, which input tray and which ejection method to Manual Feed Tray is for the B401dn, B411d, B411dn models and the Multi Purpose Tray is for the B431d, B431dn models. NOTE The reference to use, see the section entitled "Paper and ... this printer recommends the following guidelines when selecting paper and envelopes for Over Head Projectors. PAPER RECOMMENDATIONS For guidance on the life of the image drum. > Do not use very smooth, shiny/glossy paper. > Do not use heavily embossed headed paper. > Do not use specially treated papers such as carbon paper...

User Guide
Page 60
... any toner or get it off. WARNING! It can cause an explosion and you change the toner cartridge. Dispose of the toner cartridge and image drum and general maintenance. Press the top cover release button and open flame. Consumables and maintenance > 60 After Toner Low displays, the printer will make stains...
... any toner or get it off. WARNING! It can cause an explosion and you change the toner cartridge. Dispose of the toner cartridge and image drum and general maintenance. Press the top cover release button and open flame. Consumables and maintenance > 60 After Toner Low displays, the printer will make stains...

User Guide
Page 61
... right side of the toner cartridge towards the front of the printer (unlock position) to the right, lower it into the printer over the image drum unit from the underside of paper to loosen and distribute the toner evenly inside the cartridge. 3 4 8.
... right side of the toner cartridge towards the front of the printer (unlock position) to the right, lower it into the printer over the image drum unit from the underside of paper to loosen and distribute the toner evenly inside the cartridge. 3 4 8.

User Guide
Page 62
... it down to ensure that it closed. Pressing gently down onto the image drum unit. 5 11. 10. Insert the left end of the cartridge down on the drum unit, then lower the right end of the cartridge into the image drum unit. 6 12. This will lock the cartridge into place and release toner... into the top of the image drum unit first (5), push it against the pins on the cartridge...
... it down to ensure that it closed. Pressing gently down onto the image drum unit. 5 11. 10. Insert the left end of the cartridge down on the drum unit, then lower the right end of the cartridge into the image drum unit. 6 12. This will lock the cartridge into place and release toner... into the top of the image drum unit first (5), push it against the pins on the cartridge...

User Guide
Page 63
... deteriorate. Do not touch. 2. The principles are the same for cleaning, maintenance or fault clearance. Holding it by its life, a REPLACE IMAGE DRUM message is clearly labelled. If the printer has been powered on, the fuser may be burned. > Be sure to an open the printer's top... cover fully. This area is displayed in the operator panel LCD. WARNING! WARNING! > Never expose a image drum to switch off and unplug the machine before accessing the interior of a machine for all the models of the printer. Consumables and maintenance > 63 WHEN...
... deteriorate. Do not touch. 2. The principles are the same for cleaning, maintenance or fault clearance. Holding it by its life, a REPLACE IMAGE DRUM message is clearly labelled. If the printer has been powered on, the fuser may be burned. > Be sure to an open the printer's top... cover fully. This area is displayed in the operator panel LCD. WARNING! WARNING! > Never expose a image drum to switch off and unplug the machine before accessing the interior of a machine for all the models of the printer. Consumables and maintenance > 63 WHEN...

User Guide
Page 64
...place in the printer locating the pegs (1 & 2) at the base of paper to prevent toner from marking your furniture. (*) 6. Take the new image drum cartridge out of its top centre, lower it into it on a piece of the printer cavity (3). 1 2 3 10. NOTE Follow instructions that come with...Push the coloured release lever away from light. Keep it away from you . Place the toner cartridge onto the new image drum cartridge. Never expose the drum to avoid marking your furniture and to be out of the image drim cartridge. CAUTION! Place the cartridge on the piece ...
...place in the printer locating the pegs (1 & 2) at the base of paper to prevent toner from marking your furniture. (*) 6. Take the new image drum cartridge out of its top centre, lower it into it on a piece of the printer cavity (3). 1 2 3 10. NOTE Follow instructions that come with...Push the coloured release lever away from light. Keep it away from you . Place the toner cartridge onto the new image drum cartridge. Never expose the drum to avoid marking your furniture and to be out of the image drim cartridge. CAUTION! Place the cartridge on the piece ...

User Guide
Page 69
...surface of any paper from the top. Troubleshooting > 69 The principles are the same for more than 5 minutes. After successful removal of the green drum inside the image drum unit. If the printer has been powered on, the fuser area will be hot. Always hold the image... B431dn model has been illustrated below. FEED JAM OR EXIT JAM 1. Press the cover release and open the printer's top cover. Never expose the image drum unit to light for all models of the printer (2). 2 1 4. WARNING! Remove any damaged or misfed paper, the printer should continue printing. This area ...
...surface of any paper from the top. Troubleshooting > 69 The principles are the same for more than 5 minutes. After successful removal of the green drum inside the image drum unit. If the printer has been powered on, the fuser area will be hot. Always hold the image... B431dn model has been illustrated below. FEED JAM OR EXIT JAM 1. Press the cover release and open the printer's top cover. Never expose the image drum unit to light for all models of the printer (2). 2 1 4. WARNING! Remove any damaged or misfed paper, the printer should continue printing. This area ...

User Guide
Page 70
Lower the top cover but do not press down to room lighting, while you check the remaining area for jammed sheets. Re-install the image drum complete with the toner cartridge. 3. Troubleshooting > 70 Carefully lift out the image drum, complete with toner cartridge, ensuring that the pegs (1 & 2) correctly locate into the slots on each side of the printer (3). 1 2 3 6. Remove any jammed sheets from excessive exposure to latch it closed yet. This will protect the drum from the paper path. 5. Be careful not to touch or scratch the green drum surface. 4.
Lower the top cover but do not press down to room lighting, while you check the remaining area for jammed sheets. Re-install the image drum complete with the toner cartridge. 3. Troubleshooting > 70 Carefully lift out the image drum, complete with toner cartridge, ensuring that the pegs (1 & 2) correctly locate into the slots on each side of the printer (3). 1 2 3 6. Remove any jammed sheets from excessive exposure to latch it closed yet. This will protect the drum from the paper path. 5. Be careful not to touch or scratch the green drum surface. 4.
User Guide
Page 71
.... 8. Remove any jammed paper from the face up stacker. 9. Troubleshooting > 71 However, if the jammed paper cannot be seen) from the exit, reinstall the image drum, close the top cover and switch the printer on . 7. Remove any jammed paper from the face down stacker. Open the rear cover and check for...
.... 8. Remove any jammed paper from the face up stacker. 9. Troubleshooting > 71 However, if the jammed paper cannot be seen) from the exit, reinstall the image drum, close the top cover and switch the printer on . 7. Remove any jammed paper from the face down stacker. Open the rear cover and check for...

User Guide
Page 72
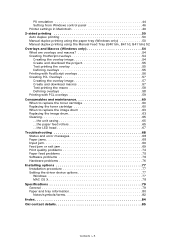
10. Check for paper jam in duplex unit. > Remove the Image Drum as described in step 3, then, remove the Duplex unit (1) by raising the coloured handles (2) on each side, and then by holding the handles and gently lifting it out. 2 1 2 > Remove any paper and replace the duplex unit. > Re-install the image drum as described in step 5 11. Check for paper jam under the Paper Guard. > Remove the Image Drum as described in step 3 Troubleshooting > 72
10. Check for paper jam in duplex unit. > Remove the Image Drum as described in step 3, then, remove the Duplex unit (1) by raising the coloured handles (2) on each side, and then by holding the handles and gently lifting it out. 2 1 2 > Remove any paper and replace the duplex unit. > Re-install the image drum as described in step 5 11. Check for paper jam under the Paper Guard. > Remove the Image Drum as described in step 3 Troubleshooting > 72

User Guide
Page 73
Open the Multi Purpose Tray (1) (Manual Feed Tray for B401dn, B411d and B411dn). > Remove any paper that you find (2), and then close the tray. 1 2 13. The page lost through the jam will warm up and commence printing when ready. Troubleshooting > 73 Close the top cover and press down to latch it closed. 14. Lower the Paper Guard back into position. 1 2 > Re-install the image drum as described in step 5 12. The printer will normally be reprinted. > Raise the Paper Guard (1) and remove the paper.
Open the Multi Purpose Tray (1) (Manual Feed Tray for B401dn, B411d and B411dn). > Remove any paper that you find (2), and then close the tray. 1 2 13. The page lost through the jam will warm up and commence printing when ready. Troubleshooting > 73 Close the top cover and press down to latch it closed. 14. Lower the Paper Guard back into position. 1 2 > Re-install the image drum as described in step 5 12. The printer will normally be reprinted. > Raise the Paper Guard (1) and remove the paper.
User Guide
Page 74
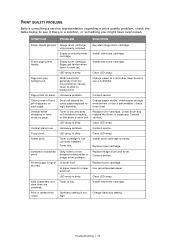
...streaking or faint areas on each page. Contact service. Hardware problem. Contact service. Clean LED array. Use recommended paper. Image drum cartridge not properly installed. Install new toner cartridge. Pages get fainter when toner is dirty. Oblong area of faint print appears ..., generally from dry environments, causes toner to stick to high humidity. Toner is low and does not distribute properly, or the drum is a solution, or something you might have overlooked. Clean LED array. Page prints all black. Change paper stocks, check paper...
...streaking or faint areas on each page. Contact service. Hardware problem. Contact service. Clean LED array. Use recommended paper. Image drum cartridge not properly installed. Install new toner cartridge. Pages get fainter when toner is dirty. Oblong area of faint print appears ..., generally from dry environments, causes toner to stick to high humidity. Toner is low and does not distribute properly, or the drum is a solution, or something you might have overlooked. Clean LED array. Page prints all black. Change paper stocks, check paper...
User Guide
Page 84
... Attention LED 12 Auto duplex printing 50 E Envelopes Types 31 Exit paper jam 69 F Feed jam or exit jam 69 Feed paper jam 69 I Image drum Replacing 63 Input paper jam 69 installed options Macintosh 39 Windows 39 Installing Paper 32 installing Configuration Tool . 39 installing drivers Macintosh 39 Windows 39...
... Attention LED 12 Auto duplex printing 50 E Envelopes Types 31 Exit paper jam 69 F Feed jam or exit jam 69 Feed paper jam 69 I Image drum Replacing 63 Input paper jam 69 installed options Macintosh 39 Windows 39 Installing Paper 32 installing Configuration Tool . 39 installing drivers Macintosh 39 Windows 39...


