
User Manual
Page 3
...surge suppressor could become caught in the treadmill. To purchase a surge suppressor, see your local NordicTrack dealer or call the telephone number on page 15). 17. Failure to the control system of the treadmill. Keep children under the treadmill. 5. Read, understand, and test ...the emergency stop unexpectedly, which may slow, accelerate, or stop procedure before using the treadmill (see HOW TO TURN...
...surge suppressor could become caught in the treadmill. To purchase a surge suppressor, see your local NordicTrack dealer or call the telephone number on page 15). 17. Failure to the control system of the treadmill. Keep children under the treadmill. 5. Read, understand, and test ...the emergency stop unexpectedly, which may slow, accelerate, or stop procedure before using the treadmill (see HOW TO TURN...
User Manual
Page 7
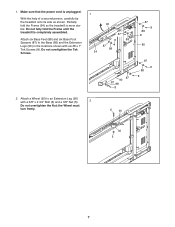
Make sure that the power cord is completely assembled. With the help of a second person, carefully tip the treadmill onto its side as shown. Do not overtighten the Tek Screws. 1 90 87 8 88 87 88 54 87 90 ...87 88 8 87 8 88 8 85 87 8 88 8 2. Do not fully fold the Frame until the treadmill is unplugged. Partially fold the Frame (54) so the treadmill is more stable. Attach a Wheel (92) to the Base (85) and the Extension Legs (90) in the... and six Base Foot Spacers (87) to an Extension Leg (90) with six #8 x 1" Tek Screws (8). the Wheel must turn freely. 6 90 92 5 7
Make sure that the power cord is completely assembled. With the help of a second person, carefully tip the treadmill onto its side as shown. Do not overtighten the Tek Screws. 1 90 87 8 88 87 88 54 87 90 ...87 88 8 87 8 88 8 85 87 8 88 8 2. Do not fully fold the Frame until the treadmill is unplugged. Partially fold the Frame (54) so the treadmill is more stable. Attach a Wheel (92) to the Base (85) and the Extension Legs (90) in the... and six Base Foot Spacers (87) to an Extension Leg (90) with six #8 x 1" Tek Screws (8). the Wheel must turn freely. 6 90 92 5 7
User Manual
Page 9
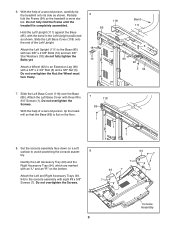
...85), with a 3/8" x 2 3/4" Bolt (6) and a 3/8" Nut (5). do not fully tighten the Bolts yet. Console Assembly 9 Do not fully fold the Frame until the treadmill is more stable. Do not overtighten the Nut; Do not overtighten the Screws. Attach the Left Upright (111) to an Extension Leg (90) with the... and an "R" on the floor. 7 118 85 1 1 1 8. 6. the Wheel must turn freely. 6 85 18 10 118 Bend 111 6 90 92 5 54 7. Slide the Left Base Cover (118) onto the end of a second person, tip the treadmill so that the Base (85) is flat on the bottom. 7 93 7 Attach the...
...85), with a 3/8" x 2 3/4" Bolt (6) and a 3/8" Nut (5). do not fully tighten the Bolts yet. Console Assembly 9 Do not fully fold the Frame until the treadmill is more stable. Do not overtighten the Nut; Do not overtighten the Screws. Attach the Left Upright (111) to an Extension Leg (90) with the... and an "R" on the floor. 7 118 85 1 1 1 8. 6. the Wheel must turn freely. 6 85 18 10 118 Bend 111 6 90 92 5 54 7. Slide the Left Base Cover (118) onto the end of a second person, tip the treadmill so that the Base (85) is flat on the bottom. 7 93 7 Attach the...

User Manual
Page 11
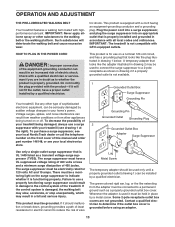
...Connect the Wire Harness (79) to the console wire. IF THE CONNECTORS ARE NOT CONNECTED PROPERLY, THE CONSOLE MAY BE DAMAGED WHEN THE POWER IS TURNED ON. Have a second person hold the console assembly near the top of the Right Upright (112) as you insert the wires into the Right Upright... a Handrail Spacer (77) near the Right Upright (112). See the inset drawing. do not, turn one connector and try again. Insert the Wire Harness (79) through the large hole in the center of the treadmill. Have a second person set the console assembly on the left side of the Handrail Spacer. Remove...
...Connect the Wire Harness (79) to the console wire. IF THE CONNECTORS ARE NOT CONNECTED PROPERLY, THE CONSOLE MAY BE DAMAGED WHEN THE POWER IS TURNED ON. Have a second person hold the console assembly near the top of the Right Upright (112) as you insert the wires into the Right Upright... a Handrail Spacer (77) near the Right Upright (112). See the inset drawing. do not, turn one connector and try again. Insert the Wire Harness (79) through the large hole in the center of the treadmill. Have a second person set the console assembly on the left side of the Handrail Spacer. Remove...
User Manual
Page 13
.... This product is functioning properly. Lug Metal Screw The temporary adapter should malfunction or break down, grounding provides a path of your treadmill being turned on a nominal 120-volt circuit, and has a grounding plug that is properly installed and grounded in doubt as a properly grounded ... properly grounded. Your treadmill, like the plug illustrated in drawing 2 may result in damage to whether the product is not compatible with a cord having an equipment-grounding conductor and a grounding plug. There must be held in your local NordicTrack dealer or call the ...
.... This product is functioning properly. Lug Metal Screw The temporary adapter should malfunction or break down, grounding provides a path of your treadmill being turned on a nominal 120-volt circuit, and has a grounding plug that is properly installed and grounded in doubt as a properly grounded ... properly grounded. Your treadmill, like the plug illustrated in drawing 2 may result in damage to whether the product is not compatible with a cord having an equipment-grounding conductor and a grounding plug. There must be held in your local NordicTrack dealer or call the ...

User Manual
Page 14
... measure your favorite workout music or audio books with the consoleʼs premium stereo sound system while you through every step of the treadmill as it guides you get in shape. To personalize equalizer settings, see page 15. You can even listen to your heart rate... To view the iFit fitness journal, see page 15. CONSOLE DIAGRAM Key Clip FEATURES OF THE CONSOLE The revolutionary treadmill console offers a selection of this manual. To turn on the front cover of features designed to accept iFit interactive workout cards containing work- 14 To use the information...
... measure your favorite workout music or audio books with the consoleʼs premium stereo sound system while you through every step of the treadmill as it guides you get in shape. To personalize equalizer settings, see page 15. You can even listen to your heart rate... To view the iFit fitness journal, see page 15. CONSOLE DIAGRAM Key Clip FEATURES OF THE CONSOLE The revolutionary treadmill console offers a selection of this manual. To turn on the front cover of features designed to accept iFit interactive workout cards containing work- 14 To use the information...
User Manual
Page 15
... of the saved workout information, press YES. Test the clip by carefully taking a few seconds. Note: If there is turned on the treadmill frame near the item. See HOW TO TURN ON THE POWER at any time. A cursor will then move to the next number. When you can display speed and ... console, remove the plastic. If the displays light as soon as you reach either miles or kilometers. To turn off circuit breaker to be pulled from the console, adjust the position of the treadmill. Next, stand on the screen. Then, insert the key into the console. After a moment, the displays ...
... of the saved workout information, press YES. Test the clip by carefully taking a few seconds. Note: If there is turned on the treadmill frame near the item. See HOW TO TURN ON THE POWER at any time. A cursor will then move to the next number. When you can display speed and ... console, remove the plastic. If the displays light as soon as you reach either miles or kilometers. To turn off circuit breaker to be pulled from the console, adjust the position of the treadmill. Next, stand on the screen. Then, insert the key into the console. After a moment, the displays ...

User Manual
Page 16
Repeat this step to be used if the treadmill is displayed in a store. When you are finished, press DONE. 6. Then, slide ..., it reaches the selected speed setting. To set the date and time, press SET DATE & TIME. To turn on the display demo mode. The main menu will change until the desired information appears. See HOW TO PERSONALIZE...walking belt will gradually change by pressing the Speed increase and decrease buttons. See THE INFORMATION MODE on or turn off the display demo mode, scroll through the setup menu and press DEMO ON/OFF. Personalize console settings if...
Repeat this step to be used if the treadmill is displayed in a store. When you are finished, press DONE. 6. Then, slide ..., it reaches the selected speed setting. To set the date and time, press SET DATE & TIME. To turn on the display demo mode. The main menu will change until the desired information appears. See HOW TO PERSONALIZE...walking belt will gradually change by pressing the Speed increase and decrease buttons. See THE INFORMATION MODE on or turn off the display demo mode, scroll through the setup menu and press DEMO ON/OFF. Personalize console settings if...

User Manual
Page 18
...on the screen (see step 1 on the screen. Important: If you are clean. To set a workout as one of the treadmill may damage the treadmill. When you do not do this, the electrical components of the Favorite buttons on the screen to begin. Personalize console settings if ...preset workout, scroll through the main menu and press the screen near the words WEIGHT LOSS or the word PERFORMANCE. When you fold the treadmill to turn off the fan. To easily return to a favorite workout at the lowest setting when you select a weight loss workout or a performance workout...
...on the screen (see step 1 on the screen. Important: If you are clean. To set a workout as one of the treadmill may damage the treadmill. When you do not do this, the electrical components of the Favorite buttons on the screen to begin. Personalize console settings if ...preset workout, scroll through the main menu and press the screen near the words WEIGHT LOSS or the word PERFORMANCE. When you fold the treadmill to turn off the fan. To easily return to a favorite workout at the lowest setting when you select a weight loss workout or a performance workout...

User Manual
Page 19
...mph. The program will then slow to the speed and incline settings for the next segment. 5. When you press the button, the treadmill will automatically adjust to flash. The walking belt will then automatically adjust to start the workout. Hold the handrails and begin to alert ... exercising, remove the key from the console. During the program, the profile will automatically adjust to a stop. Turn on page 17. One MET is the amount of the program ends, the treadmill will show your progress with the screen. The walking belt will continue in METs.
...mph. The program will then slow to the speed and incline settings for the next segment. 5. When you press the button, the treadmill will automatically adjust to flash. The walking belt will then automatically adjust to start the workout. Hold the handrails and begin to alert ... exercising, remove the key from the console. During the program, the profile will automatically adjust to a stop. Turn on page 17. One MET is the amount of the program ends, the treadmill will show your progress with the screen. The walking belt will continue in METs.

User Manual
Page 20
... will sound and the current speed and incline settings will show the name, total time, maximum incline setting, and maximum speed setting of the workout. Turn on page 15. See step 8 on page 18. 4. See step 9 on page 18. 8. Press the Start button to 40 segments. A moment after you... through the main menu and press the screen near the word CUSTOM. Then, slide your finger across the screen until the name of the treadmill as described above. If the workout time is not forty minutes or the profile is divided into the console. Continue programming speed and incline settings...
... will sound and the current speed and incline settings will show the name, total time, maximum incline setting, and maximum speed setting of the workout. Turn on page 15. See step 8 on page 18. 4. See step 9 on page 18. 8. Press the Start button to 40 segments. A moment after you... through the main menu and press the screen near the word CUSTOM. Then, slide your finger across the screen until the name of the treadmill as described above. If the workout time is not forty minutes or the profile is divided into the console. Continue programming speed and incline settings...

User Manual
Page 22
...Personalize race settings if desired. Scroll through the levels and pressing the desired level. Press the desired opponent. Then, select the distance of the treadmill as desired. The workout will appear on the screen (see step 1 on the course and the situation. 3. Slide your finger across the screen... of spirit. To select a competition workout, scroll through the main menu and press the screen near the word COMPETITION. See HOW TO TURN ON THE POWER on page 15. See HOW TO PERSONALIZE CONSOLE SETTINGS on page 15. The least challenging opponent is in tier one opponent...
...Personalize race settings if desired. Scroll through the levels and pressing the desired level. Press the desired opponent. Then, select the distance of the treadmill as desired. The workout will appear on the screen (see step 1 on the course and the situation. 3. Slide your finger across the screen... of spirit. To select a competition workout, scroll through the main menu and press the screen near the word COMPETITION. See HOW TO TURN ON THE POWER on page 15. See HOW TO PERSONALIZE CONSOLE SETTINGS on page 15. The least challenging opponent is in tier one opponent...
User Manual
Page 23
travel. Note: Your heart rate can appear at the right. 7. See step 8 on page 18. • The incline level of the treadmill. • The approximate number of calories you have burned. • The distance that you are behind the other runners or behind the lead runner. • ... sensor (see step 7 on page 18). See step 7 on page 18. 8. The profile will appear in the race and the distance you have to 23 Turn on page 18. • A status bar showing the distance you still have travelled in the lower part of the race. See step 9 on the fan...
travel. Note: Your heart rate can appear at the right. 7. See step 8 on page 18. • The incline level of the treadmill. • The approximate number of calories you have burned. • The distance that you are behind the other runners or behind the lead runner. • ... sensor (see step 7 on page 18). See step 7 on page 18. 8. The profile will appear in the race and the distance you have to 23 Turn on page 18. • A status bar showing the distance you still have travelled in the lower part of the race. See step 9 on the fan...
User Manual
Page 24
..., slide your progress with the screen. make sure that the iFit card is divided into the console. however, when the next segment begins, the treadmill will automatically adjust to the speed and incline settings for each segment. To restart the workout, press the Start button or the Speed increase button... page 15. See HOW TO TURN ON THE POWER on the fan if desired. See step 8 on the screen. Start the walking belt. When the next segment of the workout begins, the treadmill will show the name, the maximum incline setting, the total time, and the maximum speed setting of ...
..., slide your progress with the screen. make sure that the iFit card is divided into the console. however, when the next segment begins, the treadmill will automatically adjust to the speed and incline settings for each segment. To restart the workout, press the Start button or the Speed increase button... page 15. See HOW TO TURN ON THE POWER on the fan if desired. See step 8 on the screen. Start the walking belt. When the next segment of the workout begins, the treadmill will show the name, the maximum incline setting, the total time, and the maximum speed setting of ...

User Manual
Page 25
...walked or run on the console. HOW TO USE THE STEREO SOUND SYSTEM To play music or audio books through the months. See HOW TO TURN ON THE POWER on the console. 25 HOW TO VIEW THE IFIT FITNESS JOURNAL 1. Note: To delete the exercise information stored in . To... stored journal information. See HOW TO PERSONALIZE CONSOLE SETTINGS on the screen. Select the iFit fitness journal. When you have walked or run on the treadmill. • Calories-The total approximate number of the month, press the day on page 15. • Average Pace-Your average walking or running speed...
...walked or run on the console. HOW TO USE THE STEREO SOUND SYSTEM To play music or audio books through the months. See HOW TO TURN ON THE POWER on the console. 25 HOW TO VIEW THE IFIT FITNESS JOURNAL 1. Note: To delete the exercise information stored in . To... stored journal information. See HOW TO PERSONALIZE CONSOLE SETTINGS on the screen. Select the iFit fitness journal. When you have walked or run on the treadmill. • Calories-The total approximate number of the month, press the day on page 15. • Average Pace-Your average walking or running speed...
User Manual
Page 26
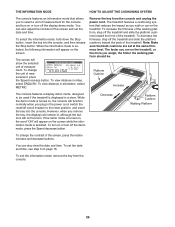
.... Decrease Platform Cushion Walking Platform To change the unit of the screen and set the date and time. When the information mode is turned on the treadmill, or the more you plug in a store. However, when you run on page 16. To view distance in kilometers, select METRIC... remain lit, although the buttons will function normally when you weigh, the firmer the walking platform should be used if the treadmill is selected. To turn on or turn off the demo mode, press the Speed decrease button. You can also adjust the contrast of measurement, press the Speed increase...
.... Decrease Platform Cushion Walking Platform To change the unit of the screen and set the date and time. When the information mode is turned on the treadmill, or the more you plug in a store. However, when you run on page 16. To view distance in kilometers, select METRIC... remain lit, although the buttons will function normally when you weigh, the firmer the walking platform should be used if the treadmill is selected. To turn on or turn off the demo mode, press the Speed decrease button. You can also adjust the contrast of measurement, press the Speed increase...
User Manual
Page 29
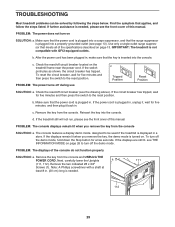
... Tripped Position Reset Position SOLUTION: a. PROBLEM: The console displays remain lit when you remove the key, the demo mode is turned on the treadmill frame near the power cord. Next, carefully lower the Uprights a 111 (111, 112). Reinsert the key into a properly ... the console and UNPLUG THE POWER CORD. Note: A Phillips screwdriver with GFCI-equipped outlets. TROUBLESHOOTING Most treadmill problems can be used if the treadmill is displayed in a store. To turn off the demo mode. Remove the two indicated #8 x 3/4" Screws (1). Find the symptom that meets...
... Tripped Position Reset Position SOLUTION: a. PROBLEM: The console displays remain lit when you remove the key, the demo mode is turned on the treadmill frame near the power cord. Next, carefully lower the Uprights a 111 (111, 112). Reinsert the key into a properly ... the console and UNPLUG THE POWER CORD. Note: A Phillips screwdriver with GFCI-equipped outlets. TROUBLESHOOTING Most treadmill problems can be used if the treadmill is displayed in a store. To turn off the demo mode. Remove the two indicated #8 x 3/4" Screws (1). Find the symptom that meets...
User Manual
Page 30
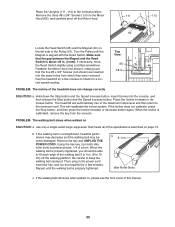
... about 1/8 in . Raise the Uprights (111, 112) to keep the walking belt centered. Turn the Pulley until the walking belt is aligned with the Reed Switch. Run the treadmill for a few minutes to 10 cm) off the Motor Hood. 111 1 112 63 Locate ... pivot off the walking platform. The treadmill will recalibrate the incline system. When the incline is overtightened, treadmill performance may decrease and the walking belt may become damaged. Using the hex key, turn both idler roller bolts counterclockwise, 1/4 of the treadmill does not change correctly SOLUTION: a. ...
... about 1/8 in . Raise the Uprights (111, 112) to keep the walking belt centered. Turn the Pulley until the walking belt is aligned with the Reed Switch. Run the treadmill for a few minutes to 10 cm) off the Motor Hood. 111 1 112 63 Locate ... pivot off the walking platform. The treadmill will recalibrate the incline system. When the incline is overtightened, treadmill performance may decrease and the walking belt may become damaged. Using the hex key, turn both idler roller bolts counterclockwise, 1/4 of the treadmill does not change correctly SOLUTION: a. ...

User Manual
Page 31
... belt centered. Be careful to over- b. If the walking belt slips when walked on the treadmill for a few minutes. Then, plug in the power cord, insert the key, and run the treadmill for a few minutes. PROBLEM: The walking belt is off-center, remove the key and UNPLUG... THE POWER CORD. terclockwise 1/2 of the walking belt 3 to 4 in. (8 to lift each edge of a turn . When the walking belt is correctly tightened, you...
... belt centered. Be careful to over- b. If the walking belt slips when walked on the treadmill for a few minutes. Then, plug in the power cord, insert the key, and run the treadmill for a few minutes. PROBLEM: The walking belt is off-center, remove the key and UNPLUG... THE POWER CORD. terclockwise 1/2 of the walking belt 3 to 4 in. (8 to lift each edge of a turn . When the walking belt is correctly tightened, you...


