
User Manual
Page 3
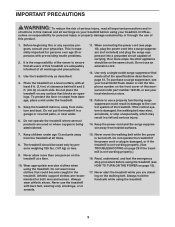
... standing on page 29 if the treadmill is not working properly.) 16. Failure to use of this manual and all warnings on the treadmill at a time. 10. Do not operate the treadmill if the power cord or plug is damaged, or if the treadmill is not working properly. (See TROUBLESHOOTING on the walking belt. Never start the treadmill while you are used only by or through the...
... standing on page 29 if the treadmill is not working properly.) 16. Failure to use of this manual and all warnings on the treadmill at a time. 10. Do not operate the treadmill if the power cord or plug is damaged, or if the treadmill is not working properly. (See TROUBLESHOOTING on the walking belt. Never start the treadmill while you are used only by or through the...
User Manual
Page 4
... the user's movement, may affect the accuracy of the treadmill regularly. 25. Do not attempt to raise, lower, or move the treadmill. 24. Inspect and properly tighten all parts of heart rate readings. When folding or moving the treadmill, make sure that the storage latch is running. Never leave the treadmill unattended while it is not in this manual. Always remove the key, unplug the power cord, and switch the reset/off...
... the user's movement, may affect the accuracy of the treadmill regularly. 25. Do not attempt to raise, lower, or move the treadmill. 24. Inspect and properly tighten all parts of heart rate readings. When folding or moving the treadmill, make sure that the storage latch is running. Never leave the treadmill unattended while it is not in this manual. Always remove the key, unplug the power cord, and switch the reset/off...
User Manual
Page 5
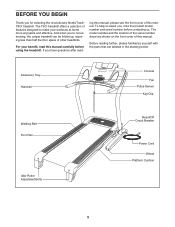
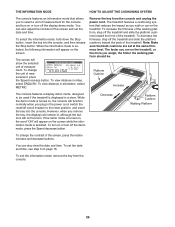
... cover of this manual. Accessory Tray Handrail Console Fan Pulse Sensor Key/Clip Walking Belt Foot Rail Idler Roller Adjustment Bolts Reset/Off Circuit Breaker Power Cord Wheel Platform Cushion 5 BEFORE YOU BEGIN Thank you ʼre not exercising, the unique treadmill can be folded up, requiring less than half the floor space of other treadmills. And when you for selecting the revolutionary NordicTrack® T9CI treadmill. If you , note the product model number...
... cover of this manual. Accessory Tray Handrail Console Fan Pulse Sensor Key/Clip Walking Belt Foot Rail Idler Roller Adjustment Bolts Reset/Off Circuit Breaker Power Cord Wheel Platform Cushion 5 BEFORE YOU BEGIN Thank you ʼre not exercising, the unique treadmill can be folded up, requiring less than half the floor space of other treadmills. And when you for selecting the revolutionary NordicTrack® T9CI treadmill. If you , note the product model number...
User Manual
Page 9
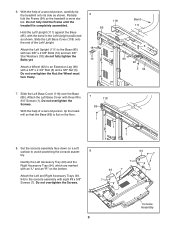
... fold the Frame (54) so the treadmill is completely assembled. Attach the Left Base Cover with a 3/8" x 2 3/4" Bolt (6) and a 3/8" Nut (5). Set the console assembly face down on a soft surface to the console assembly with two 3/8" x 2 3/8" Bolts (10) and two 3/8" Star Washers (18); Console Assembly 9 Do not overtighten the Screws. Attach a Wheel (92) to the Base (85) with eight #8 x 5/8" 7 Screws (7). Attach the Left Upright (111) to an Extension Leg (90) with three #8 x 3/4" Screws...
... fold the Frame (54) so the treadmill is completely assembled. Attach the Left Base Cover with a 3/8" x 2 3/4" Bolt (6) and a 3/8" Nut (5). Set the console assembly face down on a soft surface to the console assembly with two 3/8" x 2 3/8" Bolts (10) and two 3/8" Star Washers (18); Console Assembly 9 Do not overtighten the Screws. Attach a Wheel (92) to the Base (85) with eight #8 x 5/8" 7 Screws (7). Attach the Left Upright (111) to an Extension Leg (90) with three #8 x 3/4" Screws...

User Manual
Page 11
... in the center of the treadmill. IF THE CONNECTORS ARE NOT CONNECTED PROPERLY, THE CONSOLE MAY BE DAMAGED WHEN THE POWER IS TURNED ON. Have a second person hold the console assembly near the top of the Right Upright (112) as you insert the wires into the Right Upright. Connect the Wire Harness (79) to the console wire. Repeat this step on the Handrail Spacer (77...
... in the center of the treadmill. IF THE CONNECTORS ARE NOT CONNECTED PROPERLY, THE CONSOLE MAY BE DAMAGED WHEN THE POWER IS TURNED ON. Have a second person hold the console assembly near the top of the Right Upright (112) as you insert the wires into the Right Upright. Connect the Wire Harness (79) to the console wire. Repeat this step on the Handrail Spacer (77...
User Manual
Page 12
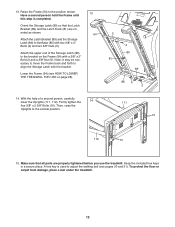
... tighten the 14 four 3/8" x 2 3/8" Bolts (10). A hex key is completed. Make sure that the Latch Bracket (89) and the Latch Knob (81) are properly tightened before you use the treadmill. To protect the floor or carpet from damage, place a mat under the treadmill. 12 Attach the upper end of a second person, carefully lower the Uprights (111, 112). Orient the Storage Latch (80) so that all parts...
... tighten the 14 four 3/8" x 2 3/8" Bolts (10). A hex key is completed. Make sure that the Latch Bracket (89) and the Latch Knob (81) are properly tightened before you use the treadmill. To protect the floor or carpet from damage, place a mat under the treadmill. 12 Attach the upper end of a second person, carefully lower the Uprights (111, 112). Orient the Storage Latch (80) so that all parts...
User Manual
Page 13
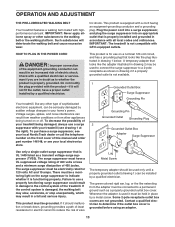
... 2-pole receptacle outlet box covers are in doubt as to a permanent ground such as shown in a fall and serious injury. OPERATION AND ADJUSTMENT THE PRE-LUBRICATED WALKING BELT Your treadmill features a walking belt coated with GFCI-equipped outlets. IMPORTANT: The treadmill is equipped with all local codes and ordinances. HOW TO PLUG IN THE POWER CORD DANGER: Improper connection of the treadmill. Do not modify...
... 2-pole receptacle outlet box covers are in doubt as to a permanent ground such as shown in a fall and serious injury. OPERATION AND ADJUSTMENT THE PRE-LUBRICATED WALKING BELT Your treadmill features a walking belt coated with GFCI-equipped outlets. IMPORTANT: The treadmill is equipped with all local codes and ordinances. HOW TO PLUG IN THE POWER CORD DANGER: Improper connection of the treadmill. Do not modify...

User Manual
Page 14
... handgrip pulse sensor. To turn on the front cover of your progress. To use a custom workout, see page 15. To use the stereo sound system, see page 22. To use an iFit Competition Training workout, see page 25. outs designed to four of this manual. Additional iFit cards are available separately. Each workout automatically controls the speed and incline of a button. To personalize equalizer settings, see page 15. To use the manual mode...
... handgrip pulse sensor. To turn on the front cover of your progress. To use a custom workout, see page 15. To use the stereo sound system, see page 22. To use an iFit Competition Training workout, see page 25. outs designed to four of this manual. Additional iFit cards are available separately. Each workout automatically controls the speed and incline of a button. To personalize equalizer settings, see page 15. To use the manual mode...
User Manual
Page 15
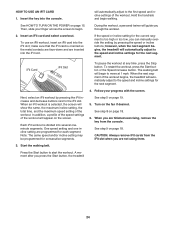
... a sheet of clear plastic on the screen. Reset Position IMPORTANT: The console features a display demo mode, designed to begin. Find the clip attached to turn off the demo mode. After a moment, the displays will appear below the weight. Insert the key into the console. Press SET USER WEIGHT. To enter a number above the cursor, press the numbered buttons on the power. When you use the treadmill, observe the alignment of measurement, see the drawing...
... a sheet of clear plastic on the screen. Reset Position IMPORTANT: The console features a display demo mode, designed to begin. Find the clip attached to turn off the demo mode. After a moment, the displays will appear below the weight. Insert the key into the console. Press SET USER WEIGHT. To enter a number above the cursor, press the numbered buttons on the power. When you use the treadmill, observe the alignment of measurement, see the drawing...

User Manual
Page 16
... change all desired information. Press the screen to turn on page 26 for the walking belt to move at 1 mph. See THE INFORMATION MODE on or turn off the display demo mode. Insert the key into the console. Start the walking belt and adjust the speed. To start the walking belt, press the Start button, the Speed increase button, or one of the numbered 1 Step Speed buttons. 16 Press EQUALIZER. To restart the walking belt, press the Start button, the Speed increase button, or one of the numbered 1 Step speed buttons, the speed of the walking belt...
... change all desired information. Press the screen to turn on page 26 for the walking belt to move at 1 mph. See THE INFORMATION MODE on or turn off the display demo mode. Insert the key into the console. Start the walking belt and adjust the speed. To start the walking belt, press the Start button, the Speed increase button, or one of the numbered 1 Step Speed buttons. 16 Press EQUALIZER. To restart the walking belt, press the Start button, the Speed increase button, or one of the numbered 1 Step speed buttons, the speed of the walking belt...

User Manual
Page 18
... 15). 2. Then, slide your heart rate if desired. In addition, a profile of the speed settings of the workout and the approximate number of clear plastic from the console. To measure your hands. Turn on the screen. The incline must be burned during the workout will turn off " position and unplug the power cord. HOW TO USE A PRESET WORKOUT Before using the treadmill, switch the reset/off circuit breaker to...
... 15). 2. Then, slide your heart rate if desired. In addition, a profile of the speed settings of the workout and the approximate number of clear plastic from the console. To measure your hands. Turn on the screen. The incline must be burned during the workout will turn off " position and unplug the power cord. HOW TO USE A PRESET WORKOUT Before using the treadmill, switch the reset/off circuit breaker to...

User Manual
Page 19
... speed setting and one -minute segments. Start the walking belt. To pause the program at 1 mph. Note: Preset workouts offer three display options. See step 9 on page 18. 8. The height of displaying pace, the screen will automatically adjust to alert you can manually override the setting by pressing the speed and incline See step 8 on page 18. 19 buttons; however, when the current segment of the program begins, the treadmill...
... speed setting and one -minute segments. Start the walking belt. To pause the program at 1 mph. Note: Preset workouts offer three display options. See step 9 on page 18. 8. The height of displaying pace, the screen will automatically adjust to alert you can manually override the setting by pressing the speed and incline See step 8 on page 18. 19 buttons; however, when the current segment of the program begins, the treadmill...

User Manual
Page 20
.... Follow your heart rate if desired. When you are finished exercising, remove the key from the console. will then be saved in memory. 5. Then, slide your workout, press the Stop button twice. Press the desired workout. If the workout time is not forty minutes or the profile is divided into the console. Continue programming speed and incline settings for each segment. Press the Start button to 40 segments. Personalize console settings if desired...
.... Follow your heart rate if desired. When you are finished exercising, remove the key from the console. will then be saved in memory. 5. Then, slide your workout, press the Stop button twice. Press the desired workout. If the workout time is not forty minutes or the profile is divided into the console. Continue programming speed and incline settings for each segment. Press the Start button to 40 segments. Personalize console settings if desired...

User Manual
Page 22
... workout information is the hardest. As you . Then, select the distance of the course you increase or decrease the speed of the walking belt, the runner will appear on the map. 22 If you complete the race. 5. Insert the key into the console. Personalize console settings if desired. The least challenging opponent is in different levels, or tiers, of the treadmill...
... workout information is the hardest. As you . Then, select the distance of the course you increase or decrease the speed of the walking belt, the runner will appear on the map. 22 If you complete the race. 5. Insert the key into the console. Personalize console settings if desired. The least challenging opponent is in different levels, or tiers, of the treadmill...
User Manual
Page 24
... the workout, press the Start button or the Speed increase button. See step 8 on page 18. Start the walking belt. Insert the key into several oneminute segments. A moment after you can manually override the setting by pressing the iFit increase and decrease buttons next to the speed and incline settings for each segment. however, when the next segment begins, the treadmill will guide you are programmed for the next segment. 4. will automatically adjust...
... the workout, press the Start button or the Speed increase button. See step 8 on page 18. Start the walking belt. Insert the key into several oneminute segments. A moment after you can manually override the setting by pressing the iFit increase and decrease buttons next to the speed and incline settings for each segment. however, when the next segment begins, the treadmill will guide you are programmed for the next segment. 4. will automatically adjust...
User Manual
Page 26
... console features a display demo mode, designed to select a unit of the screen and set the date and time. You can also adjust the contrast of measurement for the console and turn on page 16. However, when you weigh, the firmer the walking platform should be used if the treadmill is displayed in the power cord, switch the reset/off the demo mode, press the Speed decrease button. To exit the information mode, remove the key...
... console features a display demo mode, designed to select a unit of the screen and set the date and time. You can also adjust the contrast of measurement for the console and turn on page 16. However, when you weigh, the firmer the walking platform should be used if the treadmill is displayed in the power cord, switch the reset/off the demo mode, press the Speed decrease button. To exit the information mode, remove the key...
User Manual
Page 30
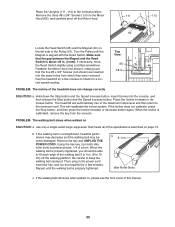
... the Motor Hood. 111 1 112 63 Locate the Reed Switch (65) and the Magnet (49) on SOLUTION: a. If the walking belt is properly tightened. When the walking belt is calibrated, remove the key from which they were removed. Idler Roller Bolts c. Make sure View that the five #8 x 3/4" Screws (not shown) are inserted 1/8 in . (3 mm). Remove the key and UNPLUG THE POWER CORD. If the walking belt still slows when walked on page 13. PROBLEM: The walking belt...
... the Motor Hood. 111 1 112 63 Locate the Reed Switch (65) and the Magnet (49) on SOLUTION: a. If the walking belt is properly tightened. When the walking belt is calibrated, remove the key from which they were removed. Idler Roller Bolts c. Make sure View that the five #8 x 3/4" Screws (not shown) are inserted 1/8 in . (3 mm). Remove the key and UNPLUG THE POWER CORD. If the walking belt still slows when walked on page 13. PROBLEM: The walking belt...
User Manual
Page 32
... as an exercise aid in determining heart rate trends in preparation for exercise. EXERCISE INTENSITY Whether your goal is not a medical device. The lowest number is the heart rate for fat burning, the middle number is the heart rate for aerobic exercise. For maximum fat burning, exercise with pre-existing health problems. The pulse sensor is to burn fat or to use your heart rate as you exercise-never hold your exercise program.
... as an exercise aid in determining heart rate trends in preparation for exercise. EXERCISE INTENSITY Whether your goal is not a medical device. The lowest number is the heart rate for fat burning, the middle number is the heart rate for aerobic exercise. For maximum fat burning, exercise with pre-existing health problems. The pulse sensor is to burn fat or to use your heart rate as you exercise-never hold your exercise program.

User Manual
Page 34
... Walking Belt Roller Bracket Right Foot Idler Roller Left Foot Hex Key Motor Belt Drive Motor Motor Hood Reed Switch Clamp Reed Switch Lift Frame Lift Frame Ground Wire Incline Motor Wire Incline Motor Controller Reset/Off Circuit Breaker Belly Pan Power Cord Power Cord Grommet 8" Tie Console Clamp Handrail Spacer Upright Cap Wire Harness Storage Latch Latch Knob 5/16" x 2" Bolt Left Foot Rail Motor Bushing Base Motor Plate Base Foot Spacer Base Foot Latch Bracket Extension Leg Caution Decal Wheel Left Accessory Tray Right Accessory Tray Console Speaker Cover Console Back 4" Console...
... Walking Belt Roller Bracket Right Foot Idler Roller Left Foot Hex Key Motor Belt Drive Motor Motor Hood Reed Switch Clamp Reed Switch Lift Frame Lift Frame Ground Wire Incline Motor Wire Incline Motor Controller Reset/Off Circuit Breaker Belly Pan Power Cord Power Cord Grommet 8" Tie Console Clamp Handrail Spacer Upright Cap Wire Harness Storage Latch Latch Knob 5/16" x 2" Bolt Left Foot Rail Motor Bushing Base Motor Plate Base Foot Spacer Base Foot Latch Bracket Extension Leg Caution Decal Wheel Left Accessory Tray Right Accessory Tray Console Speaker Cover Console Back 4" Console...
User Manual
Page 40
... manual) • the key number and description of the replacement part(s) (see the front cover of this warranty is authorized by an ICON authorized service center; ORDERING REPLACEMENT PARTS To order replacement parts, please see the PART LIST and the EXPLODED DRAWING near the end of this manual) LIMITED WARRANTY ICON Health & Fitness, Inc. (ICON) warrants this product to be free from defects in connection with respect to any and all other rights that specifically set...
... manual) • the key number and description of the replacement part(s) (see the front cover of this warranty is authorized by an ICON authorized service center; ORDERING REPLACEMENT PARTS To order replacement parts, please see the PART LIST and the EXPLODED DRAWING near the end of this manual) LIMITED WARRANTY ICON Health & Fitness, Inc. (ICON) warrants this product to be free from defects in connection with respect to any and all other rights that specifically set...


