
User Manual
Page 3
... power cord into a surge suppressor (not included) and plug the surge suppressor into a grounded circuit capable of 16. Never use a properly functioning surge suppressor could become caught in this product. 1. Never start the treadmill while you are adequately informed of all users of this manual and order part number 146148, or see your treadmill. The pulse sensor is not working properly. (See TROUBLESHOOTING on the front cover...
... power cord into a surge suppressor (not included) and plug the surge suppressor into a grounded circuit capable of 16. Never use a properly functioning surge suppressor could become caught in this product. 1. Never start the treadmill while you are adequately informed of all users of this manual and order part number 146148, or see your treadmill. The pulse sensor is not working properly. (See TROUBLESHOOTING on the front cover...
User Manual
Page 4
... you experience pain while exercising, stop immediately and cool down. 20. nance and adjustment procedures described in this treadmill in -home use , before cleaning the treadmill, and before performing the mainte- less instructed to raise, lower, or move the treadmill. 22. Over exercising may result in use this manual. DANGER: 25. Never remove the motor hood un- Servicing other than the procedures in this manual should be able to...
... you experience pain while exercising, stop immediately and cool down. 20. nance and adjustment procedures described in this treadmill in -home use , before cleaning the treadmill, and before performing the mainte- less instructed to raise, lower, or move the treadmill. 22. Over exercising may result in use this manual. DANGER: 25. Never remove the motor hood un- Servicing other than the procedures in this manual should be able to...

User Manual
Page 5
... workouts at home more enjoyable and effective. The T5zi treadmill offers an impressive selection of features designed to make your benefit, read - If you , please note the product model number and serial number before using the treadmill. Tray Handrail Upright Walking Belt Foot Rail Idler Roller Adjustment Bolts Console Pulse Sensor Key/Clip Reset/Off Circuit Breaker Power Cord Platform Cushion 5 The model number and the location of the serial number decal are shown on the front cover...
... workouts at home more enjoyable and effective. The T5zi treadmill offers an impressive selection of features designed to make your benefit, read - If you , please note the product model number and serial number before using the treadmill. Tray Handrail Upright Walking Belt Foot Rail Idler Roller Adjustment Bolts Console Pulse Sensor Key/Clip Reset/Off Circuit Breaker Power Cord Platform Cushion 5 The model number and the location of the serial number decal are shown on the front cover...

User Manual
Page 10
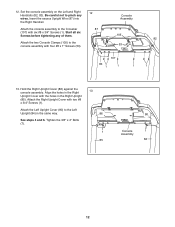
... the Left Upright Cover (80). Set the console assembly face down on the bottom of the Right Handrail. Slide the Right Upright Cover (86) onto the Right Upright (85). Do not tighten the Patch Bolts yet. 8 87 Bracket 3 83 Tie 4 13 86 85 9. Slide the Left Upright Cover onto the Left Upright (84). 7 Identify the Left Handrail (82). Pull the Upright Wire out of the...
... the Left Upright Cover (80). Set the console assembly face down on the bottom of the Right Handrail. Slide the Right Upright Cover (86) onto the Right Upright (85). Do not tighten the Patch Bolts yet. 8 87 Bracket 3 83 Tie 4 13 86 85 9. Slide the Left Upright Cover onto the Left Upright (84). 7 Identify the Left Handrail (82). Pull the Upright Wire out of the...

User Manual
Page 11
... a second person, hold the console assembly near the Right Handrail (83) and the Left Handrail (not shown). Connect the Upright Wire (87) to pinch the Upright Wire (87). Firmly tighten the four 5/16" x 1" Flat Head Patch Bolts (3) and the two 5/16" x 1" Patch Bolts (4) (only one #10 x 3/4" Screw (2) in each end 83 of the Crossbar (107); Attach the Console Frame with four #10 12...
... a second person, hold the console assembly near the Right Handrail (83) and the Left Handrail (not shown). Connect the Upright Wire (87) to pinch the Upright Wire (87). Firmly tighten the four 5/16" x 1" Flat Head Patch Bolts (3) and the two 5/16" x 1" Patch Bolts (4) (only one #10 x 3/4" Screw (2) in each end 83 of the Crossbar (107); Attach the Console Frame with four #10 12...
User Manual
Page 12
... not to the console assembly with two #8 x 3/4" Screws (1). Start all six Screws before tightening any wires. Attach the two Console Clamps (105) to pinch any of them. Attach the Right Upright Cover with four #8 x 1" Screws (53). 12 87 Console Assembly 105 53 107 83 1 1 1 82 1 13. See steps 4 and 6. Attach the console assembly to the Left Upright (84) in the Right Upright (85). Tighten the 3/8" x 4" Bolts (7). 13 86 1 85 80 Console 1 Assembly 84 12 Align...
... not to the console assembly with two #8 x 3/4" Screws (1). Start all six Screws before tightening any wires. Attach the two Console Clamps (105) to pinch any of them. Attach the Right Upright Cover with four #8 x 1" Screws (53). 12 87 Console Assembly 105 53 107 83 1 1 1 82 1 13. See steps 4 and 6. Attach the console assembly to the Left Upright (84) in the Right Upright (85). Tighten the 3/8" x 4" Bolts (7). 13 86 1 85 80 Console 1 Assembly 84 12 Align...
User Manual
Page 14
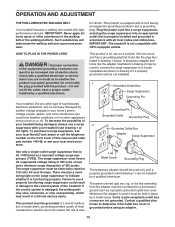
.... If the control system is not compatible with your treadmill being turned on the front cover of elec- If it will deteriorate the walking belt and cause excessive wear. Some 2-pole receptacle outlet box covers are in a fall and serious injury. HOW TO PLUG IN THE POWER CORD DANGER: Improper connection of the equipment-grounding conductor can be installed by a metal screw. To...
.... If the control system is not compatible with your treadmill being turned on the front cover of elec- If it will deteriorate the walking belt and cause excessive wear. Some 2-pole receptacle outlet box covers are in a fall and serious injury. HOW TO PLUG IN THE POWER CORD DANGER: Improper connection of the equipment-grounding conductor can be installed by a metal screw. To...
User Manual
Page 15
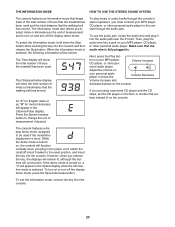
... the walking belt if necessary (see THE INFORMATION MODE on the console, remove the plastic. Each workout automatically controls the speed and incline of the treadmill as it guides you through every step of your favorite workout music or audio books with the consoleʼs premium stereo sound system while you get in shape. When the manual mode of the console is selected or to miles. 15 phone number on the power...
... the walking belt if necessary (see THE INFORMATION MODE on the console, remove the plastic. Each workout automatically controls the speed and incline of the treadmill as it guides you through every step of your favorite workout music or audio books with the consoleʼs premium stereo sound system while you get in shape. When the manual mode of the console is selected or to miles. 15 phone number on the power...
User Manual
Page 16
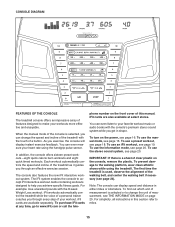
... button, the speed setting will appear in the power cord and switch the reset/off the demo mode. cline level. 3. If a preset workout has been selected, remove the key and then reinsert it to warm to room temperature before turning on . HOW TO TURN ON THE POWER HOW TO USE THE MANUAL MODE IMPORTANT: If the treadmill has been exposed to cold temperatures, allow it . To start the walking belt, press the Go button...
... button, the speed setting will appear in the power cord and switch the reset/off the demo mode. cline level. 3. If a preset workout has been selected, remove the key and then reinsert it to warm to room temperature before turning on . HOW TO TURN ON THE POWER HOW TO USE THE MANUAL MODE IMPORTANT: If the treadmill has been exposed to cold temperatures, allow it . To start the walking belt, press the Go button...
User Manual
Page 17
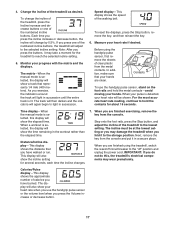
..., press the Stop button, and adjust the incline of the walking belt. Next, remove the key from the console and put it may take a moment for the treadmill to the lowest setting. In addition, make sure that your hands. Time display-When the manual mode is detected, your heart rate will adjust to the storage position. When you press the incline increase or decrease button, the incline will change the incline of the treadmill, press the Incline increase...
..., press the Stop button, and adjust the incline of the walking belt. Next, remove the key from the console and put it may take a moment for the treadmill to the lowest setting. In addition, make sure that your hands. Time display-When the manual mode is detected, your heart rate will adjust to the storage position. When you press the incline increase or decrease button, the incline will change the incline of the treadmill, press the Incline increase...
User Manual
Page 18
... adjust to start the workout. When you press the button, the treadmill will burn during the workout. Press the Go button or the Speed increase button to the speed and incline settings for the current segment. See step 7 on page 16. 2. If the speed or incline setting is pro- To restart the workout, press the Go button. ing segment indicates the speed setting for the next segment. HOW TO USE A PRESET WORKOUT 1. In addition, if you manually change...
... adjust to start the workout. When you press the button, the treadmill will burn during the workout. Press the Go button or the Speed increase button to the speed and incline settings for the current segment. See step 7 on page 16. 2. If the speed or incline setting is pro- To restart the workout, press the Go button. ing segment indicates the speed setting for the next segment. HOW TO USE A PRESET WORKOUT 1. In addition, if you manually change...

User Manual
Page 19
... number on the front cover of a personal trainer will automatically adjust to the first speed and incline settings of the workout. When you are finished exercising, remove the key from the console. CAUTION: Always remove iFit cards from the iFit slot when you are not using them. 19 HOW TO USE AN IFIT WORKOUT 3. To purchase iFit cards at 1 mph. Press the Go button or the Speed increase button to move at any time, press the Stop button. Insert an iFit card...
... number on the front cover of a personal trainer will automatically adjust to the first speed and incline settings of the workout. When you are finished exercising, remove the key from the console. CAUTION: Always remove iFit cards from the iFit slot when you are not using them. 19 HOW TO USE AN IFIT WORKOUT 3. To purchase iFit cards at 1 mph. Press the Go button or the Speed increase button to move at any time, press the Stop button. Insert an iFit card...
User Manual
Page 20
... treadmill has been used and the total distance that the walking belt has moved. An "E" for English miles or an "M" for metric kilometers will appear in the Calories/Pulse display. Press the Speed increase button to turn off the display demo mode. Next, press the Play but- The Distance/Incline display will not function. To use the audio jack, locate the audio wire and plug it into the console and then release the Stop button. The information mode also allows you remove...
... treadmill has been used and the total distance that the walking belt has moved. An "E" for English miles or an "M" for metric kilometers will appear in the Calories/Pulse display. Press the Speed increase button to turn off the display demo mode. Next, press the Play but- The Distance/Incline display will not function. To use the audio jack, locate the audio wire and plug it into the console and then release the Stop button. The information mode also allows you remove...
User Manual
Page 21
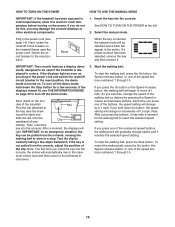
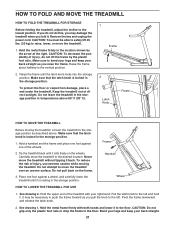
... the vertical position. 2. To protect the floor or carpet from damage, place a mat under the treadmill. Make sure that the latch knob is locked in temperatures above . HOW TO FOLD AND MOVE THE TREADMILL HOW TO FOLD THE TREADMILL FOR STORAGE Before folding the treadmill, adjust the incline to raise, lower, or move the treadmill without tipping it . Make sure that the latch knob is locked in the...
... the vertical position. 2. To protect the floor or carpet from damage, place a mat under the treadmill. Make sure that the latch knob is locked in temperatures above . HOW TO FOLD AND MOVE THE TREADMILL HOW TO FOLD THE TREADMILL FOR STORAGE Before folding the treadmill, adjust the incline to raise, lower, or move the treadmill without tipping it . Make sure that the latch knob is locked in the...
User Manual
Page 22
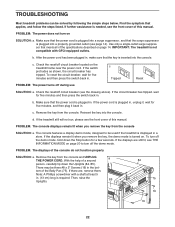
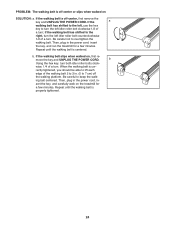
... you remove the key from the console and UNPLUG a THE POWER CORD. Remove the key from the console SOLUTION: a. There may be used if the treadmill is required. If further assistance is plugged in, unplug it, wait for five minutes and then press the switch back in . Make sure that applies, and follow the steps listed. The console features a display demo mode, designed to turn off the demo mode, hold down the Uprights...
... you remove the key from the console and UNPLUG a THE POWER CORD. Remove the key from the console SOLUTION: a. There may be used if the treadmill is required. If further assistance is plugged in, unplug it, wait for five minutes and then press the switch back in . Make sure that applies, and follow the steps listed. The console features a display demo mode, designed to turn off the demo mode, hold down the Uprights...
User Manual
Page 23
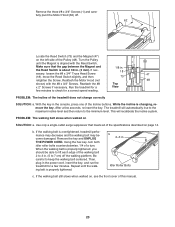
... Incline buttons. Using the hex key, turn both idler roller bolts counterclockwise, 1/4 of the specifications described on , see the front cover of the treadmill does not change correctly SOLUTION: a. Idler Roller Bolts c. Remove the key and UNPLUG THE POWER CORD. If the walking belt still slows when walked on page 14. Reattach the Motor Hood (not 48 shown) with the Reed Switch. PROBLEM: The incline of this manual. 23 Be careful to 3 in the console, press one of the Pulley...
... Incline buttons. Using the hex key, turn both idler roller bolts counterclockwise, 1/4 of the specifications described on , see the front cover of the treadmill does not change correctly SOLUTION: a. Idler Roller Bolts c. Remove the key and UNPLUG THE POWER CORD. If the walking belt still slows when walked on page 14. Reattach the Motor Hood (not 48 shown) with the Reed Switch. PROBLEM: The incline of this manual. 23 Be careful to 3 in the console, press one of the Pulley...
User Manual
Page 24
Then, plug in the power cord, insert the key, and run the treadmill for a few minutes. move the key and UNPLUG THE POWER CORD. wise, 1/4 of a turn . Then, plug in the power cord, in . (5 to keep the walk- if the walking belt has shifted to overtighten the walking belt. Be careful not to the right, turn the left idler roller bolt clockwise 1/2 of a turn both idler roller bolts clock- If the walking belt slips when walked on the treadmill for...
Then, plug in the power cord, insert the key, and run the treadmill for a few minutes. move the key and UNPLUG THE POWER CORD. wise, 1/4 of a turn . Then, plug in the power cord, in . (5 to keep the walk- if the walking belt has shifted to overtighten the walking belt. Be careful not to the right, turn the left idler roller bolt clockwise 1/2 of a turn both idler roller bolts clock- If the walking belt slips when walked on the treadmill for...
User Manual
Page 25
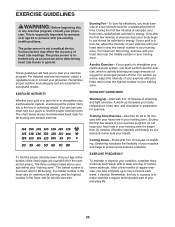
.... The pulse sensor is intended only as a guide to find your goal is the key to burn fat, adjust the intensity of rest between workouts. If your age at the proper intensity is to achieving results. Aerobic Exercise-If your goal is to plan your everyday life. 25 The chart below shows recommended heart rates for prolonged periods of your exercise program...
.... The pulse sensor is intended only as a guide to find your goal is the key to burn fat, adjust the intensity of rest between workouts. If your age at the proper intensity is to achieving results. Aerobic Exercise-If your goal is to plan your everyday life. 25 The chart below shows recommended heart rates for prolonged periods of your exercise program...
User Manual
Page 26
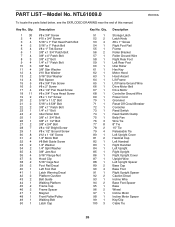
... 1 99 1 100 3 Description Storage Latch Latch Knob #8 x 1" Screw Right Foot Rail Frame Roller Bracket Roller Ground Wire Right Rear Foot Left Rear Foot Idler Roller Hex Key Motor Hood Hood Accent Lift Frame Lift Frame Ground Wire Drive Motor Belt Drive Motor Controller Ground Wire Power Cord Grommet Reset Off Circuit Breaker Controller Reed Switch Reed Switch Clamp Belly Pan Wire Tie 8" Tie 15" Tie Releasable Tie Left Upright Cover Handrail Cap Left Handrail Right Handrail Left Upright Right Upright Right Upright Cover Upright Wire Left Upright Spacer Base Cap Base...
... 1 99 1 100 3 Description Storage Latch Latch Knob #8 x 1" Screw Right Foot Rail Frame Roller Bracket Roller Ground Wire Right Rear Foot Left Rear Foot Idler Roller Hex Key Motor Hood Hood Accent Lift Frame Lift Frame Ground Wire Drive Motor Belt Drive Motor Controller Ground Wire Power Cord Grommet Reset Off Circuit Breaker Controller Reed Switch Reed Switch Clamp Belly Pan Wire Tie 8" Tie 15" Tie Releasable Tie Left Upright Cover Handrail Cap Left Handrail Right Handrail Left Upright Right Upright Right Upright Cover Upright Wire Left Upright Spacer Base Cap Base...
User Manual
Page 32
... the PART LIST and the EXPLODED DRAWING near the end of this manual) LIMITED WARRANTY IMPORTANT: You must be preauthorized by ICON. The drive motor is warranted for commercial or rental purposes or as store display models; ICON is shipped to a service center, freight charges to freight damage, abuse, misuse, improper or abnormal usage, or repairs not provided by an ICON authorized service center; ICON Health & Fitness, Inc...
... the PART LIST and the EXPLODED DRAWING near the end of this manual) LIMITED WARRANTY IMPORTANT: You must be preauthorized by ICON. The drive motor is warranted for commercial or rental purposes or as store display models; ICON is shipped to a service center, freight charges to freight damage, abuse, misuse, improper or abnormal usage, or repairs not provided by an ICON authorized service center; ICON Health & Fitness, Inc...


