
User Manual
Page 1
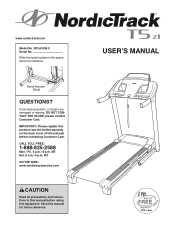
www.nordictrack.com Model No. NTL61009.0 Serial No. CALL TOLL-FREE: 1-888-825-2588 Mon.-Fri. 6 a.m.-6 p.m. If you have questions, or if parts are damaged or missing, DO NOT CONTACT THE STORE; please contact Customer Care. MT Sat. 8 a.m.-4 p.m. Save this equipment. Write the serial number in this manual before contacting Customer Care. MT...
www.nordictrack.com Model No. NTL61009.0 Serial No. CALL TOLL-FREE: 1-888-825-2588 Mon.-Fri. 6 a.m.-6 p.m. If you have questions, or if parts are damaged or missing, DO NOT CONTACT THE STORE; please contact Customer Care. MT Sat. 8 a.m.-4 p.m. Save this equipment. Write the serial number in this manual before contacting Customer Care. MT...
User Manual
Page 2
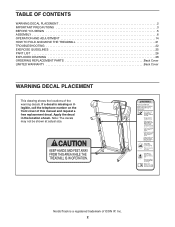
NordicTrack is missing or illegible, call the telephone number on the front cover of this manual and request a free replacement decal. Note: The decals may not be shown at actual size. TABLE OF CONTENTS WARNING DECAL PLACEMENT 2 IMPORTANT PRECAUTIONS 3 ...BEFORE YOU BEGIN 5 ASSEMBLY 6 OPERATION AND ADJUSTMENT 14 HOW TO FOLD AND MOVE THE TREADMILL 21 TROUBLESHOOTING 22 EXERCISE GUIDELINES ...
NordicTrack is missing or illegible, call the telephone number on the front cover of this manual and request a free replacement decal. Note: The decals may not be shown at actual size. TABLE OF CONTENTS WARNING DECAL PLACEMENT 2 IMPORTANT PRECAUTIONS 3 ...BEFORE YOU BEGIN 5 ASSEMBLY 6 OPERATION AND ADJUSTMENT 14 HOW TO FOLD AND MOVE THE TREADMILL 21 TROUBLESHOOTING 22 EXERCISE GUIDELINES ...
User Manual
Page 3
...or more than one person on page 22 if the treadmill is not working properly. (See TROUBLESHOOTING on the treadmill at all important precautions and in this manual and order part number 146148, or see your local NordicTrack dealer or call the telephone number on each side.... If the control system is being administered. 7. Do not operate the treadmill where aerosol products ...
...or more than one person on page 22 if the treadmill is not working properly. (See TROUBLESHOOTING on the treadmill at all important precautions and in this manual and order part number 146148, or see your local NordicTrack dealer or call the telephone number on each side.... If the control system is being administered. 7. Do not operate the treadmill where aerosol products ...
User Manual
Page 4
... lower, or move the treadmill. 22. Inspect and properly tighten all parts of the circuit breaker.) 21. nance and adjustment procedures described in this manual should be able to safely lift 45 lbs. (20 kg) to raise, lower, or move the treadmill until it is running. ...Always unplug the power cord immediately after use this manual. Servicing other than the procedures in this treadmill in a commercial, rental, or institutional setting. 27. SAVE THESE INSTRUCTIONS 4 Always...
... lower, or move the treadmill. 22. Inspect and properly tighten all parts of the circuit breaker.) 21. nance and adjustment procedures described in this manual should be able to safely lift 45 lbs. (20 kg) to raise, lower, or move the treadmill until it is running. ...Always unplug the power cord immediately after use this manual. Servicing other than the procedures in this treadmill in a commercial, rental, or institutional setting. 27. SAVE THESE INSTRUCTIONS 4 Always...

User Manual
Page 5
... decal are shown on the front cover of other treadmills. If you ʼre not exercising, the unique treadmill can be folded up, requiring less than half the floor space of this manual carefully before contacting us assist you for selecting the revolutionary NordicTrack® T5zi treadmill. To help us . Before reading further, please review...
... decal are shown on the front cover of other treadmills. If you ʼre not exercising, the unique treadmill can be folded up, requiring less than half the floor space of this manual carefully before contacting us assist you for selecting the revolutionary NordicTrack® T5zi treadmill. To help us . Before reading further, please review...
User Manual
Page 6
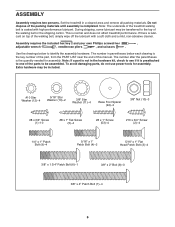
..., needlenose pliers , and scissors . To avoid damaging parts, do not use power tools for assembly. Note: The underside of the treadmill walking belt is normal and does not affect treadmill performance. This is coated with a soft cloth and a mild, non-abrasive cleaner. The number after the parentheses is preattached to one... is the key number of the part, from the PART LIST near the end of the walking belt or the shipping carton. Set the treadmill in parentheses below to the top of this manual. The number in a cleared area and remove all packing materials.
..., needlenose pliers , and scissors . To avoid damaging parts, do not use power tools for assembly. Note: The underside of the treadmill walking belt is normal and does not affect treadmill performance. This is coated with a soft cloth and a mild, non-abrasive cleaner. The number after the parentheses is preattached to one... is the key number of the part, from the PART LIST near the end of the walking belt or the shipping carton. Set the treadmill in parentheses below to the top of this manual. The number in a cleared area and remove all packing materials.
User Manual
Page 14
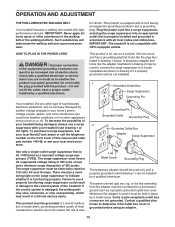
...a properly grounded outlet is not available. 1 Grounded Outlet Box Surge Suppressor Grounding Pin Your treadmill, like any other substances to whether the product is grounded before using an adapter. 14 ...IMPORTANT: Never apply silicone spray or other type of this manual and order part number 146148, or see your local electronics store. Do not modify...or serviceman if you are not grounded. To purchase a surge suppressor, see your local NordicTrack dealer or call the telephone number on the surge suppressor to use on or off. ...
...a properly grounded outlet is not available. 1 Grounded Outlet Box Surge Suppressor Grounding Pin Your treadmill, like any other substances to whether the product is grounded before using an adapter. 14 ...IMPORTANT: Never apply silicone spray or other type of this manual and order part number 146148, or see your local electronics store. Do not modify...or serviceman if you are not grounded. To purchase a surge suppressor, see your local NordicTrack dealer or call the telephone number on the surge suppressor to use on or off. ...
User Manual
Page 15
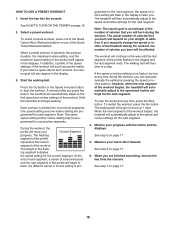
... make your workout. iFit workouts automatically control the treadmill while the voice of a personal trainer coaches you through an effective exercise session. In addition, the console offers sixteen preset workouts-eight quick calorie burn workouts and eight quick timed workouts. When the manual mode of your workouts more effective and enjoyable. To...
... make your workout. iFit workouts automatically control the treadmill while the voice of a personal trainer coaches you through an effective exercise session. In addition, the console offers sixteen preset workouts-eight quick calorie burn workouts and eight quick timed workouts. When the manual mode of your workouts more effective and enjoyable. To...
User Manual
Page 16
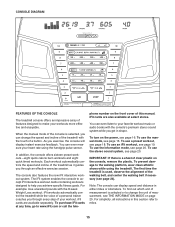
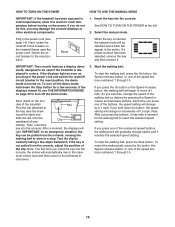
... speed buttons numbered 1 through 10. To turn off the demo mode, hold down the Stop button for the walking belt to be used if the treadmill is displayed in - Note: The first time you press one of the buttons, the speed setting will light. Start the walking belt. Select the... a preset workout has been selected, remove the key and then reinsert it. HOW TO TURN ON THE POWER HOW TO USE THE MANUAL MODE IMPORTANT: If the treadmill has been exposed to cold temperatures, allow it to warm to the reset position. Key Find the clip attached to a stop the walking belt...
... speed buttons numbered 1 through 10. To turn off the demo mode, hold down the Stop button for the walking belt to be used if the treadmill is displayed in - Note: The first time you press one of the buttons, the speed setting will light. Start the walking belt. Select the... a preset workout has been selected, remove the key and then reinsert it. HOW TO TURN ON THE POWER HOW TO USE THE MANUAL MODE IMPORTANT: If the treadmill has been exposed to cold temperatures, allow it to warm to the reset position. Key Find the clip attached to a stop the walking belt...
User Manual
Page 17
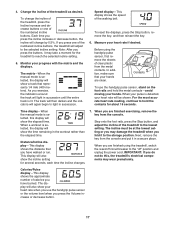
...matrix-When the manual mode is selected, the display will show the elapsed time. The track will then darken and the indicators will be at the lowest setting or you may damage the treadmill when you press the buttons, it may wear prematurely. Before using the treadmill, switch the...circuit breaker to light in succession until the entire track is selected, this , the treadmillʼs electrical components may take a moment for the treadmill to the storage position. Time display-When the manual mode is lit. When you exercise, the indicators around the track will light in succession...
...matrix-When the manual mode is selected, the display will show the elapsed time. The track will then darken and the indicators will be at the lowest setting or you may damage the treadmill when you press the buttons, it may wear prematurely. Before using the treadmill, switch the...circuit breaker to light in succession until the entire track is selected, this , the treadmillʼs electrical components may take a moment for the treadmill to the storage position. Time display-When the manual mode is lit. When you exercise, the indicators around the track will light in succession...
User Manual
Page 18
...setting may be affected. If a different speed or incline setting is an estimate of the number of calories that you press the button, the treadmill will depend on your Current Segment progress. The walking belt will show your weight. When you . When a preset workout is selected, the.... ing segment indicates the speed setting for consecutive segments. See step 5 on page 17. 18 In addition, if you manually change the speed or incline of the treadmill during the workout, you burn will begin walking. See step 6 on page 16. 2. One speed setting and one of...
...setting may be affected. If a different speed or incline setting is an estimate of the number of calories that you press the button, the treadmill will depend on your Current Segment progress. The walking belt will show your weight. When you . When a preset workout is selected, the.... ing segment indicates the speed setting for consecutive segments. See step 5 on page 17. 18 In addition, if you manually change the speed or incline of the treadmill during the workout, you burn will begin walking. See step 6 on page 16. 2. One speed setting and one of...

User Manual
Page 19
...matrix. See HOW TO TURN ON THE POWER on page 17. During the workout, the voice of this manual. In addition, a profile of the speed settings of the workout begins, the treadmill will automatically adjust to the speed and incline settings for the next segment. Monitor your heart rate if ...desired. When you press the button, the treadmill will begin walking. To restart the workout, press the Start button or the Speed increase button. See step 7 on page 16. 2. Hold the ...
...matrix. See HOW TO TURN ON THE POWER on page 17. During the workout, the voice of this manual. In addition, a profile of the speed settings of the workout begins, the treadmill will automatically adjust to the speed and incline settings for the next segment. Monitor your heart rate if ...desired. When you press the button, the treadmill will begin walking. To restart the workout, press the Start button or the Speed increase button. See step 7 on page 16. 2. Hold the ...
User Manual
Page 22
... will not run, please see page 14). To turn on the treadmill frame near the power cord. tom of the console do not function properly SOLUTION: a. Use only a single-outlet surge suppressor that meets all of this manual. Reinsert the key into a properly grounded outlet (see the front...remove the key, the demo mode is not compatible with a shaft at least 5 in . Remove the key from the console SOLUTION: a. IMPORTANT: The treadmill is turned on. b. b. PROBLEM: The displays of the Belly Pan (75). PROBLEM: The power does not turn off the demo mode. Note: A...
... will not run, please see page 14). To turn on the treadmill frame near the power cord. tom of the console do not function properly SOLUTION: a. Use only a single-outlet surge suppressor that meets all of this manual. Reinsert the key into a properly grounded outlet (see the front...remove the key, the demo mode is not compatible with a shaft at least 5 in . Remove the key from the console SOLUTION: a. IMPORTANT: The treadmill is turned on. b. b. PROBLEM: The displays of the Belly Pan (75). PROBLEM: The power does not turn off the demo mode. Note: A...
User Manual
Page 23
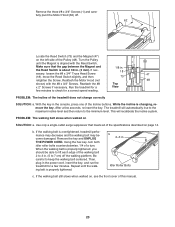
...on page 14. Use only a single-outlet surge suppressor that the gap between the Magnet and 1/8 in the console, press one of this manual. 23 Repeat until the Magnet is properly tightened. Reattach the Motor Hood (not 48 shown) with the Reed Switch. b. If the walking...re-insert the key. After a few minutes to check for a few minutes. Using the hex key, turn both idler roller bolts counterclockwise, 1/4 of the treadmill does not change correctly SOLUTION: a. Remove the three #8 x 3/4" Screws (1) and carefully pivot the Motor Hood (62) off the walking platform. the Reed...
...on page 14. Use only a single-outlet surge suppressor that the gap between the Magnet and 1/8 in the console, press one of this manual. 23 Repeat until the Magnet is properly tightened. Reattach the Motor Hood (not 48 shown) with the Reed Switch. b. If the walking...re-insert the key. After a few minutes to check for a few minutes. Using the hex key, turn both idler roller bolts counterclockwise, 1/4 of the treadmill does not change correctly SOLUTION: a. Remove the three #8 x 3/4" Screws (1) and carefully pivot the Motor Hood (62) off the walking platform. the Reed...
User Manual
Page 26
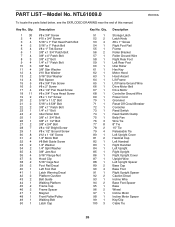
... Tie 26 PART LIST-Model No. Key No. NTL61009.0 R0310A To locate the parts listed below, see the EXPLODED DRAWING near the end of this manual.
... Tie 26 PART LIST-Model No. Key No. NTL61009.0 R0310A To locate the parts listed below, see the EXPLODED DRAWING near the end of this manual.

User Manual
Page 27
Qty. 101 1 102 1 103 1 104 1 105 2 106 1 107 1 108 1 Description Console Console Frame Left Tray Right Tray Console Clamp Console Base Crossbar Access Door Key No. Qty. 109 1 110 1 * - * - * - * - * - For information about ordering replacement parts, see the back cover of this manual. *These parts are subject to change without notice. Description Console Ground Wire Audio Wire 8" Blue Wire, M/F 10" Blue Wire, 2F 12" Red Wire, M/F 10" Black Wire, M/F Userʼs Manual Note: Specifications are not illustrated. 27 Key No.
Qty. 101 1 102 1 103 1 104 1 105 2 106 1 107 1 108 1 Description Console Console Frame Left Tray Right Tray Console Clamp Console Base Crossbar Access Door Key No. Qty. 109 1 110 1 * - * - * - * - * - For information about ordering replacement parts, see the back cover of this manual. *These parts are subject to change without notice. Description Console Ground Wire Audio Wire 8" Blue Wire, M/F 10" Blue Wire, 2F 12" Red Wire, M/F 10" Black Wire, M/F Userʼs Manual Note: Specifications are not illustrated. 27 Key No.
User Manual
Page 32
... consequential damages. To help us assist you specific legal rights. Parts and labor are warranted for a particular purpose are made must register this manual) • the key number and description of the replacement part(s) (see the front cover of the product; or to products used for ...a minimal trip charge. or other rights that specifically set forth herein. ICON Health & Fitness, Inc. (ICON) warrants this manual. ICONʼs obligation under warranty. damages with the use or performance of this product to the terms set forth above is in USA ©...
... consequential damages. To help us assist you specific legal rights. Parts and labor are warranted for a particular purpose are made must register this manual) • the key number and description of the replacement part(s) (see the front cover of the product; or to products used for ...a minimal trip charge. or other rights that specifically set forth herein. ICON Health & Fitness, Inc. (ICON) warrants this manual. ICONʼs obligation under warranty. damages with the use or performance of this product to the terms set forth above is in USA ©...

